

Transport yourself to the stylish world of the 1960s with these 25 vintage dinner party recipes inspired by “Mad Men.” Each dish captures the essence of a bygone era, bringing classic flavors and presentation to your table. From elegant hors d’oeuvres to decadent desserts, you’ll find everything you need for a memorable gathering that feels like a scene straight from Sterling Cooper.
Prime Rib Roast With Rosemary Jus
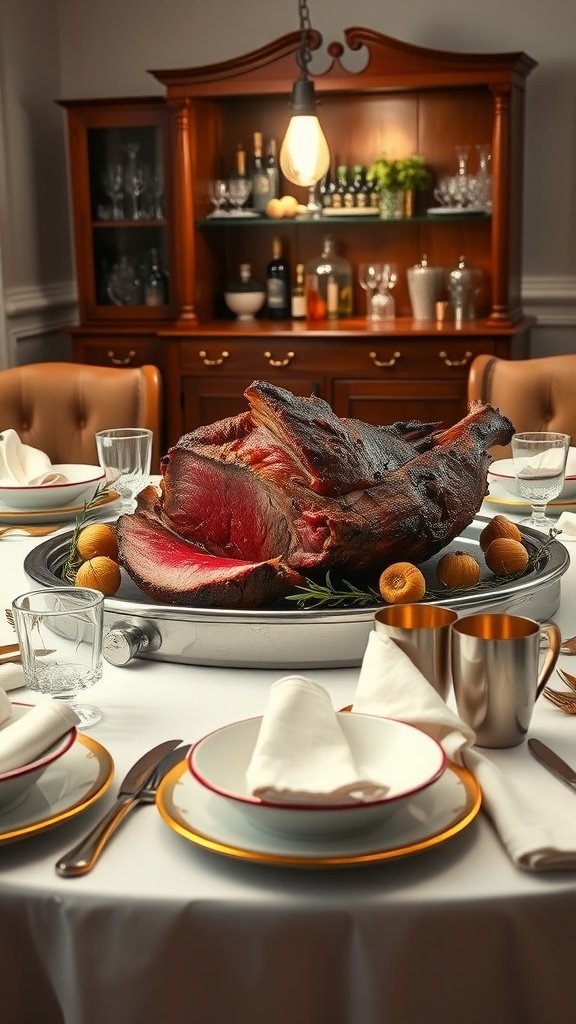
Prime rib roast is a classic centerpiece for any dinner party, especially one inspired by the elegance of Mad Men’s golden age. The juicy, tender meat, paired with a rich rosemary jus, creates a comforting and luxurious flavor that is sure to impress your guests. While it may seem like a complex dish, preparing prime rib is quite straightforward with the right technique.
The secret lies in slow roasting the meat to achieve that perfect pink center, ensuring it remains moist and flavorful. The aroma of rosemary mingling with the roast fills the room, making it an irresistible choice. Serve it alongside some roasted vegetables or creamy mashed potatoes for a truly nostalgic dining experience.
Ingredients
- 1 (5-7 pound) prime rib roast, bone-in
- 4 cloves garlic, minced
- 2 tablespoons fresh rosemary, chopped
- 2 tablespoons olive oil
- Salt and black pepper to taste
- 1 cup beef broth
- 1 cup red wine
- 2 tablespoons cornstarch (optional, for thickening)
Instructions
- Preheat your oven to 450°F (232°C).
- In a small bowl, mix together the minced garlic, rosemary, olive oil, salt, and pepper to create a paste.
- Rub the garlic-rosemary mixture all over the prime rib roast.
- Place the roast in a roasting pan, bone side down, and roast it in the preheated oven for 20 minutes.
- Reduce the temperature to 325°F (163°C) and continue roasting for about 1.5 to 2 hours, or until the internal temperature reaches 130°F (54°C) for medium-rare.
- Remove the roast from the oven and let it rest for at least 20 minutes before carving.
- For the jus, place the roasting pan over medium heat and add the beef broth and red wine. Scrape up any browned bits from the bottom. If desired, mix cornstarch with a little water to thicken the jus.
- Slice the roast and serve it with the rosemary jus drizzled over the top.
Classic Shrimp Cocktail In Coupe Glasses
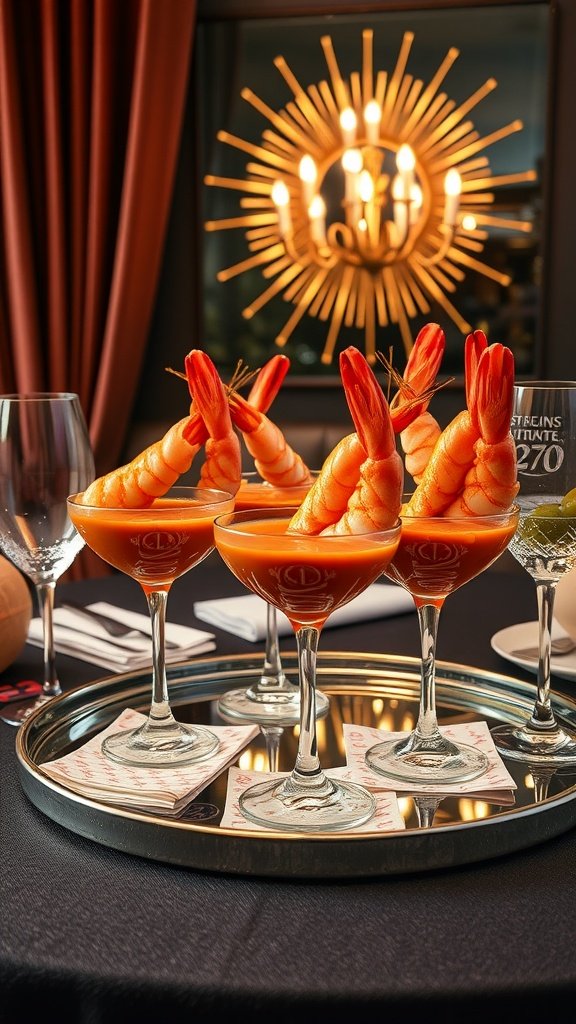
Shrimp cocktail is a timeless appetizer that brings a touch of sophistication to any dinner party. The sweet, succulent shrimp pair perfectly with a tangy cocktail sauce, creating a delightful balance of flavors. Not only is it easy to whip up, but it can also be prepared ahead of time, making it a stress-free option for entertaining.
Serving shrimp cocktail in coupe glasses gives it a vintage twist, reminiscent of the mid-century elegance seen in classic cocktail parties. This dish is sure to impress your guests and spark conversation as they enjoy the vibrant colors and refreshing taste.
Ingredients
- 1 pound large shrimp, peeled and deveined
- 2 cups water
- 1 tablespoon Old Bay seasoning
- 1 cup cocktail sauce
- 1 tablespoon lemon juice
- Lettuce leaves for garnish
- Fresh lemon wedges for serving
Instructions
- Prepare the Shrimp: In a pot, bring water and Old Bay seasoning to a boil. Add the shrimp and cook for 2-3 minutes until they turn pink and opaque. Remove from heat and immediately transfer to an ice bath to stop the cooking process.
- Chill: Once cooled, drain the shrimp and refrigerate until ready to serve.
- Assemble: In each coupe glass, place a few lettuce leaves at the bottom. Arrange the chilled shrimp around the edges of the glass, leaving the center open.
- Serve: In the center, add a generous dollop of cocktail sauce and drizzle with lemon juice. Garnish with lemon wedges on the side and enjoy!
Waldorf Crown Salad With Candied Pecans
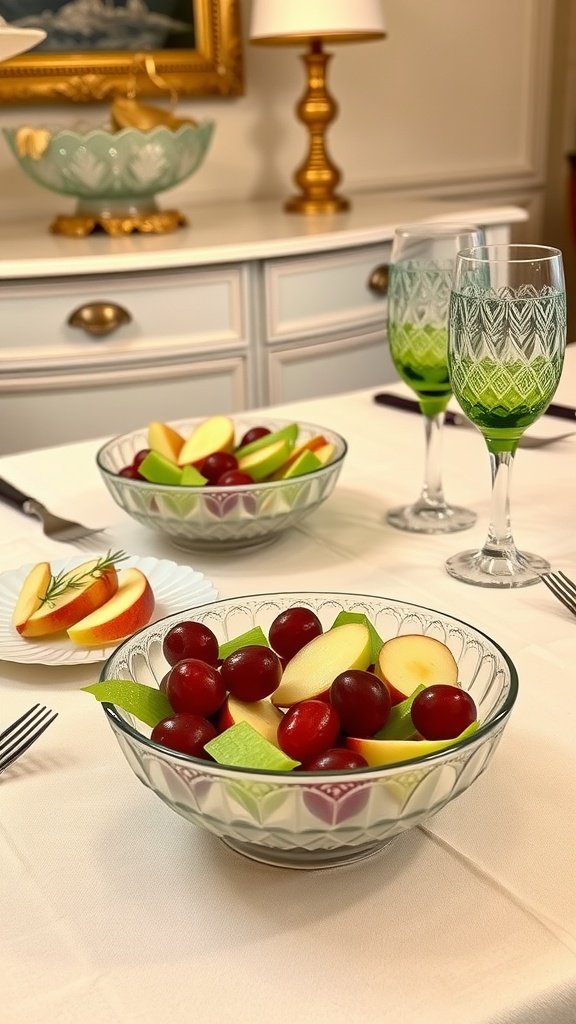
The Waldorf Crown Salad is a classic dish that marries fresh fruits with crunchy nuts, making it a refreshing and delightful addition to any dinner party. With its crisp apples, juicy grapes, and a hint of sweetness from candied pecans, this salad is not only a feast for the eyes but also for the palate. Plus, it’s pretty simple to whip up!
This salad perfectly balances flavors and textures, blending tartness and sweetness with a satisfying crunch. It’s light yet filling, making it a standout choice for vintage-themed gatherings. Serve it in a decorative bowl to really capture that retro charm!
Ingredients
- 2 cups diced apples (such as Granny Smith and Red Delicious)
- 1 cup red grapes, halved
- 1 cup celery, chopped
- 1/2 cup candied pecans
- 1/4 cup mayonnaise
- 1 tablespoon lemon juice
- Salt and pepper to taste
- Fresh mint leaves for garnish (optional)
Instructions
- In a large bowl, combine the diced apples, halved grapes, and chopped celery.
- In a separate bowl, mix together the mayonnaise, lemon juice, salt, and pepper until well combined.
- Pour the dressing over the fruit mixture and toss gently to coat everything evenly.
- Add the candied pecans and give it another light toss.
- Transfer the salad to a serving bowl, garnish with fresh mint leaves if desired, and serve immediately.
Beef Wellington With Brandy Peppercorn Sauce
Beef Wellington is a classic dish that embodies luxury and comfort. With its tender beef wrapped in flaky pastry, it offers a delightful combination of flavors and textures that will impress your guests. The rich brandy peppercorn sauce adds a touch of elegance and a hint of spice, making every bite a treat.
While it may seem complex, making Beef Wellington is achievable with some preparation. With the right ingredients and a bit of patience, you can create a centerpiece that will shine on your vintage dinner party table.
Ingredients
- 1.5 lbs beef tenderloin, trimmed
- 2 tablespoons Dijon mustard
- 8 oz mushrooms, finely chopped
- 3 tablespoons unsalted butter
- 4 slices prosciutto
- 1 sheet puff pastry, thawed
- 1 egg, beaten
- Salt and pepper, to taste
- 1/2 cup brandy
- 1 cup heavy cream
- 2 tablespoons crushed peppercorns
Instructions
- Prepare the Beef: Season the beef with salt and pepper. Sear it in a hot skillet with 1 tablespoon of butter until browned on all sides. Let it cool, then brush with Dijon mustard.
- Cook the Mushrooms: In the same skillet, add remaining butter and sauté the mushrooms until all moisture has evaporated. Season with salt and pepper, then let cool.
- Assemble: Lay the prosciutto slices on plastic wrap, slightly overlapping. Spread the mushroom mixture over the prosciutto, then place the beef on top. Roll tightly, using the wrap to shape it. Chill for 30 minutes.
- Wrap in Puff Pastry: Roll out the puff pastry and place the beef in the center. Fold the pastry over, sealing the edges. Brush with beaten egg.
- Bake: Preheat oven to 400°F (200°C). Place the wrapped beef on a baking sheet and bake for 25-30 minutes, until golden brown. Let it rest for 10 minutes before slicing.
- Make the Sauce: In the same skillet, add brandy and deglaze, scraping up bits from the bottom. Stir in cream and peppercorns, simmer until thickened.
- Serve: Slice the Beef Wellington and drizzle with the brandy peppercorn sauce before serving.
Deviled Eggs With Paprika And Caviar
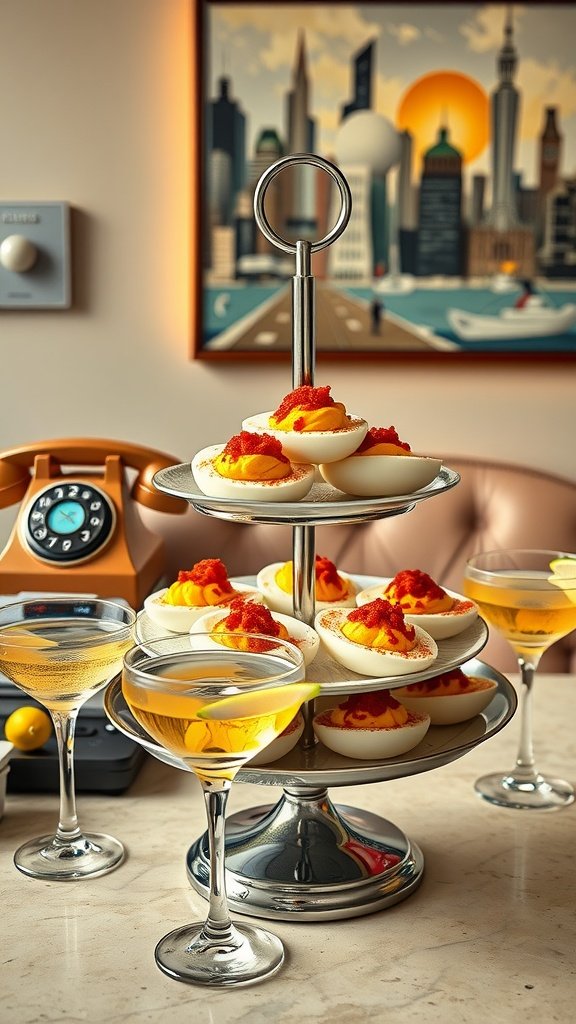
Deviled eggs are a classic appetizer that brings a sense of nostalgia and elegance to any gathering. With a creamy filling and a slight kick from the paprika, these bite-sized treats are sure to impress your guests. Plus, they’re surprisingly easy to whip up, making them a perfect addition to your vintage dinner party.
The caviar adds a touch of sophistication, elevating the humble deviled egg into a luxurious treat. Whether served on a tiered stand or on a simple platter, these deviled eggs are not only delicious but also a feast for the eyes.
Ingredients
- 6 large eggs
- 1/4 cup mayonnaise
- 1 teaspoon Dijon mustard
- 1 teaspoon apple cider vinegar
- Salt and pepper to taste
- 1 teaspoon smoked paprika
- 2 tablespoons caviar
- Fresh chives for garnish
Instructions
- Hard-boil the eggs: In a pot, cover the eggs with water and bring to a boil. Once boiling, cover and remove from heat, letting them sit for 12 minutes. Then, transfer to an ice bath to cool.
- Prepare the filling: Once cooled, peel the eggs and slice them in half lengthwise. Remove the yolks and place them in a bowl. Mash the yolks with mayonnaise, Dijon mustard, apple cider vinegar, and salt and pepper until smooth.
- Fill the eggs: Spoon or pipe the yolk mixture back into the egg whites. Sprinkle smoked paprika over the top for flavor and color.
- Add the caviar: Place a small dollop of caviar on each filled egg.
- Garnish and serve: Add chopped chives for a fresh touch. Serve chilled or at room temperature.
Pineapple Glazed Ham With Clove Studs
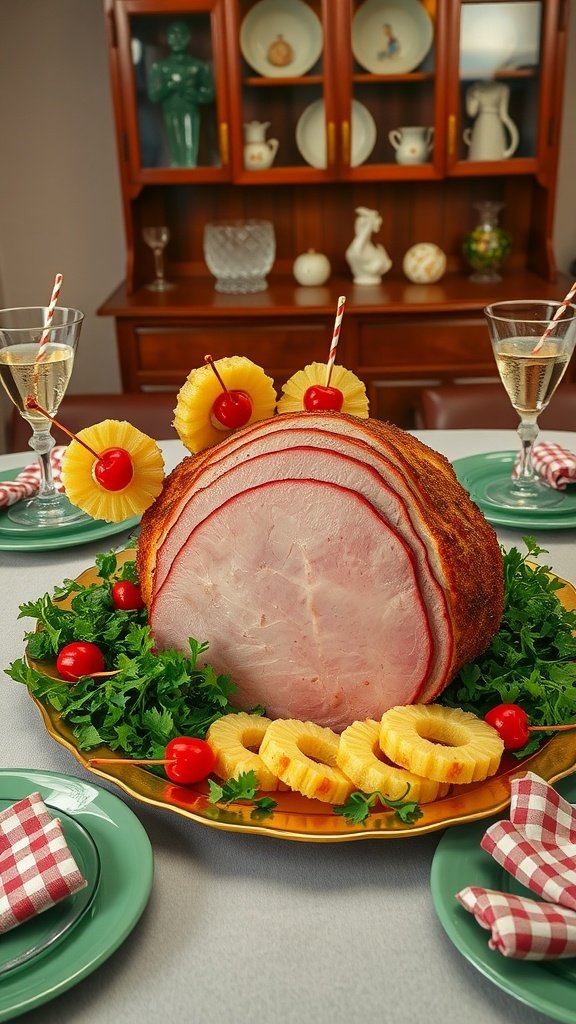
Pineapple glazed ham is a classic dish that brings a touch of nostalgia to any dinner party. The sweet and tangy glaze, combined with the warm spices from the cloves, creates a delightful flavor that pairs perfectly with the savory ham. This recipe is not only delicious but also simple to prepare, making it an ideal choice for both novice and experienced cooks.
As the ham bakes, the pineapple juice caramelizes, creating a beautiful, glossy finish that’s sure to impress your guests. The cloves add just the right amount of warmth and spice, making this dish a true centerpiece for your vintage dinner party.
Ingredients
- 1 fully cooked bone-in ham (about 8-10 lbs)
- 1 cup pineapple juice
- 1 cup brown sugar
- 1/4 cup honey
- 1 teaspoon ground cinnamon
- 1/2 teaspoon ground cloves
- 1/4 teaspoon ground nutmeg
- Whole cloves for studding
- Pineapple slices and maraschino cherries for garnish
Instructions
- Preheat your oven to 325°F (165°C).
- Score the surface of the ham in a diamond pattern and stud it with whole cloves.
- In a bowl, mix together pineapple juice, brown sugar, honey, cinnamon, cloves, and nutmeg.
- Place the ham in a roasting pan and brush the glaze over the ham, reserving some for basting later.
- Bake the ham for about 15 minutes per pound, basting every 30 minutes with the reserved glaze.
- During the last 30 minutes, add pineapple slices and maraschino cherries to the top of the ham for added flair.
- Once done, let the ham rest for 15 minutes before slicing and serving.
Asparagus Spears With Hollandaise Sauce
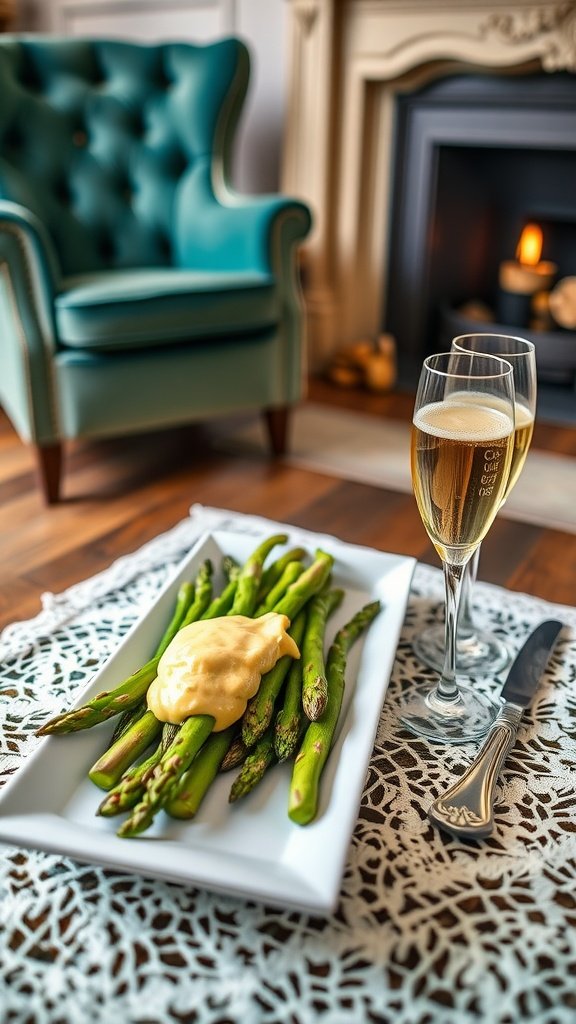
Asparagus spears with hollandaise sauce is a classic dish that’s simple yet elegant, making it perfect for a vintage dinner party. The tender asparagus provides a fresh, earthy flavor, complemented beautifully by the rich and creamy hollandaise. This dish brings a touch of sophistication to any table without requiring extensive cooking skills.
The combination of the crisp asparagus and the buttery hollandaise creates a delightful taste experience. It’s an impressive addition to your menu that will surely impress your guests, whether it’s a formal gathering or a casual get-together. Let’s get cooking!
Ingredients
- 1 pound fresh asparagus, trimmed
- 4 large egg yolks
- 1 tablespoon fresh lemon juice
- 1/2 cup unsalted butter, melted
- Salt, to taste
- Cayenne pepper, for garnish (optional)
Instructions
- Prepare the Asparagus: Bring a pot of salted water to a boil. Add the asparagus and cook for about 3-4 minutes until bright green and tender-crisp. Drain and set aside.
- Make the Hollandaise: In a heatproof bowl, whisk together the egg yolks and lemon juice. Place the bowl over a saucepan of simmering water, making sure the bowl doesn’t touch the water. Whisk continuously until the mixture thickens slightly.
- Incorporate Butter: Slowly drizzle in the melted butter while whisking constantly until the sauce is smooth. Season with salt to taste.
- Serve: Arrange the asparagus on a serving platter and drizzle the hollandaise sauce over the top. Sprinkle with a pinch of cayenne pepper, if desired, and serve immediately.
Lobster Thermidor In Shell Halves
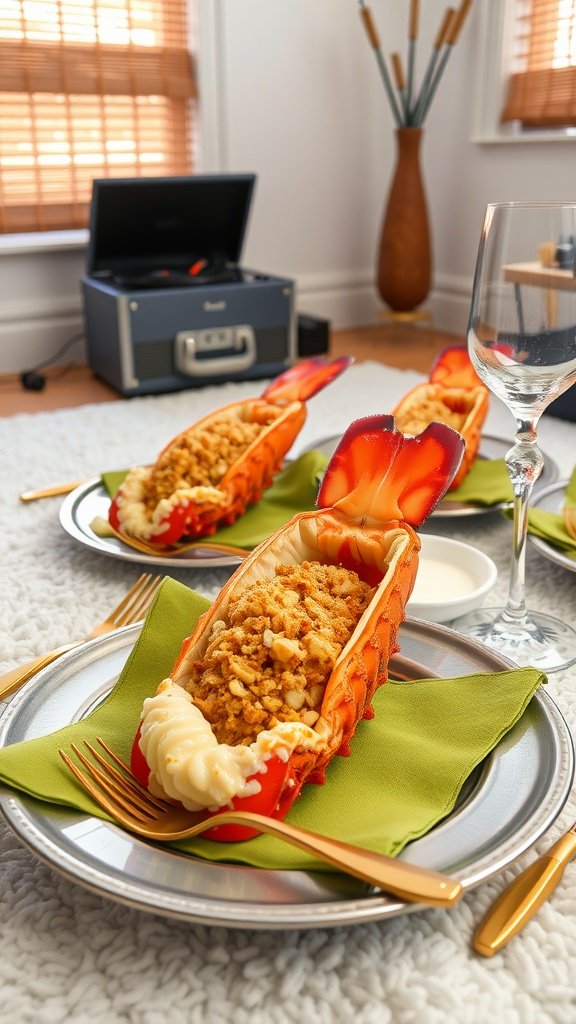
Lobster Thermidor is a classic dish that brings the elegance of the sea right to your dinner table. With its creamy, cheesy sauce enveloping tender lobster meat and baked to a golden perfection, this recipe is sure to impress your guests. The rich flavors combined with the iconic presentation in the lobster shell make it a standout at any dinner party.
While it might sound fancy, Lobster Thermidor is quite manageable for home cooks. The process involves cooking the lobster, preparing a creamy sauce, and then baking everything until bubbly. It’s a delightful way to showcase seafood that feels both luxurious and nostalgic, perfectly suited for a vintage-inspired gathering.
Ingredients
- 2 lobster tails
- 1 cup heavy cream
- 1 tablespoon Dijon mustard
- 1/2 cup grated Gruyère cheese
- 1 tablespoon butter
- 1 small onion, finely chopped
- 1/4 cup white wine
- 1 tablespoon fresh parsley, chopped
- Salt and pepper to taste
- Breadcrumbs for topping
Instructions
- Cook the Lobster: Bring a large pot of water to a boil. Add the lobster tails and cook for about 8-10 minutes. Remove and let cool slightly. Once cooled, slice the tails in half and remove the meat, chop it into bite-sized pieces.
- Make the Sauce: In a pan, melt the butter over medium heat. Add the chopped onion and sauté until translucent. Pour in the white wine and let it simmer for a few minutes. Stir in the heavy cream and Dijon mustard, followed by the Gruyère cheese until melted and smooth.
- Combine: Fold the chopped lobster meat into the sauce and season with salt, pepper, and parsley.
- Assemble: Spoon the lobster mixture back into the lobster shells and sprinkle breadcrumbs on top.
- Bake: Preheat the oven to 350°F (175°C) and bake the filled lobster shells for 15-20 minutes, or until the top is golden and bubbly.
Chicken À La King In Puff Pastry Shells
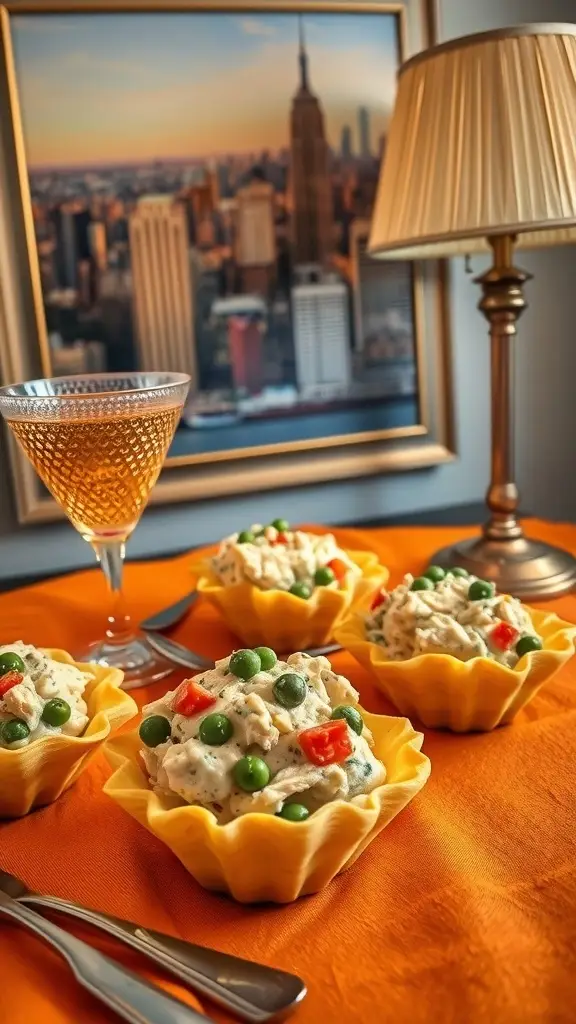
Chicken À La King is a classic dish that combines tender chicken in a creamy sauce, often with vegetables, all served in a delightful puff pastry shell. This comforting meal is rich in flavor and texture, making it a favorite for dinner parties and family meals alike. It’s surprisingly simple to whip up and feels like a gourmet treat right out of a vintage cookbook.
The puff pastry adds a crispy contrast to the creamy filling, creating a satisfying bite every time. Perfect for showcasing at any gathering, this dish not only pleases the palate but also adds a touch of nostalgia to your table, reminiscent of the elegant dinner parties from the Mad Men era.
Ingredients
- 2 cups cooked chicken, diced
- 1 cup mixed vegetables (peas, carrots, and bell peppers)
- 1/4 cup butter
- 1/4 cup all-purpose flour
- 2 cups chicken broth
- 1 cup heavy cream
- 1 teaspoon garlic powder
- Salt and pepper to taste
- 1 package puff pastry (2 sheets)
- 1 egg (for egg wash)
Instructions
- Preheat the oven to 400°F (200°C). Roll out the puff pastry sheets and cut them into circles large enough to fit into individual muffin tins.
- Press the pastry into the tins and prick the bottoms with a fork. Bake for about 10-15 minutes or until golden brown. Remove from oven and set aside.
- In a large skillet, melt the butter over medium heat. Stir in the flour and cook for about 1 minute.
- Gradually whisk in the chicken broth and bring to a simmer, allowing it to thicken. Add the heavy cream, garlic powder, and season with salt and pepper.
- Fold in the cooked chicken and mixed vegetables, cooking until heated through.
- Fill the baked pastry shells with the chicken mixture. Brush the edges with beaten egg for a nice shine.
- Return to the oven for an additional 5-10 minutes, until everything is heated through. Serve warm and enjoy your vintage-inspired meal!
Retro Cheese Ball With Almond Coating
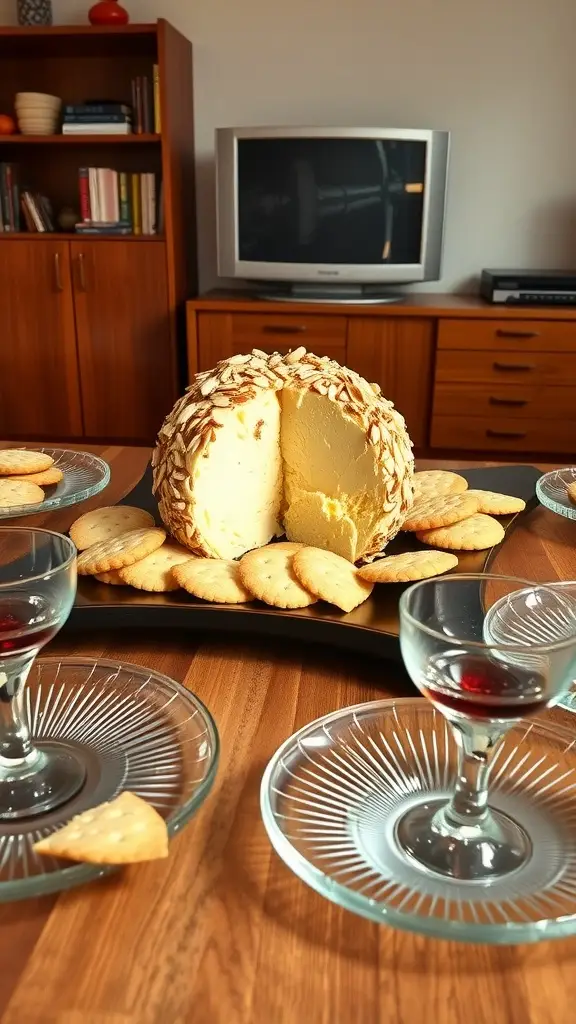
This retro cheese ball is a delightful throwback to the classic appetizers of the Mad Men era. Creamy cheese blends seamlessly with savory spices, and the crunchy almond coating adds a perfect finishing touch. It’s easy to whip up, making it an ideal choice for any dinner party or gathering.
Not only does this cheese ball taste fantastic, but it also looks impressive on a platter, making it a standout centerpiece for your spread. Serve it alongside an array of crackers or fresh vegetables, and watch it disappear in no time!
Ingredients
- 8 oz cream cheese, softened
- 1 cup shredded cheddar cheese
- 1/2 cup crumbled blue cheese
- 1/4 cup finely chopped green onions
- 1 tablespoon Worcestershire sauce
- 1/2 teaspoon garlic powder
- 1 cup chopped almonds
- Crackers or sliced vegetables for serving
Instructions
- In a mixing bowl, combine cream cheese, cheddar cheese, blue cheese, green onions, Worcestershire sauce, and garlic powder. Mix until well blended.
- Form the mixture into a ball and wrap it in plastic wrap. Refrigerate for at least 2 hours to firm up.
- Once chilled, roll the cheese ball in chopped almonds until fully coated.
- Place the cheese ball on a serving platter and serve with crackers or sliced vegetables.
Oysters Rockefeller With Herbed Butter
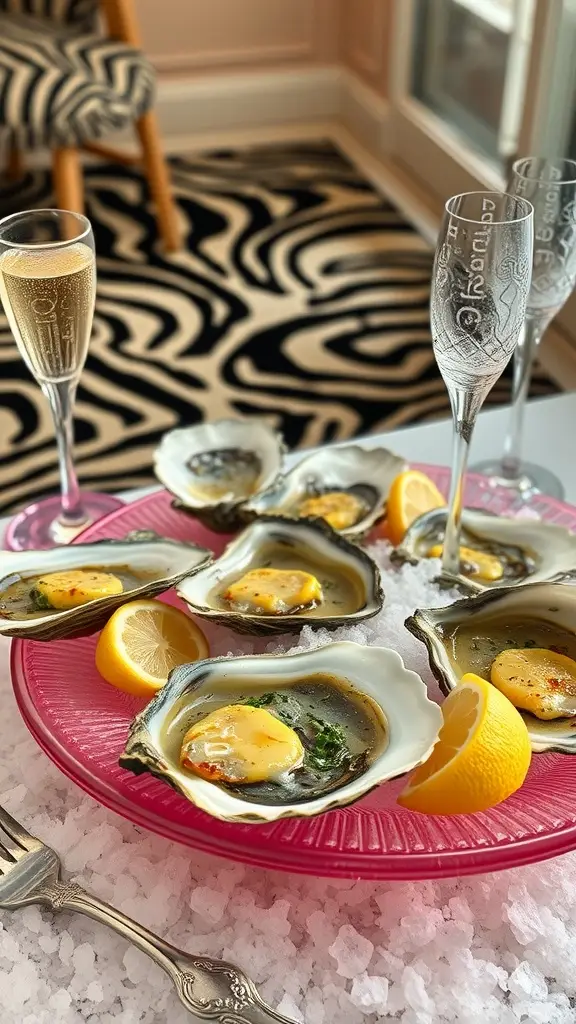
Oysters Rockefeller is a classic dish that brings a taste of luxury right to your dinner table. Rich and savory, these baked oysters are topped with a creamy blend of herbs and butter, making them a delightful appetizer for any special occasion. The combination of flavors is truly mouthwatering, with the buttery topping perfectly complementing the fresh oysters.
Making Oysters Rockefeller is simpler than you might think. With just a few ingredients and some baking time, you can impress your guests with this vintage recipe that has stood the test of time. It’s a perfect starter for your dinner party, especially when paired with a glass of bubbly!
Ingredients
- 12 fresh oysters, shucked
- 1/4 cup unsalted butter, softened
- 2 tablespoons chopped fresh parsley
- 1 tablespoon chopped fresh basil
- 1 teaspoon minced garlic
- 1/4 teaspoon cayenne pepper
- 1/2 cup bread crumbs
- 1/4 cup grated Parmesan cheese
- Juice of 1 lemon
- Salt and pepper to taste
Instructions
- Preheat the oven to 400°F (200°C).
- In a mixing bowl, combine softened butter, parsley, basil, garlic, cayenne pepper, lemon juice, salt, and pepper. Mix until well blended.
- Place the shucked oysters on a baking dish filled with rock salt to keep them stable.
- Spoon a generous amount of the herb butter mixture onto each oyster.
- Top each oyster with bread crumbs and sprinkle with grated Parmesan cheese.
- Bake in the oven for about 10-12 minutes, or until the tops are golden and the oysters are cooked through.
- Serve hot, garnished with lemon wedges.
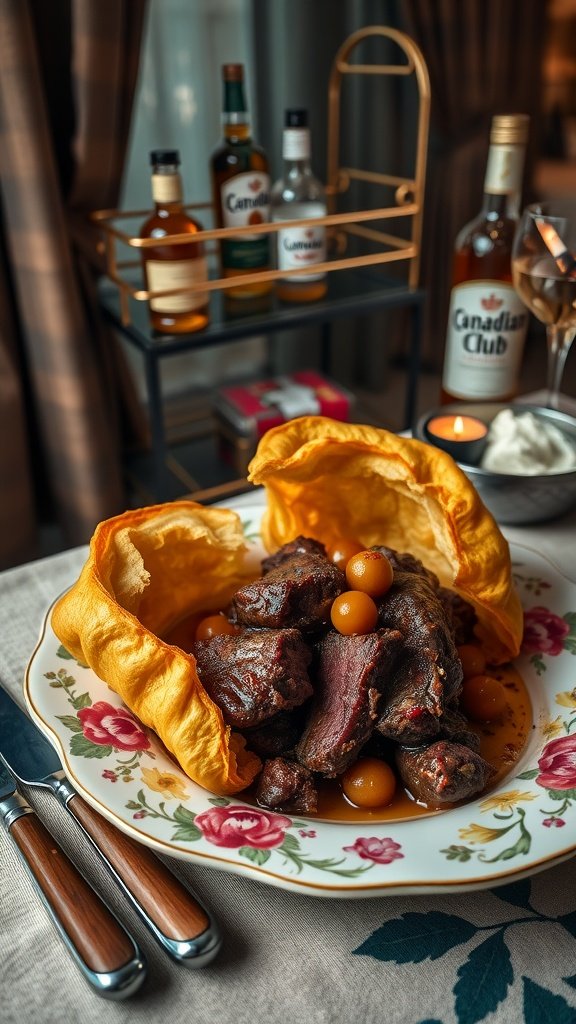
Swedish Meatballs With Lingonberry Sauce
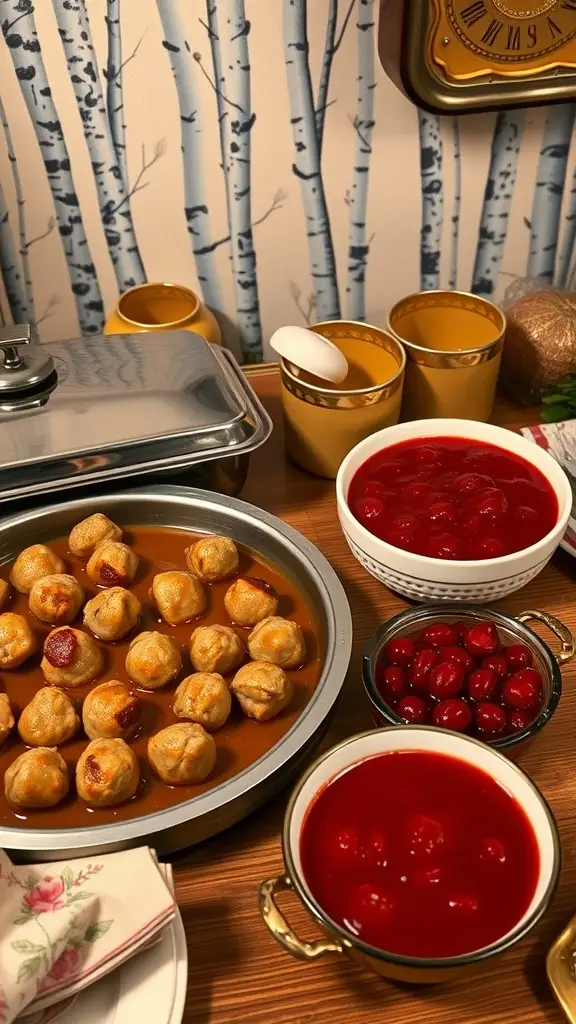
Swedish meatballs are a classic dish that perfectly combines savory flavors with a hint of sweetness. These tender meatballs are usually made with a mix of beef and pork, seasoned with spices, and served in a creamy sauce alongside the tartness of lingonberry sauce. The balance of these flavors makes them a hit at any dinner party, evoking a sense of nostalgia and comfort.
This recipe is simple enough for a weeknight dinner yet elegant enough for a vintage-inspired gathering. The meatballs come together quickly, and the lingonberry sauce adds a delightful twist that takes the dish to the next level. Pair them with mashed potatoes or egg noodles for a complete meal that your guests will love.
Ingredients
- 1 pound ground beef
- 1 pound ground pork
- 1/2 cup breadcrumbs
- 1/4 cup milk
- 1/4 cup onion, finely chopped
- 1 large egg
- 1 teaspoon salt
- 1/2 teaspoon pepper
- 1/4 teaspoon nutmeg
- 1 tablespoon butter
- 1 cup beef broth
- 1/2 cup heavy cream
- Lingonberry sauce (for serving)
Instructions
- Preheat oven to 400°F (200°C).
- In a bowl, mix together ground beef, ground pork, breadcrumbs, milk, onion, egg, salt, pepper, and nutmeg until well combined.
- Shape the mixture into small meatballs, about 1 inch in diameter.
- In a large skillet, melt butter over medium heat. Add meatballs and brown on all sides, about 5 minutes.
- Transfer the meatballs to a baking dish and bake for 15-20 minutes until cooked through.
- In the same skillet, add beef broth to deglaze, scraping up any browned bits. Stir in heavy cream and simmer until slightly thickened.
- Serve the meatballs drizzled with the creamy sauce and a side of lingonberry sauce.
Glazed Carrots With Brown Sugar And Orange Zest
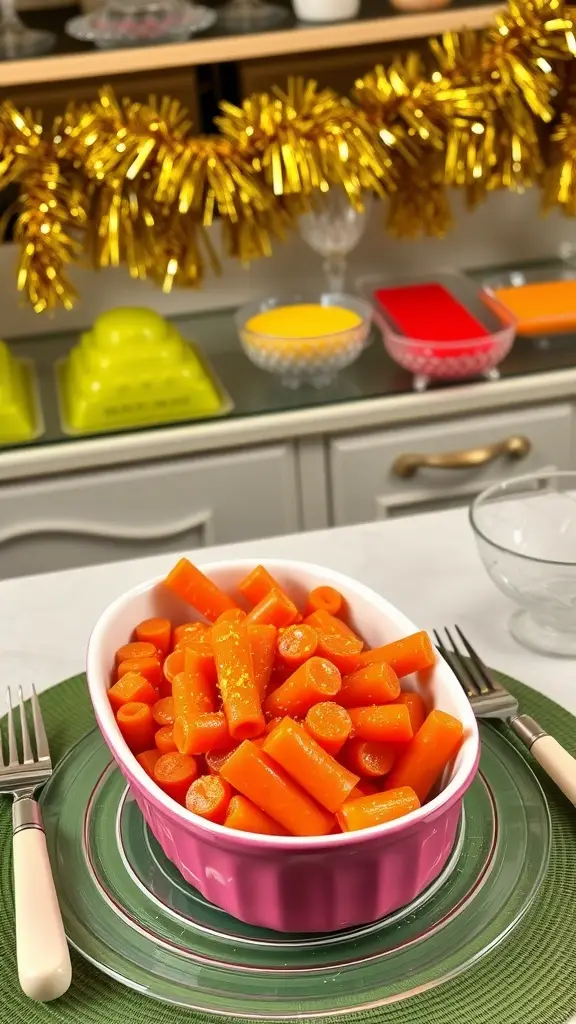
Glazed carrots are a delightful side dish that brings a touch of sweetness and a pop of color to any vintage dinner party table. The combination of brown sugar and orange zest creates a vibrant flavor that perfectly complements the natural sweetness of the carrots. This recipe is simple and quick, making it an easy addition to any meal while still impressing your guests.
With just a few basic ingredients, you can whip up these glazed carrots in no time. They are not only visually appealing but also a tasty treat that pairs well with a variety of main courses. Serve them warm for the best flavor experience!
Ingredients
- 1 pound carrots, sliced into sticks
- 2 tablespoons unsalted butter
- 1/4 cup brown sugar
- 1/2 cup orange juice
- Zest of 1 orange
- Salt and pepper to taste
Instructions
- Cook the Carrots: In a pot of boiling water, add the sliced carrots. Cook for about 5-7 minutes until just tender. Drain and set aside.
- Make the Glaze: In a skillet, melt the butter over medium heat. Add the brown sugar and stir until it dissolves. Pour in the orange juice and add the orange zest. Stir well to combine.
- Combine: Add the cooked carrots to the skillet. Toss to coat the carrots in the glaze and cook for an additional 3-5 minutes until heated through.
- Season: Season with salt and pepper to taste. Serve warm and enjoy!
Crab-Stuffed Avocados With Dill
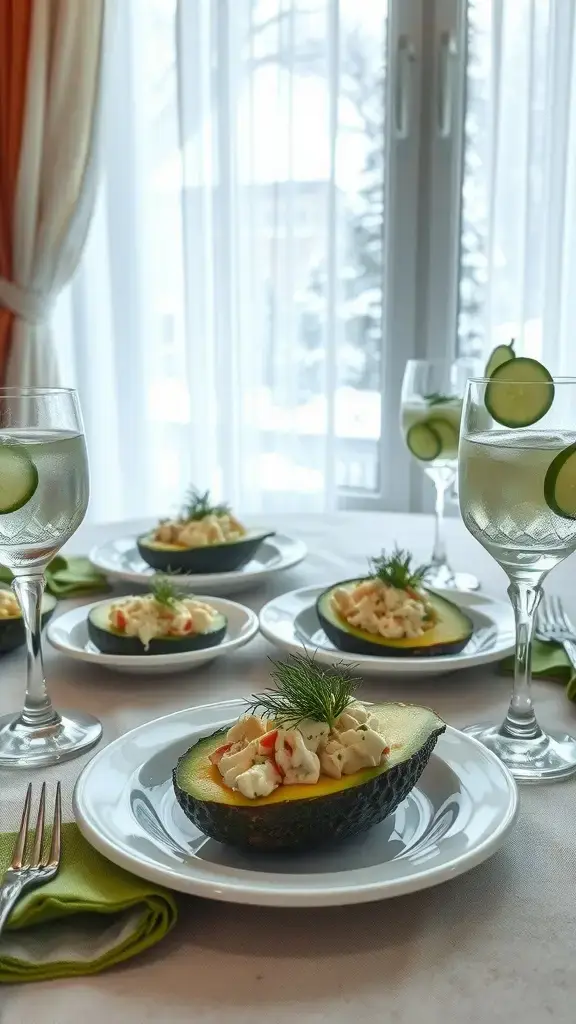
Crab-stuffed avocados with dill bring a refreshing twist to any dinner table. This delightful dish combines the creamy texture of ripe avocados with savory crab meat, making it a perfect appetizer for a vintage dinner party. The bright notes of dill elevate the flavors, creating a taste that feels both elegant and comforting.
This recipe is simple to prepare and can easily be scaled for larger gatherings. It’s a crowd-pleaser that requires minimal cooking, allowing you to spend more time enjoying your guests and less time in the kitchen.
Ingredients
- 2 ripe avocados
- 1 cup cooked crab meat
- 1/4 cup mayonnaise
- 2 tablespoons fresh dill, chopped
- 1 tablespoon lemon juice
- 1 teaspoon Dijon mustard
- Salt and pepper to taste
- Slices of cucumber for garnish (optional)
Instructions
- Prepare the Avocados: Cut the avocados in half and remove the pits. Scoop out a little extra flesh if needed to make room for the filling.
- Make the Filling: In a bowl, combine the crab meat, mayonnaise, chopped dill, lemon juice, Dijon mustard, salt, and pepper. Mix until well combined.
- Stuff the Avocados: Generously spoon the crab mixture into each avocado half.
- Garnish: If desired, add cucumber slices on the plate for garnish. Serve immediately or chill for a short while before serving.
Mini Chicken Kiev Bites On Cocktail Picks
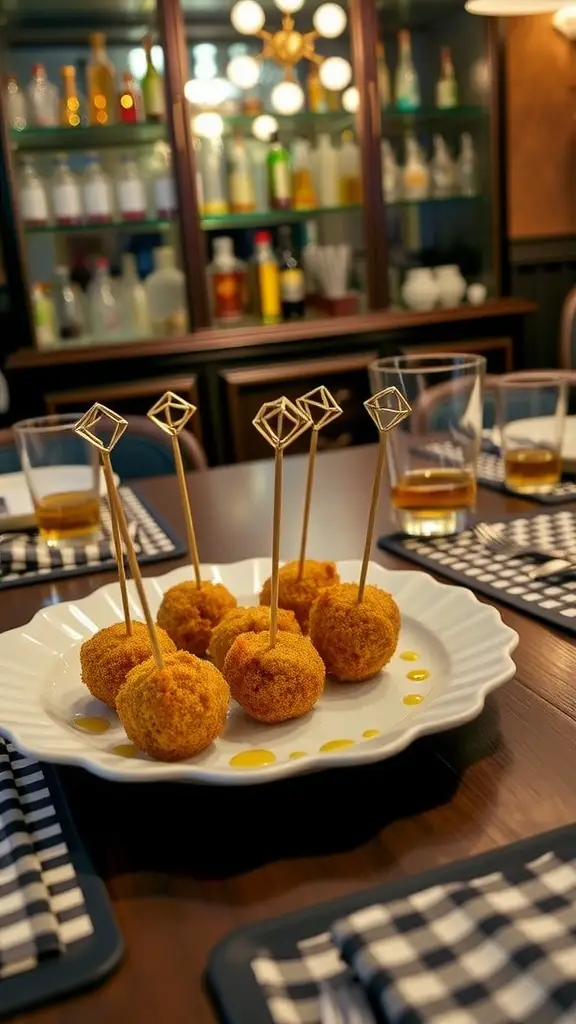
Mini Chicken Kiev Bites bring a delightful twist to a classic dish. These bite-sized treats are crispy on the outside, tender chicken on the inside, and ooze with rich garlic butter, making them a crowd-pleaser. They are perfect for a vintage dinner party, offering a fun and elegant way to serve a timeless flavor.
Simple to prepare, these bites can be made ahead of time and just need to be popped in the oven right before serving. They’re ideal for pairing with cocktails or wine, making them a fantastic addition to your next gathering.
Ingredients
- 2 cups cooked chicken, shredded
- 1/2 cup unsalted butter, softened
- 3 cloves garlic, minced
- 1 tablespoon fresh parsley, chopped
- 1 teaspoon lemon juice
- 1 cup all-purpose flour
- 2 large eggs, beaten
- 2 cups breadcrumbs
- Oil for frying
Instructions
- Make the Filling: In a bowl, mix the softened butter, minced garlic, parsley, and lemon juice until well combined. Place in the fridge to firm up.
- Prepare the Chicken: Combine shredded chicken with half of the garlic butter mixture. Form small balls and press a small piece of the remaining butter mixture inside each, sealing them well.
- Coat the Bites: Roll each ball in flour, then dip in beaten eggs, and finally coat with breadcrumbs.
- Fry the Bites: Heat oil in a skillet over medium heat. Fry the bites until golden brown, about 3-4 minutes on each side. Drain on paper towels.
- Serve: Arrange on cocktail picks and serve warm with extra garlic butter on the side for dipping.
Tomato Aspic Ring With Cream Cheese Filling
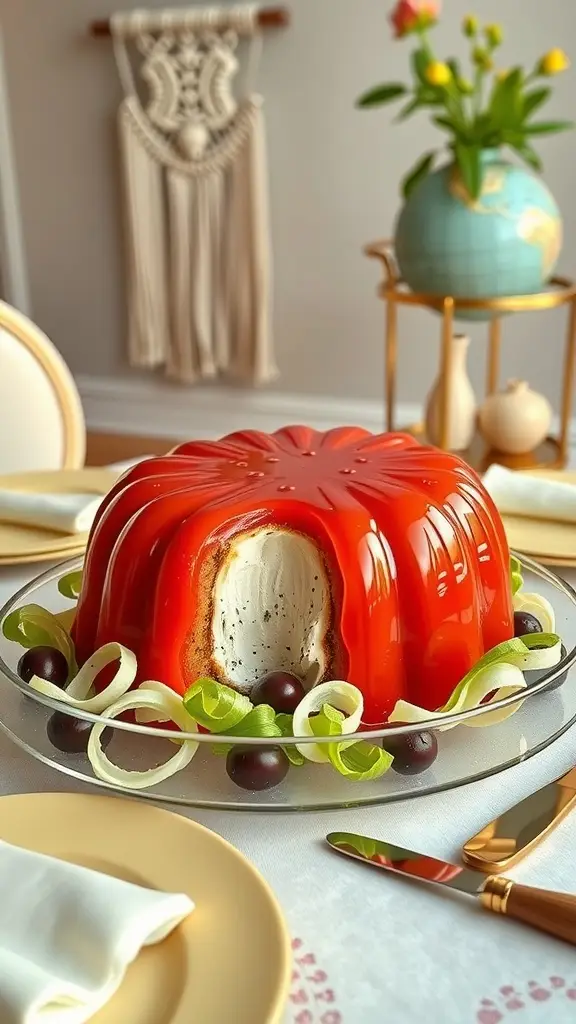
The Tomato Aspic Ring with Cream Cheese Filling is a nostalgic dish that beautifully embodies the charm of vintage dinner parties. This savory jelly is not only visually striking but also offers a unique blend of flavors. The tangy tomato base is complemented by the rich, creamy filling, making it a delightful addition to any table. Plus, it’s surprisingly easy to whip up, allowing you to impress your guests without spending all day in the kitchen.
This dish shines as a centerpiece and serves as a refreshing appetizer. It pairs well with crisp crackers or fresh vegetables, making it a versatile choice for gatherings. Whether you’re hosting a themed soirée or simply looking to try something new, this Tomato Aspic Ring is sure to be a conversation starter.
Ingredients
- 1 can (15 oz) tomato juice
- 1/4 cup fresh lemon juice
- 1 envelope unflavored gelatin
- 1 teaspoon Worcestershire sauce
- 1 teaspoon salt
- 1/4 teaspoon black pepper
- 1 cup water
- 1 cup cream cheese, softened
- 1/4 cup mayonnaise
- 1/4 cup finely chopped green onions
- 1/4 cup finely chopped pimentos
- Fresh herbs for garnish (optional)
Instructions
- Prepare the Aspic: In a saucepan, combine tomato juice, lemon juice, Worcestershire sauce, salt, and pepper. Heat gently until warm. In a separate bowl, dissolve gelatin in water. Combine the two mixtures and stir until smooth.
- Set the Aspic: Pour the mixture into a ring mold and refrigerate for about 4 hours or until set.
- Make the Filling: In a mixing bowl, combine the softened cream cheese and mayonnaise until creamy. Stir in green onions and pimentos until evenly distributed.
- Assemble: Once the tomato aspic is set, carefully unmold it onto a serving platter. Fill the center with the cream cheese mixture, smoothing it down. Garnish with fresh herbs if desired.
- Serve: Cut into slices and serve with crackers or fresh vegetables. Enjoy!
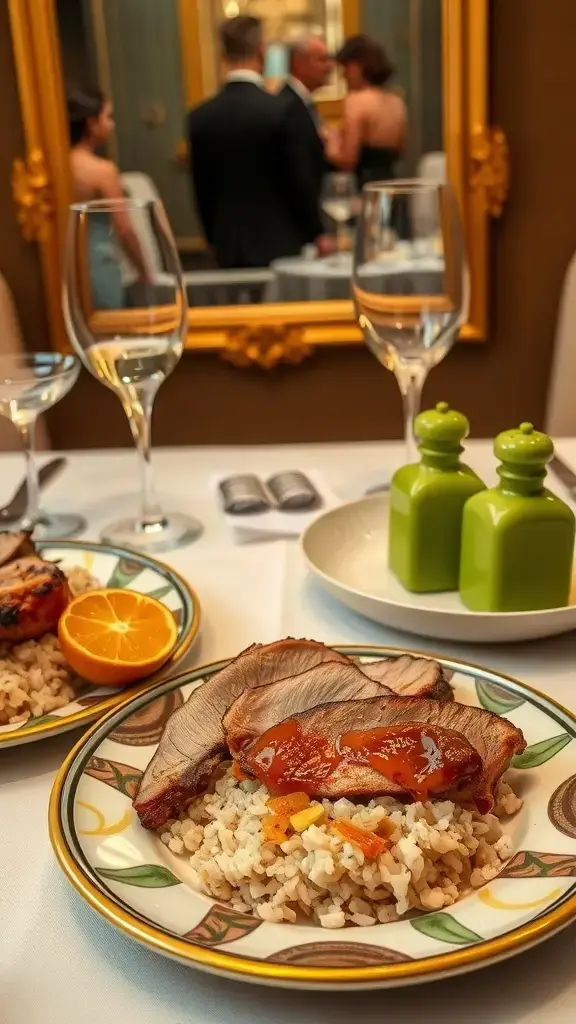
Glazed Cornish Game Hens With Apricot Sauce
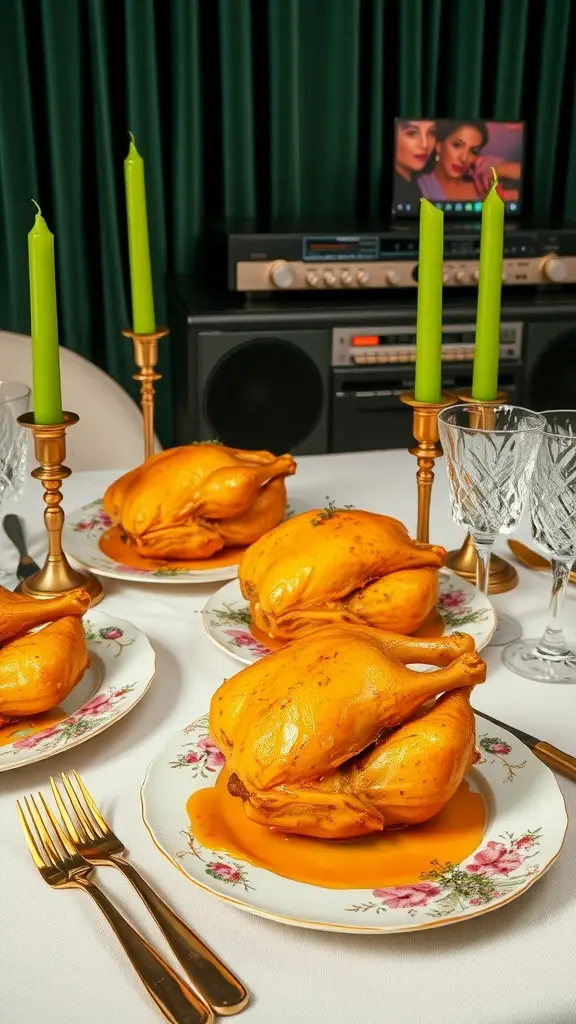
Glazed Cornish game hens are a delightful dish that captures the essence of vintage dinner parties. These small birds are tender and flavorful, making them perfect for a special gathering. The sweet apricot sauce adds a lovely glaze that not only enhances the taste but also makes for an eye-catching presentation on your dinner table.
This recipe is straightforward, allowing you to impress your guests without spending all day in the kitchen. The combination of savory and sweet flavors makes for a well-rounded dish that pairs wonderfully with a variety of sides.
Ingredients
- 4 Cornish game hens
- 1/2 cup apricot preserves
- 1/4 cup Dijon mustard
- 1/4 cup soy sauce
- 1 tablespoon olive oil
- 2 cloves garlic, minced
- Salt and pepper to taste
- Fresh herbs for garnish (like thyme or parsley)
Instructions
- Preheat your oven to 375°F (190°C).
- In a bowl, mix apricot preserves, Dijon mustard, soy sauce, olive oil, garlic, salt, and pepper.
- Place the game hens in a roasting pan and brush them generously with the apricot sauce mixture.
- Roast in the oven for about 45-50 minutes or until the hens are golden brown and cooked through, basting occasionally with the remaining sauce.
- Once done, let them rest for a few minutes before serving. Garnish with fresh herbs and enjoy!
Stuffed Celery With Cream Cheese And Pimentos
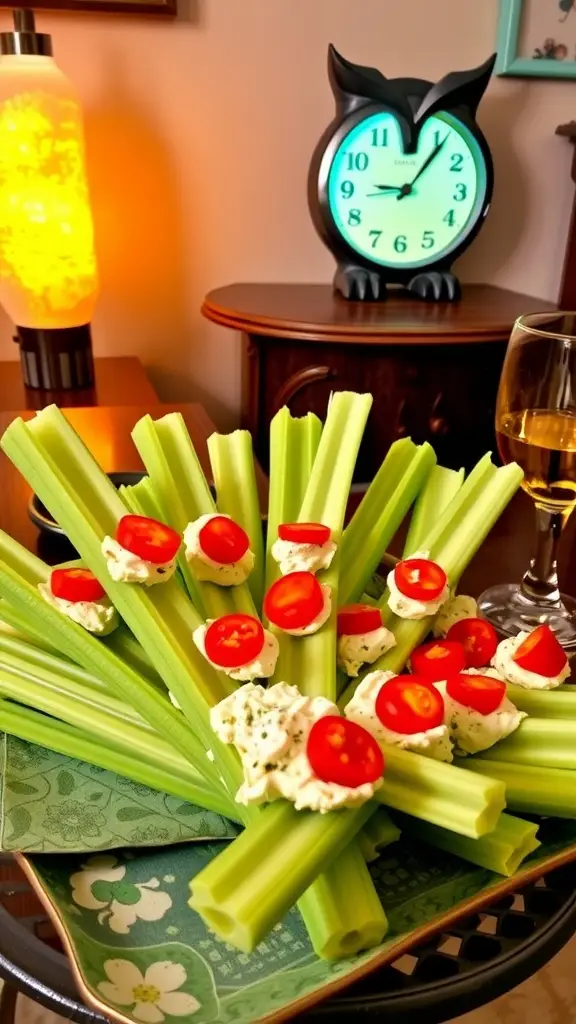
Stuffed celery with cream cheese and pimentos is a charming retro appetizer that brings a delightful crunch to your dinner party spread. This simple dish combines the crispness of celery with a creamy, tangy filling, making it a hit for guests of all ages.
Not only is it easy to prepare, but it also adds a splash of color to your table. The creamy filling, enriched with pimentos, complements the fresh celery perfectly, creating a light and refreshing bite that balances any heavier dishes you might serve.
Ingredients
- 1 bunch of celery, washed and cut into 3-inch pieces
- 8 oz cream cheese, softened
- 1/4 cup pimentos, chopped
- 1/4 teaspoon garlic powder
- 1/4 teaspoon onion powder
- Salt and pepper to taste
- Cherry tomatoes for garnish (optional)
Instructions
- Prepare the Filling: In a mixing bowl, combine the softened cream cheese, chopped pimentos, garlic powder, onion powder, salt, and pepper. Mix well until creamy and smooth.
- Fill the Celery: Using a small spoon or a piping bag, fill each piece of celery with the cream cheese mixture, making sure to fill it well.
- Garnish: If desired, place a cherry tomato at one end of each stuffed celery stick for an extra pop of color.
- Serve: Arrange the stuffed celery on a platter and serve immediately, or refrigerate until ready to serve.
Baked Alaska With Flaming Meringue
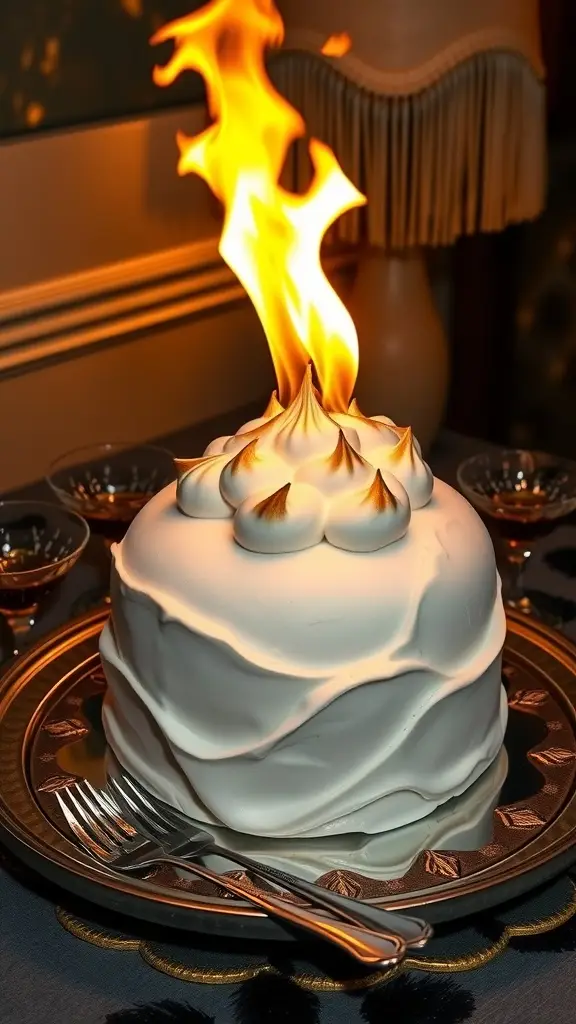
Baked Alaska is a stunning dessert that combines cake, ice cream, and meringue in a delightful way. The contrasting temperatures of the warm meringue and the cold ice cream create an exciting experience for the taste buds. It may seem complex, but with a little patience, you can impress your guests with this nostalgic treat.
This dessert not only looks incredible, especially when flambéed at the table, but it also tastes divine. The combination of flavors—sweet meringue, rich cake, and creamy ice cream—makes every bite a delight. Dive into making this vintage classic and bring a sense of flair to your dinner party!
Ingredients
- 1 layer of sponge cake (9-inch round)
- 3 cups ice cream (your favorite flavor)
- 4 egg whites
- 1 cup granulated sugar
- 1 teaspoon vanilla extract
- 1/4 teaspoon cream of tartar
- 1/4 cup rum or brandy (for flambéing)
Instructions
- Prepare the Cake: Place the sponge cake on a serving platter. Scoop the ice cream onto the cake, shaping it into a dome. Freeze until firm, about 2 hours.
- Make the Meringue: In a clean bowl, whisk egg whites and cream of tartar until soft peaks form. Gradually add sugar, whisking until stiff peaks form. Stir in vanilla extract.
- Cover the Ice Cream: Remove the cake and ice cream from the freezer. Spread the meringue over the ice cream and cake, ensuring it completely covers it.
- Bake: Preheat your oven to 500°F (260°C). Bake for about 3-5 minutes until the meringue is golden brown. Keep a close eye to avoid over-browning.
- Flambé: Carefully pour rum over the meringue and ignite with a long lighter for a dramatic finish. Serve immediately!
Candied Sweet Potato Fans With Orange Glaze
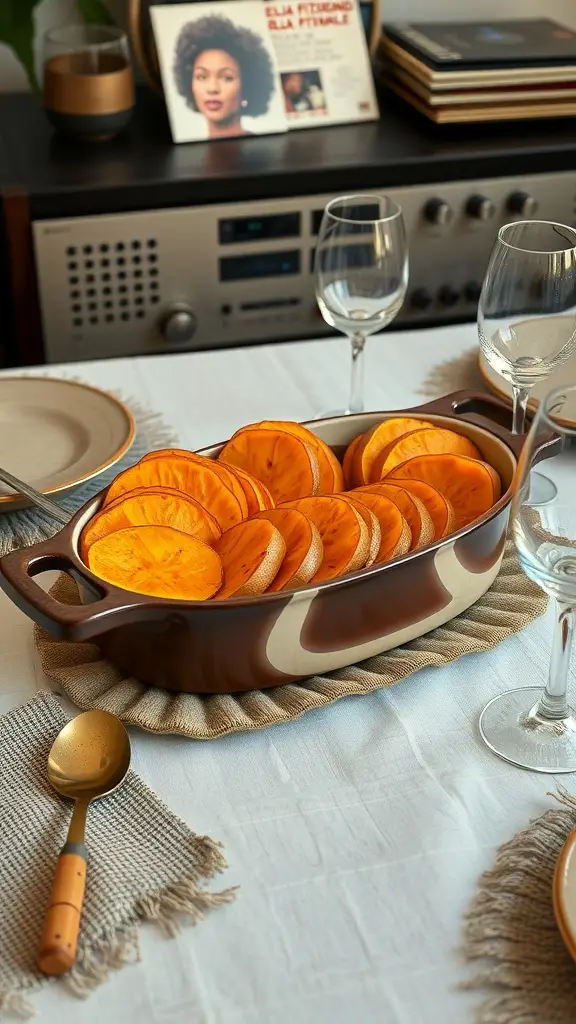
Candied Sweet Potato Fans With Orange Glaze are a delightful side dish that brings a burst of color and flavor to any vintage dinner party. The sweet potatoes are sliced into elegant fans, then coated in a luscious orange glaze that enhances their natural sweetness while adding a zesty twist. This dish not only pleases the palate but also makes a stunning presentation on the table.
Making these sweet potato fans is quite simple. With just a few straightforward steps, you can create a dish that is both visually appealing and deliciously satisfying. The balance of sweetness from the potatoes and the citrusy notes from the orange glaze makes for a perfect complement to any main course.
Ingredients
- 4 large sweet potatoes
- 1/2 cup brown sugar
- 1/4 cup unsalted butter, melted
- 1/2 cup orange juice
- 1 teaspoon vanilla extract
- 1 teaspoon ground cinnamon
- 1/4 teaspoon salt
Instructions
- Preheat your oven to 375°F (190°C).
- Peel the sweet potatoes and slice them into thin rounds, then cut each round into a fan shape.
- In a mixing bowl, combine brown sugar, melted butter, orange juice, vanilla extract, cinnamon, and salt until smooth.
- Place the sweet potato fans in a baking dish and pour the orange glaze over them, ensuring they are well coated.
- Bake in the preheated oven for about 30-35 minutes, or until the sweet potatoes are tender and the glaze is bubbly.
- Serve warm, garnished with any remaining glaze for an extra touch!
Herb-Crusted Pork Crown Roast
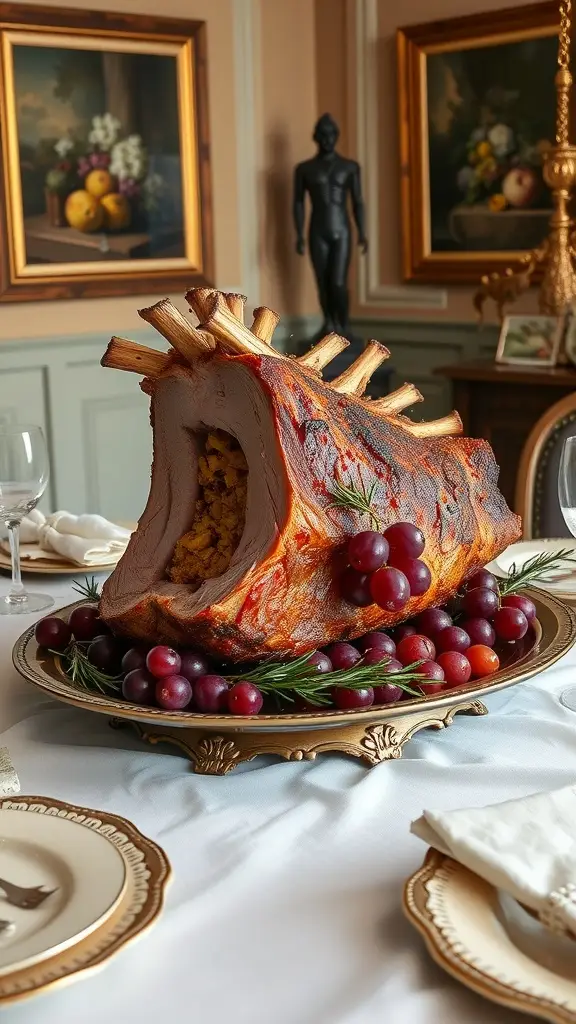
Herb-Crusted Pork Crown Roast is a stunning centerpiece that’s perfect for any vintage dinner party. The savory blend of herbs creates a delightful crust that enhances the tender, juicy pork. With flavors that evoke a sense of nostalgia, this roast is sure to impress your guests without requiring advanced culinary skills.
This dish combines simple ingredients and straightforward techniques, making it accessible for home cooks. Pair it with roasted vegetables or a holiday-inspired sauce, and you’ll have a meal that feels special and celebratory.
Ingredients
- 1 crown roast of pork (about 8-10 pounds)
- 1/4 cup Dijon mustard
- 2 tablespoons fresh rosemary, chopped
- 2 tablespoons fresh thyme, chopped
- 2 tablespoons fresh parsley, chopped
- 4 cloves garlic, minced
- 1 tablespoon olive oil
- Salt and pepper to taste
- 2 cups of breadcrumbs
- 1/2 cup grated Parmesan cheese
Instructions
- Preheat your oven to 375°F (190°C).
- In a small bowl, mix together the mustard, rosemary, thyme, parsley, garlic, olive oil, salt, and pepper.
- Rub this mixture all over the pork crown roast, making sure to get it into all the crevices.
- In another bowl, combine the breadcrumbs and Parmesan cheese. Press this mixture onto the mustard-coated roast.
- Place the roast in a roasting pan and cover with aluminum foil. Bake for about 2 hours, removing the foil for the last 30 minutes to achieve a golden crust.
- Check for doneness using a meat thermometer; it should read at least 145°F (63°C) in the thickest part. Let it rest for 15 minutes before slicing.
Creamed Spinach In Vintage Ramekins
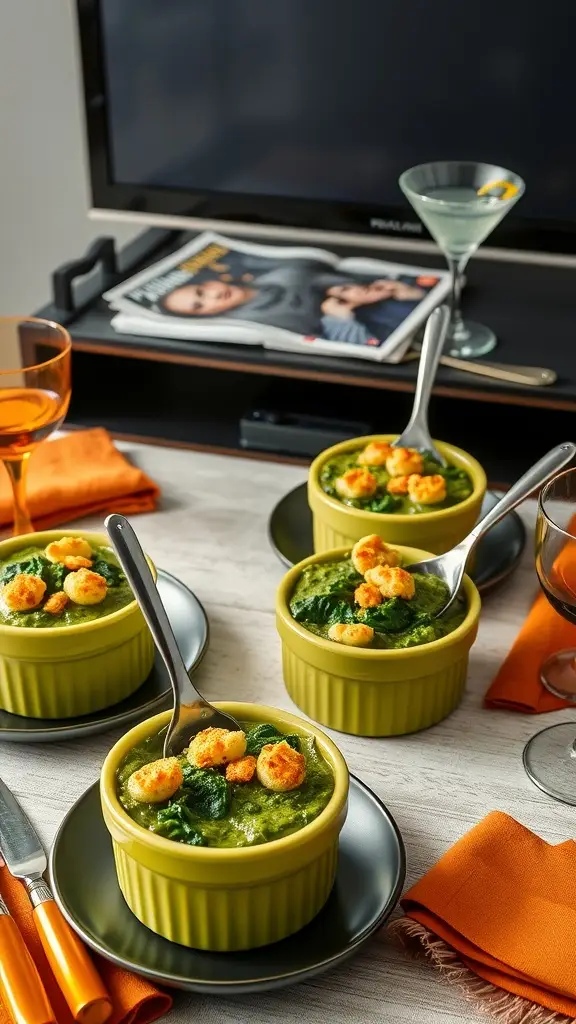
Creamed spinach is a classic dish that brings a rich and creamy flavor to any dinner table. This vintage recipe combines tender spinach with a velvety béchamel sauce, making it a delicious side that pairs perfectly with steak or chicken. It’s simple to whip up and adds a touch of elegance to your vintage dinner party.
The flavors are comforting and nostalgic, reminding us of dinner gatherings from a bygone era. Serving it in vintage ramekins not only enhances its appeal but also makes for an eye-catching presentation. It’s a dish that will impress your guests and leave them wanting more!
Ingredients
- 1 pound fresh spinach, washed and trimmed
- 2 tablespoons unsalted butter
- 2 tablespoons all-purpose flour
- 1 cup milk
- 1/2 cup heavy cream
- 1/4 teaspoon nutmeg
- Salt and pepper to taste
- 1/2 cup grated Parmesan cheese
- 1/2 cup crunchy topping (like crushed crackers or breadcrumbs)
Instructions
- Prepare the Spinach: In a large pot of boiling water, blanch the spinach for about 2 minutes until wilted. Drain, rinse under cold water, and squeeze out excess moisture. Chop coarsely and set aside.
- Make the Sauce: In a saucepan, melt the butter over medium heat. Stir in the flour and cook for 1-2 minutes until light golden. Gradually whisk in the milk and cream, cooking until thickened. Season with nutmeg, salt, and pepper.
- Combine: Stir the chopped spinach into the sauce, followed by the Parmesan cheese. Mix well to combine.
- Transfer to Ramekins: Spoon the creamed spinach into vintage ramekins and sprinkle with the crunchy topping.
- Bake: Preheat the oven to 350°F (175°C) and bake for about 20 minutes until hot and bubbly. Serve warm and enjoy your delightful vintage treat!
Shrimp Newburg In Pastry Shells

Shrimp Newburg in pastry shells is a classic dish that combines tender shrimp in a creamy, rich sauce with a delightful, flaky pastry. The flavors are savory and slightly decadent, making it a perfect choice for a vintage dinner party. This recipe is surprisingly simple to make, ensuring you can impress your guests without spending all day in the kitchen.
The pastry shells provide a lovely crunch that contrasts beautifully with the creamy filling, while the shrimp add a touch of elegance. Whether you’re planning an intimate gathering or a festive celebration, this dish will surely be a hit!
Ingredients
- 1 pound shrimp, peeled and deveined
- 2 tablespoons butter
- 1/4 cup finely chopped onion
- 1/4 cup flour
- 1 cup seafood stock
- 1 cup heavy cream
- 1 tablespoon sherry
- Salt and pepper to taste
- 1 package puff pastry shells
- Chopped parsley for garnish
Instructions
- Preheat the oven to 400°F (200°C). Bake the puff pastry shells according to the package instructions until golden brown.
- In a skillet, melt the butter over medium heat. Add the chopped onion and sauté until translucent.
- Add the shrimp to the skillet and cook until they turn pink, about 3-4 minutes. Remove from heat.
- Stir in the flour, cooking for 1-2 minutes, then gradually add the seafood stock, stirring constantly until thickened.
- Reduce the heat and pour in the cream and sherry. Season with salt and pepper, and let simmer for a few minutes until creamy.
- Spoon the shrimp mixture into the baked pastry shells and garnish with chopped parsley before serving.
Citrus-Glazed Duck With Wild Rice
Citrus-glazed duck is a delightful dish that combines the rich flavors of duck with a refreshing citrus glaze. This recipe is not only a showstopper for your dinner party, but it’s also relatively simple to prepare. The key is balancing the savory taste of the duck with the bright and tangy notes from the citrus, creating a dish that is both comforting and sophisticated.
The wild rice serves as a perfect base, adding a nutty flavor and chewy texture that complements the duck beautifully. This dish is sure to impress your guests with its elegant presentation and mouthwatering taste!
Ingredients
- 2 duck breasts
- 1 tablespoon olive oil
- Salt and pepper to taste
- 1/2 cup orange juice
- 1/4 cup honey
- 1 tablespoon soy sauce
- 1 tablespoon Dijon mustard
- 1 cup wild rice
- 2 cups chicken broth
- 1/4 cup chopped walnuts (optional)
- Fresh herbs for garnish (like parsley or thyme)
Instructions
- Prepare the Duck: Preheat your oven to 400°F (200°C). Score the skin of the duck breasts in a crosshatch pattern, then rub with olive oil, salt, and pepper.
- Sear the Duck: In a hot oven-safe skillet, sear the duck breasts skin-side down for about 6-8 minutes, until the skin is crispy and golden. Flip and sear the other side for 2-3 minutes.
- Add the Glaze: In a small bowl, mix orange juice, honey, soy sauce, and Dijon mustard. Pour the glaze over the duck, then transfer the skillet to the oven. Roast for 10-15 minutes, until the duck is cooked to your liking.
- Cook the Wild Rice: While the duck is roasting, rinse the wild rice in cold water. In a saucepan, combine wild rice and chicken broth. Bring to a boil, then reduce heat and simmer covered for about 40-45 minutes, until the rice is tender.
- Serve: Slice the duck and serve it over the wild rice, spooning extra glaze over the top. Sprinkle with walnuts and fresh herbs before enjoying!
Lemon Chiffon Pie With Whipped Cream Peaks
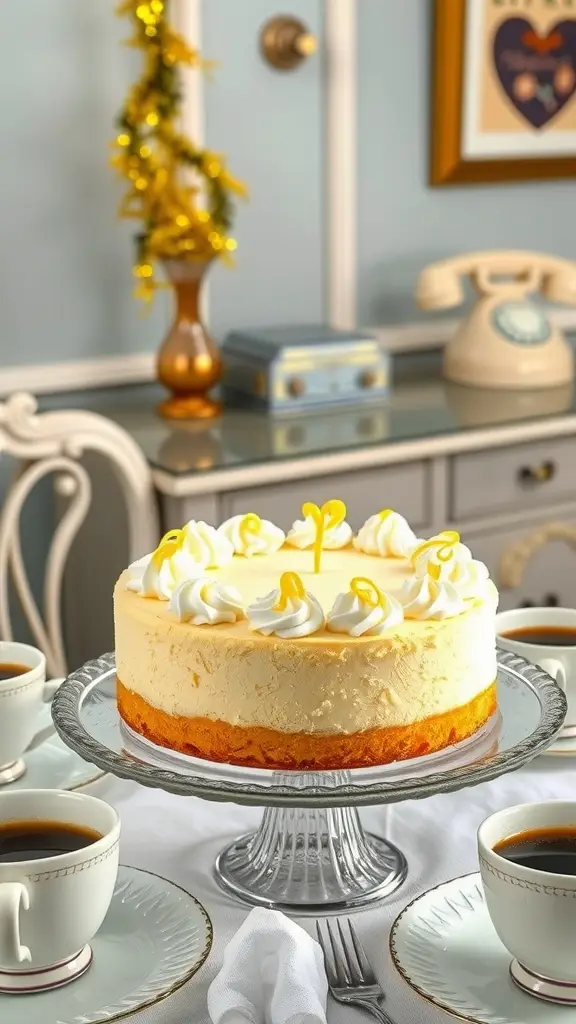
Lemon chiffon pie is a delightful dessert that perfectly blends tartness and sweetness. With its light and airy texture, it offers a refreshing finish to any meal, making it a vintage favorite at dinner parties. This pie is not only delicious but also simple to prepare, ensuring that even novice bakers can impress their guests.
The fluffy lemon filling sits atop a buttery crust, creating a delicious contrast that keeps everyone coming back for seconds. Topped with peaks of whipped cream, this dessert is a true showstopper that brings a touch of elegance to the table.
Ingredients
- 1 1/2 cups graham cracker crumbs
- 1/2 cup granulated sugar
- 1/2 cup unsalted butter, melted
- 1/4 cup fresh lemon juice
- 1 tablespoon lemon zest
- 1 teaspoon unflavored gelatin
- 3/4 cup cold water
- 3 large egg whites
- 1/4 teaspoon salt
- 1 cup heavy cream
- 2 tablespoons powdered sugar
Instructions
- Prepare the Crust: Preheat your oven to 350°F (175°C). In a bowl, mix together graham cracker crumbs, granulated sugar, and melted butter. Press the mixture into the bottom and sides of a pie pan. Bake for 10 minutes, then allow to cool.
- Make the Filling: In a small bowl, sprinkle gelatin over cold water and let it sit for 5 minutes. In a saucepan, combine lemon juice, lemon zest, and sugar; heat until dissolved. Stir in the gelatin mixture until fully dissolved. Remove from heat.
- Whip Egg Whites: In a separate bowl, beat egg whites with salt until soft peaks form. Fold the egg whites into the lemon mixture gently until well combined.
- Fill the Crust: Pour the lemon filling into the cooled crust and refrigerate for at least 4 hours or until set.
- Prepare Whipped Cream: Beat heavy cream and powdered sugar in a bowl until stiff peaks form. Spread or pipe the whipped cream on top of the chilled pie before serving.
You may also like:
– 21 Children’s Birthday Cakes Inspired by Gotham City
– 19 Vintage Appetizers Inspired by the 1960s Mad Men Era
– 30 Recipes for the Ultimate Trooper’s Space Journey
If you enjoyed this blog you can visit us or check out our other blogs and learn a bit about us.
Disclaimer: This blog post is inspired by fictional universes and characters created by their respective rights holders. All related content and imagery remain the property of their respective rights holder. This fan-inspired content is for entertainment and commentary purposes only and is not affiliated with or endorsed by HBO, Disney, Warner Bros., Lionsgate, or any other rights holders. To explore the official source material, please visit:
HBO