
Get ready to whip up some fun and spooky treats for your kids’ Halloween party! These easy-to-make delights not only please the little ones’ taste buds but also add a festive flair to the occasion. With simple ingredients and quick tips for substitutions, you can create delicious snacks that everyone will love. Let’s jump into these ghastly goodies that are sure to impress!
Spooky Spider Cookies: A Fun Treat For Little Ghouls
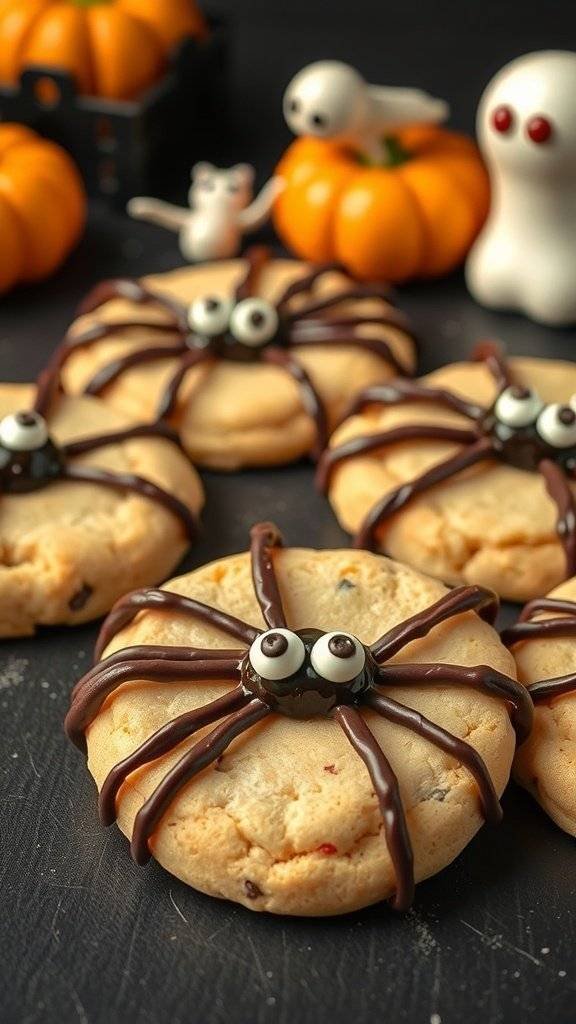
These spooky spider cookies are perfect for any kids Halloween party treats! They are not only cute but also delicious, making them a hit among little ghouls and goblins. Picture a soft cookie topped with rich chocolate and decorated to look like a creepy spider. The combination of flavors and fun designs will surely bring smiles to everyone’s faces.
Making these cookies is a fun activity that kids can help with. They can get creative with the decorations, adding their own twist to each spider. Plus, they make for a great centerpiece at your Halloween gathering.
Ingredients
- 1 cup unsalted butter, softened
- 1 cup granulated sugar
- 2 large eggs
- 2 teaspoons vanilla extract
- 3 cups all-purpose flour
- 1 teaspoon baking soda
- 1/2 teaspoon salt
- 1 cup chocolate chips
- 1 cup black candy melts
- 12 candy eyes
- Black licorice or chocolate sticks for legs
Instructions
- Preheat your oven to 350°F (175°C). Line a baking sheet with parchment paper.
- In a large bowl, cream together the softened butter and sugar until light and fluffy. Add the eggs and vanilla, mixing until well combined.
- In another bowl, whisk together the flour, baking soda, and salt. Gradually add this dry mixture to the wet ingredients, stirring until a dough forms.
- Roll the dough into balls and place them on the prepared baking sheet. Flatten each ball slightly with your hand.
- Bake for 10-12 minutes, or until the edges are lightly golden. Remove from the oven and let them cool completely.
- Melt the black candy melts according to package instructions. Dip the top of each cookie into the melted chocolate, allowing any excess to drip off.
- While the chocolate is still wet, place the candy eyes on top and use the licorice or chocolate sticks to create spider legs.
- Let the cookies set until the chocolate hardens. Enjoy your spooky spider cookies!
Cooking Tips: If you want to make these cookies gluten-free, substitute the all-purpose flour with a gluten-free blend. For a different flavor, try adding a teaspoon of almond extract to the dough.
These spider cookies are sure to be a hit at your Halloween party. Get creative and have fun with the decorations!
Witch’S Brew Cupcakes: Magical Delights For A Halloween Bash
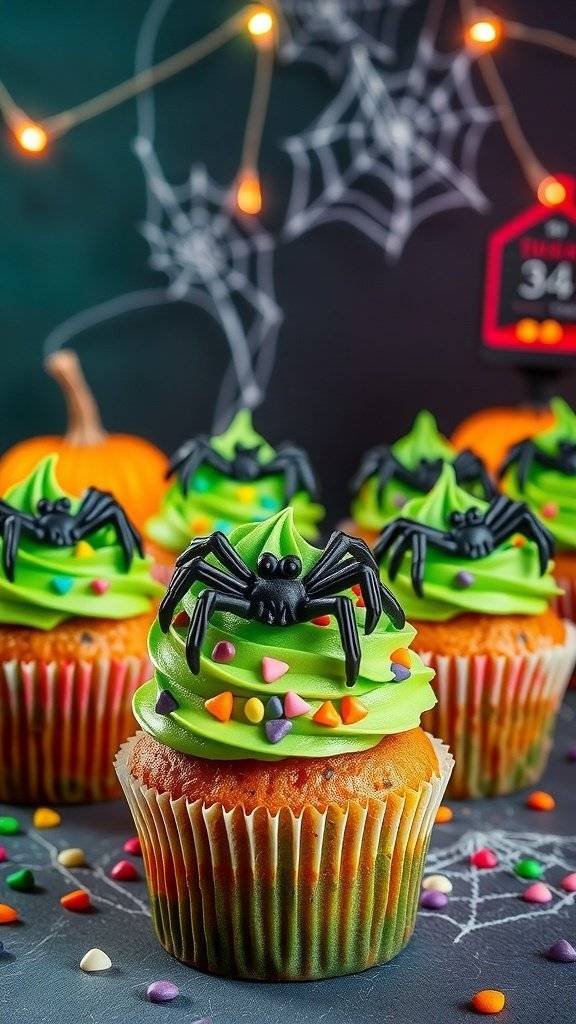
Witch’s Brew Cupcakes are the perfect treat for any Kids Halloween Party. These colorful cupcakes are topped with vibrant green frosting and spooky spider decorations, making them a hit with kids and adults alike. The fun design adds a magical touch to your Halloween festivities.
To make these cupcakes, you can use a simple vanilla or chocolate cake base. The bright green frosting is made with buttercream, colored with food dye for that witchy vibe. Don’t forget the cute spider toppers and some festive sprinkles to complete the look!
Here’s how to whip up these delightful treats:
Ingredients
- 1 ½ cups all-purpose flour
- 1 cup granulated sugar
- ½ cup unsalted butter, softened
- 2 large eggs
- 1 tsp vanilla extract
- 1 ½ tsp baking powder
- ½ cup milk
- Green food coloring
- 1 cup buttercream frosting
- Spider decorations
- Sprinkles (optional)
Instructions
- Preheat your oven to 350°F (175°C) and line a cupcake pan with liners.
- In a bowl, cream together the softened butter and sugar until light and fluffy. Add the eggs one at a time, mixing well after each addition.
- Stir in the vanilla extract.
- In another bowl, mix the flour and baking powder. Gradually add this to the butter mixture, alternating with the milk. Mix until just combined.
- Scoop the batter into the cupcake liners, filling them about 2/3 full.
- Bake for 18-20 minutes or until a toothpick comes out clean. Let them cool completely.
- Once cooled, tint the buttercream frosting with green food coloring until you reach your desired shade.
- Frost the cupcakes generously and top with spider decorations and sprinkles.
Cooking Tips: If you want a different flavor, try adding cocoa powder for chocolate cupcakes or some lemon zest for a citrus twist. You can also substitute the butter with applesauce for a lighter version.
These Witch’s Brew Cupcakes will surely enchant everyone at your Halloween bash!
Looking for the perfect stand for your cupcakes? Check this out.
Mummy Hot Dogs: A Creepy Yet Tasty Snack
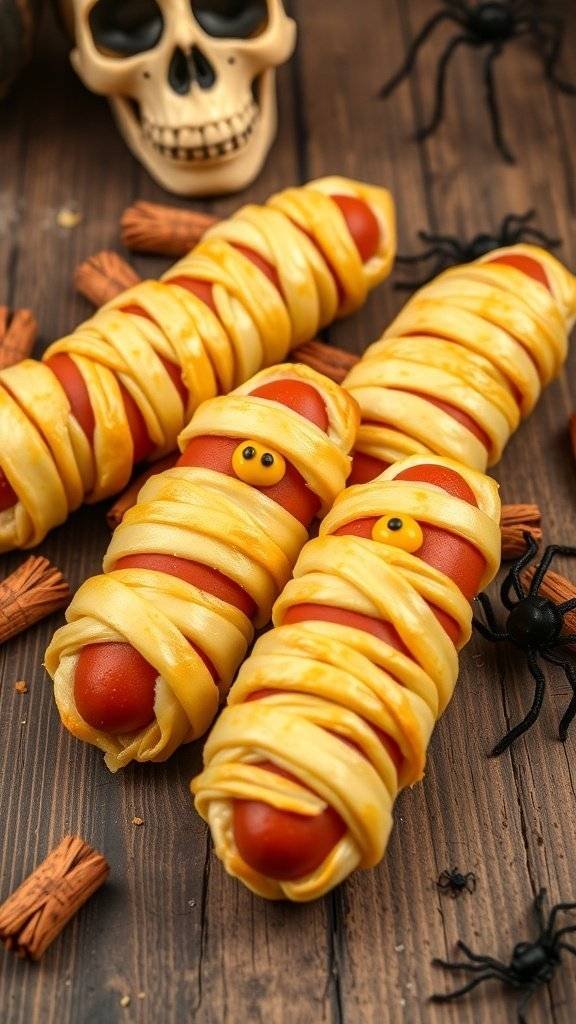
Mummy hot dogs are a fun and spooky treat perfect for any kids Halloween party. These little mummies are made by wrapping hot dogs in crescent roll dough, giving them a creepy yet cute appearance. The kids will love these tasty snacks, and they are super easy to make!
To create these mummy hot dogs, you will need some simple ingredients. The dough wraps around the hot dogs, making them look like mummies. You can even add little eyes using mustard or candy eyes for extra fun!
Ingredients
- 8 hot dogs
- 1 can of crescent roll dough
- Mustard or candy eyes for decoration
Instructions
- Preheat your oven to 375°F (190°C).
- Unroll the crescent roll dough and cut it into thin strips.
- Wrap each hot dog with the dough strips, leaving a small gap for the eyes.
- Place the wrapped hot dogs on a baking sheet lined with parchment paper.
- Bake for 12-15 minutes or until the dough is golden brown.
- Once baked, add mustard or candy eyes to create the mummy’s face.
Cooking tips: If you want a healthier option, you can use turkey or veggie hot dogs. For a twist, try adding cheese inside the hot dogs before wrapping them. Enjoy making these spooky snacks!
Ghostly Banana Pops: Healthy Halloween Treats

Ghostly Banana Pops are a fun and healthy treat for any Kids Halloween Party. These delightful snacks are not only cute but also packed with nutrition. Bananas are a great source of potassium and energy, making them perfect for little ones who need a boost while enjoying Halloween festivities.
To make these ghostly treats, you simply slice bananas in half, insert a popsicle stick, and dip them in white chocolate. After that, you can add chocolate chips for eyes to give them a spooky look. They are easy to make and will surely be a hit at your Halloween gathering!
Ingredients
- 2 ripe bananas
- 1 cup white chocolate chips
- Chocolate chips (for eyes)
- Popsicle sticks
- Sprinkles (optional, for decoration)
Instructions
- Prepare the Bananas: Peel the bananas and cut them in half. Insert a popsicle stick into each half.
- Melt the Chocolate: In a microwave-safe bowl, melt the white chocolate chips in 30-second intervals, stirring in between until smooth.
- Dip the Bananas: Dip each banana half into the melted chocolate, ensuring it’s fully coated. Allow excess chocolate to drip off.
- Add Eyes: While the chocolate is still wet, place two chocolate chips on each banana to create eyes.
- Chill: Place the dipped bananas on a baking sheet lined with parchment paper. Refrigerate for about 30 minutes until the chocolate hardens.
- Serve: Once set, arrange the ghostly pops on a platter and enjoy!
Cooking Tips: If you want to make these pops even healthier, consider using dark chocolate instead of white chocolate. You can also add a sprinkle of shredded coconut for a ghostly effect!
Ingredient Substitutions: If you don’t have white chocolate chips, you can use yogurt or a dairy-free chocolate alternative. For a nut-free version, ensure the chocolate you use is nut-free.
Want a coffin platter to go with your ghosts? Click here.
Pumpkin Patch Rice Krispie Treats: A No-Bake Delight
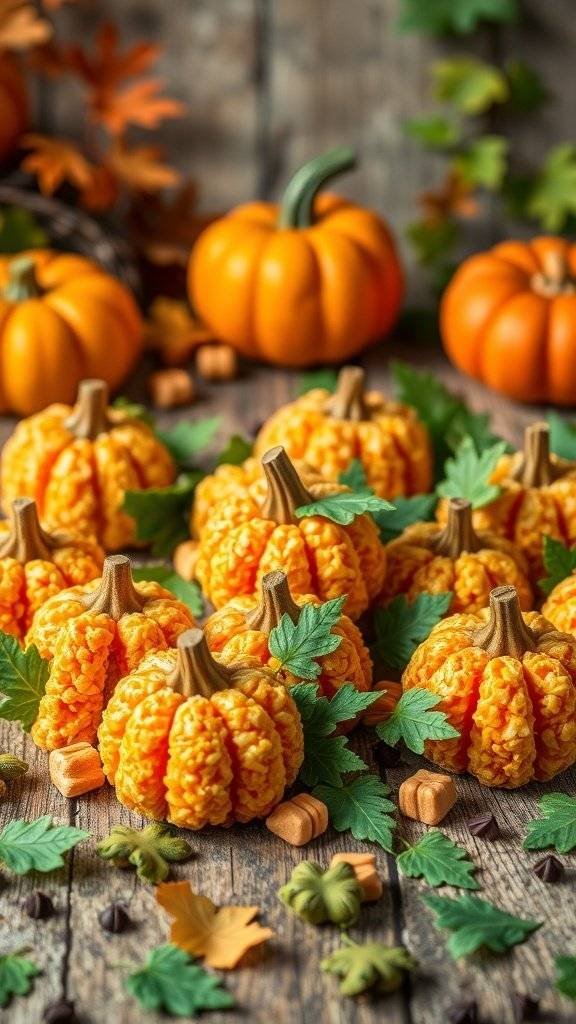
These Pumpkin Patch Rice Krispie Treats are a fun and easy addition to your Kids Halloween Party Treats. They look just like little pumpkins, making them perfect for the season. The bright orange color and cute pumpkin shape will surely delight kids and adults alike!
To make these treats, you only need a few ingredients. They are simple to prepare, and the best part is that they require no baking. Just melt, mix, and shape!
Here’s how to make them:
Ingredients
- 6 cups Rice Krispies cereal
- 1 package (10 oz) marshmallows
- 3 tablespoons butter
- Orange food coloring
- Chocolate candy melts or chocolate chips (for stems)
- Green leaves (candy or fondant)
Instructions
- Melt the Butter: In a large pot, melt the butter over low heat. Add the marshmallows and stir until completely melted and smooth.
- Add Color: Remove from heat and mix in a few drops of orange food coloring until you reach your desired shade.
- Mix in Cereal: Stir in the Rice Krispies cereal until well coated with the marshmallow mixture.
- Shape the Treats: Allow the mixture to cool slightly, then use your hands to shape it into small pumpkin-like balls. Press in a piece of chocolate for the stem and add green leaves for decoration.
- Let Set: Place the treats on wax paper and let them cool completely before serving.
Cooking Tips: If you want to make these treats even more festive, you can add some cinnamon or pumpkin spice to the melted marshmallow mixture. For a healthier version, consider using brown rice cereal.
Ingredient Substitutions: If you don’t have orange food coloring, you can use yellow and red food coloring mixed together. Instead of chocolate for the stems, you can use pretzel sticks for a crunchy twist.
Gummy Worm Dirt Cups: A Sweet, Creepy Favorite
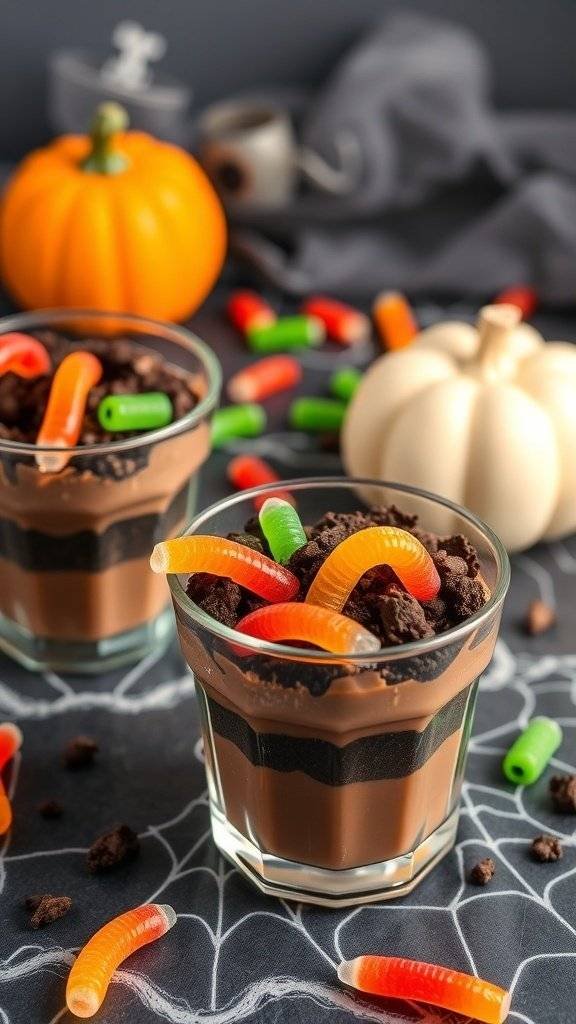
Gummy Worm Dirt Cups are a hit at any Kids Halloween Party. These fun treats combine chocolate pudding, crushed cookies, and gummy worms to create a spooky dessert that kids love. The layers of chocolate and cookie crumbs look like dirt, while the gummy worms add a creepy touch. They are easy to make and perfect for little hands to enjoy.
To make these cups, you’ll need just a few simple ingredients. Start by preparing chocolate pudding and letting it cool. Then, crush some chocolate sandwich cookies to create the ‘dirt’ layer. Layer the pudding and cookie crumbs in clear cups for a fun presentation. Top it off with gummy worms for that extra Halloween flair!
These cups are not only delicious but also allow for creativity. Kids can help assemble their own cups, making it a fun activity. You can even switch up the gummy candies for different themes or flavors. If you want a healthier option, consider using yogurt instead of pudding and granola instead of cookies.
Ingredients
- 2 cups chocolate pudding
- 1 cup crushed chocolate sandwich cookies
- 1 cup gummy worms
- Clear plastic cups
Instructions
- Prepare the pudding according to package instructions and let it cool.
- In a clear plastic cup, add a layer of chocolate pudding at the bottom.
- Add a layer of crushed cookies on top of the pudding.
- Repeat the layers until the cup is full, finishing with a layer of cookie crumbs.
- Top with gummy worms, placing them on the edge of the cup for a fun look.
- Serve immediately or chill until ready to enjoy.
Cooking Tips: You can use vanilla pudding for a different flavor. For a gluten-free option, use gluten-free cookies. Feel free to mix in some whipped cream for a creamier texture!
Frankenstein Marshmallow Treats: A Creative Snack Idea
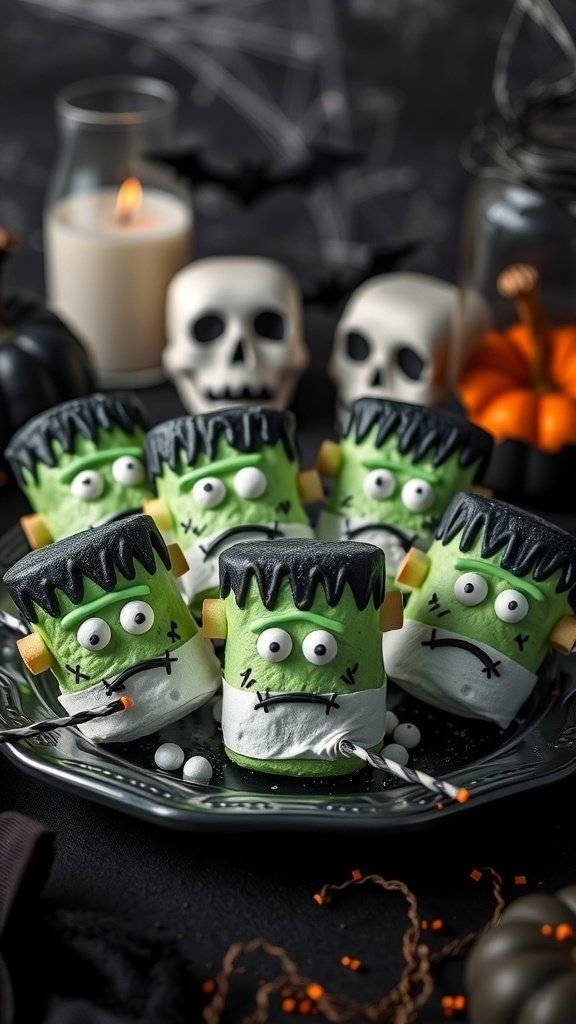
Frankenstein Marshmallow Treats are a fun and spooky addition to your Kids Halloween Party Treats. These adorable snacks are not only easy to make, but they also add a festive touch to your celebration. Picture fluffy marshmallows transformed into little green monsters, complete with chocolate hair and candy features. Kids will love the creativity involved in making these treats, and they’ll be a hit at any Halloween gathering!
To make these delightful snacks, you’ll need some basic ingredients. Start with large marshmallows, green candy melts, black icing, and candy eyes. The process is simple and allows for plenty of fun decorating. Melt the candy melts, dip the marshmallows, and let your imagination run wild with the details!
Ingredients
- 10 large marshmallows
- 1 cup green candy melts
- 1/2 cup black icing
- 20 candy eyes
- 10 orange candy pieces (for bolts)
- 10 small pieces of white fondant (for bandages)
Instructions
- Melt the green candy melts in a microwave-safe bowl, heating in 30-second intervals until smooth.
- Dip each marshmallow into the melted candy, ensuring it’s fully coated. Let the excess drip off.
- Place the dipped marshmallows on a baking sheet lined with parchment paper to set.
- Once set, use the black icing to create hair on top of each marshmallow.
- Attach two candy eyes to each marshmallow using a dab of icing.
- For the bolts, stick an orange candy piece on each side of the marshmallow.
- Wrap a small piece of white fondant around the bottom of each marshmallow to mimic bandages.
- Let everything set for a few minutes before serving.
Cooking Tips: If you can’t find green candy melts, you can use white chocolate and add green food coloring. For a fun twist, try using different colored icing for the hair! These treats can also be made ahead of time and stored in an airtight container.
Candy Corn Fruit Cups: A Healthy Twist On Halloween
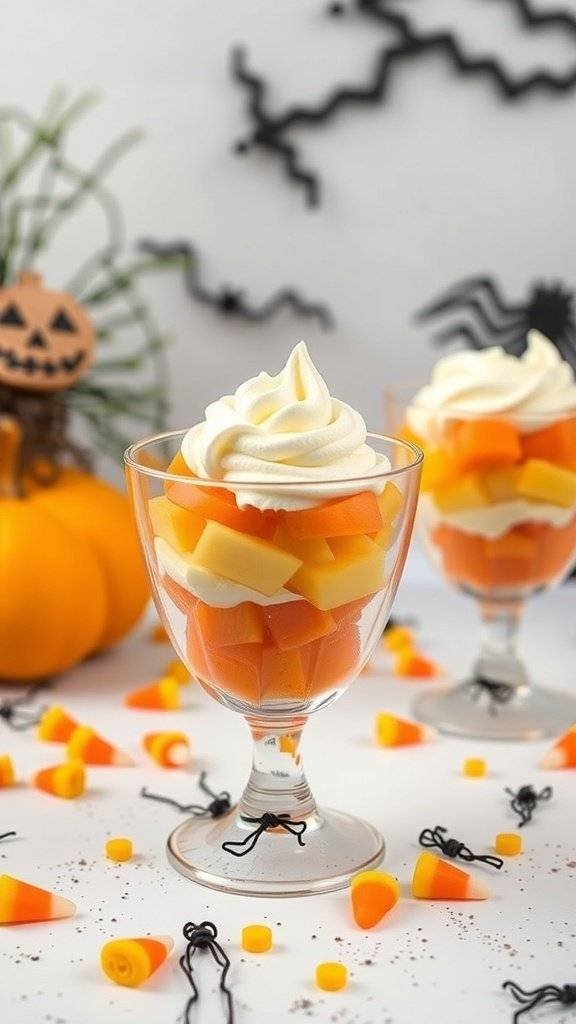
Candy Corn Fruit Cups are a fun and healthy treat for any Kids Halloween Party. These colorful cups mimic the look of candy corn while packing in nutritious fruit. They are simple to make and perfect for little hands to enjoy.
Start with layers of diced pineapple, orange melon, and whipped cream to create that classic candy corn look. You can even add a sprinkle of edible glitter on top for a festive touch. These cups are not only eye-catching but also a great way to get kids excited about eating fruit.
For a twist, consider using yogurt instead of whipped cream. This adds a creamy texture while keeping it light. You can also swap out the fruits based on what you have on hand or what your kids prefer. Strawberries, peaches, or even bananas can work well!
Ingredients
- 1 cup diced pineapple
- 1 cup diced orange melon (like cantaloupe)
- 1 cup whipped cream or yogurt
- Edible glitter (optional)
- Candy corn for decoration (optional)
Instructions
- Layer the diced pineapple at the bottom of a clear cup.
- Add a layer of orange melon on top of the pineapple.
- Top with whipped cream or yogurt.
- If desired, sprinkle edible glitter on top for a festive look.
- Finish with a few pieces of candy corn for decoration.
Cooking Tips: Make sure to cut the fruit into small, bite-sized pieces for easy eating. You can prepare the fruit cups a few hours in advance and store them in the fridge until serving time.
Ingredient Substitutions: If pineapple or orange melon isn’t available, feel free to use any fruit that fits the color scheme. Kiwi or mango can add a fun twist!
Bat Brownies: A Chocolatey Treat With A Spooky Twist
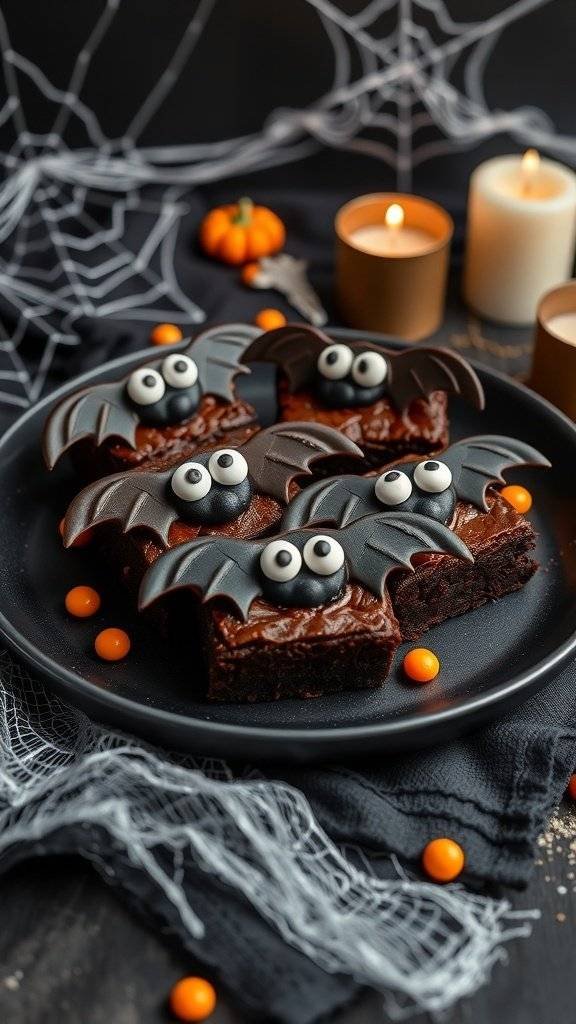
These bat brownies are the perfect addition to your Kids Halloween Party Treats. They are not just delicious; they also bring a fun and spooky vibe to the table. The rich, fudgy brownies are topped with cute bat decorations that kids will love. With their big googly eyes and chocolate wings, these treats are sure to be a hit!
Making these brownies is simple and fun. You can involve the kids in decorating, turning it into a fun activity. Plus, they can be made ahead of time, so you won’t be rushed on the day of the party.
For a little twist, you can substitute the chocolate frosting with cream cheese frosting if you want a tangy flavor. You can also use different candies for the eyes if you prefer something colorful. Don’t hesitate to get creative!
Ingredients
- 1 cup unsalted butter
- 2 cups granulated sugar
- 4 large eggs
- 1 teaspoon vanilla extract
- 1 cup all-purpose flour
- 1 cup unsweetened cocoa powder
- 1/2 teaspoon salt
- 1/2 teaspoon baking powder
- Chocolate bat decorations (store-bought or homemade)
- Googly eyes (candy or edible)
Instructions
- Preheat your oven to 350°F (175°C). Grease a 9×13 inch baking pan.
- In a large bowl, melt the butter. Stir in the sugar until well combined.
- Add the eggs one at a time, mixing well after each addition. Stir in the vanilla extract.
- In another bowl, whisk together the flour, cocoa powder, salt, and baking powder.
- Gradually add the dry ingredients to the wet mixture, stirring until just combined.
- Pour the batter into the prepared pan and spread it evenly.
- Bake for 25-30 minutes, or until a toothpick inserted in the center comes out clean.
- Let the brownies cool completely before decorating.
- Once cooled, spread chocolate frosting on top and place the bat decorations and googly eyes on the brownies.
Cooking Tips: Make sure to let the brownies cool completely before frosting to avoid melting. If you want a richer flavor, consider adding chocolate chips to the batter.
Ingredient Substitutions: You can use coconut oil instead of butter for a dairy-free option. If you don’t have cocoa powder, you can use melted chocolate in the same quantity.
Need some bat shaped serving dishes for these beauties? Check this out.
Cauldron Cakes: Mini Treats For Little Witches And Wizards
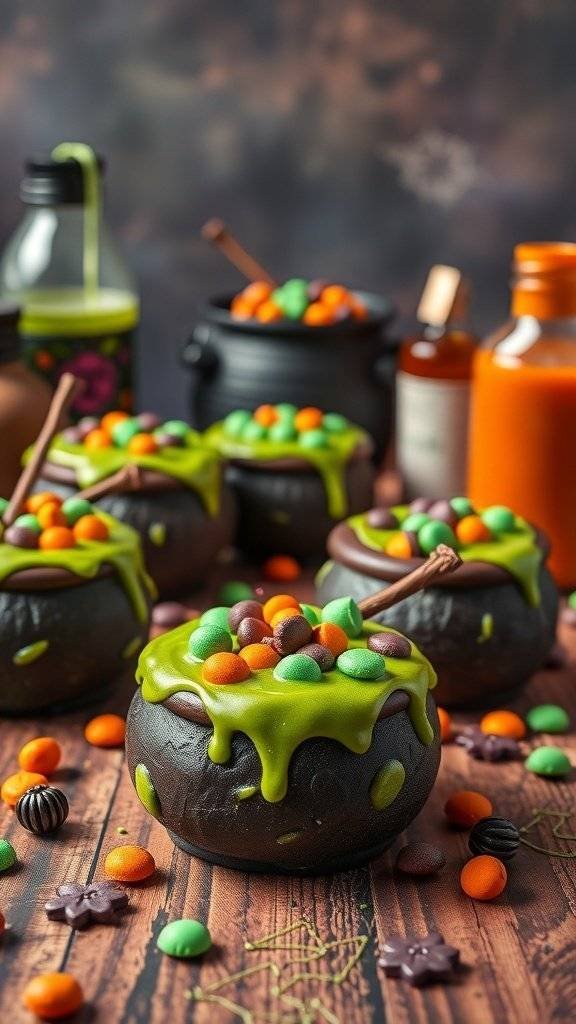
Cauldron cakes are the perfect addition to any kids Halloween party treats. These mini delights look like bubbling cauldrons, making them a fun and festive treat for little witches and wizards. The vibrant colors and playful design will surely catch the eye of every child at the party.
These treats are made from chocolate cake, topped with bright green icing that resembles a witch’s brew. Each cauldron is filled with colorful candies, adding a sweet surprise inside. They are not only tasty but also fun to make, allowing kids to get creative with their decorations.
To make these cauldron cakes, you’ll need simple ingredients that are easy to find. You can even customize the candies based on what your kids love the most. If you want to switch things up, consider using different colors of icing or various types of candies to create unique cauldrons.
Here’s how to whip up these delightful cauldron cakes:
Ingredients
- 1 box chocolate cake mix
- Eggs, oil, and water (as per cake mix instructions)
- Green icing (store-bought or homemade)
- Chocolate candies (M&M’s, chocolate chips, etc.)
- Mini chocolate cauldron cups (or small bowls)
Instructions
- Preheat the oven according to the cake mix instructions. Prepare the chocolate cake batter as directed on the box.
- Pour the batter into mini chocolate cauldron cups, filling them about two-thirds full. Bake according to the package instructions.
- Once baked, let the cakes cool completely. Carefully remove them from the cups if needed.
- Frost the tops of the cooled cakes with green icing, letting it drip down the sides for a bubbling effect.
- Top each cauldron with a variety of colorful candies to resemble a witch’s brew.
- Serve these fun treats at your Halloween party and watch the kids enjoy!
Cooking Tips: If you want a richer flavor, consider adding a teaspoon of vanilla extract to the cake batter. For a healthier twist, you can use a sugar-free cake mix and natural candies.
Ingredient Substitutions: If chocolate isn’t a favorite, feel free to use vanilla cake mix instead. You can also swap out the candies for gummy worms or other Halloween-themed treats for a spooky surprise!
Eyeball Pasta: A Spooky Dinner Idea For Halloween
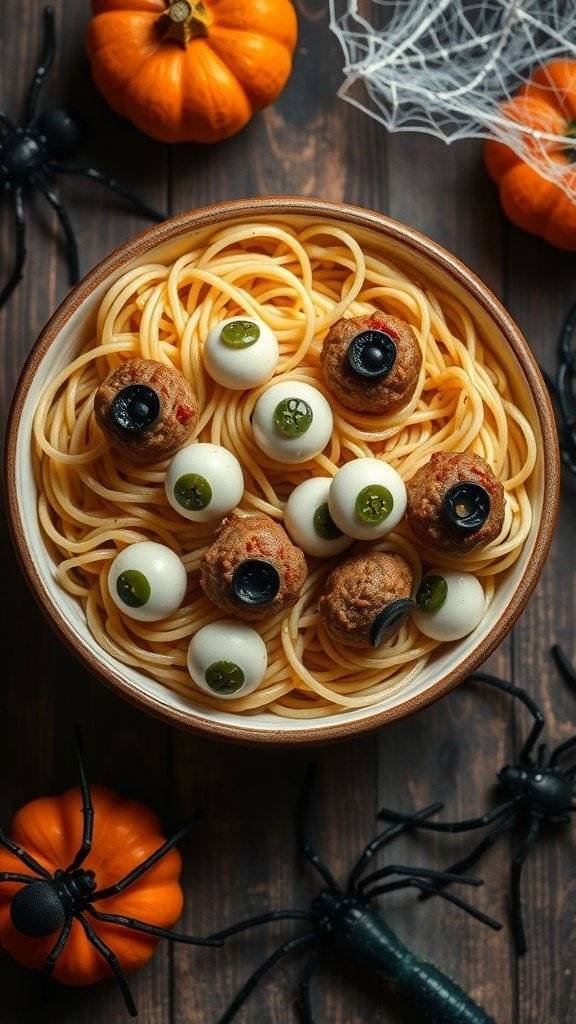
Eyeball Pasta is a fun and spooky dish that will thrill kids at any Halloween party. This creative meal combines spaghetti with meatballs that look like eyeballs, making it a perfect centerpiece for your Halloween feast.
The dish features long strands of pasta, topped with meatballs that are decorated with edible eyes. The combination of flavors is delicious, while the presentation is sure to get a few giggles from the little ones. It’s a great way to make dinner exciting during the Halloween season!
To make this dish even more festive, consider adding some creepy decorations around the table. Fake spiders, pumpkins, and cobwebs can enhance the spooky vibe. Now, let’s get into the recipe!
Ingredients
- 8 oz spaghetti
- 1 lb ground beef or turkey
- 1/2 cup breadcrumbs
- 1/4 cup grated Parmesan cheese
- 1 egg
- 1 teaspoon garlic powder
- 1 teaspoon onion powder
- Salt and pepper to taste
- 1 jar marinara sauce
- Edible candy eyeballs
Instructions
- Cook the Spaghetti: Boil water in a large pot and cook the spaghetti according to package instructions. Drain and set aside.
- Make the Meatballs: In a bowl, combine ground beef, breadcrumbs, Parmesan cheese, egg, garlic powder, onion powder, salt, and pepper. Mix until well combined.
- Form Meatballs: Roll the mixture into small balls, about the size of a golf ball.
- Cook the Meatballs: In a skillet over medium heat, cook the meatballs until browned on all sides and cooked through, about 10-12 minutes.
- Add Sauce: Pour the marinara sauce over the meatballs and let it simmer for a few minutes.
- Assemble the Dish: Place the spaghetti on a serving plate, top with meatballs, and add the edible eyeballs on top of each meatball.
Cooking Tips: You can use ground chicken or plant-based meat for a lighter version. For extra flavor, add Italian herbs to the meatball mixture. If you want to make it gluten-free, substitute spaghetti with zucchini noodles or gluten-free pasta.
Enjoy this spooky dish at your next Halloween gathering!
Monster Fruit Kabobs: A Fun And Healthy Choice
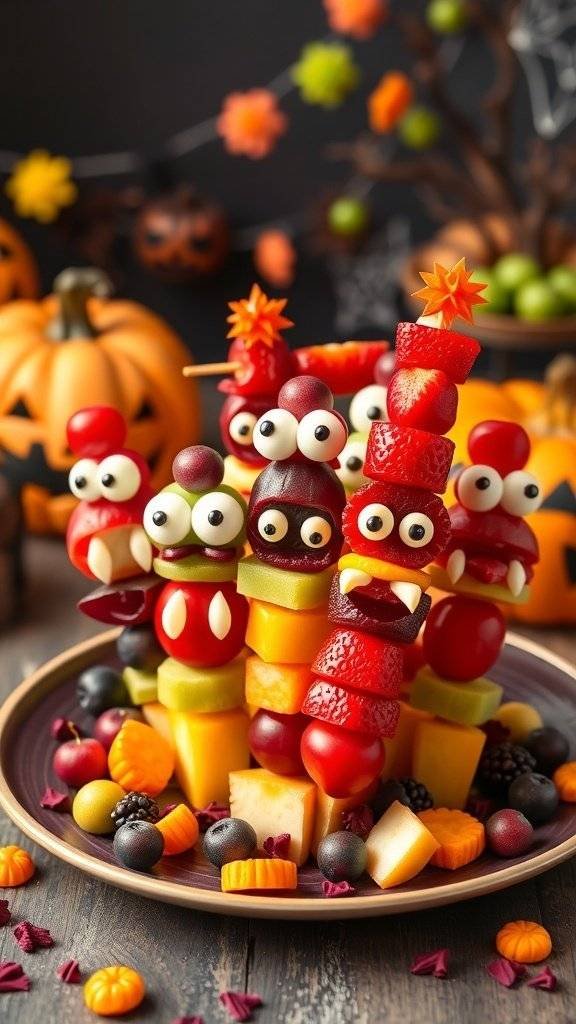
Monster Fruit Kabobs are a fantastic addition to any Kids Halloween Party Treats table. These colorful skewers are not only visually appealing but also packed with healthy fruits. Kids will love the playful monster faces made from various fruits, making it a fun way to encourage them to eat healthy.
Using fruits like strawberries, grapes, and melon, you can create a variety of monster designs. The bright colors and funny faces will surely capture the attention of little ones. Plus, they are easy to make and can be a fun activity for kids to help with.
Here’s how to whip up these delightful kabobs:
Ingredients
- 1 cup strawberries, hulled and halved
- 1 cup green grapes
- 1 cup melon, cubed
- 1 cup blackberries
- 1 cup cheese cubes (optional)
- Mini candy eyes or chocolate chips for decoration
- Wooden skewers
Instructions
- Prepare the Fruits: Wash and cut the fruits into bite-sized pieces. Make sure to have a mix of colors for a vibrant look.
- Assemble the Kabobs: Take a wooden skewer and start threading the fruits onto it. You can alternate between fruits and cheese cubes for added fun.
- Create Monster Faces: Use mini candy eyes or chocolate chips to create faces on the fruits. Get creative with different fruit combinations to make unique monsters.
- Serve: Arrange the kabobs on a platter and enjoy! They can be made a few hours in advance and stored in the fridge until the party.
Cooking Tips: If you want to add a twist, consider using other fruits like pineapple or kiwi. You can also use marshmallows for a sweeter touch. For a healthier option, skip the cheese and focus on fruits.
These Monster Fruit Kabobs are sure to be a hit at your Halloween gathering, combining fun and nutrition in one tasty treat!
Zombie Cheese Sticks: A Spooky Snack For Kids
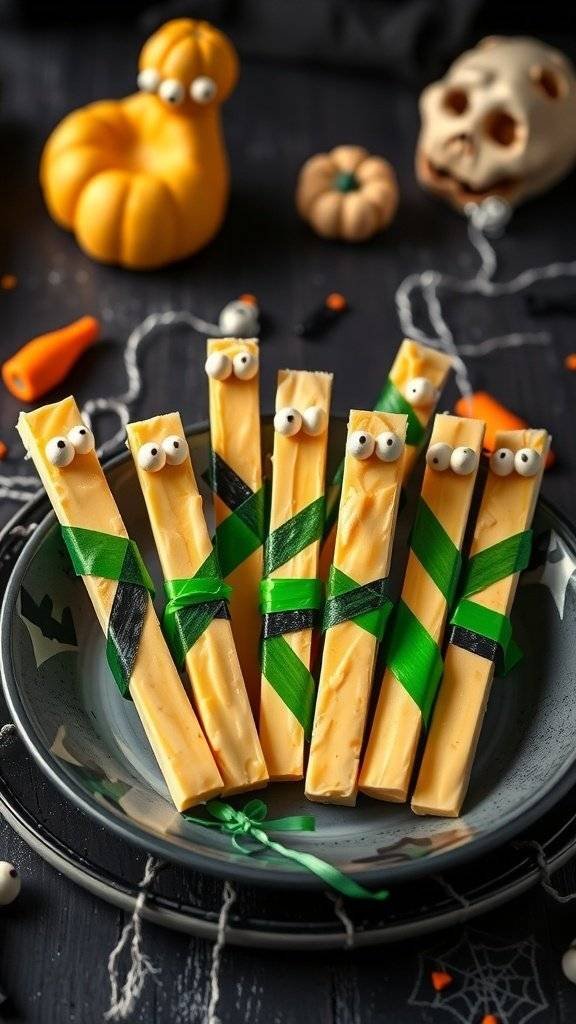
These Zombie Cheese Sticks are a fun and spooky treat for any Kids Halloween Party! They look like little mummies, making them perfect for the occasion. With just a few simple ingredients, you can create a snack that kids will love. The cheese sticks are wrapped in green and black ribbons, giving them a creepy yet cute appearance.
To make these treats, you’ll need cheese sticks, edible googly eyes, and some colorful ribbon. The kids can even help with the assembly, making it a great activity for the party!
Ingredients
- 8 cheese sticks
- 1 roll of green ribbon
- 1 roll of black ribbon
- 16 edible googly eyes
Instructions
- Wrap each cheese stick with the green ribbon, leaving some space at the top for the eyes.
- Next, wrap a piece of black ribbon around the green ribbon for added detail.
- Attach two googly eyes at the top of each cheese stick using a small dab of cream cheese or edible glue.
- Arrange the cheese sticks on a plate and serve them at your Halloween party!
Cooking Tips: If you can’t find googly eyes, you can use small pieces of olives or even chocolate chips instead. For a twist, try using different flavored cheese sticks like pepper jack or mozzarella.
Enjoy these spooky snacks and watch the kids have a blast at your Halloween celebration!
Looking for an interesting bowl to display your Halloween treats? Click here.
Pumpkin Spice Popcorn: A Seasonal Treat For Halloween
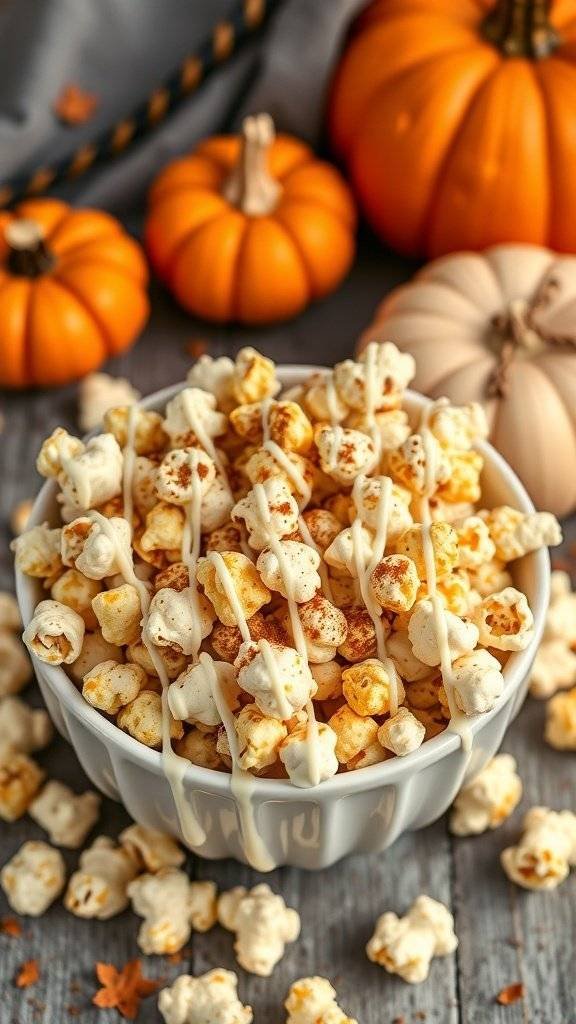
When it comes to Kids Halloween Party Treats, pumpkin spice popcorn is a fun and festive option. This treat combines the crunch of popcorn with the warm flavors of pumpkin spice, making it perfect for the season. The image shows a bowl filled with popcorn drizzled with white chocolate and sprinkled with pumpkin spice, surrounded by cute little pumpkins. It’s a delightful sight that captures the spirit of Halloween.
Making this treat is easy and enjoyable. You can involve the kids in the process, letting them help with mixing and drizzling. It’s a great way to create lasting memories while preparing for the party.
For those who want to switch things up, consider using dark chocolate instead of white for a richer flavor. You can also add nuts or candy corn for extra texture and sweetness. This popcorn is not just a treat; it’s a fun activity that everyone can enjoy together!
Ingredients
- 8 cups popped popcorn
- 1/2 cup white chocolate chips
- 1 teaspoon pumpkin pie spice
- 1/4 cup powdered sugar
- 1 tablespoon butter
- 1/4 teaspoon salt
Instructions
- Pop the Popcorn: Start by popping your popcorn using an air popper or on the stove. Place it in a large bowl.
- Melt the Chocolate: In a microwave-safe bowl, melt the white chocolate chips and butter together in 30-second intervals, stirring until smooth.
- Mix the Ingredients: Drizzle the melted chocolate over the popcorn. Sprinkle the pumpkin pie spice and salt, then toss everything together until well coated.
- Add Powdered Sugar: Dust the popcorn with powdered sugar for a sweet finish and mix again to combine.
- Cool and Serve: Let the popcorn cool on a baking sheet lined with parchment paper. Once set, break it apart and serve in bowls or bags for the kids!
Cooking Tip: If you want to make this treat healthier, you can use dark chocolate and reduce the amount of sugar. You can also substitute coconut oil for butter for a dairy-free option.
Enjoy this delicious pumpkin spice popcorn at your Halloween party!
Chocolate Dipped Pretzel Brooms: A Fun Crafty Treat
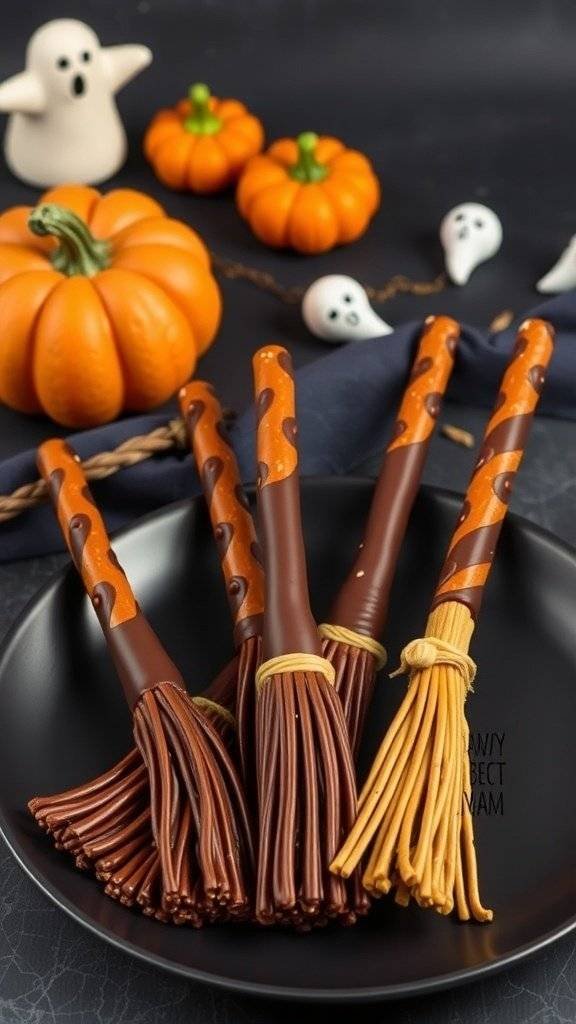
Chocolate dipped pretzel brooms are a delightful treat for any Kids Halloween Party. These fun snacks look like little brooms and are easy to make. Kids will love helping out in the kitchen, making this a perfect activity for the holiday.
To create these brooms, you will need pretzel rods, chocolate melts, and some candy to decorate. The combination of sweet chocolate and salty pretzels is simply irresistible. Plus, they make for a great decoration on your party table!
Start by melting your chocolate in a microwave-safe bowl. Dip one end of the pretzel rod into the melted chocolate, then sprinkle it with candy or colored sugar to resemble broom bristles. Let them cool on parchment paper until the chocolate hardens.
These treats are not just tasty; they also add a fun, festive touch to your Halloween celebration. You can even get creative with colors and toppings to match your party theme!
Ingredients
- 1 cup pretzel rods
- 1 cup chocolate melts (dark, milk, or white)
- Colored sugar or sprinkles for decoration
- Twine or string for tying
Instructions
- Melt the Chocolate: In a microwave-safe bowl, melt the chocolate melts according to package instructions. Stir until smooth.
- Dip the Pretzels: Dip one end of each pretzel rod into the melted chocolate, covering about an inch.
- Add Decorations: While the chocolate is still wet, sprinkle with colored sugar or sprinkles to create the broom bristles.
- Cool: Place the dipped pretzels on parchment paper to cool and harden.
- Finish: Once the chocolate has set, tie a piece of twine around the pretzel to resemble a broom handle.
Cooking Tips: If you want to add a twist, try using different types of chocolate or even drizzle contrasting colors over the top for a fun design. For a nut-free option, ensure the chocolate melts are free from allergens.
Enjoy these Chocolate Dipped Pretzel Brooms at your Kids Halloween Party Treats table!
Witch Hat Cookies: A Sweet Treat For Trick-Or-Treaters
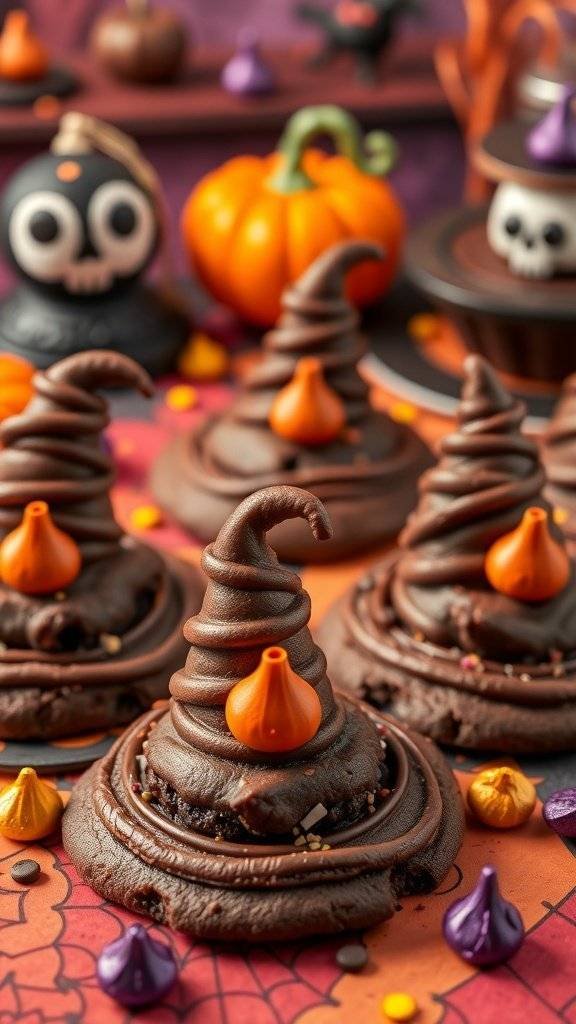
Witch Hat Cookies are a fun and creative treat for any Kids Halloween Party. These cookies are not just delicious; they also look adorable and fit perfectly into the spooky theme. The chocolate cookies are shaped like witch hats, topped with a swirl of chocolate frosting and a candy corn for the finishing touch. They are sure to delight kids and adults alike!
Making these cookies is simple and a great activity to do with the kids. You can even let them help with decorating. Plus, they make a fantastic centerpiece for your Halloween dessert table. The vibrant colors and playful design will catch everyone’s eye!
Here’s how to whip up these delightful Witch Hat Cookies:
Ingredients
- 1 cup unsalted butter, softened
- 1 cup granulated sugar
- 1 cup brown sugar, packed
- 2 large eggs
- 2 teaspoons vanilla extract
- 2 1/2 cups all-purpose flour
- 1 cup cocoa powder
- 1 teaspoon baking soda
- 1/2 teaspoon salt
- 1 cup chocolate frosting
- Candy corn for decoration
Instructions
- Preheat your oven to 350°F (175°C). Line a baking sheet with parchment paper.
- In a large bowl, cream together the softened butter, granulated sugar, and brown sugar until light and fluffy.
- Add the eggs and vanilla extract, mixing well.
- In another bowl, whisk together the flour, cocoa powder, baking soda, and salt.
- Gradually add the dry ingredients to the wet ingredients, mixing until combined.
- Drop spoonfuls of dough onto the prepared baking sheet, shaping them into cones to resemble witch hats.
- Bake for 10-12 minutes. Let them cool completely on a wire rack.
- Once cooled, pipe chocolate frosting on top of each cookie to create the hat shape.
- Top each frosting swirl with a piece of candy corn to finish the witch hat look.
Cooking Tips: If you want a lighter cookie, you can substitute half of the butter with applesauce. For a gluten-free version, use a gluten-free flour blend. Enjoy making these fun treats!
Skeleton Veggie Platter: A Healthy Halloween Option
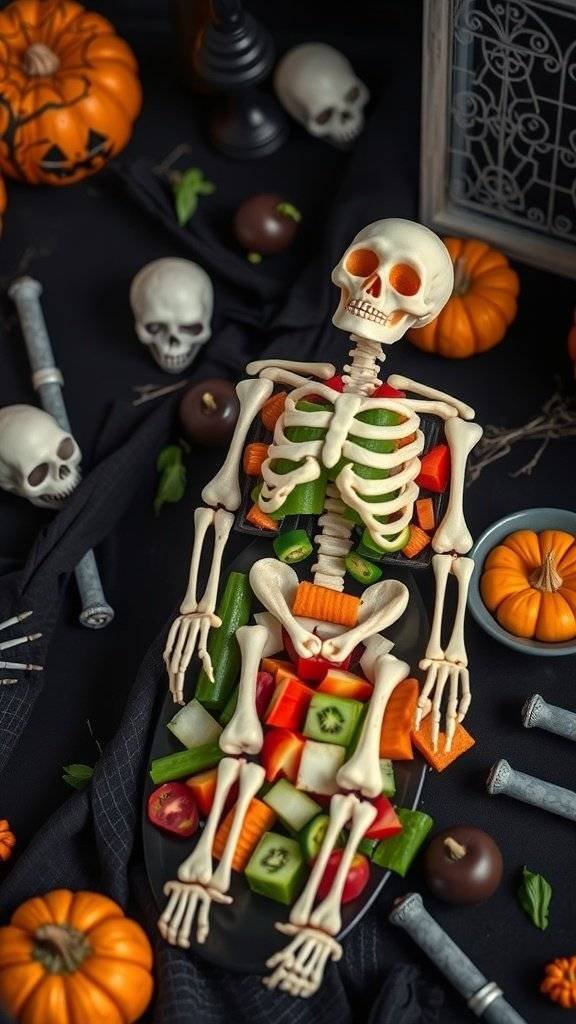
Halloween is a time for fun treats, but it’s also a great chance to sneak in some healthy options. The Skeleton Veggie Platter is a creative and playful way to serve vegetables at your kids’ Halloween party. This platter features a skeleton shape made from colorful veggies, making it both spooky and appealing for little ones.
Using fresh vegetables like bell peppers, cucumbers, and carrots, you can create a vibrant display. The skeleton shape adds a festive touch that kids will love. Pair it with a tasty dip, like hummus or ranch, to make it even more enticing.
For those looking to mix things up, consider using different vegetables or adding some fun shapes with cookie cutters. This platter not only looks great but also encourages kids to munch on healthy snacks instead of sugary treats.
Ingredients
- 1 cup baby carrots
- 1 cucumber, sliced
- 1 red bell pepper, cut into strips
- 1 yellow bell pepper, cut into strips
- 1 cup cherry tomatoes
- 1 cup celery sticks
- 1 cup ranch dressing or hummus for dipping
Instructions
- Prepare the Vegetables: Wash and cut all the vegetables into appropriate sizes. Use a variety of colors for a more appealing look.
- Arrange the Skeleton: On a large platter, arrange the veggies to form a skeleton shape. Use the baby carrots for the ribs and the cucumber slices for the skull.
- Add the Dipping Sauce: Place a small bowl of ranch dressing or hummus in the center of the platter for dipping.
- Serve and Enjoy: Place the platter on the table and watch as kids enjoy this fun and healthy Halloween treat!
Cooking Tips: If you want to make the platter even more festive, add some olives for eyes or use different dips for variety. You can substitute any of the vegetables based on what your kids like best. For a twist, consider adding some sliced radishes or even fruit for a sweet touch!
Mummy Pizza: A Fun And Delicious Dinner Idea
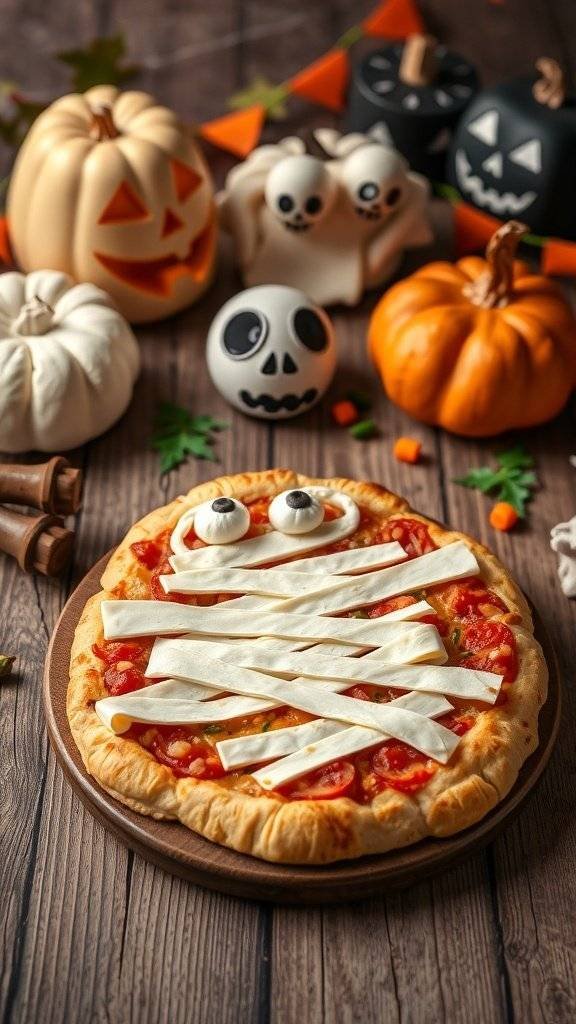
Mummy pizza is a fantastic way to bring some Halloween spirit to the dinner table. This dish is not only fun to make, but it also looks adorable and tastes great. Kids will love the spooky design, and it’s a perfect addition to your Kids Halloween Party Treats.
To create this mummy masterpiece, you’ll need a few simple ingredients. Start with a pizza base, which can be homemade or store-bought. Then, add your favorite pizza sauce and toppings. The real fun comes from using cheese strips to create the mummy’s wrappings. Add some olives or small pieces of cheese for the eyes, and you have a dish that’s both creepy and cute!
Cooking tips: If you want to make it healthier, consider using whole wheat dough or adding more veggies as toppings. You can also swap out the cheese for a dairy-free alternative if needed. Get creative with the toppings to suit your kids’ preferences!
Here’s how to make your own mummy pizza:
Creepy Crawly Cupcakes: A Delightfully Scary Treat
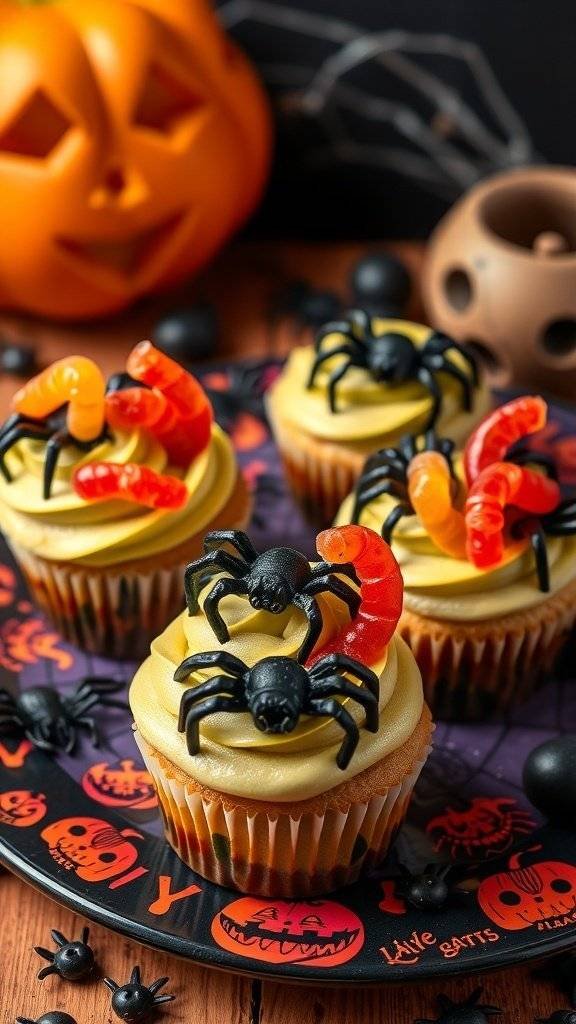
These Creepy Crawly Cupcakes are perfect for a Kids Halloween Party Treats. They look both fun and spooky, making them a hit among kids and adults alike. Topped with gummy worms and plastic spiders, these cupcakes are sure to bring a smile (and maybe a little scare) to your Halloween festivities.
The cupcakes are made with a simple vanilla base, topped with a creamy frosting that can be colored to match the Halloween theme. You can use yellow or green frosting to give them that eerie vibe. The addition of gummy candies adds a playful touch that kids will love.
For a fun twist, consider using chocolate cupcakes instead of vanilla. This will give a richer flavor and a darker appearance, enhancing the spooky look. You can also swap out the gummy worms for other candies like gummy bats or eyeballs for variety.
Ingredients
- 1 1/2 cups all-purpose flour
- 1 cup granulated sugar
- 1/2 cup unsalted butter, softened
- 2 large eggs
- 1/2 cup milk
- 1 1/2 teaspoons baking powder
- 1 teaspoon vanilla extract
- 1/4 teaspoon salt
- Yellow or green food coloring (optional)
- Gummy worms and plastic spiders for decoration
Instructions
- Preheat your oven to 350°F (175°C) and line a cupcake pan with liners.
- In a bowl, cream together the softened butter and sugar until light and fluffy. Add in the eggs one at a time, mixing well after each addition.
- In another bowl, combine the flour, baking powder, and salt. Gradually add this dry mixture to the wet mixture, alternating with milk. Stir in the vanilla extract.
- If using, add a few drops of food coloring to achieve your desired color.
- Fill each cupcake liner about 2/3 full with batter. Bake for 18-20 minutes or until a toothpick inserted in the center comes out clean.
- Let the cupcakes cool completely before frosting.
- Frost with your choice of yellow or green frosting and top with gummy worms and plastic spiders.
Cooking Tips: If you want to make these cupcakes even more fun, consider adding a surprise filling like chocolate or raspberry jam in the center. For a healthier option, you can substitute half of the all-purpose flour with whole wheat flour.
Enjoy these spooky treats at your Halloween gathering!
You may also like:
– 23 Easy Dinner Recipes Inspired by Qarth – GOT
– 19 Breakfast Recipes Inspired by the Gatsby Roaring 1920s
– 21 Children’s Birthday Cakes Inspired by Gotham City
If you enjoyed this blog you can visit us or check out our other blogs and learn a bit about us.
Disclaimer: This blog post is inspired by fictional universes and characters created by their respective rights holders. All related content and imagery remain the property of their respective rights holder. This fan-inspired content is for entertainment and commentary purposes only and is not affiliated with or endorsed by HBO, Disney, Warner Bros., Lionsgate, or any other rights holders. To explore the official source material, please visit:
HBO