
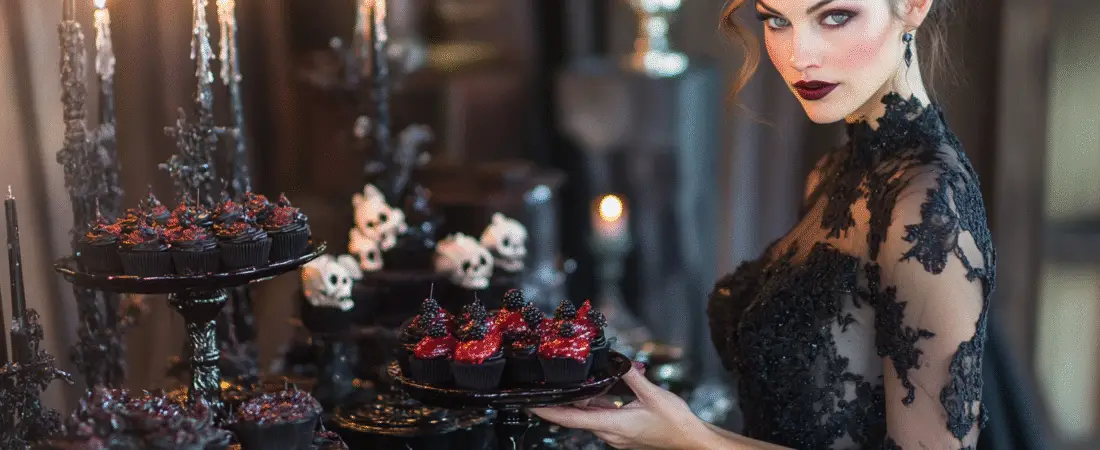
Get ready to embrace your dark side with “Sinisterly Sweet: 30 Chaotic Desserts with a Dark Twist.” This collection of tempting treats combines the unexpected with a hint of mischief, pushing the boundaries of traditional desserts. From spooky flavor combinations to visually striking designs, every recipe invites a delicious thrill that will intrigue and delight both the daring baker and those with a taste for the unusual.
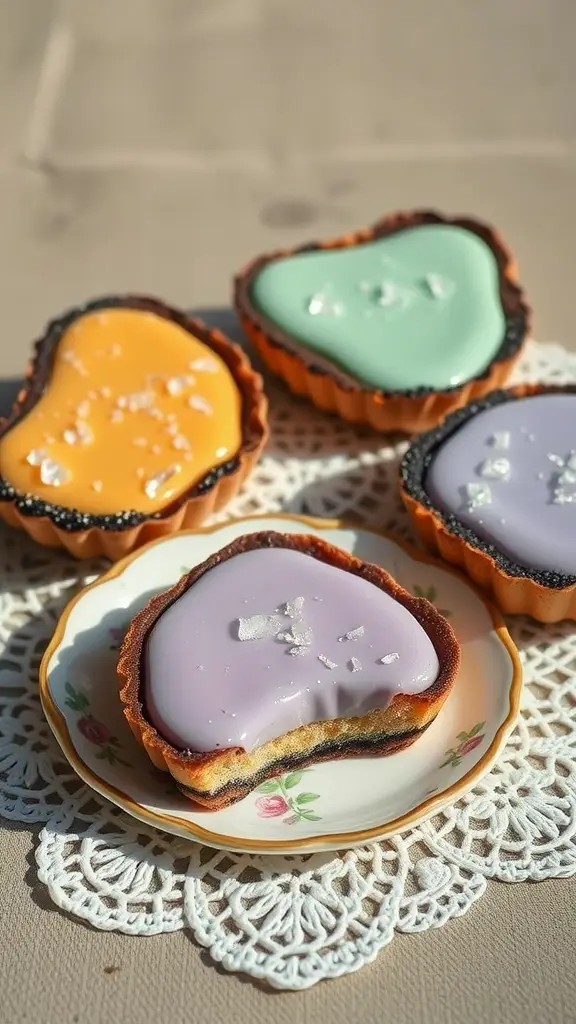
Licorice Lava Tarts
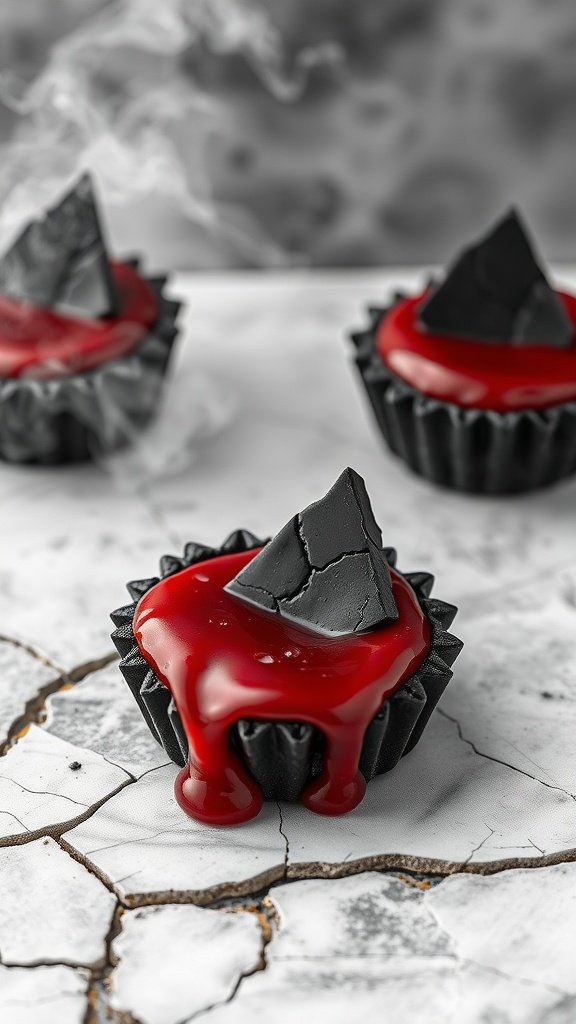
Licorice Lava Tarts are a striking dessert that combines the unique flavor of licorice with a molten center that flows when you take a bite. These tarts are both intriguing and delicious, offering a complex taste that balances sweetness with a hint of anise. While they might look sophisticated, they are surprisingly simple to make, making them a fun option for any dessert lover.
The combination of the rich, dark tart shell paired with the gooey center creates a delightful contrast. Topped off with a vibrant sauce that adds a splash of color, these tarts are perfect for any occasion where you want to impress your guests while satisfying your sweet tooth.
Ingredients
- 1 cup all-purpose flour
- 1/4 cup cocoa powder
- 1/2 cup unsalted butter, softened
- 1/4 cup powdered sugar
- 1 large egg yolk
- 1/4 teaspoon salt
- 1/4 cup heavy cream
- 1/2 cup dark chocolate chips
- 1 tablespoon licorice extract
- 1/2 cup red fruit sauce (raspberry or cherry)
- Chocolate shards for decoration
Instructions
- Make the Tart Shell: In a bowl, combine flour, cocoa powder, and salt. In a separate bowl, cream together butter and powdered sugar until light and fluffy. Add the egg yolk and mix well. Gradually add the flour mixture until a dough forms. Press the dough into tartlet pans and chill for 30 minutes.
- Preheat the Oven: Preheat your oven to 350°F (175°C). Bake the chilled tart shells for about 10-12 minutes, or until set. Let them cool completely.
- Prepare the Filling: In a saucepan, heat the heavy cream until just simmering. Remove from heat and add dark chocolate chips and licorice extract, stirring until smooth.
- Fill the Tarts: Pour the chocolate mixture into the cooled tart shells and refrigerate for at least 30 minutes until set but still gooey in the center.
- Serve: Drizzle with red fruit sauce and top with chocolate shards before serving. Enjoy your Licorice Lava Tarts!
Bleeding Velvet Brûlée
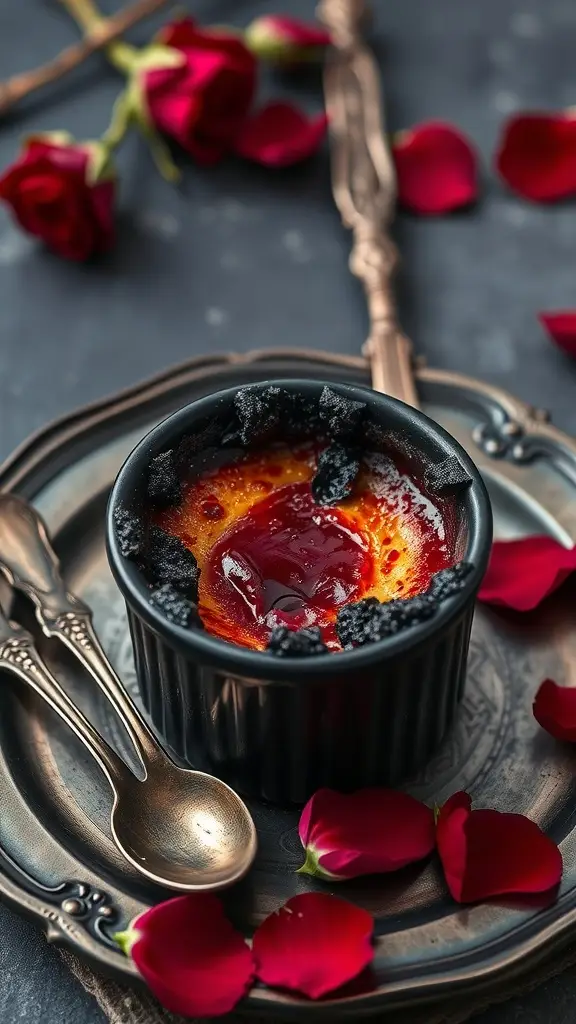
Bleeding Velvet Brûlée takes traditional crème brûlée to a whole new level with its deep red hue and rich flavors. This dessert balances smooth, creamy custard with a caramelized sugar crust, making each bite a delightful experience. The unique twist of adding a berry coulis gives it a dramatic bleeding effect that’s sure to impress anyone who sees it.
With a straightforward recipe, this dessert is surprisingly easy to whip up. Perfect for gatherings or a special treat, it’s a delicious way to indulge your sweet tooth while showcasing your culinary skills. Let’s get to the recipe!
Ingredients
- 2 cups heavy cream
- 1 cup whole milk
- 1 cup granulated sugar
- 5 large egg yolks
- 1 teaspoon vanilla extract
- 1/2 cup raspberry or strawberry coulis
- 1/4 cup granulated sugar (for topping)
Instructions
- Preheat your oven to 325°F (160°C).
- In a saucepan, heat the heavy cream and milk over medium heat until just boiling. Remove from heat.
- In a bowl, whisk together the egg yolks and sugar until pale. Gradually pour the hot cream mixture into the egg mixture, stirring constantly. Add vanilla extract.
- Place ramekins in a baking dish and pour the custard mixture into them. Fill the baking dish with hot water until it reaches halfway up the sides of the ramekins.
- Bake for about 30-35 minutes, or until set but slightly wobbly in the center. Let cool, then refrigerate for at least 2 hours.
- Before serving, drizzle the coulis over the custard and sprinkle with granulated sugar. Use a kitchen torch to caramelize the sugar until golden brown.
Twisted Candy Cane Mille-Feuille
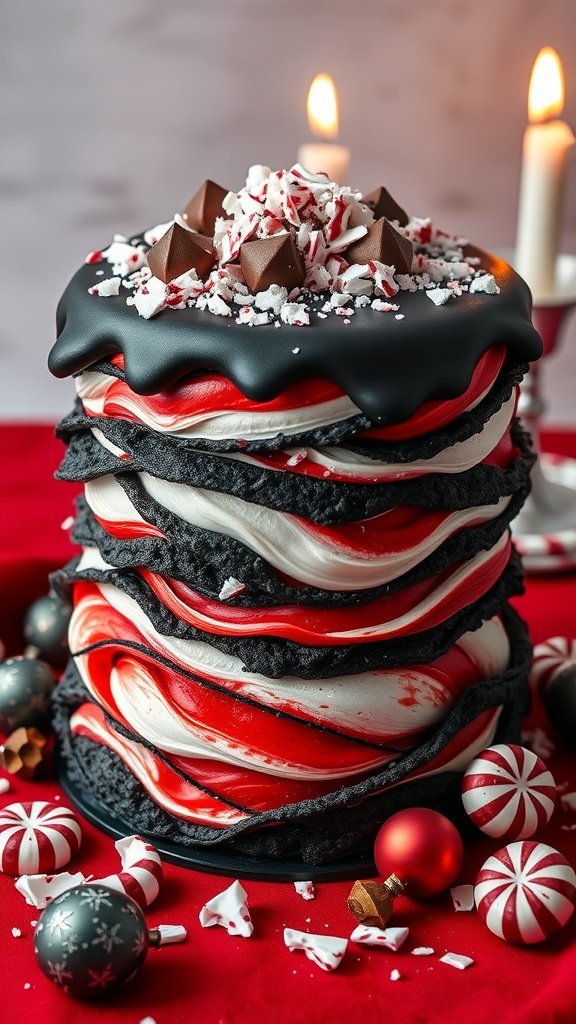
Get ready for a fun and festive twist on a classic dessert with this Twisted Candy Cane Mille-Feuille! Combining layers of light, flaky pastry with rich peppermint cream, this treat is as delightful to eat as it is to look at. The sweet and minty flavors create a unique taste that captures the spirit of the holidays without being overly complicated to make.
This recipe is a playful take on the traditional French mille-feuille, bringing in the refreshing essence of candy canes. It’s perfect for holiday gatherings, and your guests will be impressed by both its appearance and flavor!
Ingredients
- 1 package of puff pastry sheets
- 1 cup heavy cream
- 1/2 cup powdered sugar
- 1 teaspoon peppermint extract
- 1/4 cup crushed candy canes
- Red gel food coloring
- Dark chocolate for drizzling
- Additional crushed candy canes for garnish
Instructions
- Preheat the oven to 400°F (200°C) and roll out the puff pastry sheets on a floured surface. Cut into rectangles and place on a baking sheet lined with parchment paper.
- Poke holes in the pastry with a fork to prevent puffing too much. Bake for 15-20 minutes, or until golden brown. Let them cool completely.
- In a large bowl, whip the heavy cream until soft peaks form. Gradually add powdered sugar and peppermint extract, mixing until well combined.
- Divide the whipped cream into two bowls. In one bowl, add red gel food coloring and gently fold to create a swirled effect.
- Layer the cooled pastry rectangles with alternating spoonfuls of white and red cream. Repeat until all layers are stacked.
- Drizzle melted dark chocolate over the top and sprinkle with additional crushed candy canes. Chill for at least 30 minutes before serving.
Rotten Apple Galette
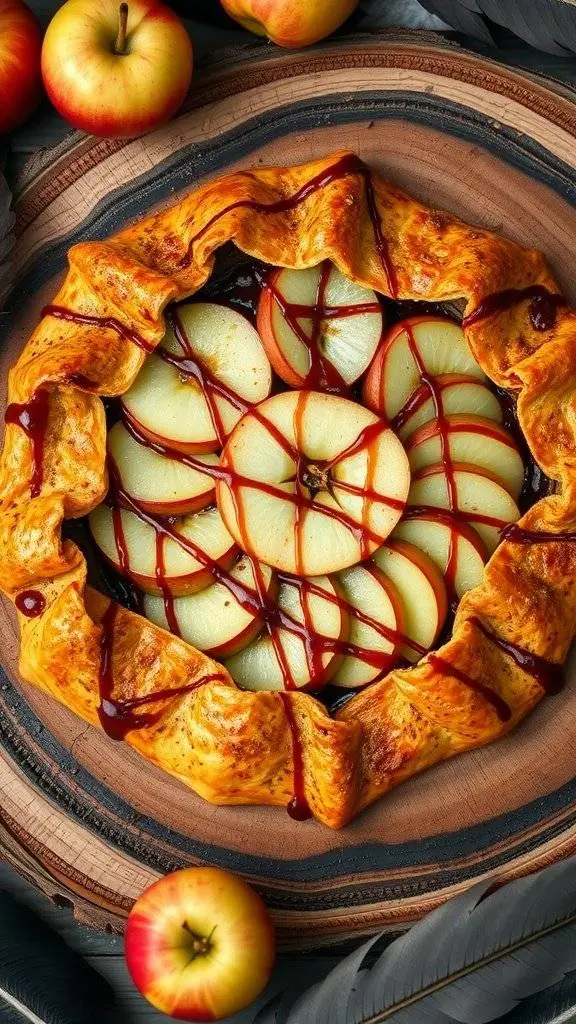
The Rotten Apple Galette is a playful twist on the classic dessert that combines the sweet and tart flavors of fresh apples with a hint of mischief. This rustic tart is simple to make, making it perfect for both seasoned bakers and those just starting out. With its flaky crust and beautifully arranged apple slices, this galette is both visually appealing and deliciously satisfying.
The contrast of sweet apples with a dash of caramel sauce and a sprinkle of cinnamon offers a delightful taste experience that’s both comforting and intriguing. It’s great for gatherings, cozy nights in, or a fun Halloween treat!
Ingredients
- 1 ½ cups all-purpose flour
- ½ teaspoon salt
- 1 tablespoon sugar
- ½ cup unsalted butter, chilled and diced
- 4-5 tablespoons ice water
- 3-4 medium-sized apples, peeled, cored, and sliced
- 1 tablespoon lemon juice
- ¼ cup brown sugar
- 1 teaspoon ground cinnamon
- 1 tablespoon caramel sauce (for drizzling)
Instructions
- Make the Dough: In a bowl, mix the flour, salt, and sugar. Add the diced butter and mix until the mixture resembles coarse crumbs. Stir in the ice water, a tablespoon at a time, until the mixture forms a dough. Wrap in plastic wrap and chill for at least 30 minutes.
- Prepare the Apples: In another bowl, toss the sliced apples with lemon juice, brown sugar, and cinnamon. Let them sit for about 10 minutes.
- Roll Out the Dough: Preheat the oven to 375°F (190°C). On a floured surface, roll out the dough into a circle about 12 inches in diameter. Transfer it to a baking sheet lined with parchment paper.
- Assemble the Galette: Arrange the apple slices in the center of the dough, leaving about a 2-inch border. Fold the edges of the dough over the apples, pleating as necessary. Drizzle caramel sauce on the apples.
- Bake: Bake for 30-35 minutes or until the apples are tender and the crust is golden brown. Let cool slightly before slicing and serving.
Cupcakes Of Chaos
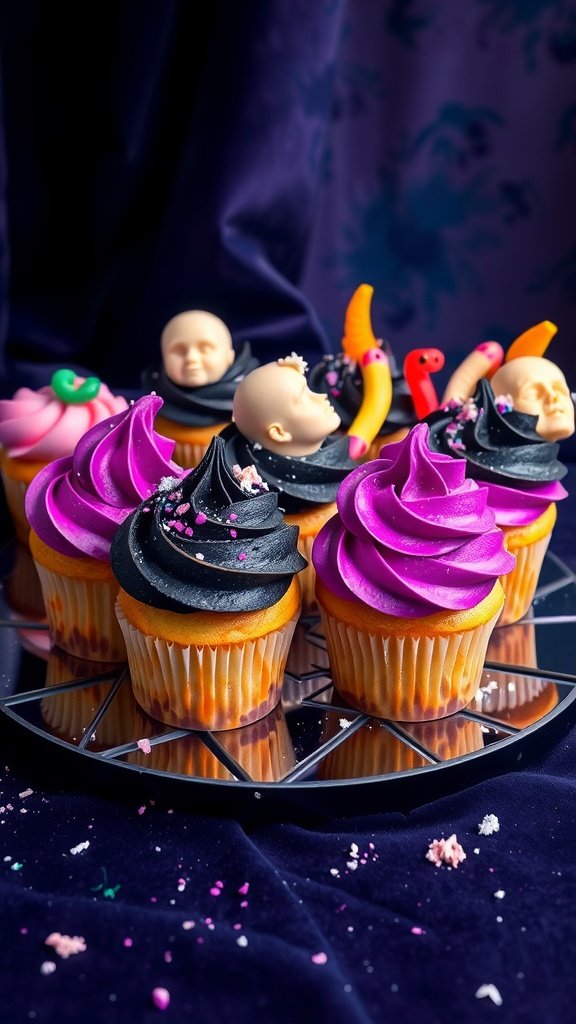
These Cupcakes of Chaos bring a fun twist to classic cupcakes, combining vibrant flavors with a hint of mischief. With their eye-catching colors and whimsical decorations, they offer a delightful treat that’s perfect for any spooky gathering or just a sweet indulgence at home.
Making these cupcakes is simple, ensuring that bakers of all skill levels can enjoy the process. The combination of moist vanilla cake and rich buttercream frosting makes each bite a little adventure in flavor and presentation.
Ingredients
- 1 ½ cups all-purpose flour
- 1 cup granulated sugar
- ½ cup unsalted butter, softened
- 2 large eggs
- 1 ½ teaspoons baking powder
- ½ cup milk
- 1 teaspoon vanilla extract
- Food coloring (black and purple)
- 2 cups butter, softened (for frosting)
- 4 cups powdered sugar
- 1 tablespoon milk (for frosting)
- Decorative toppings (candy eyes, gummy worms, edible glitter)
Instructions
- Preheat your oven to 350°F (175°C). Line a muffin tin with cupcake liners.
- In a large bowl, cream the softened butter and sugar together until light and fluffy. Add in the eggs, one at a time, mixing until fully incorporated.
- In another bowl, mix the flour and baking powder together. Gradually add this to the butter mixture, alternating with milk, and mix until smooth. Stir in the vanilla extract.
- Divide the batter into two bowls. Add black food coloring to one bowl and purple to the other, mixing until you reach the desired colors.
- Using a spoon, drop alternating spoonfuls of each colored batter into the cupcake liners, creating a marbled effect.
- Bake for 18-20 minutes or until a toothpick inserted in the center comes out clean. Let them cool completely.
- For the frosting, beat the softened butter until creamy. Gradually add powdered sugar, then mix in milk and food coloring to achieve the desired shade.
- Frost the cooled cupcakes with black and purple frosting, creating swirls. Top them with your choice of decorations like candy eyes, gummy worms, or edible glitter to add to the chaotic charm.
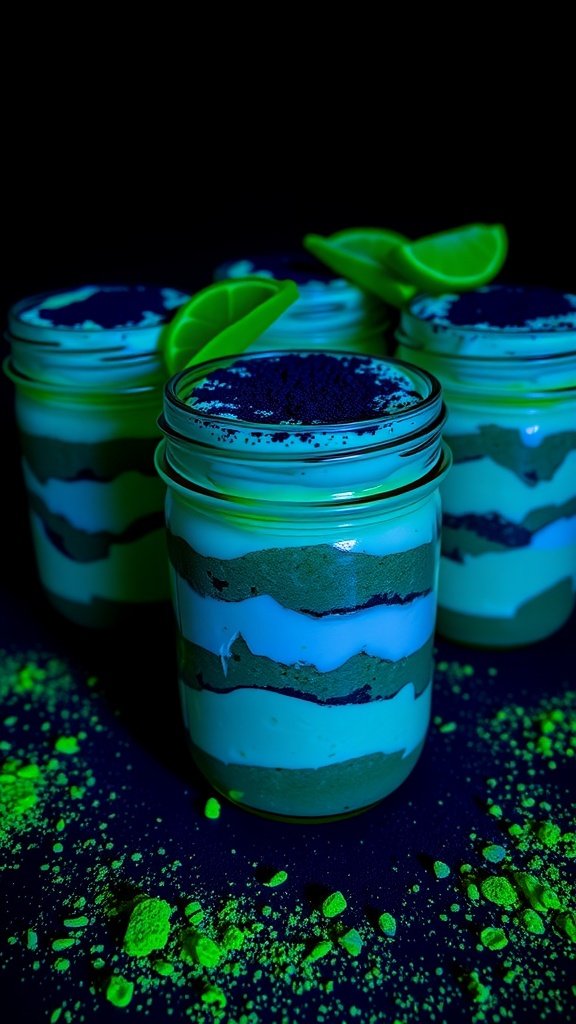
Ectoplasm Mousse Bombs

These Ectoplasm Mousse Bombs are a fun and spooky dessert that bring a twist of excitement to your sweet table. With a creamy mousse center and a shiny green shell, they deliver a playful mix of flavors that’s both sweet and a little eerie. They’re perfect for Halloween gatherings or themed parties, and surprisingly, they’re not too difficult to whip up!
Once you break through the glossy exterior, you’ll discover a vibrant blue mousse that oozes out, adding to the fun. The combination of textures, from the smooth mousse to the crunchy chocolate base, makes each bite a delight. Grab your ingredients and get ready to impress your friends with these chaotic, yet delightful treats!
Ingredients
- 1 cup heavy cream
- 1/2 cup powdered sugar
- 1/2 cup cream cheese, softened
- 1 tablespoon gelatin powder
- 3 tablespoons cold water
- 1 teaspoon vanilla extract
- 1/4 cup blue raspberry syrup
- 1 cup chocolate cookies, crushed
- 1/4 cup unsalted butter, melted
- Green chocolate melts (for coating)
Instructions
- Prepare the Mousse: In a small bowl, sprinkle gelatin over cold water and let it bloom for about 5 minutes. In a saucepan, gently heat the gelatin until dissolved. In a large bowl, combine cream cheese, powdered sugar, and gelatin. Mix until smooth.
- Add the Cream: In another bowl, whip the heavy cream to stiff peaks. Gently fold the whipped cream into the cream cheese mixture until fully incorporated. Divide the mousse into two bowls.
- Flavor the Mousse: Mix blue raspberry syrup into one bowl to create the blue mousse. Leave the other bowl as is for the green layer.
- Make the Base: Combine crushed chocolate cookies with melted butter in a bowl, then press this mixture into the bottom of serving dishes. Chill for about 30 minutes.
- Assemble the Bombs: Once the crust is set, layer the green mousse on top, followed by a layer of blue mousse. Freeze for at least 2 hours.
- Coat with Chocolate: Melt green chocolate melts in a microwave-safe bowl. Once the mousse bombs are frozen solid, dip them into the melted green chocolate, then let them set on a wire rack.
- Serve: Once set, serve the Ectoplasm Mousse Bombs and enjoy the surprise that awaits inside!
Corpse Bride’s Meringues
Corpse Bride’s Meringues are a whimsical twist on the classic meringue cookie, perfect for anyone looking to create a spooky yet delightful treat. These airy, cloud-like confections have a light and crispy texture, melting in your mouth with each bite. The taste is sweet and subtly vanilla-flavored, making them an irresistible dessert for any occasion, especially around Halloween!
Not only are they fun to make, but they’re also simple enough for bakers of all skill levels. With just a handful of ingredients, you can whip up these enchanting meringues in no time. Grab your egg whites, sugar, and a dash of vanilla, and let’s get started!
Ingredients
- 4 large egg whites
- 1 cup granulated sugar
- 1 teaspoon vanilla extract
- 1/4 teaspoon cream of tartar
- Pinch of salt
Instructions
- Preheat your oven to 200°F (93°C) and line a baking sheet with parchment paper.
- In a clean, dry mixing bowl, whisk the egg whites and salt until soft peaks form.
- Add cream of tartar and continue whisking while gradually adding the sugar until the mixture becomes glossy and forms stiff peaks.
- Fold in vanilla extract carefully to maintain the airy texture.
- Transfer the meringue to a piping bag and pipe out spooky shapes onto the baking sheet.
- Bake for 1.5 to 2 hours until the meringues are dry and easily lift off the parchment.
- Let them cool completely before serving.
Licorice-Stained Ghost Cake
This Licorice-Stained Ghost Cake is a delightful twist on traditional desserts, perfect for any spooky occasion. With its rich, dark layers and haunting decor, it combines the fun of Halloween with a sweet indulgence. The taste is a mix of sweet and slightly salty, with hints of anise from the licorice, making it a unique treat that will surprise your taste buds.
Creating this cake isn’t overly complicated, making it a fun project for bakers of all skill levels. The layers are moist and flavorful, while the black licorice glaze adds a striking appearance. Top it off with some ghostly decorations for a perfect blend of eerie and tasty!
Ingredients
- 2 cups all-purpose flour
- 1 1/2 cups granulated sugar
- 1 cup unsweetened cocoa powder
- 1 teaspoon baking powder
- 1/2 teaspoon baking soda
- 1/2 teaspoon salt
- 1 cup buttermilk
- 1/2 cup vegetable oil
- 2 large eggs
- 1 teaspoon vanilla extract
- 1 cup hot water
- 1/2 cup black licorice syrup
- 1 cup heavy cream
- 1 cup powdered sugar
- Black food coloring (optional)
- Decorative skulls (for topping)
Instructions
- Preheat your oven to 350°F (175°C) and grease two 9-inch round cake pans.
- In a large bowl, sift together flour, sugar, cocoa powder, baking powder, baking soda, and salt.
- In another bowl, whisk together buttermilk, vegetable oil, eggs, and vanilla extract. Gradually add this mixture to the dry ingredients, mixing until combined.
- Slowly stir in hot water and black licorice syrup until the batter is smooth.
- Divide the batter evenly between the prepared pans and bake for 30-35 minutes or until a toothpick inserted into the center comes out clean.
- Let the cakes cool in the pans for 10 minutes before transferring to wire racks to cool completely.
- For the frosting, whip the heavy cream until soft peaks form. Gradually add powdered sugar and mix until stiff peaks form. If desired, add a few drops of black food coloring to get a darker shade.
- Once the cakes have cooled, spread a layer of frosting between the two layers and then cover the entire cake with the remaining frosting.
- Decorate the top with decorative skulls and any other spooky embellishments you like.
Raspberry Riddle Pies
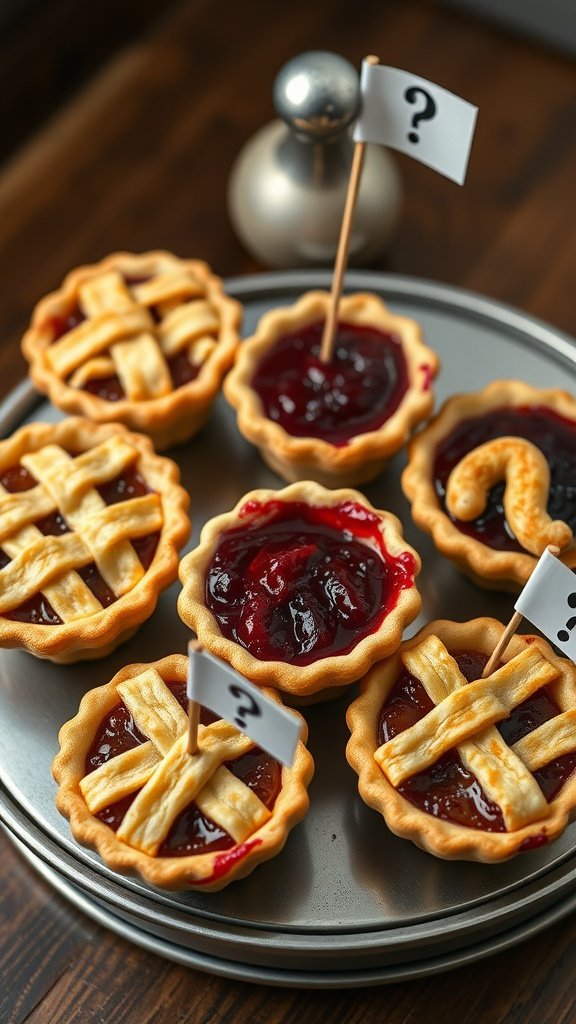
Raspberry Riddle Pies are a delightful twist on the classic dessert, combining the sweetness of ripe raspberries with a hint of mystery. Each mini pie features a flaky crust filled with tart raspberry jam, topped with a playful lattice design. Easy to make, these treats are perfect for gatherings or a cozy night in.
These adorable pies not only look charming but also deliver a burst of flavor that will have your taste buds dancing. With a simple crust and straightforward filling, even novice bakers can whip these up with ease. Plus, the surprise element of different fillings keeps everyone guessing!
Ingredients
- 1 pre-made pie crust (or homemade if you prefer)
- 2 cups fresh raspberries (or raspberry jam)
- 1/4 cup granulated sugar
- 1 tablespoon cornstarch
- 1 teaspoon lemon juice
- 1 egg (for egg wash)
- 1 tablespoon milk (for egg wash)
Instructions
- Prepare the Filling: In a bowl, mix raspberries, sugar, cornstarch, and lemon juice. Set aside to let the flavors meld.
- Roll Out Dough: If using a homemade crust, roll out the dough and cut into circles to fit your muffin tin. Place the circles in the tin.
- Fill the Pies: Spoon the raspberry mixture into each pie shell, filling them about three-quarters full.
- Make the Lattice: Roll out any leftover dough and cut into strips. Lay these strips across the top of each pie in a crisscross pattern.
- Egg Wash: Beat the egg with milk and brush it over the lattice for a golden finish.
- Bake: Preheat your oven to 375°F (190°C) and bake the pies for 20-25 minutes or until the crust is golden brown.
- Cool and Serve: Let the pies cool before serving. Enjoy the delightful flavors and the fun of guessing the fillings!
Chaotic Churro Stacks
Chaotic Churro Stacks are a delightful twist on the classic churro, featuring layers of crispy, cinnamon-sugar-coated churro dough stacked high and filled with a variety of luscious creams. Each bite is a balance of textures, from the crunch of the churro exterior to the smooth, sweet center, making them a perfect treat for anyone looking to indulge their sweet tooth while enjoying a bit of mischief. Plus, they’re surprisingly easy to whip up at home!
The flavors here are both familiar and intriguing, with a playful take on traditional churros. Cinnamon and sugar provide a warm, comforting backdrop, while the fillings can range from chocolate to fruity creams, allowing you to customize the experience. Whether you’re serving these for a spooky gathering or just for fun, they promise to bring a chaotic yet delicious touch to your dessert table.
Ingredients
- 1 cup water
- 1/2 cup unsalted butter
- 1 tablespoon sugar
- 1/4 teaspoon salt
- 1 cup all-purpose flour
- 3 large eggs
- Vegetable oil for frying
- 1 cup granulated sugar
- 2 tablespoons ground cinnamon
- 1 cup whipped cream or pastry cream
- Optional toppings: chocolate drizzle, sprinkles, or fresh fruit
Instructions
- Make the Dough: In a saucepan, combine water, butter, sugar, and salt. Bring to a boil and stir in flour until a ball forms. Remove from heat and let cool slightly.
- Beat in Eggs: Once cooled, add eggs one at a time, mixing until smooth and glossy.
- Heat Oil: In a deep pan, heat vegetable oil to 375°F (190°C).
- Fry Churros: Pipe the dough into the hot oil in long strips or desired shapes. Fry until golden brown, about 2-3 minutes per side. Remove and drain on paper towels.
- Coat in Cinnamon Sugar: Mix sugar and cinnamon in a bowl. Roll the fried churros in the mixture until fully coated.
- Assemble Stacks: Layer the churros and fill between layers with whipped or pastry cream. Drizzle with chocolate or add toppings as desired.
Macaron Madness Medley
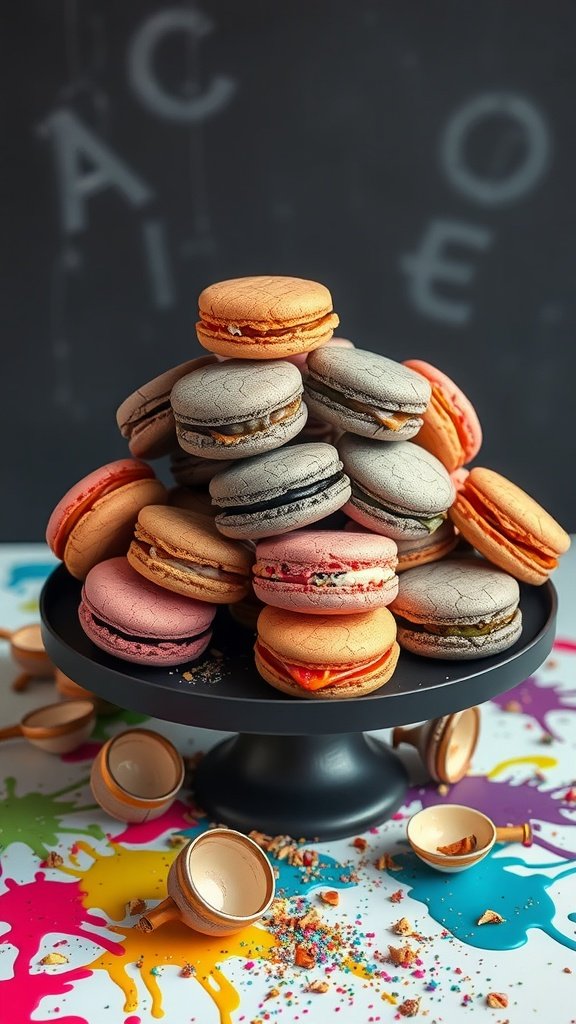
Macarons are a delightful treat that blend texture and flavor in an enticing way. These little sandwich cookies offer a crisp shell with a soft, chewy interior, making them a favorite for many. The variety of colors and flavors can turn any dessert table into a visual feast, while the contrasting textures provide an unforgettable taste experience. Don’t worry—while they may seem fancy, macarons are quite approachable to make at home with a little patience and practice!
This Macaron Madness Medley features an assortment of vibrant flavors, from classic vanilla to bold chocolate and zesty fruit. Each batch allows for creativity and experimentation, so feel free to mix and match flavors and colors. Once you master the basics, you’ll be whipping up these colorful delights in no time, impressing friends and family alike!
Ingredients
- 1 cup almond flour
- 1 3/4 cups powdered sugar
- 3 large egg whites, at room temperature
- 1/4 cup granulated sugar
- 1/4 teaspoon cream of tartar
- Gel food coloring (various colors)
- 1 cup butter, softened
- 2 cups powdered sugar (for filling)
- 1 teaspoon vanilla extract (or other flavorings)
Instructions
- Prepare the Macaron Shells: Preheat your oven to 300°F (150°C). In a bowl, sift almond flour and powdered sugar together. In a separate bowl, whip egg whites until foamy, then gradually add granulated sugar and cream of tartar. Continue whipping until stiff peaks form. Gently fold in the almond mixture and desired food coloring.
- Pipe the Macarons: Transfer the mixture to a piping bag and pipe small circles onto parchment-lined baking sheets. Tap the sheets on the counter to release air bubbles. Let them sit for 30-60 minutes until a skin forms on the surface.
- Bake the Shells: Bake for 15-20 minutes, rotating the trays halfway through. Let them cool completely before removing from the parchment.
- Prepare the Filling: In a bowl, beat the softened butter until creamy. Gradually add powdered sugar and vanilla (or other flavorings), mixing until smooth and fluffy.
- Assemble: Pair the macaron shells, adding a dollop of filling to one shell and topping with its match. Let them sit for a day to allow flavors to meld, then enjoy your creations!
Poison Plum Fool
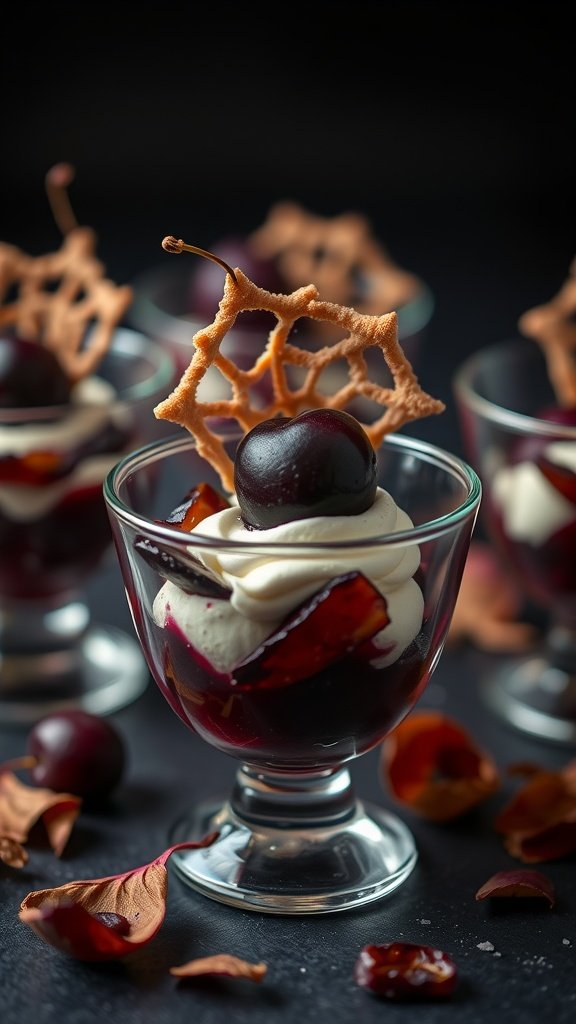
Poison Plum Fool is a delightful dessert that balances sweetness with a hint of tartness from fresh plums. The creamy texture of whipped cream combined with the rich plum puree creates a deliciously chaotic treat that’s both eye-catching and tasty. This recipe is surprisingly simple to make and is perfect for any gathering, adding a touch of whimsy to your dessert table.
With layers of luscious plum goodness and airy cream, each bite is a harmonious blend of flavors. Plus, you can dress it up with fun garnishes like a spider web cookie or fresh fruit for an extra spooky touch!
Ingredients
- 2 cups ripe plums, pitted and chopped
- 1/4 cup granulated sugar
- 1 tablespoon lemon juice
- 1 cup heavy cream
- 2 tablespoons powdered sugar
- 1 teaspoon vanilla extract
- Optional: spider web cookies for garnish
Instructions
- Make the Plum Puree: In a saucepan, combine the chopped plums, granulated sugar, and lemon juice. Cook over medium heat for about 10 minutes, stirring occasionally, until the plums are soft. Remove from heat and let cool. Blend until smooth.
- Whip the Cream: In a mixing bowl, combine the heavy cream, powdered sugar, and vanilla extract. Beat with an electric mixer until soft peaks form.
- Assemble the Dessert: In individual serving glasses, layer the plum puree and whipped cream alternately. Finish with a dollop of cream on top.
- Garnish: Decorate with spider web cookies or fresh plums for a spooky touch. Chill for about an hour before serving.
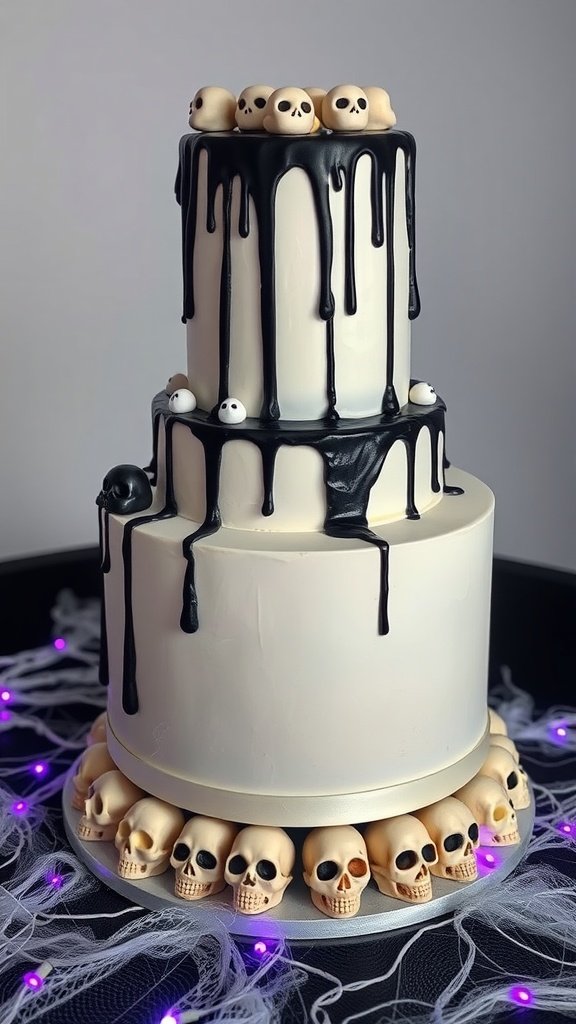
Upside-Down Nightmare Cake
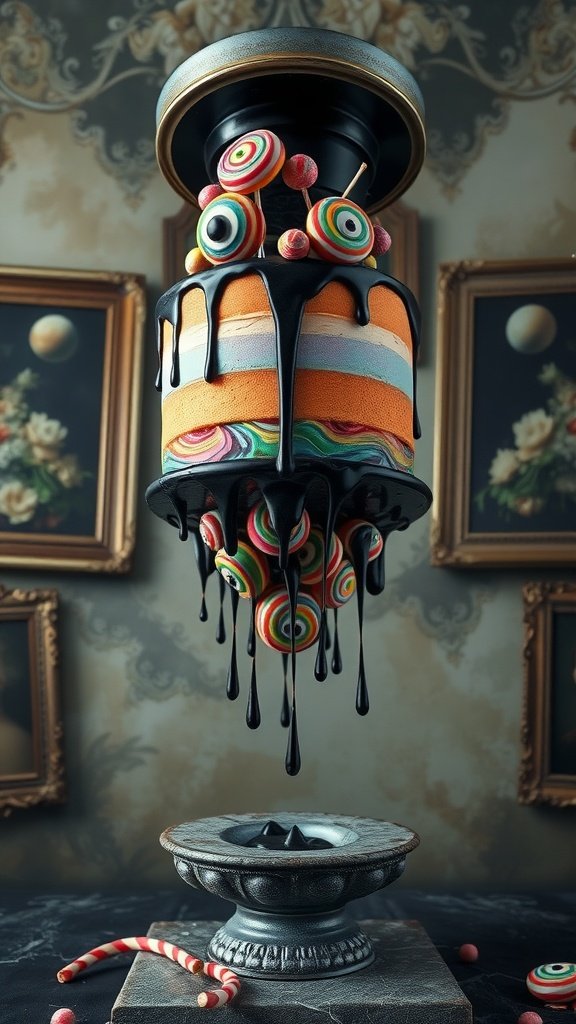
Upside-Down Nightmare Cake is a wild twist on the classic upside-down cake, perfect for those who enjoy bold flavors with a hint of the eerie. This cake blends rich chocolate with an array of gooey toppings that create a striking visual and deliciously sweet taste. It’s simple enough to make, yet it has that show-stopping effect to impress your guests.
Each bite offers a combination of moist chocolate cake and a surprising burst of flavor. Topped with a glossy black chocolate glaze and an assortment of colorful gummy candies, this cake is both creepy and delightful. It’s a fun dessert for Halloween parties or any gathering where you want to add a touch of chaos.
Sinister S’Mores Crostata
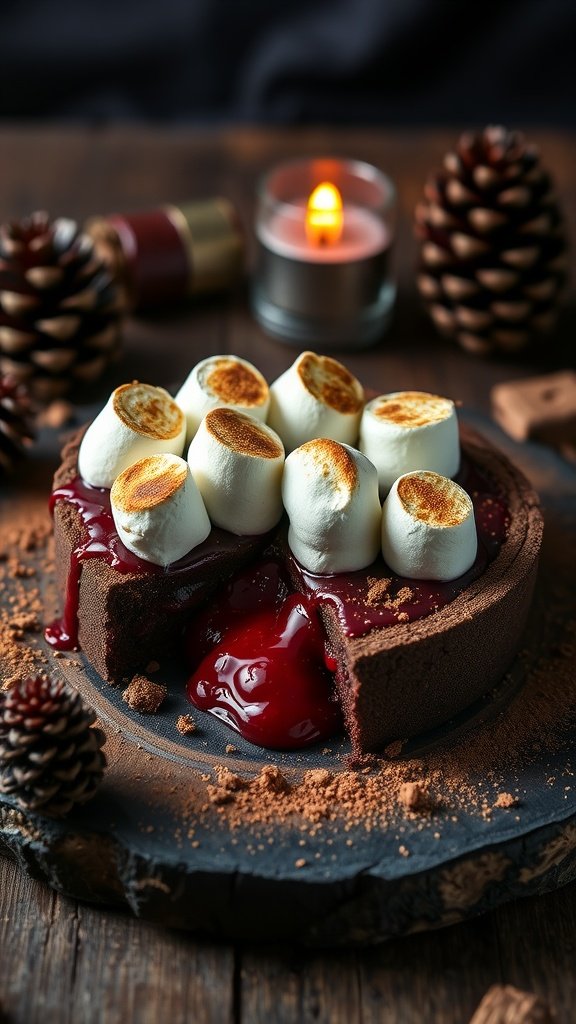
This Sinister S’Mores Crostata brings a spooky twist to a beloved classic. Imagine a rich, chocolatey crust filled with gooey marshmallow and a touch of tart cherry compote, creating a perfect balance of sweetness and tang. Easy to make, this dessert is sure to impress your friends and family.
The combination of the crispy crust with the creamy filling and toasty marshmallows makes each bite a delightful experience. Whether you’re hosting a Halloween gathering or simply indulging in a sweet treat, this crostata will be a hit.
Ingredients
- 1 1/2 cups all-purpose flour
- 1/4 cup cocoa powder
- 1/2 cup unsalted butter, chilled and cubed
- 1/4 cup granulated sugar
- 1/4 teaspoon salt
- 1 large egg
- 1 cup cherry pie filling
- 2 cups mini marshmallows
- 1/2 cup chocolate chips
Instructions
- Make the Dough: In a bowl, mix flour, cocoa powder, sugar, and salt. Cut in the butter until the mixture resembles coarse crumbs. Stir in the egg until the dough comes together. Wrap in plastic and refrigerate for 30 minutes.
- Prepare the Filling: Preheat your oven to 350°F (175°C). Roll out the chilled dough and press it into a tart pan, trimming the edges. Spread the cherry pie filling evenly over the crust.
- Add the Toppings: Sprinkle chocolate chips over the cherry filling, then layer the mini marshmallows on top.
- Bake: Place the crostata in the oven and bake for 25-30 minutes, or until the marshmallows are golden and the crust is firm.
- Cool and Serve: Let it cool slightly before slicing. Serve warm for the best ooey-gooey experience!
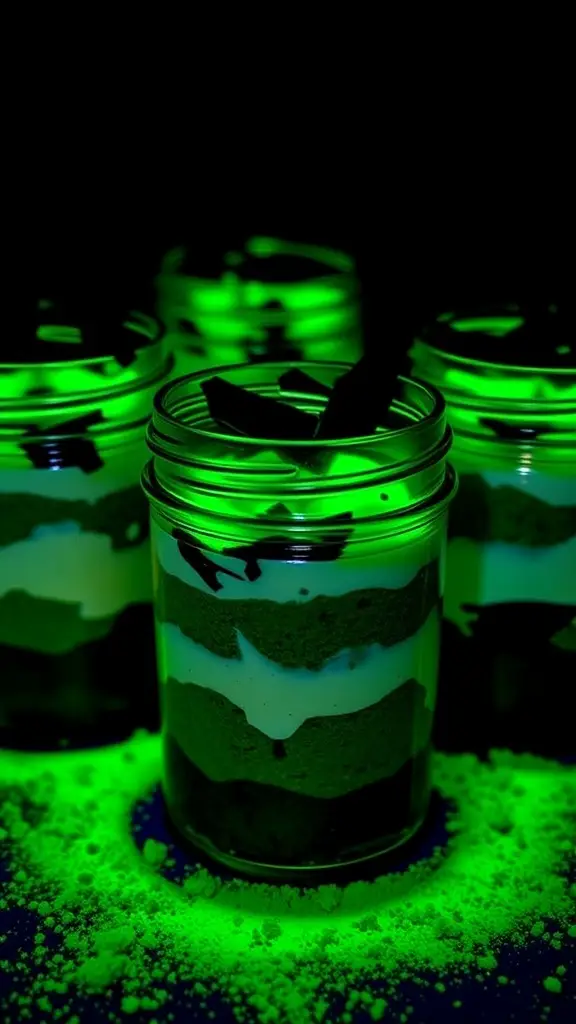
Sour Patch Pudding Jars
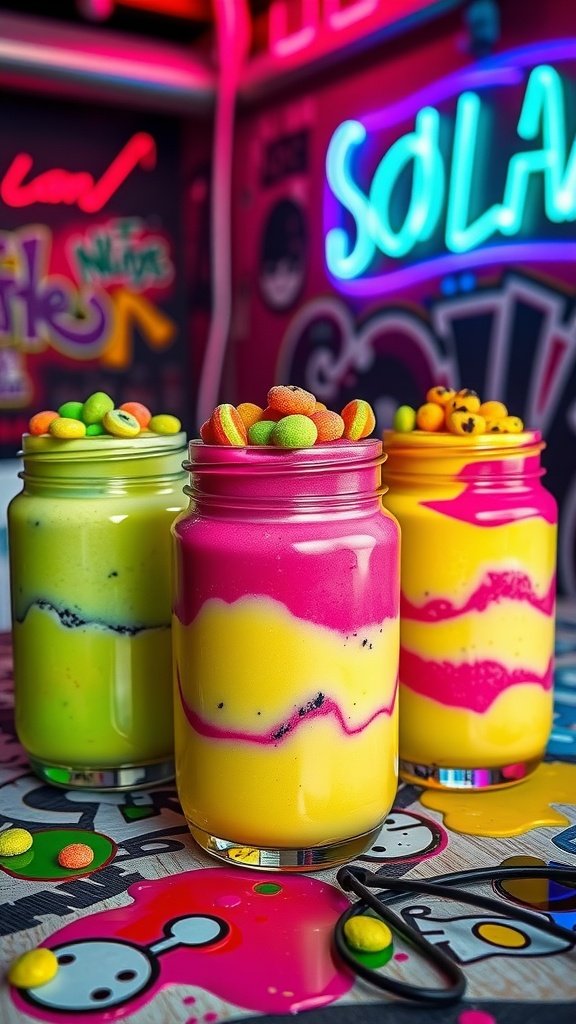
Sour Patch Pudding Jars offer a fun and whimsical twist on traditional desserts. This treat combines layers of sweet and tangy flavors, creating a playful dessert that’s sure to impress anyone with a sweet tooth. They are surprisingly simple to make, making them a great choice for both novice bakers and seasoned dessert lovers.
With vibrant colors and a delightful mix of textures, these pudding jars are not only tasty but visually appealing too. The combination of creamy pudding, tart candy, and crunchy toppings creates a sweet chaos in every spoonful. Perfect for parties or just a fun treat at home, these jars are a showstopper!
Ingredients
- 1 box of instant vanilla pudding mix
- 2 cups milk
- 1/2 cup sour cream
- 1 cup whipped topping
- Food coloring (yellow, pink, green)
- 1 cup Sour Patch Kids candy
- Gummy worms (optional)
- Sprinkles (for topping)
Instructions
- Prepare the Pudding: In a mixing bowl, combine the vanilla pudding mix and milk. Whisk until thickened, about 2 minutes.
- Layer the Colors: Divide the pudding into three separate bowls. Add a few drops of food coloring to each bowl and mix until you achieve your desired colors.
- Mix in Sour Cream: Gently fold the sour cream into each bowl of colored pudding to add creaminess and a slight tang.
- Assemble the Jars: In clear jars, layer the colored pudding, starting with one color at the bottom, followed by another, and then the third. Alternate until the jars are filled.
- Add Toppings: Top each jar with whipped topping and garnish with Sour Patch Kids, gummy worms, and sprinkles for a fun finish.
- Chill and Serve: Place the jars in the refrigerator for at least 30 minutes before serving to allow the flavors to meld and the pudding to set.
Strawberry Slasher Slice
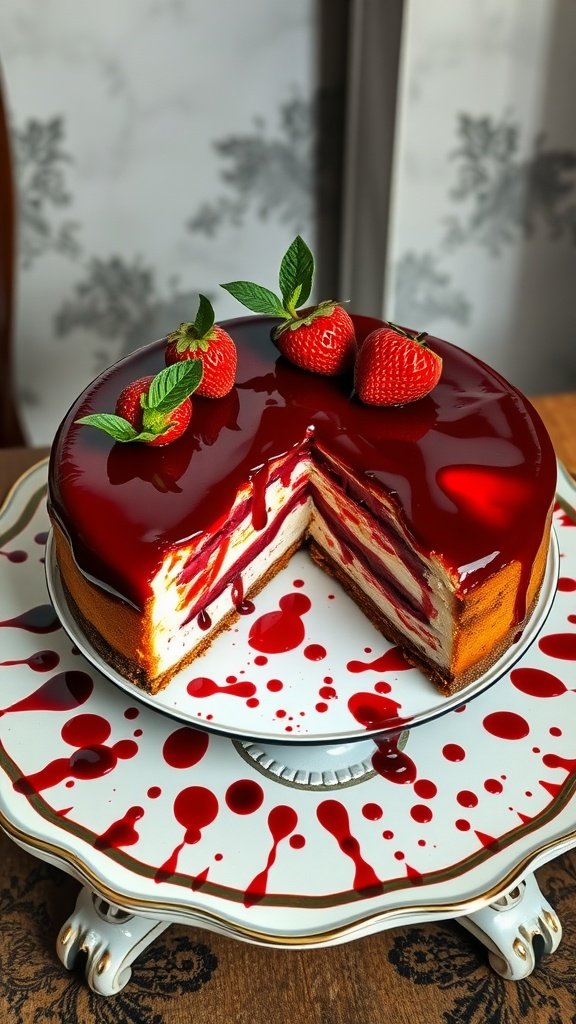
Indulging in a Strawberry Slasher Slice is like taking a sweet plunge into a berry-infused thrill! This dessert combines a rich cream cheese filling with layers of luscious strawberry bliss, all draped in a striking red glaze that’s sure to turn heads. Not only does it scream taste, with its balance of sweet and slightly tangy flavors, but it’s also surprisingly simple to whip up, making it perfect for any occasion.
As you slice into this dessert, the creamy layers reveal a vibrant strawberry filling that is both visually enticing and delicious. Perfect for gatherings or a spooky-themed treat, this recipe is bound to impress. Let’s get to it!
Glitch Gateaux Cubes
Glitch Gateaux Cubes are a fun and unique dessert that combines layers of bright flavors and textures. These colorful cubes are not only a treat for the taste buds but also a feast for the eyes. With their whimsical design and vibrant colors, they are perfect for any themed party or gathering.
This recipe is approachable for bakers of all levels and doesn’t require complex techniques. The combination of fruity layers with a creamy filling is balanced perfectly, making every bite delightful. Get ready to impress your friends with these sweet treats!
Ingredients
- 1 cup all-purpose flour
- 1/2 cup granulated sugar
- 1/2 cup unsweetened cocoa powder
- 1 teaspoon baking powder
- 1/4 teaspoon salt
- 1/2 cup unsalted butter, melted
- 2 large eggs
- 1 teaspoon vanilla extract
- 1/2 cup milk
- 1 cup whipped cream
- 1/2 cup fruit puree (strawberry, mango, or your choice)
- Colored chocolate or candy melts for decoration
- Edible glitter or sprinkles for garnish
Instructions
- Preheat your oven to 350°F (175°C) and grease a square baking pan.
- In a mixing bowl, combine flour, sugar, cocoa powder, baking powder, and salt. Stir in melted butter, eggs, vanilla extract, and milk until smooth.
- Pour the batter into the prepared pan and bake for 25-30 minutes until a toothpick inserted in the center comes out clean. Let it cool completely.
- Once cooled, slice the cake into equal-sized squares. Layer the squares with whipped cream and fruit puree to create a layered effect.
- Melt the colored chocolate or candy melts and pour over the stacked cake layers. Allow it to set.
- Garnish with edible glitter or sprinkles before serving for an added touch of fun.
Demon Claw Donuts
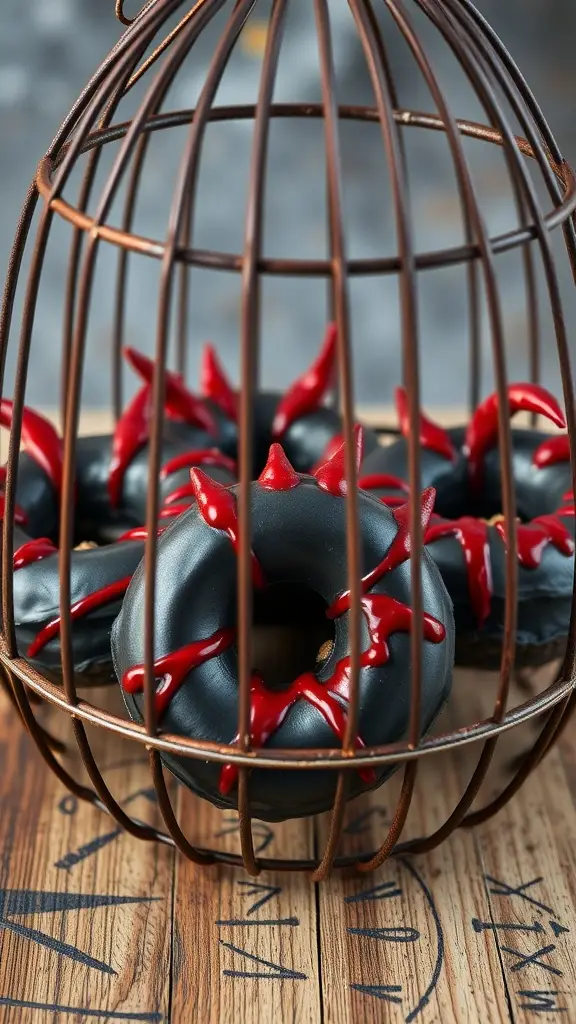
Demon Claw Donuts bring a fun and spooky twist to your dessert table. These treats pack a punch with their rich, chocolate flavor and eerie appearance, making them perfect for Halloween or any dark-themed gathering. They’re surprisingly simple to whip up, combining a basic donut recipe with creative decorating that will leave everyone intrigued.
Each donut is coated in a deep black glaze, resembling a dark abyss, while vibrant red icing drizzles down like dripping claws. With a touch of creativity and a few ingredients, you can serve these deliciously sinister donuts that are both visually striking and irresistibly sweet.
Ingredients
- 2 cups all-purpose flour
- 3/4 cup granulated sugar
- 1 tablespoon baking powder
- 1/2 teaspoon salt
- 1/2 cup unsweetened cocoa powder
- 1 cup milk
- 1/4 cup vegetable oil
- 2 large eggs
- 1 teaspoon vanilla extract
- 1 cup dark chocolate chips
- 1 cup powdered sugar (for glaze)
- 2 tablespoons milk (for glaze)
- Red icing (for decoration)
Instructions
- Preheat the oven to 350°F (175°C) and grease a donut pan.
- In a large bowl, mix together the flour, sugar, baking powder, salt, and cocoa powder.
- In a separate bowl, whisk the milk, vegetable oil, eggs, and vanilla until combined.
- Slowly add the wet ingredients to the dry ingredients, mixing until just combined. Fold in the chocolate chips.
- Pour the batter into the donut pan, filling each cavity about halfway. Bake for 10-12 minutes or until a toothpick comes out clean.
- Let the donuts cool in the pan for a few minutes before transferring them to a wire rack.
- For the glaze, mix powdered sugar and milk until smooth. Dip the cooled donuts in the glaze and let it set.
- Once the glaze is dry, use red icing to create claw-like drips for that spooky finish.
Inkblot Ice Cream Cones
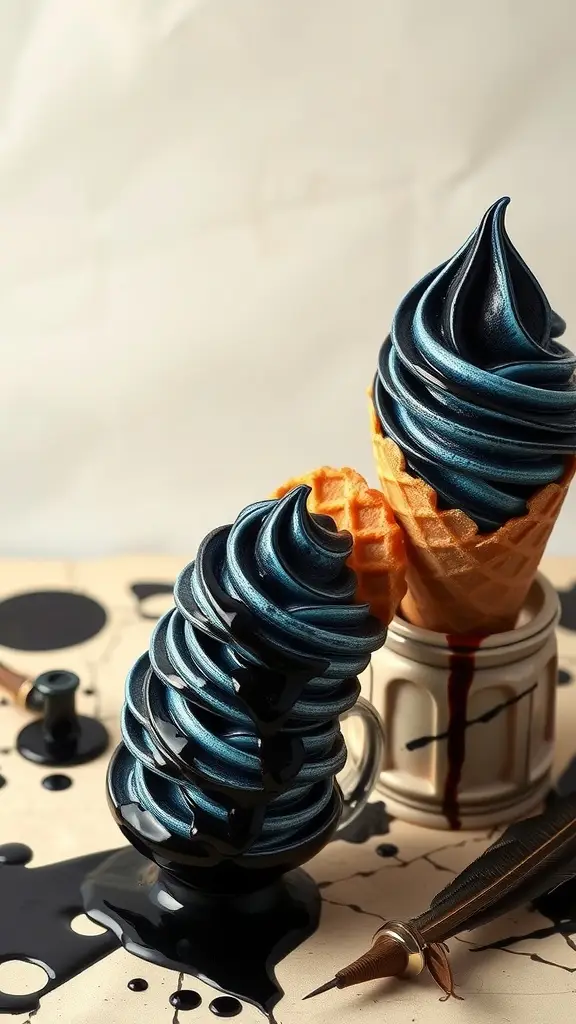
Inkblot Ice Cream Cones are a delightfully dark twist on a classic treat. The rich, velvety ice cream features a striking blend of deep colors and flavors, making it not only a visual masterpiece but also a sweet indulgence. Combining hints of chocolate and a touch of something unexpected, this dessert offers a unique taste experience that’s both fun and a little mysterious.
This recipe is simple enough for anyone to try at home, and it’s perfect for those looking to impress with a dessert that’s both whimsical and slightly sinister. Get ready to scoop up some creativity!
Ingredients
- 2 cups heavy cream
- 1 cup sweetened condensed milk
- 1 teaspoon vanilla extract
- 3 tablespoons cocoa powder
- 1/4 cup black food coloring
- 1/4 cup chocolate syrup
- Waffle cones
Instructions
- In a large bowl, whisk together the heavy cream, sweetened condensed milk, and vanilla extract until well combined.
- Divide the mixture into two bowls. In one bowl, add the cocoa powder and mix until blended. In the second bowl, stir in the black food coloring to achieve a rich, dark hue.
- Using a spoon, alternate layers of the chocolate and black mixtures into a freezer-safe container. Swirl with a knife for an inkblot effect.
- Cover and freeze for at least 4 hours, or until firm.
- When ready to serve, scoop the ice cream into waffle cones and drizzle with chocolate syrup.
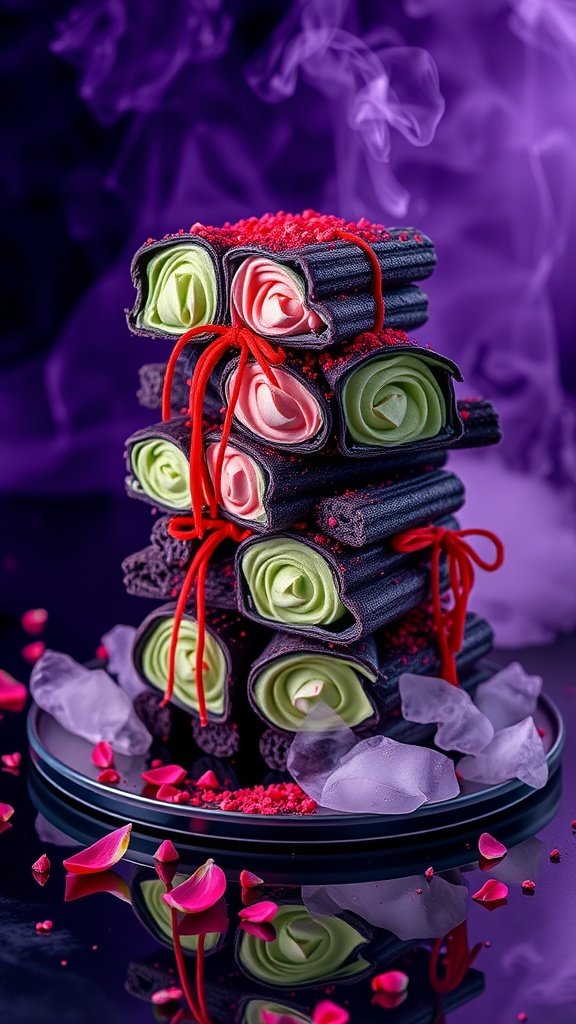
Witch’S Kiss Éclairs

Witch’s Kiss Éclairs are the perfect blend of hauntingly delicious flavors and a touch of whimsy. These delightful pastries feature a light and airy choux pastry filled with rich, dark chocolate cream and topped with a glossy ganache. The addition of rose petals adds a charming, floral note, making each bite feel like a sweet spell cast just for you.
This recipe is surprisingly simple to make, perfect for both seasoned bakers and those looking to dabble in the art of pastry creation. With just a few ingredients and steps, you can conjure up these enchanting treats for any occasion.
Ingredients
- 1 cup water
- 1/2 cup unsalted butter
- 1 cup all-purpose flour
- 1 teaspoon sugar
- 1/4 teaspoon salt
- 4 large eggs
- 2 cups heavy cream
- 1/2 cup powdered sugar
- 1 cup dark chocolate, chopped
- 1/2 cup heavy cream (for ganache)
- Dried rose petals for garnish
Instructions
- Make the Choux Pastry: In a medium saucepan, combine water, butter, sugar, and salt. Bring to a boil. Remove from heat and add flour all at once, stirring until the mixture pulls away from the sides of the pan. Let it cool slightly, then beat in the eggs one at a time until smooth.
- Pipe and Bake: Preheat the oven to 375°F (190°C). Transfer the choux pastry to a piping bag and pipe 4-inch lines on a lined baking sheet. Bake for 25-30 minutes until golden brown and puffed. Let them cool completely.
- Prepare the Filling: Whip heavy cream and powdered sugar until stiff peaks form. Gently fold in cooled melted dark chocolate until well combined.
- Fill the Éclairs: Once the pastry shells are cool, slice them open and fill with the chocolate cream using a piping bag.
- Make the Ganache: Heat 1/2 cup heavy cream until just simmering and pour over chopped dark chocolate. Stir until smooth. Let it cool slightly, then dip the tops of the filled éclairs into the ganache.
- Garnish: Sprinkle dried rose petals on top of the ganache before it sets. Allow the ganache to firm up before serving.
Grimace Gelatin Terrarium
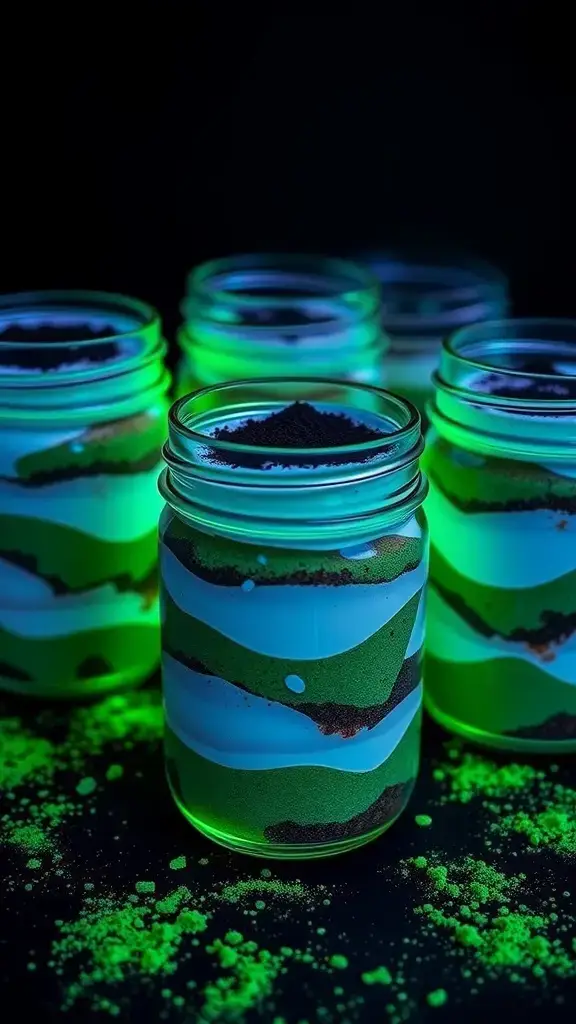
Get ready to stir up some fun with the Grimace Gelatin Terrarium! This dessert is a playful twist on traditional gelatin, featuring vibrant colors and a mix of textures that mimic a mysterious terrarium. The taste is a delightful blend of fruity flavors, making it both whimsical and delicious. Plus, it’s relatively easy to make, so it’s perfect for both experienced bakers and beginners looking to impress.
This dessert is sure to be a conversation starter at any gathering. The visual appeal, combined with the fun of layering different colors and textures, creates an inviting treat that everyone will want to try. Don’t worry if it gets a little messy; that just adds to the charm!
Ingredients
- 1 package (3 oz) black cherry gelatin
- 1 package (3 oz) lime gelatin
- 1 package (3 oz) berry blue gelatin
- 2 cups boiling water
- 2 cups cold water
- 1 cup gummy worms
- 1 cup assorted fruit (like blueberries and blackberries)
- 1 cup whipped cream (optional)
- Edible decorations like candy eyes and chocolate sticks
Instructions
- Prepare the Gelatin: In separate bowls, dissolve each gelatin flavor in 1 cup of boiling water. Stir well until completely dissolved.
- Add Cold Water: Once dissolved, add 1 cup of cold water to each bowl and mix again. Pour the first layer into a clear container and refrigerate until set, about 2 hours.
- Layering: Once the first layer is set, add the gummy worms and assorted fruit. Pour the next gelatin layer over it and return to the fridge. Repeat until all layers are poured.
- Final Touches: After all layers have set, top with whipped cream and decorate with edible items like candy eyes and chocolate sticks to mimic plants.
- Serve: To serve, cut into squares or scoop out with a spoon and enjoy the flavors of your sinisterly sweet creation!
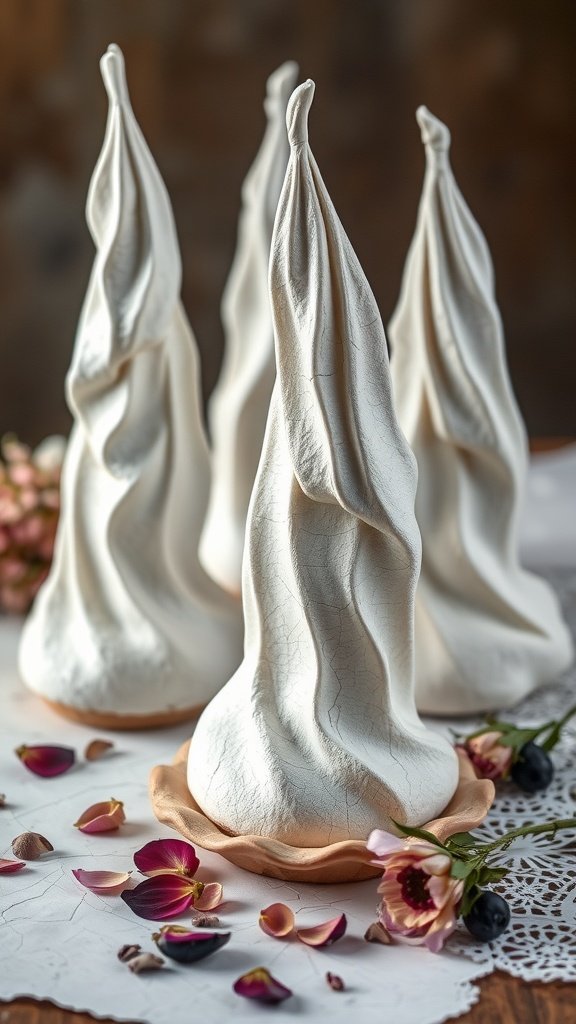
Twisted Meringue Spires
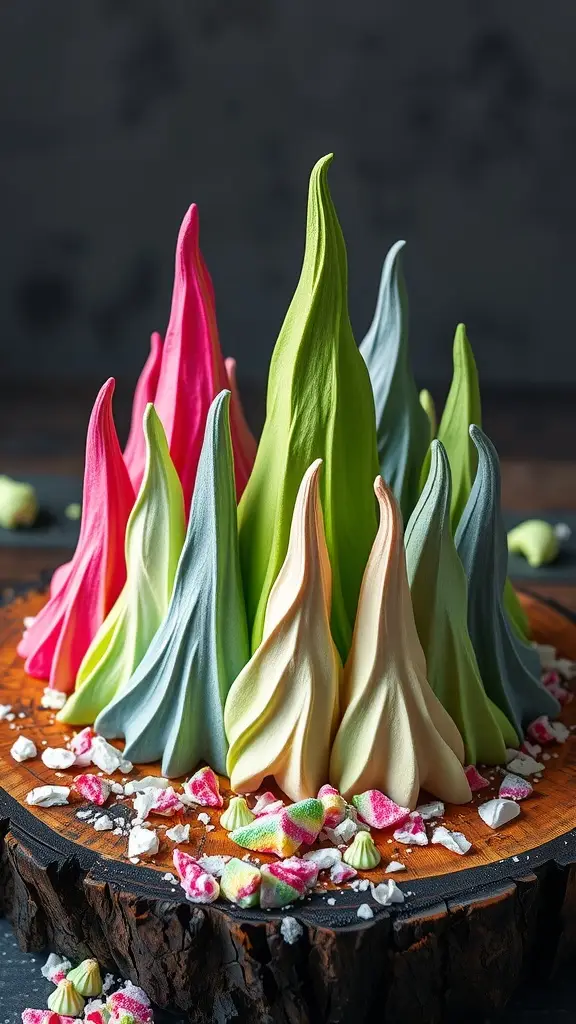
Twisted Meringue Spires are a delightful treat that combines whimsy and sweetness into a stunning dessert. With a crisp outer shell and a soft, chewy interior, these colorful spires offer a unique texture experience. They can be a bit tricky to master, but with a little patience, you’ll create a show-stopping centerpiece that dazzles your guests.
The vibrant colors and towering shapes evoke a sense of playful chaos that pairs wonderfully with a light, sweet flavor. Perfect for parties or any occasion where you want to impress, these meringue spires are sure to be a hit. So roll up your sleeves and enjoy the process of crafting these enchanting treats!
Ingredients
- 4 large egg whites
- 1 cup granulated sugar
- 1/4 teaspoon cream of tartar
- 1 teaspoon vanilla extract
- Food coloring (various colors)
- 1/2 cup crushed candies (for garnish)
Instructions
- Preheat your oven to 225°F (110°C) and line a baking sheet with parchment paper.
- In a clean bowl, beat the egg whites until foamy. Add cream of tartar and continue to beat until soft peaks form.
- Gradually add sugar, one tablespoon at a time, while beating on high speed until stiff, glossy peaks form. Mix in the vanilla extract.
- Divide the meringue into separate bowls and add food coloring to each, mixing until you achieve your desired shades.
- Transfer the meringue to piping bags fitted with a star tip. Pipe the meringue onto the baking sheet in tall, spire-like shapes.
- Bake for 1.5 to 2 hours or until the meringues are completely dry and easily lift off the parchment. Turn off the oven and let them cool inside for an additional hour.
- Once cooled, decorate with crushed candies and serve. Enjoy your Twisted Meringue Spires!
Chaos Crème Brûlée

Crème brûlée gets a thrilling twist with this Chaos Crème Brûlée recipe. It’s a delightful mix of classic custard with an unexpected flavor burst that surprises the palate. Creamy, rich, and with a perfectly caramelized top, this dessert is both fun to make and delicious to eat.
This dessert is simple enough for novice bakers while still impressing dinner guests. The combination of sweet and slightly bitter notes creates a taste that’s both comforting and exciting, making it a standout treat for any occasion.
Ingredients
- 2 cups heavy cream
- 1/2 cup granulated sugar
- 1 teaspoon vanilla extract
- 4 large egg yolks
- 1/4 cup brown sugar
- Pinch of salt
- Optional: a splash of dark rum or coffee
Instructions
- Preheat the oven to 325°F (160°C).
- In a medium saucepan, heat the heavy cream, granulated sugar, and vanilla extract over medium heat until hot but not boiling.
- In a separate bowl, whisk egg yolks until smooth. Gradually add the hot cream mixture into the yolks, stirring continuously to prevent curdling.
- Once combined, add a pinch of salt and the optional splash of dark rum or coffee for extra depth of flavor.
- Pour the mixture into ramekins and place them in a baking dish. Fill the dish with boiling water halfway up the sides of the ramekins.
- Bake for about 30-35 minutes, or until the custard is set but slightly wobbly in the center.
- Remove from the oven and let cool. Refrigerate for at least 2 hours.
- Before serving, sprinkle brown sugar on top of each custard and use a kitchen torch to caramelize it until golden brown.
- Let it cool for a minute, then dig in and enjoy the chaos!
Graveyard Ganache Tarts
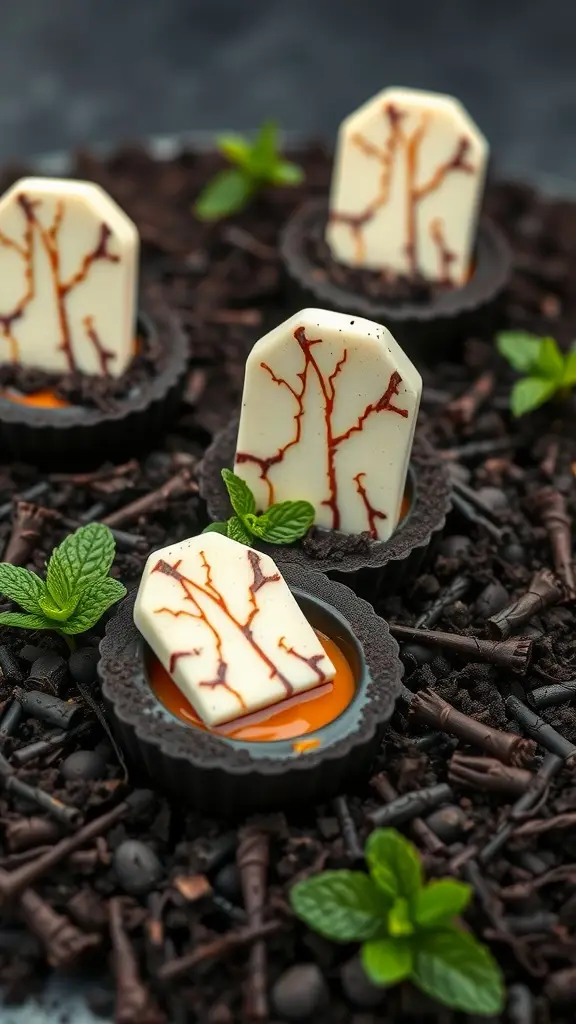
Graveyard Ganache Tarts are a delightful and spooky treat that combines rich chocolate ganache with a playful graveyard theme. The tarts feature a buttery crust filled with creamy ganache, topped with chocolate gravestones and sweet decorations. They’re not only delicious but also a fun addition to any Halloween gathering.
This recipe is simple enough for bakers of all skill levels, making it a perfect project for a fun evening in the kitchen. The combination of chocolate, cream, and a little creativity will leave everyone coming back for more!
Ingredients
- 1 1/2 cups chocolate cookie crumbs
- 1/4 cup unsalted butter, melted
- 1 cup heavy cream
- 8 ounces dark chocolate, chopped
- 1 teaspoon vanilla extract
- White chocolate for gravestones
- Red food coloring for decoration
- Mint leaves for garnish
Instructions
- Prepare the Crust: Preheat your oven to 350°F (175°C). In a bowl, mix chocolate cookie crumbs and melted butter until combined. Press the mixture into tartlet pans to form crusts. Bake for 10 minutes and let cool.
- Make the Ganache: In a saucepan, heat heavy cream until just simmering. Remove from heat and add chopped dark chocolate. Stir until smooth, then mix in vanilla extract.
- Assemble the Tarts: Pour the ganache into the cooled crusts and let them set in the refrigerator for about 2 hours.
- Decorate: Melt white chocolate and pipe gravestone shapes onto parchment paper. Once set, use red food coloring to create “blood” effects. Place the gravestones on top of the ganache.
- Serve: Garnish with mint leaves around the tarts and enjoy your spooky creation!
Marshmallow Mayhem Skewers

Marshmallow Mayhem Skewers bring a fun and chaotic twist to your dessert table. These colorful, sweet treats are perfect for any gathering, adding both visual appeal and delightful flavors. With a mix of fluffy marshmallows and vibrant candy decorations, they are as easy to make as they are to enjoy.
The taste is a delightful blend of sweetness, with the soft marshmallows contrasting beautifully against the crunchy candy elements. Plus, this recipe is simple enough for anyone to whip up, making it a fantastic choice for kids and adults alike!
Ingredients
- 10 large marshmallows
- 1 cup white chocolate chips
- 2 tablespoons coconut oil
- 1/2 cup colorful sprinkles
- 1/2 cup crushed candy (like sour gummies or toffee)
- Skewers or lollipop sticks
Instructions
- Melt the white chocolate: In a microwave-safe bowl, combine the white chocolate chips and coconut oil. Heat in 30-second intervals, stirring until fully melted and smooth.
- Prepare the marshmallows: Insert a skewer into each marshmallow, leaving enough stick at the bottom for easy handling.
- Dip and decorate: Dip each marshmallow in the melted chocolate, allowing excess to drip off. Roll in sprinkles or crushed candies while the chocolate is still wet.
- Let them set: Place the decorated marshmallows on a baking sheet lined with parchment paper. Allow them to cool and set at room temperature or in the refrigerator for about 15 minutes.
- Serve and enjoy: Once set, arrange the skewers on a platter and watch them disappear!
Toxic Tiramisu Jars
Get ready for a dessert that’s both fun and a little spooky! Toxic Tiramisu Jars are a playful twist on the classic Italian dessert. These layered treats combine rich coffee flavors with creamy mascarpone, all while being presented in a whimsical jar that brings out the adventurous side of dessert lovers.
The taste is a delightful mix of sweet and slightly bitter, with a hint of chocolate. Plus, they’re simple to whip up, making them perfect for parties or a casual treat at home. Let’s dive into how to create these charming jars!
Ingredients
- 1 cup strong brewed coffee, cooled
- 1 tablespoon coffee liqueur (optional)
- 8 ounces mascarpone cheese
- 1 cup heavy cream
- 1/2 cup granulated sugar
- 1 teaspoon vanilla extract
- 1 package ladyfingers
- 2 tablespoons cocoa powder
- Crushed chocolate cookies for topping
Instructions
- Prepare Coffee Mixture: In a bowl, mix the cooled coffee with coffee liqueur if using. Set aside.
- Make Cream Mixture: In another bowl, combine mascarpone cheese, heavy cream, sugar, and vanilla. Beat with an electric mixer until soft peaks form.
- Layer the Jars: Dip ladyfingers quickly into the coffee mixture. Place a layer in the bottom of the jars, followed by a layer of the cream mixture. Repeat layers until the jars are filled, finishing with the cream mixture.
- Chill: Cover the jars and refrigerate for at least 4 hours or overnight to set.
- Serve: Before serving, dust the tops with cocoa powder and sprinkle crushed chocolate cookies. Enjoy your Toxic Tiramisu Jars!
Serpent’s Apple Bombs
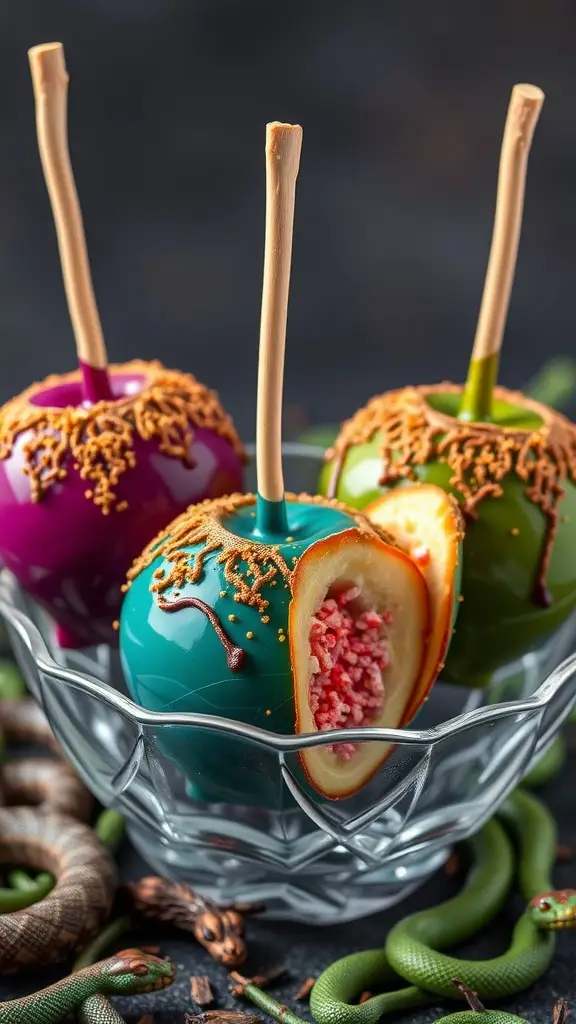
Serpent’s Apple Bombs are a playful and delicious twist on the classic caramel apple. These treats combine the sweetness of candy-coated apples with a hidden surprise inside, making them a fun and spooky dessert for any occasion. The flavor is a delightful mix of tartness from the apple and sweetness from the candy coating, with an extra punch from the surprise filling.
Making these is surprisingly easy and a great activity to share with friends or family. With just a few ingredients and some creativity, you can whip up these eye-catching treats that are sure to impress!
Ingredients
- 4 medium-sized apples (Granny Smith or your choice)
- 2 cups of candy melts (in various colors)
- 1 cup of mini marshmallows or gummy worms for filling
- 1/2 cup of crushed nuts or sprinkles for decoration
- Wooden popsicle sticks
- Optional: food coloring for extra fun
Instructions
- Prepare the Apples: Wash and dry the apples thoroughly. Insert a popsicle stick into the top of each apple.
- Melt the Candy: In a microwave-safe bowl, melt the candy melts according to package instructions. If desired, add food coloring to achieve your desired shades.
- Coat the Apples: Dip each apple into the melted candy, swirling until fully coated. Allow excess candy to drip off, then place the apples on a parchment-lined baking sheet.
- Add the Filling: Before the candy coating hardens, carefully peel the top layer of candy to create a small hole. Insert mini marshmallows or gummy worms inside each apple for the hidden surprise.
- Decorate: Sprinkle crushed nuts or colorful sprinkles over the coating while it’s still wet. Let the apples cool completely until the coating sets.
- Serve: Once set, these Serpent’s Apple Bombs are ready to be enjoyed! Slice them open for a fun reveal or serve them whole for an exciting treat.
Fractured Fairy Tarts
Fractured Fairy Tarts are a playful twist on traditional pastries, combining whimsical flavors and colors for a delightful treat. These tarts are not only visually striking but also offer a mix of sweet and slightly tangy flavors that will leave your taste buds dancing. Plus, they are fairly simple to whip up, making them perfect for any casual baking session.
The tart shell provides a buttery, flaky base, while the vibrant toppings can range from lavender to citrus shades, each bringing its own unique flavor to the mix. They’re a fun way to celebrate any occasion, or just to indulge in a little chaos!
Ingredients
- 1 cup all-purpose flour
- 1/2 cup unsalted butter, cold and cubed
- 1/4 cup powdered sugar
- 1 egg yolk
- 2 tablespoons cold water
- 1 cup pastry cream (vanilla or flavored)
- Food coloring (various colors)
- Sprinkles or edible glitter (for garnish)
Instructions
- Make the Tart Shell: In a bowl, mix flour and powdered sugar. Cut in the cold butter until the mixture resembles coarse crumbs. Add the egg yolk and cold water, mixing until the dough forms. Press the dough into tart pans and chill for 30 minutes.
- Preheat the Oven: Preheat your oven to 350°F (175°C). Bake the tart shells for 15-20 minutes until golden. Let them cool completely.
- Prepare the Pastry Cream: Make or buy pastry cream and divide it into small bowls. Add different food coloring to each bowl, mixing until you achieve your desired shades.
- Fill the Tarts: Spoon the colored pastry cream into the cooled tart shells in alternating layers for a fractured look. Swirl the colors together for a marbled effect if desired.
- Garnish: Top with sprinkles or edible glitter for a magical touch. Serve chilled and enjoy your Fractured Fairy Tarts!
Mirror Maze Mille-Feuille

Get ready for a dessert that’s as fun to make as it is to eat! The Mirror Maze Mille-Feuille takes the classic French pastry and adds a dark twist, with a glossy, reflective glaze that catches the light beautifully. Layers of flaky pastry, rich cream, and fruity jam create a delightful contrast of textures and flavors. It’s sweet, slightly tangy, and oh-so-decadent.
This recipe isn’t overly complicated, making it perfect for both novice bakers and seasoned pros. It’s all about assembling those layers and giving each bite a taste of pure bliss. Your friends and family will be wowed by the presentation and the taste!
Ingredients
- 1 package of puff pastry (2 sheets)
- 1 cup heavy cream
- 1/2 cup powdered sugar
- 1 teaspoon vanilla extract
- 1/2 cup fruit jam (raspberry or strawberry works well)
- 4 ounces dark chocolate, melted
- 1/4 cup water
- 1 cup granulated sugar
- 1 teaspoon corn syrup
Instructions
- Preheat the oven to 400°F (200°C). Roll out the puff pastry sheets on a floured surface and cut them into equal rectangles.
- Place the rectangles on a baking sheet lined with parchment paper. Prick each rectangle with a fork to prevent puffing. Bake for 15-20 minutes, or until golden brown. Let cool completely.
- In a mixing bowl, whip the heavy cream with powdered sugar and vanilla until soft peaks form. Set aside.
- Once the pastry layers are cooled, start assembling. Spread a layer of fruit jam on one pastry rectangle, followed by a layer of whipped cream. Repeat layering until all pastry pieces are used, finishing with a layer of pastry on top.
- For the mirror glaze, combine granulated sugar, water, and corn syrup in a saucepan. Bring to a boil, then remove from heat and stir in melted chocolate until smooth.
- Let the glaze cool slightly, then pour it over the assembled mille-feuille, ensuring it covers the top evenly. Chill for at least 30 minutes before slicing and serving.
The Final Bite Bombshell
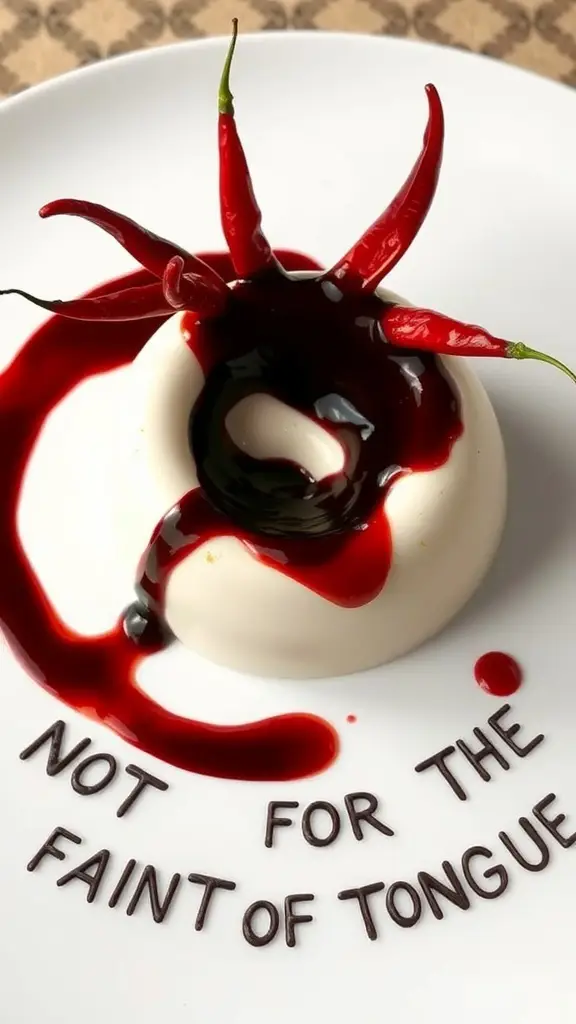
Get ready for a dessert that flips the script on sweetness! This unique treat combines creamy panna cotta with a spicy twist, delivering a flavor experience that is both smooth and fiery. With its rich texture and the surprise of heat, this dessert is sure to leave your taste buds tingling. Plus, it’s surprisingly simple to prepare, making it perfect for any occasion.
The panna cotta itself is light and velvety, balanced by a sweet chili sauce that adds intensity. This dish will impress your guests not just with its taste, but also its unexpected boldness. It’s a perfect way to end any meal with a bang!
Ingredients
- 2 cups heavy cream
- 1 cup whole milk
- 3/4 cup granulated sugar
- 2 teaspoons vanilla extract
- 2 1/2 teaspoons gelatin powder
- 1/4 cup cold water
- 1/2 cup sweet chili sauce
- Fresh red chilies, for garnish
Instructions
- Prepare the Gelatin: In a small bowl, sprinkle the gelatin over cold water and let it sit for about 5 minutes until softened.
- Heat the Cream: In a saucepan, combine the heavy cream, whole milk, and sugar. Cook over medium heat until the sugar dissolves and the mixture is warm, but not boiling. Stir in the vanilla extract.
- Add the Gelatin: Remove the saucepan from heat and stir in the softened gelatin until fully dissolved.
- Pour into Molds: Pour the mixture into individual serving molds or cups. Refrigerate for at least 4 hours, or until set.
- Prepare the Sauce: Just before serving, warm the sweet chili sauce in a saucepan and then drizzle it over the panna cotta. Garnish with fresh red chilies for an extra kick.
You may also like:
– 23 Easy Dinner Recipes Inspired by Qarth – GOT
– 19 Breakfast Recipes Inspired by the Gatsby Roaring 1920s
– 21 Children’s Birthday Cakes Inspired by Gotham City
If you enjoyed this blog you can visit us or check out our other blogs and learn a bit about us.
Disclaimer: This blog post is inspired by fictional universes and characters created by their respective rights holders. All related content and imagery remain the property of their respective rights holder. This fan-inspired content is for entertainment and commentary purposes only and is not affiliated with or endorsed by HBO, Disney, Warner Bros., Lionsgate, or any other rights holders. To explore the official source material, please visit:
HBO