

Gotham’s high-end culinary scene is a thrilling mix of fancy atmospheres and intense flavors, where every restaurant is a unique experience waiting to be had. From velvet booths that invite you to linger, to dishes that push the envelope of taste, this vibrant landscape serves up something for everyone. Whether you’re a seasoned foodie or simply looking for a night out, there’s no shortage of unforgettable recipes to savor in this gastronomic playground.
Crimson Carpaccio At Midnight

Crimson Carpaccio is a delightful recipe that showcases the rich flavors of thinly sliced beef, often complemented by a splash of citrus and fresh herbs. It’s light yet indulgent, making it a perfect starter for a late-night gathering or an elegant dinner. The tender meat combined with zesty accents creates a refreshing balance that dances on the palate.
This recipe is straightforward and fun to make, ideal for both novice cooks and seasoned chefs. With just a few ingredients and minimal prep time, you can impress your guests with a gourmet appetizer that feels luxurious without being overly complicated.
Ingredients
- 8 ounces beef tenderloin, trimmed
- 2 tablespoons olive oil
- 1 tablespoon lemon juice
- 1 tablespoon balsamic vinegar
- Salt and black pepper, to taste
- Fresh arugula, for garnish
- Parmesan cheese, shaved, for topping
Instructions
- Chill the Meat: Wrap the beef tenderloin tightly in plastic wrap and place it in the freezer for about 1 hour to firm up, making it easier to slice.
- Slice the Beef: Once firm, remove the beef from the freezer and use a sharp knife to cut it into very thin slices. Arrange the slices on a plate, slightly overlapping them.
- Make the Dressing: In a small bowl, whisk together olive oil, lemon juice, balsamic vinegar, salt, and pepper. Drizzle the dressing over the beef slices.
- Garnish: Top with fresh arugula and shaved Parmesan cheese for added flavor and presentation.
- Serve Immediately: Enjoy your Crimson Carpaccio chilled as a sophisticated appetizer.
Smoke-Kissed Lobster Beneath The Gargoyles
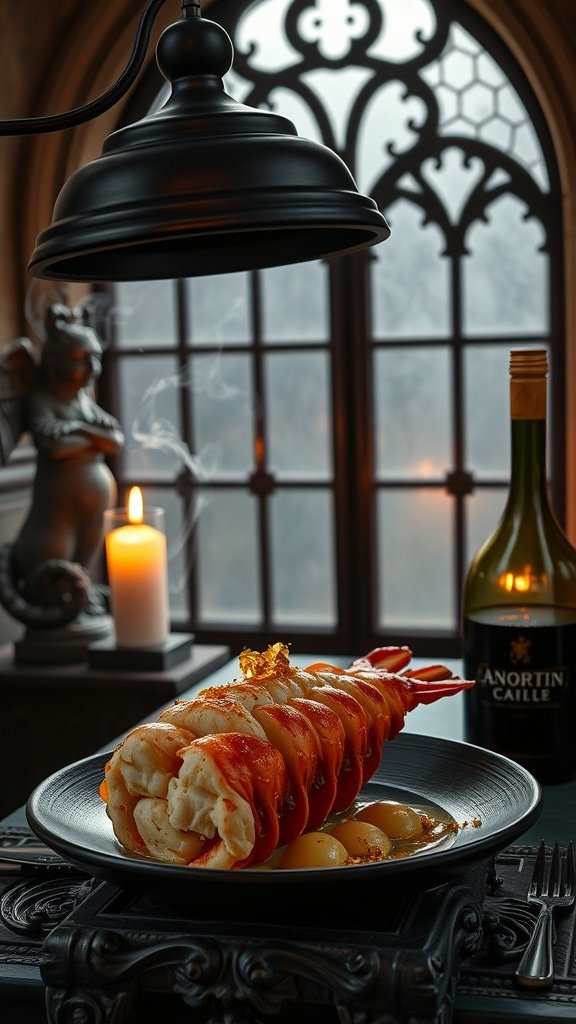
This smoke-kissed lobster recipe is a delightful combination of rich flavors and elegant presentation. The lobster is tender and juicy, with a hint of smokiness that elevates its natural sweetness. It’s a dish that impresses without being overly complicated, making it perfect for a special occasion or a cozy dinner at home.
Pairing this dish with roasted baby potatoes and a drizzle of citrus butter adds a beautiful balance. This recipe is straightforward, allowing anyone to showcase their culinary skills. With just a few ingredients and some simple steps, you can create a dish that feels luxurious and satisfying.
Ingredients
- 2 lobster tails
- 1 tablespoon olive oil
- Salt and pepper to taste
- 1 teaspoon smoked paprika
- 2 tablespoons unsalted butter
- 1 tablespoon fresh lemon juice
- 2 cloves garlic, minced
- Fresh parsley for garnish
Instructions
- Preheat your grill or smoker to medium-high heat.
- Prepare the lobster tails by cutting them in half lengthwise. Brush with olive oil and season with salt, pepper, and smoked paprika.
- Place the lobster tails on the grill, flesh side down, and cook for about 5-7 minutes, until the meat is opaque and cooked through.
- In a small saucepan, melt the butter over low heat. Add the minced garlic and cook until fragrant, about 1 minute. Stir in the lemon juice.
- Remove the lobster from the grill and drizzle with the garlic butter. Garnish with fresh parsley before serving.
Noir Duck With Ash-Cured Plum Sauce
Noir Duck with Ash-Cured Plum Sauce offers a delightful blend of rich flavors and elegant presentation. The duck is tender and juicy, perfectly complemented by the sweet and slightly smoky plum sauce. This dish strikes a balance between savory and sweet, making it a standout in any culinary setting.
This recipe may seem sophisticated, but it’s surprisingly simple to prepare at home. With a few key ingredients and some straightforward techniques, you can elevate your dining experience and impress your guests with a gourmet meal.
Ingredients
- 2 duck breasts
- Salt and pepper, to taste
- 1 cup plums, pitted and diced
- 1 tablespoon sugar
- 1 tablespoon balsamic vinegar
- 1 teaspoon smoked salt
- 1 tablespoon olive oil
- Fresh herbs (like thyme or rosemary), for garnish
Instructions
- Prepare the Duck: Score the skin of the duck breasts in a crisscross pattern without cutting into the meat. Season both sides with salt and pepper.
- Cook the Duck: In a skillet over medium heat, place the duck breasts skin-side down. Cook for about 6-8 minutes until the skin is crispy. Flip and cook for an additional 4-6 minutes until medium-rare. Remove and let rest for 5 minutes.
- Make the Plum Sauce: In a saucepan, combine the plums, sugar, balsamic vinegar, and smoked salt. Cook over medium heat until the plums break down and the sauce thickens, about 10 minutes.
- Slice and Serve: Slice the duck breasts thinly and arrange on a plate. Drizzle with the ash-cured plum sauce and garnish with fresh herbs before serving.
Caviar Eclipse On Black Porcelain

Caviar Eclipse on Black Porcelain is a luxurious dish that brings together the briny richness of caviar with the delicate touch of edible flowers. The combination offers a symphony of flavors that are both bold and subtle, making it a perfect choice for a high-end dining experience. While it may sound extravagant, the preparation is surprisingly straightforward, allowing you to impress your guests without spending hours in the kitchen.
This dish excels in presentation, with its striking contrast against black porcelain, creating an inviting canvas for the shiny caviar. It’s not only a feast for the taste buds but also a delight for the eyes, making it a fabulous centerpiece for any gourmet meal.
Ingredients
- 4 ounces of high-quality caviar
- 1 tablespoon of crème fraîche
- Edible flowers for garnish (like violets or pansies)
- 1 teaspoon of lemon zest
- Black porcelain plate
Instructions
- Prepare the Plate: Start by selecting a beautiful black porcelain plate. This will enhance the presentation of the dish.
- Layer the Base: Spoon a small dollop of crème fraîche in the center of the plate, creating a smooth base for the caviar.
- Add the Caviar: Carefully place the caviar on top of the crème fraîche, allowing it to shine and stand out.
- Garnish: Sprinkle lemon zest around the caviar for a fresh burst of flavor. Then, artistically place the edible flowers around the dish to add color and elegance.
- Serve: Present the dish immediately, encouraging your guests to savor the delicate flavors and textures of this luxurious treat.
Poison Apple Tarte Tatin With Spiced Wine Glaze

Poison Apple Tarte Tatin is a striking twist on the classic French dessert. This version features beautifully arranged apples that caramelize in a rich, spiced wine glaze, giving it a bold flavor profile that balances sweetness with a hint of warmth and spice. It’s both elegant and approachable, making it a perfect choice for any high-end gathering or cozy dinner.
Making this dessert is simpler than it looks! The process involves caramelizing the apples and then baking them with a buttery pastry top, resulting in a delightful upside-down tart. It offers an impressive presentation and an unforgettable taste, making it a true showstopper.
Ingredients
- 6 medium-sized apples, peeled, cored, and quartered
- 1 cup granulated sugar
- 1/2 cup unsalted butter
- 1 teaspoon cinnamon
- 1/2 teaspoon nutmeg
- 1/2 cup red wine
- 1 tablespoon lemon juice
- 1 sheet puff pastry, thawed
- Flour for dusting
Instructions
- Preheat your oven to 375°F (190°C).
- In a large skillet, melt the butter over medium heat. Add the granulated sugar and stir until dissolved, forming a light caramel.
- Add the apple quarters to the skillet, sprinkling with cinnamon and nutmeg. Cook for about 10 minutes, stirring occasionally, until the apples are slightly softened.
- Pour in the red wine and lemon juice, continuing to cook for another 5 minutes until the mixture thickens slightly.
- Transfer the apples to a tart pan, arranging them neatly. Roll out the puff pastry and cover the apples, tucking the edges down around the apples.
- Bake for 25-30 minutes, or until the pastry is golden brown. Allow cooling slightly before inverting onto a serving plate.
- Serve warm, drizzled with the remaining spiced wine glaze from the pan for extra flavor.
Velvet Beet Risotto In Candlelight
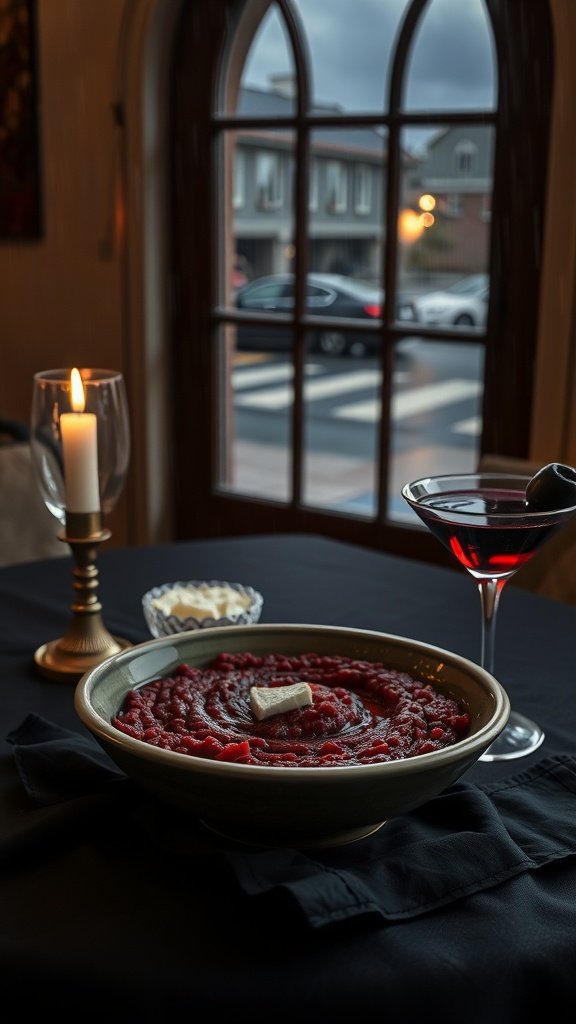
Indulge in the rich, earthy flavor of Velvet Beet Risotto, a dish that perfectly captures the essence of cozy, high-end dining. Its creamy texture, complemented by the natural sweetness of beets, makes it a showstopper on any table. This risotto is surprisingly simple to prepare, yet it feels luxurious and special enough for a romantic evening or an elegant gathering.
The vibrant color and unique taste of this dish not only please the palate but also create an inviting atmosphere. Each spoonful is a delightful blend of creamy Arborio rice, earthy beets, and a hint of tangy cheese. With a little patience and love, you can impress your guests or enjoy a comforting meal on a quiet night.
Ingredients
- 1 cup Arborio rice
- 2 medium beets, roasted and diced
- 4 cups vegetable broth
- 1 small onion, finely chopped
- 2 cloves garlic, minced
- 1/2 cup white wine (optional)
- 1/2 cup grated Parmesan cheese
- 2 tablespoons unsalted butter
- Salt and pepper to taste
- Fresh parsley, for garnish
Instructions
- Prepare the Broth: In a saucepan, heat the vegetable broth and keep it warm over low heat.
- Sauté the Aromatics: In a large skillet, melt 1 tablespoon of butter over medium heat. Add the chopped onion and garlic, cooking until softened and fragrant.
- Add the Rice: Stir in the Arborio rice, allowing it to toast for about 1-2 minutes until slightly translucent.
- Pour in the Wine: If using, add the white wine and cook until it’s mostly absorbed by the rice.
- Incorporate the Broth: Gradually add the warm vegetable broth, one ladle at a time, stirring frequently. Wait until the liquid is mostly absorbed before adding more. Continue this process for about 18-20 minutes until the rice is creamy and al dente.
- Mix in Beets and Cheese: Once the rice is cooked, gently fold in the roasted beets, remaining butter, and Parmesan cheese. Season with salt and pepper to taste.
- Serve: Plate the risotto and garnish with fresh parsley. Enjoy this beautiful dish warm, perhaps alongside a glass of wine!
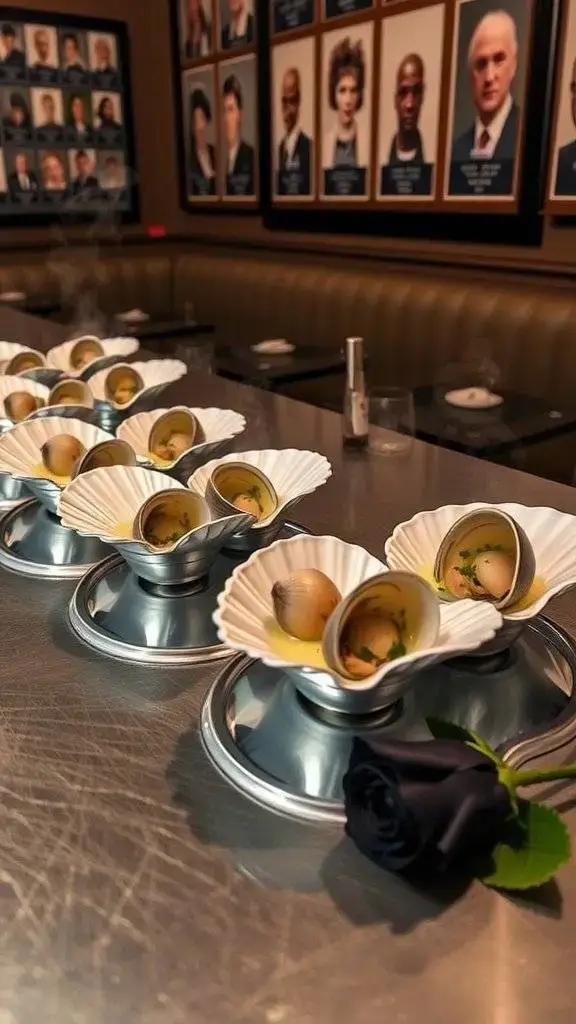
Truffle Sashimi In The Ice Lounge

Truffle sashimi is a luxurious and refreshing dish that exemplifies the elegance of high-end dining. Its delicate flavors create a unique experience, merging the earthiness of truffles with the bright, clean taste of fresh sashimi. This dish is not only a treat for the palate but is also relatively easy to prepare, making it perfect for impressing guests at your next dinner party.
The combination of high-quality fish with truffle oil adds a sophisticated twist that is sure to delight. Served chilled, this sashimi is perfect for warm evenings or as an appetizer at a lavish gathering. Let’s jump into the ingredients and instructions for this exquisite dish!
Ingredients
- 200g sushi-grade fish (like tuna or salmon)
- 1-2 tablespoons truffle oil
- 1 teaspoon sea salt
- Fresh herbs (like chives or microgreens) for garnish
- 1 tablespoon soy sauce (optional)
- Wasabi (optional)
Instructions
- Prepare the Fish: Begin by slicing the sushi-grade fish into thin, even pieces. Aim for about 1/4 inch thick for the best texture.
- Plate the Sashimi: Arrange the sashimi slices on a chilled plate, slightly overlapping them for a beautiful presentation.
- Drizzle with Truffle Oil: Lightly drizzle the truffle oil over the sashimi. Be careful not to overdo it, as truffle oil has a strong flavor.
- Season: Sprinkle sea salt over the fish to enhance the flavors. You can also add a dash of soy sauce on the side if desired.
- Garnish: Finish off with fresh herbs to add a pop of color and extra flavor. Serve immediately for the best experience.
Charred Octopus With Ink Aioli
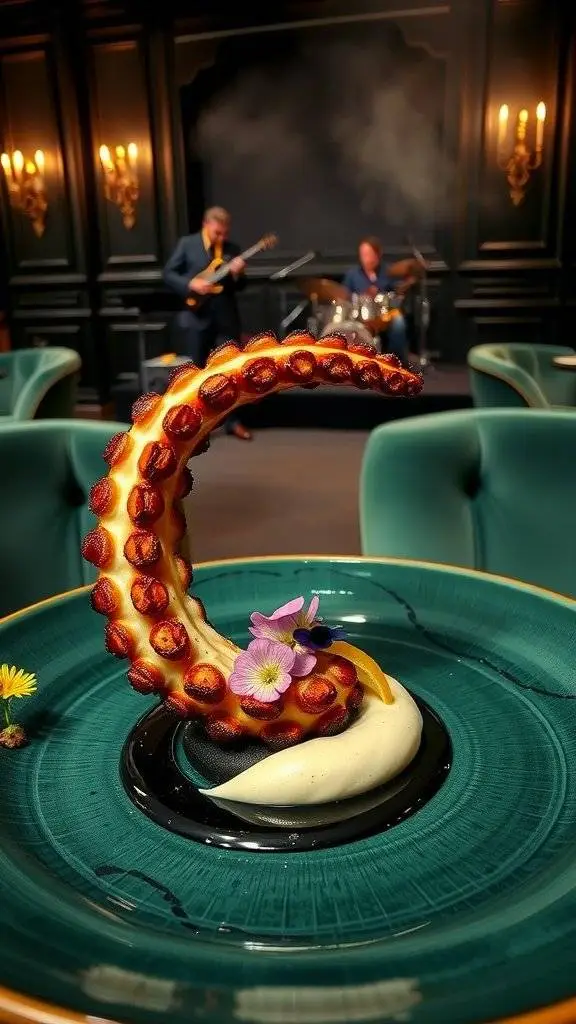
Charred octopus is a stunning dish that brings a taste of the sea right to your plate. The tender, smoky flavor of the octopus pairs perfectly with a rich and creamy ink aioli, creating an unforgettable culinary experience. This recipe is not overly complicated and can be tackled by home cooks looking to impress their guests or just treat themselves to a gourmet meal.
The octopus is charred to perfection, giving it a delightful texture that contrasts beautifully with the smoothness of the aioli. With just a few ingredients and some careful cooking techniques, you can create this high-end dish in your own kitchen.
Gold-Dusted Bone Marrow Canoes
Gold-dusted bone marrow canoes are a luxurious treat that adds a touch of elegance to any dining experience. The rich, buttery flavor of the marrow paired with a hint of smokiness creates an indulgent taste that’s simply unforgettable. Perfect for impressing dinner guests, this recipe is surprisingly easy to prepare and makes for a delightful starter or a unique addition to your main course.
The best part? These canoes are versatile; you can enjoy them on toasted bread, with fresh herbs, or even topped with a sprinkle of sea salt. The striking presentation, combined with the unique flavor, makes them a standout dish in any high-end culinary setting.
Ingredients
- 4 large bone marrow bones, cut lengthwise
- 2 tablespoons olive oil
- Salt and pepper to taste
- Edible gold leaf (for garnish)
- Fresh parsley, chopped (for garnish)
- Toasted bread or crostini (for serving)
Instructions
- Preheat your oven to 450°F (230°C).
- Place the bone marrow bones on a baking sheet, cut side up. Drizzle the olive oil over the bones and season with salt and pepper.
- Bake for about 15-20 minutes, or until the marrow is bubbling and slightly golden.
- Remove from the oven and let cool slightly. Carefully add small pieces of edible gold leaf on top for a luxurious touch.
- Serve warm with toasted bread and garnish with chopped parsley for a vibrant finish.
Crimson Chocolate Sphere With A Hot Espresso Pour

This recipe for a crimson chocolate sphere is a delightful mix of rich chocolate and bold espresso. The stunning presentation makes it perfect for impressing guests or treating yourself to something special. While it may seem a bit complex, the process is straightforward with a little patience and practice.
The outer shell is made with smooth, silky chocolate that melts beautifully when a hot espresso is poured over it. The combination of flavors offers a sweet and slightly bitter contrast that is simply irresistible.
Ingredients
- 200g dark chocolate (preferably 70% cocoa)
- 100ml heavy cream
- 2 tablespoons sugar
- 1 teaspoon vanilla extract
- 2 shots of espresso
- Edible glitter (optional, for decoration)
- Crushed cookies or biscuit crumbs (for serving)
Instructions
- Melt the Chocolate: In a heatproof bowl, melt the dark chocolate over a pot of simmering water, stirring until smooth. Allow it to cool slightly.
- Prepare the Molds: Lightly grease the inside of silicone sphere molds. Pour melted chocolate into the molds, swirling to coat evenly. Refrigerate until set, about 30 minutes.
- Make the Filling: In a small saucepan, heat the cream, sugar, and vanilla extract until warm. Pour this mixture over the remaining melted chocolate and stir until smooth. Let it cool slightly.
- Assemble the Spheres: Once the chocolate shells are set, carefully remove them from the molds. Fill half of the spheres with the chocolate filling and place the other halves on top, sealing them gently.
- Serve: Place the filled spheres on a plate with crushed cookies around them. Just before serving, pour hot espresso over the spheres to let them melt and reveal the filling inside. Sprinkle with edible glitter if desired.
Bitter Elegance: Smoked Quail Eggs With Black Garlic Aioli

This recipe for smoked quail eggs with black garlic aioli is a delightful blend of smoky, rich flavors with a hint of sweetness. The delicate texture of the quail eggs pairs beautifully with the creamy, umami-laden aioli, creating a dish that’s both refined and satisfying. While it may seem fancy, making this dish at home is simpler than you might think!
The gentle smokiness of the eggs complements the deep, savory notes of the black garlic, creating a unique flavor profile that will impress your guests. Serve these as an elegant appetizer or a light snack at your next gathering. Here’s how to make them!
Ingredients
- 12 quail eggs
- 1 tablespoon olive oil
- 1 teaspoon smoked salt
- 4 cloves black garlic
- 1/2 cup mayonnaise
- 1 tablespoon lemon juice
- Salt and pepper to taste
Instructions
- Prepare the Eggs: Place quail eggs in a saucepan and cover with water. Bring to a gentle boil, then reduce heat and simmer for 4 minutes. Remove eggs and place in an ice bath to cool.
- Smoke the Eggs: Once cooled, peel the eggs. Preheat a smoker or stovetop smoking setup. Lightly coat the eggs with olive oil and sprinkle with smoked salt. Smoke the eggs for about 15-20 minutes, allowing them to absorb the flavor.
- Make the Aioli: In a bowl, combine black garlic, mayonnaise, lemon juice, salt, and pepper. Mash the black garlic into the mayonnaise until smooth and well mixed.
- Serve: Halve the smoked quail eggs, plate them, and drizzle the black garlic aioli over the top. Enjoy these elegant bites as a stylish appetizer!
Crime Scene Canapés: Crimson-Beet Cured Salmon On Charcoal Blinis

Culinary creativity knows no bounds, and these crimson-beet cured salmon on charcoal blinis are a perfect example. This dish combines the rich flavors of salmon and earthy beets, offering a delightful balance of taste and texture. The subtle smokiness of the charcoal blinis complements the sweetness of the beet-cured salmon, making every bite a treat for the senses.
Making this dish is relatively simple, so whether you’re hosting a chic gathering or just want to impress at a dinner party, these canapés are a fantastic choice. With vibrant colors and a striking presentation, they’re sure to grab attention and satisfy even the most discerning palates.
Ingredients
- 4 ounces fresh salmon, skinless
- 1 medium-sized beet, cooked and peeled
- 1 tablespoon sea salt
- 1 tablespoon sugar
- 1 tablespoon lemon juice
- 1/4 cup crème fraîche
- 1 package ready-made charcoal blinis
- Fresh dill for garnish
- Black olives for garnish
Instructions
- Cure the Salmon: In a blender, combine the cooked beet, sea salt, sugar, and lemon juice until smooth. Spread the beet mixture on both sides of the salmon. Cover and refrigerate for at least 4 hours or overnight.
- Prepare the Blinis: While the salmon is curing, heat the charcoal blinis according to package instructions.
- Assemble the Canapés: Once the salmon is cured, slice it thinly. Place a slice of salmon on each blinis, followed by a dollop of crème fraîche.
- Garnish: Top with fresh dill and a black olive for an extra touch of flavor and presentation.
- Serve: Arrange the canapés on a platter and serve immediately for a stunning appetizer.
Rogue’S Risotto: Inked Arborio With Truffle Foam
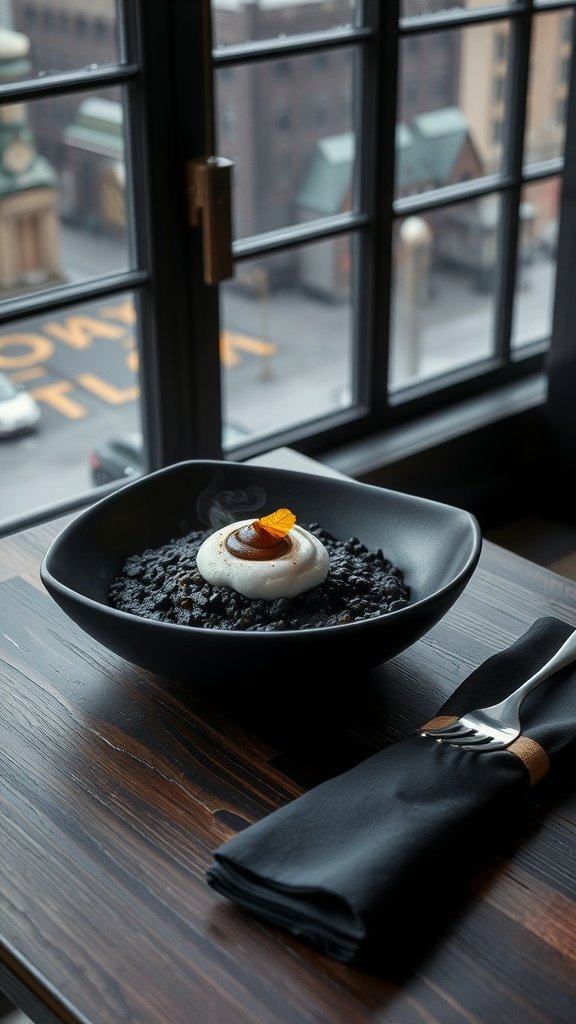
Rogue’s Risotto is a striking dish that combines the creaminess of Arborio rice with a unique black ink, typically from cuttlefish or squid. This dish not only tantalizes the taste buds but also offers a visual feast, boasting a deep, dramatic hue. The addition of truffle foam elevates the flavor profile, introducing earthy and luxurious notes that perfectly complement the risotto’s richness.
While it may seem intimidating, making this dish is quite straightforward. With a few essential ingredients and some patience, you can whip up a restaurant-quality meal in your own kitchen. Perfect for impressing guests or treating yourself to a gourmet experience, this risotto is sure to delight.
Ingredients
- 1 cup Arborio rice
- 4 cups vegetable or seafood stock
- 1/4 cup dry white wine
- 2 tablespoons olive oil
- 1 small onion, finely chopped
- 2 cloves garlic, minced
- 2 tablespoons cuttlefish or squid ink
- 1/2 cup grated Parmesan cheese
- Salt and pepper to taste
- For the truffle foam:
- 1 cup heavy cream
- 1 tablespoon truffle oil
- Salt to taste
Instructions
- Prepare the Stock: In a pot, bring the vegetable or seafood stock to a gentle simmer. Keep it warm on low heat.
- Sauté Aromatics: In a separate pan, heat olive oil over medium heat. Add chopped onion and garlic, cooking until soft and translucent.
- Add Rice: Stir in the Arborio rice, coating it with the oil and letting it toast for about 2 minutes.
- Deglaze: Pour in the white wine, stirring until it’s mostly absorbed.
- Add Stock Gradually: Begin adding warm stock to the rice a ladle at a time, stirring continuously and allowing it to absorb before adding more. Continue for about 18-20 minutes until rice is al dente.
- Incorporate Ink and Cheese: Stir in the squid ink, mixing until the rice turns a deep black. Add Parmesan cheese, and season with salt and pepper to taste.
- Make the Truffle Foam: In a small saucepan, heat the heavy cream until just simmering. Remove from heat and whisk in truffle oil and salt. Use an immersion blender to froth the mixture.
- Serve: Spoon the risotto into bowls, topping each with a dollop of truffle foam. Enjoy the rich flavors and stunning presentation!
Femme Fatale Fondue: Blood Orange & Dark Chocolate Duo

This fondue recipe brings a seductive twist to the classic chocolate experience. The pairing of rich dark chocolate with the tangy notes of blood orange creates a delightful contrast that’s both bold and refreshing. It’s perfect for a cozy night in or an intimate gathering with friends and loved ones.
Plus, it’s surprisingly simple to whip up. Just melt the chocolate, mix in some blood orange juice and zest, and you’re ready to dive into a world of flavor. Serve it with a variety of dippables like fruits, cookies, and marshmallows for a fun and interactive dessert experience that everyone will love!
Ingredients
- 8 ounces dark chocolate, chopped
- 1/2 cup heavy cream
- 1/4 cup blood orange juice
- 1 tablespoon blood orange zest
- Fresh strawberries, for dipping
- Shortbread cookies, for dipping
- Marshmallows, for dipping
Instructions
- Prepare the Chocolate: In a medium saucepan over low heat, combine the heavy cream and chopped dark chocolate. Stir until the chocolate is melted and the mixture is smooth.
- Add Blood Orange: Remove the saucepan from heat and stir in the blood orange juice and zest until well combined.
- Transfer to Fondue Pot: Pour the chocolate mixture into a fondue pot or a heat-safe bowl to keep it warm.
- Serve: Arrange fresh strawberries, shortbread cookies, and marshmallows on a platter for dipping.
- Enjoy: Use skewers or forks to dip your favorite treats into the luscious chocolate mixture and enjoy the sweet and tangy flavors!
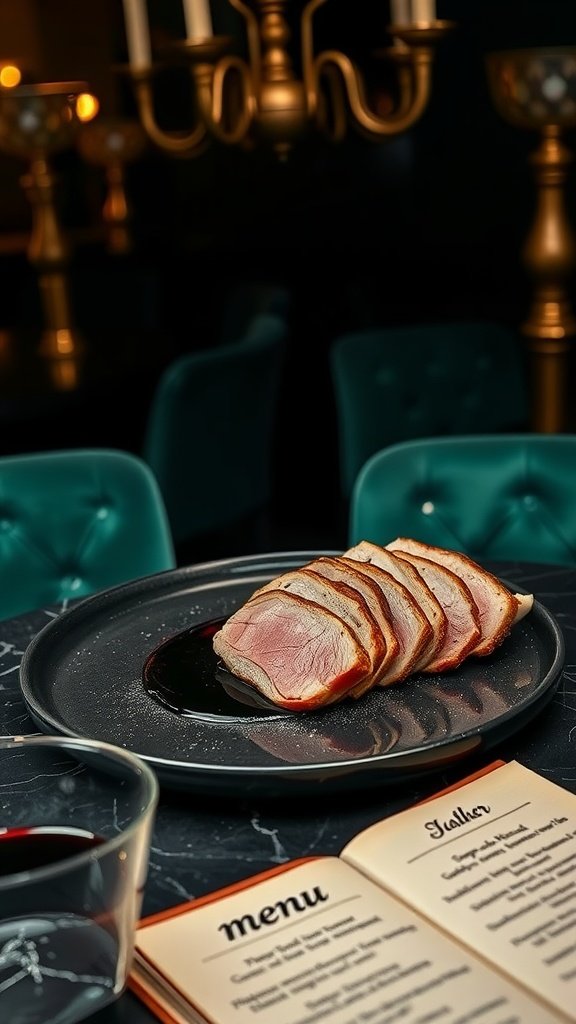
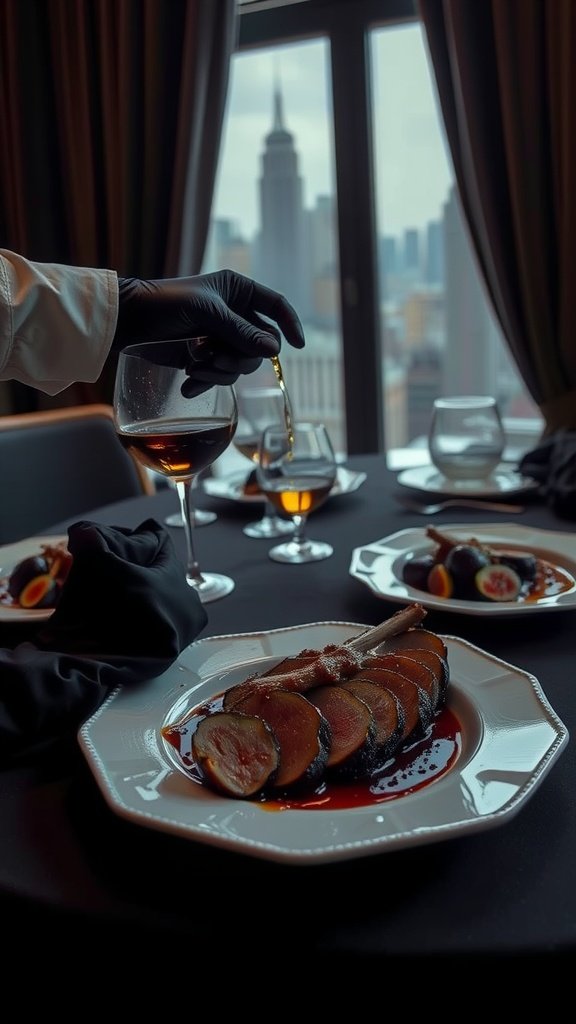
The Don’s Duck: Seared Breast With Cognac Fig Glaze

The Don’s Duck is a luxurious dish that brings together the rich flavors of seared duck breast and a sweet Cognac fig glaze. The juicy, tender meat pairs beautifully with the aromatic sweetness of figs, creating a delightful balance. Perfect for a special occasion or when you want to impress, this recipe is surprisingly simple to master.
The glaze adds a touch of sophistication, making each bite memorable. Cooking the duck to crispy perfection while keeping it moist can be a rewarding experience. Get ready to elevate your culinary skills with this elegant dish!
Ingredients
- 2 duck breasts
- Salt and pepper, to taste
- 1 cup fresh figs, quartered
- 1/2 cup Cognac
- 1/2 cup chicken stock
- 2 tablespoons honey
- 1 tablespoon balsamic vinegar
- 1 tablespoon unsalted butter
Instructions
- Prepare the Duck: Score the skin of the duck breasts in a crosshatch pattern. Season both sides generously with salt and pepper.
- Sear the Duck: Place the duck breasts skin-side down in a cold skillet. Turn the heat to medium and allow the fat to render out and the skin to crisp, about 6-8 minutes. Flip the breasts and cook for an additional 4-6 minutes, until medium rare. Remove the duck from the pan and let it rest.
- Make the Glaze: In the same skillet, add quartered figs and cook for 2 minutes. Pour in Cognac and allow it to reduce by half. Add chicken stock, honey, and balsamic vinegar, stirring to combine. Simmer until the sauce thickens slightly.
- Finish the Sauce: Stir in the butter to add richness and gloss to the glaze. Taste and adjust seasoning if needed.
- Serve: Slice the duck and arrange it on plates. Drizzle the Cognac fig glaze over the top and serve immediately.
Cold Case Carpaccio: Wagyu With Burnt Lemon Dust
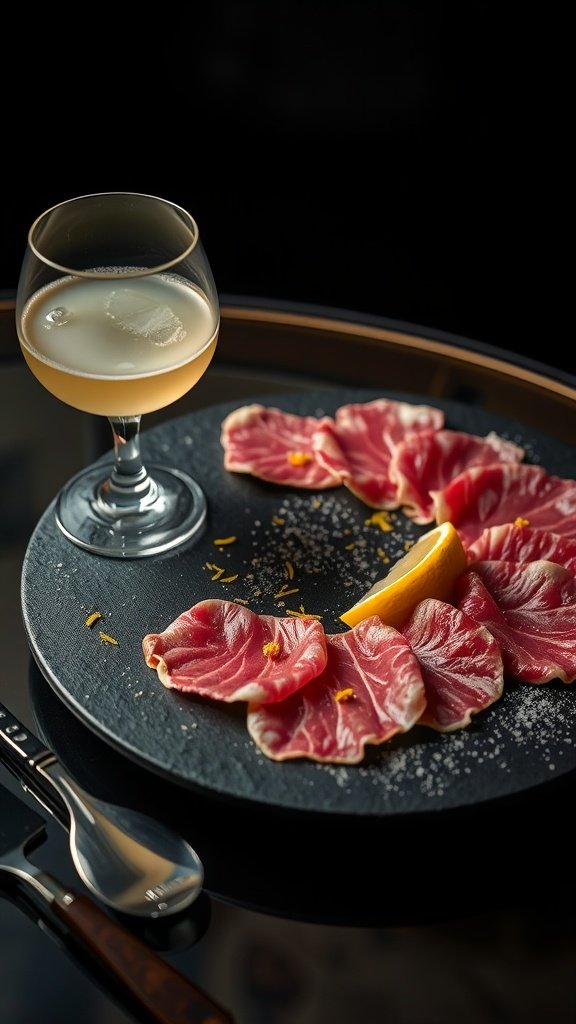
This recipe is a luxurious take on classic carpaccio, featuring the rich flavors of Wagyu beef paired with the zesty kick of burnt lemon dust. The tender meat melts in your mouth, offering a delightful combination of textures and tastes. It’s a surprisingly simple dish to prepare, making it perfect for impressing guests or treating yourself to something special.
The burnt lemon dust adds an unexpected depth, enhancing the natural flavors of the beef while introducing a hint of smokiness. Serve it as an elegant appetizer or a light main course, and watch how it elevates your dining experience!
Ingredients
- 8 oz Wagyu beef, thinly sliced
- 1 lemon
- 1 tablespoon olive oil
- Salt, to taste
- Black pepper, to taste
- Microgreens or arugula, for garnish
Instructions
- Prepare the Beef: Freeze the Wagyu beef for about 30 minutes to make it easier to slice thinly. Using a sharp knife, cut the beef into paper-thin slices.
- Make the Burnt Lemon Dust: Over a flame or on a grill, carefully char the lemon until the skin is blackened. Allow it to cool, then zest the lemon and finely chop the charred skin.
- Plate the Carpaccio: Arrange the Wagyu slices on a serving plate in a circular pattern. Drizzle with olive oil and season with salt and black pepper.
- Finish with Burnt Lemon Dust: Sprinkle the burnt lemon dust over the beef and garnish with microgreens or arugula for a fresh touch.
- Serve: Enjoy immediately while the flavors are vibrant and fresh.
Black Mask Bisque: Lobster With Sherry Reduction
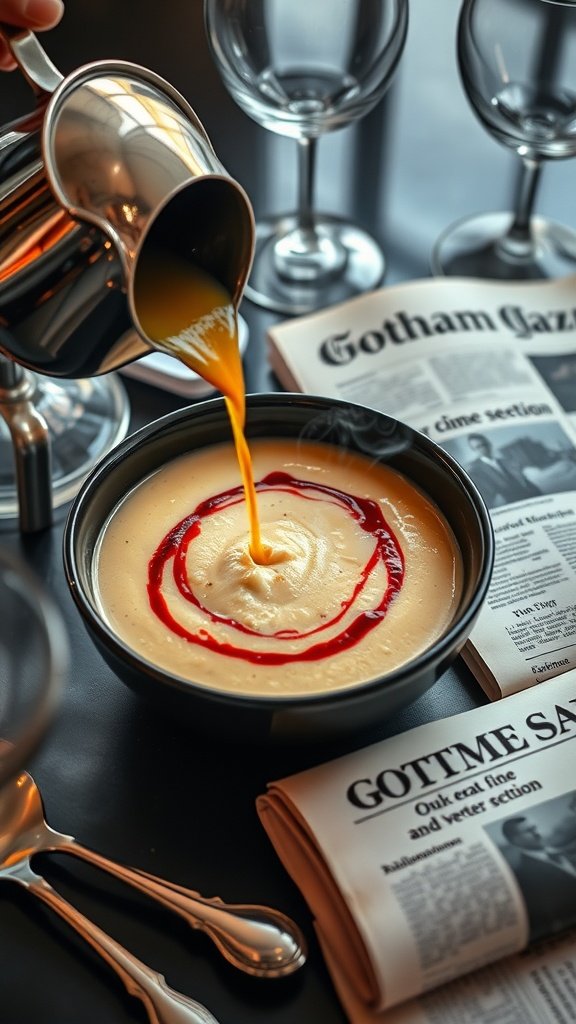
The Black Mask Bisque is a luxurious blend of flavors, featuring tender lobster meat enveloped in a creamy, rich base. The sherry reduction adds a depth of flavor that enhances the sweetness of the lobster, creating a dish that feels indulgent yet approachable for those who enjoy cooking. This bisque is perfect for special occasions or when you’re craving something sophisticated at home.
Making this bisque is simpler than it sounds! With just a few quality ingredients, you can whip up a comforting bowl of goodness that showcases the elegance of seafood without overwhelming your palate. It’s a dish that invites conversation and compliments at the dinner table.
Ingredients
- 2 cups lobster meat, cooked and chopped
- 4 cups seafood stock
- 1 cup heavy cream
- 1/4 cup dry sherry
- 1 medium onion, diced
- 2 cloves garlic, minced
- 2 tablespoons butter
- 1 teaspoon thyme, dried
- Salt and pepper to taste
- Chives or parsley for garnish
Instructions
- Start by melting butter in a large pot over medium heat. Add the diced onion and cook until soft and translucent.
- Stir in the minced garlic and thyme, cooking for an additional minute until fragrant.
- Pour in the dry sherry and let it simmer for a few minutes to reduce slightly.
- Add the seafood stock and bring the mixture to a boil. Reduce heat and let it simmer for about 10 minutes.
- Stir in the heavy cream and cooked lobster meat, allowing it to heat through. Season with salt and pepper to taste.
- Use an immersion blender to blend the bisque until smooth, or transfer in batches to a blender if you prefer a silky texture.
- Serve hot, garnished with chives or parsley. Enjoy your luxurious lobster bisque!
Widow’s Web Tartlets: Caramelized Onion & Goat Cheese In Charcoal Crusts

Widow’s Web Tartlets are a delightful blend of flavors that balance sweet and savory. The caramelized onions bring a rich, deep flavor that pairs perfectly with the tangy goat cheese, all nestled in a unique charcoal crust that adds a striking visual appeal. These tartlets are surprisingly simple to make and are sure to impress at any gathering.
With their elegant presentation and complex taste, they’re perfect for a high-end dining experience at home. Whether you’re hosting a dinner party or simply treating yourself, these tartlets are a great choice.
Ingredients
- 1 cup all-purpose flour
- 1/2 cup activated charcoal powder
- 1/4 teaspoon salt
- 1/4 cup cold unsalted butter, cubed
- 1/4 cup cold water
- 2 large onions, thinly sliced
- 2 tablespoons olive oil
- 1/4 teaspoon sugar
- 4 ounces goat cheese, crumbled
- Fresh thyme, for garnish
Instructions
- Make the Crust: In a bowl, mix flour, charcoal powder, and salt. Cut in the butter until the mixture resembles coarse crumbs. Gradually add cold water, mixing until a dough forms. Wrap in plastic wrap and refrigerate for 30 minutes.
- Prepare the Onions: In a skillet, heat olive oil over medium heat. Add sliced onions and sugar, cooking until soft and caramelized, about 15-20 minutes, stirring frequently.
- Preheat the Oven: Preheat your oven to 375°F (190°C). Roll out the chilled dough and cut into rounds to fit tartlet pans. Press into the pans and trim the edges.
- Assemble the Tartlets: Spoon the caramelized onions into each crust, then sprinkle with crumbled goat cheese. Bake in the preheated oven for 20-25 minutes, or until the crust is lightly golden.
- Serve: Allow to cool slightly before garnishing with fresh thyme. Enjoy warm or at room temperature!
Nocturne Nigiri: Sea Urchin & Caviar Over Black Rice

Nocturne Nigiri combines the rich, oceanic flavor of sea urchin with the luxurious touch of caviar, all served on a bed of visually striking black rice. This dish is not only a feast for the eyes but also a delightful treat for the palate, balancing umami and brininess in one bite. While it may seem fancy, the recipe is surprisingly straightforward, making it accessible for home cooks looking to impress.
The black rice, also known as forbidden rice, adds an intriguing depth to the dish, both in flavor and presentation. Topped with vibrant sea urchin and caviar, this nigiri brings a touch of elegance to any dining table. Whether it’s a special occasion or just a night in, making this dish is a delicious way to explore high-end culinary experiences at home.
Ingredients
- 1 cup black rice
- 1 1/2 cups water
- 1/4 teaspoon salt
- 4 ounces fresh sea urchin
- 2 ounces caviar
- 1 tablespoon rice vinegar
- 1 teaspoon sugar
- Thinly sliced scallions for garnish
Instructions
- Rinse the black rice under cold water until the water runs clear. In a saucepan, combine the black rice, water, and salt. Bring to a boil, then reduce heat to low, cover, and simmer for about 30-35 minutes, or until the rice is tender and the water is absorbed.
- Once cooked, remove from heat and let the rice sit covered for an additional 10 minutes. Fluff the rice with a fork and gently mix in rice vinegar and sugar.
- While the rice cools, prepare the sea urchin. Carefully open the sea urchin and scoop out the roe, taking care not to damage it. Set aside.
- Once the rice is cool, form small, oval-shaped mounds of rice and place them on a serving platter.
- Top each mound of rice with a piece of sea urchin and a small dollop of caviar. Garnish with thinly sliced scallions for an extra touch.
- Serve immediately and enjoy your gourmet homemade Nocturne Nigiri!
Crooked Creme Brûlée With Shattered Sugar Top
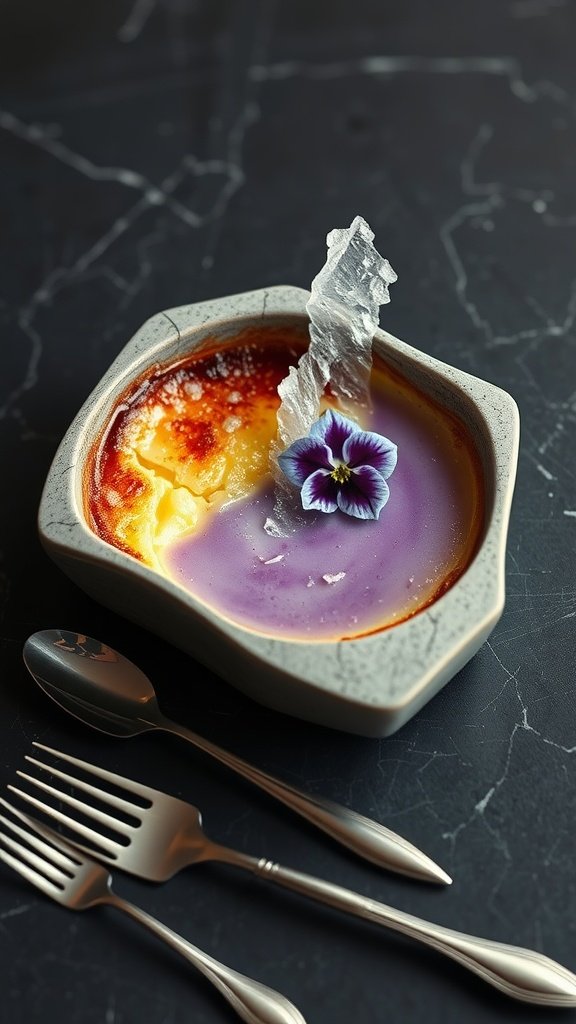
Creamy, rich, and a little playful, the crooked crème brûlée is a delightful twist on the classic dessert. It features a silky custard base that melts in your mouth, topped with a beautifully shattered layer of caramelized sugar. The combination of textures and flavors makes for a show-stopping end to any meal, and its sophisticated appearance will impress your guests without requiring complex techniques.
This recipe is surprisingly straightforward and perfect for both novice and experienced bakers. With a few simple ingredients and some patience, you can create a dessert that captures both the art and science of cooking.
Ingredients
- 2 cups heavy cream
- 1 cup whole milk
- 1 cup granulated sugar, divided
- 4 large egg yolks
- 1 teaspoon vanilla extract
- Pinch of salt
- 1/4 cup additional granulated sugar for topping
Instructions
- Preheat your oven to 325°F (160°C). In a saucepan, combine heavy cream, whole milk, and 1/2 cup of sugar. Heat over medium until the mixture is just simmering, then remove from heat.
- In a bowl, whisk together egg yolks, remaining 1/2 cup sugar, vanilla extract, and salt until well combined. Gradually pour the warm cream mixture into the egg yolk mixture, whisking constantly to avoid scrambling the eggs.
- Strain the mixture through a fine sieve into a large measuring cup to remove any egg bits. Pour into ramekins, filling them about three-quarters full.
- Place the ramekins in a baking dish and fill the dish with hot water until it reaches halfway up the sides of the ramekins. Bake for 30-35 minutes, or until the edges are set but the centers still slightly jiggle.
- Remove from the oven and let cool to room temperature. Refrigerate for at least two hours, or overnight.
- Before serving, sprinkle a layer of granulated sugar evenly across the top of each crème brûlée. Using a kitchen torch, caramelize the sugar until it becomes golden and hardens; alternatively, place under a broiler for a few seconds.
- Let the sugar cool for a minute before serving, allowing the top to shatter beautifully as you dig in.
The Riddler’s Root Vegetable Mosaic
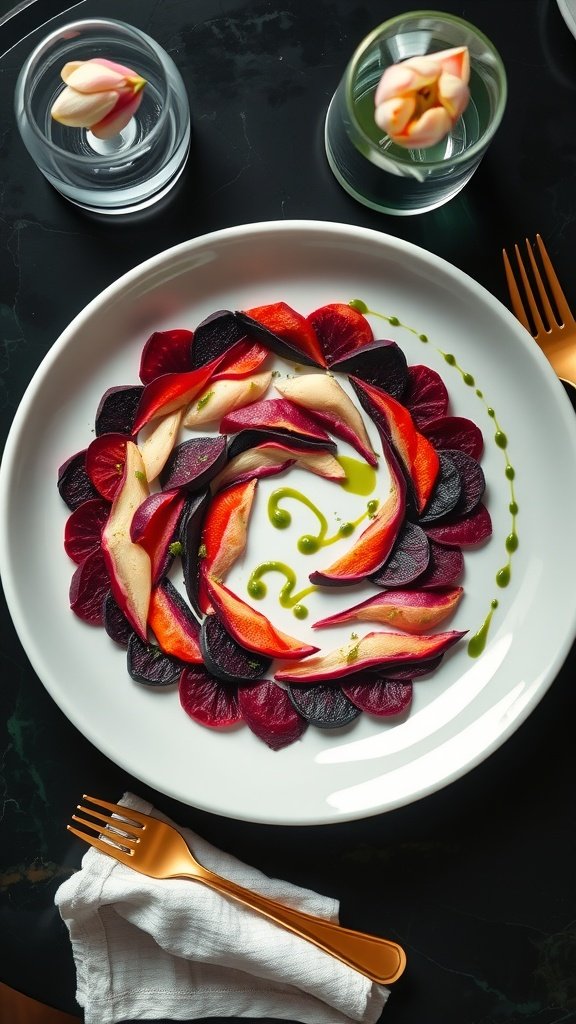
The Riddler’s Root Vegetable Mosaic is a stunning dish that combines the earthy flavors of various root vegetables into a vibrant and artistic presentation. This recipe is not only a feast for the eyes but also offers a delightful balance of textures and tastes. The natural sweetness of beets and carrots shines through, while a hint of herb-infused oil adds freshness. Perfect for sharing at gatherings, this dish is surprisingly easy to make, allowing you to impress your guests without spending all day in the kitchen.
With a playful arrangement of thinly sliced vegetables, this mosaic captures the essence of high-end dining while being accessible to home cooks. It’s a delightful way to celebrate seasonal produce and showcases how simplicity can lead to beautiful results. Let’s get to the ingredients and the steps to create this elegant dish!
Criminal Caviar Tasting Trio

This dish is a luxurious trio of caviar that offers a delightful mix of flavors and textures. Each type of caviar brings its own unique essence, making it a perfect choice for sophisticated gatherings. The taste is rich and briny, with a hint of creaminess that pairs beautifully with the accompaniments.
Making this dish is quite simple, allowing you to impress guests without too much fuss. With just a few high-quality ingredients and careful presentation, you can create an unforgettable culinary experience.
Ingredients
- 3 types of caviar (e.g., beluga, osetra, and salmon roe)
- 1 cup crème fraîche
- 1 small red onion, finely chopped
- 1 lemon, cut into wedges
- 4 oz blinis or toasted bread
- Fresh chives for garnish
Instructions
- Prepare the Blinis: If using store-bought blinis, warm them according to package instructions. For homemade, mix flour, milk, eggs, and a pinch of salt, then cook small rounds on a hot skillet until golden.
- Arrange the Caviar: On a serving platter, place small dollops of each type of caviar in separate areas, allowing guests to sample and compare.
- Add Accompaniments: Spoon crème fraîche beside the caviar, sprinkle chopped red onion, and garnish with fresh chives for a pop of color.
- Serve with Lemon: Provide lemon wedges for guests to squeeze over the caviar, enhancing the flavors.
- Enjoy: Invite your guests to create their own combinations on the blinis, mixing flavors as they please.
Bloody Belle Pavlova With Cherry Smoke

The Bloody Belle Pavlova is an eye-catching dessert that combines the lightness of meringue with the rich flavors of cherries and a hint of smoke. This impressive dish not only tastes amazing with its sweet and tart balance but also brings a dramatic flair to any gathering. Perfect for those looking to impress with minimal effort, this pavlova is surprisingly simple to whip up.
With a crispy exterior and a soft, marshmallow-like interior, each bite melts in your mouth. The cherry topping adds a vibrant splash of color and flavor, while the smoky element enhances the overall experience. Whether it’s for a special occasion or a casual dinner, this dessert is sure to steal the show.
Ingredients
- 4 large egg whites
- 1 cup granulated sugar
- 1 teaspoon vanilla extract
- 1 teaspoon white vinegar
- 1 tablespoon cornstarch
- 1 cup heavy whipping cream
- 2 tablespoons powdered sugar
- 1 cup cherries, pitted and halved
- 1/2 cup cherry syrup or sauce
- Smoked wood chips (for infusing smoke)
Instructions
- Preheat your oven to 250°F (120°C). Line a baking sheet with parchment paper and draw a 9-inch circle on it as a guide.
- In a clean mixing bowl, beat the egg whites until soft peaks form. Gradually add granulated sugar, beating until the mixture is glossy and stiff peaks form.
- Gently fold in vanilla extract, vinegar, and cornstarch until just combined. Spoon the meringue onto the prepared baking sheet, shaping it into a round nest.
- Bake for about 1 hour or until the pavlova is dry to the touch. Turn off the oven and let it cool completely inside.
- While the pavlova cools, whip the heavy cream with powdered sugar until soft peaks form. Wash and prepare the cherries.
- Once cooled, top the pavlova with whipped cream and cherries. Drizzle with cherry syrup.
- To create the smoky effect, place wood chips in a smoker box or on a piece of foil in a grill. Light it and let the smoke infuse for a few minutes before serving the pavlova with a light touch of smoke.
Ace’s Alibi: Pork Belly Cubes With Charred Apple Glaze
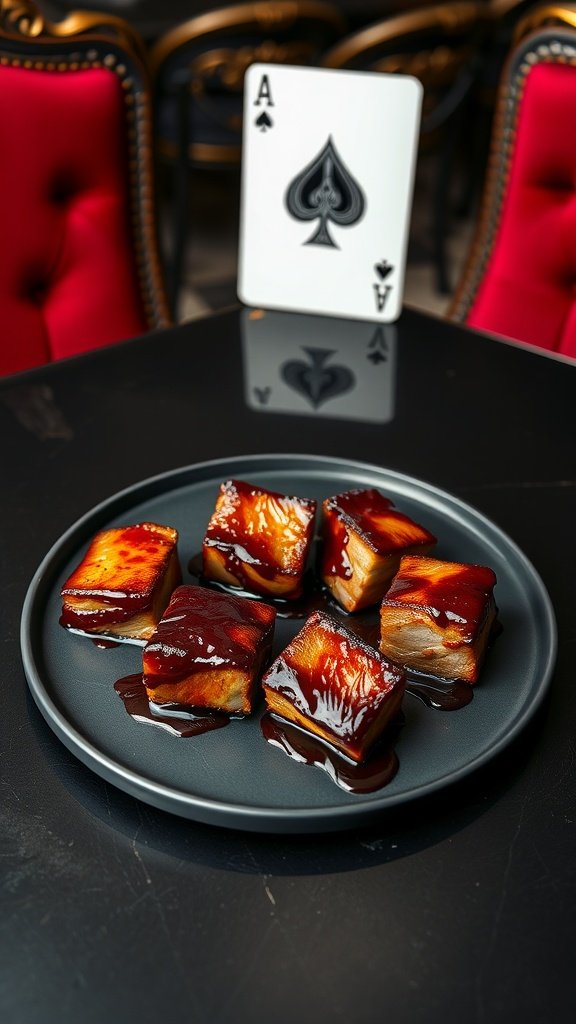
Pork belly cubes with charred apple glaze offer a delightful blend of flavors that will tantalize your taste buds. The rich, tender meat is perfectly complemented by the sweet and smoky notes of the glaze, making this dish a standout in any culinary setting. Not only does it taste incredible, but it’s also surprisingly simple to prepare, making it a fantastic choice for both novice and seasoned cooks.
The process of slow-cooking the pork belly allows the fat to render beautifully, resulting in melt-in-your-mouth bites. The charred apple glaze adds an exciting twist, with its balanced sweetness and depth, elevating the dish to a new level. Whether you’re entertaining guests or simply indulging in a comforting meal at home, these pork belly cubes are sure to impress.
Ingredients
- 1 lb pork belly, cut into 1-inch cubes
- 1 cup apple cider
- 1/2 cup brown sugar
- 1/4 cup soy sauce
- 2 tablespoons apple cider vinegar
- 1 tablespoon smoked paprika
- 1 teaspoon black pepper
- 1 tablespoon olive oil
- 1/2 cup diced apples
- Salt, to taste
Instructions
- Preheat your oven to 300°F (150°C). In a mixing bowl, combine the apple cider, brown sugar, soy sauce, apple cider vinegar, smoked paprika, black pepper, and salt. Stir until well mixed.
- In a large oven-safe skillet, heat olive oil over medium-high heat. Add the pork belly cubes and sear them until golden brown on all sides, about 5-7 minutes.
- Pour the apple cider mixture over the pork belly, ensuring they are well coated. Cover the skillet with a lid or aluminum foil and transfer it to the oven.
- Cook for about 2 hours, or until the pork belly is tender and juicy. In the last 30 minutes of cooking, add the diced apples to the skillet to caramelize.
- Once done, remove from the oven and let it rest for a few minutes before serving. Enjoy the pork belly cubes drizzled with the charred apple glaze for a perfect finish!
Whispered Waffles With Spiced Clotted Cream

Whispered Waffles are a delightful treat, blending warmth and spice in each bite. These waffles are light and crispy, creating a satisfying crunch that perfectly contrasts the rich and creamy topping. The addition of spiced clotted cream lends a luxurious feel, making this dish a perfect indulgence for any occasion. While the recipe might seem a bit fancy, it’s quite simple to whip up at home!
With a dash of cinnamon and a hint of nutmeg in the clotted cream, these waffles become an elevated version of a breakfast classic. Serve them with your favorite coffee or tea for a cozy brunch that feels like a special outing, right in your own kitchen.
Ingredients
- 2 cups all-purpose flour
- 2 tablespoons sugar
- 1 tablespoon baking powder
- 1/2 teaspoon salt
- 2 large eggs
- 1 3/4 cups milk
- 1/2 cup unsalted butter, melted
- 1 teaspoon vanilla extract
- 1 cup clotted cream
- 1 teaspoon ground cinnamon
- 1/2 teaspoon ground nutmeg
- Maple syrup for serving
Instructions
- Make the Waffle Batter: In a large bowl, mix together flour, sugar, baking powder, and salt. In another bowl, whisk eggs, milk, melted butter, and vanilla until well combined. Pour the wet ingredients into the dry ingredients and stir until just blended.
- Preheat the Waffle Iron: Follow the manufacturer’s instructions to preheat your waffle iron.
- Cook the Waffles: Pour the batter onto the hot waffle iron and cook according to the manufacturer’s directions until golden brown. Repeat with remaining batter.
- Prepare the Spiced Clotted Cream: In a small bowl, combine clotted cream, cinnamon, and nutmeg. Mix until well blended.
- Serve: Stack the waffles on a plate, dollop with spiced clotted cream, and drizzle with maple syrup. Enjoy!
Powder Room Profiteroles With Cognac Custard

Powder Room Profiteroles are a delightful treat that combines light, airy pastry with a rich cognac custard filling. The sweetness of the choux pastry perfectly balances the warm, aromatic notes of cognac, creating a sophisticated dessert that’s sure to impress. While they may seem fancy, profiteroles are surprisingly easy to make at home, making them ideal for both special occasions and everyday indulgences.
These little puffs can be filled with a variety of creams, but the cognac custard offers a unique twist that elevates them beyond the ordinary. Lightly dusted with powdered sugar and garnished with a sprinkle of gold leaf, these treats are a feast for the eyes as well as the palate. Let’s get into making this delectable dessert!
Ingredients
- 1 cup water
- 1/2 cup unsalted butter
- 1 cup all-purpose flour
- 1/4 teaspoon salt
- 4 large eggs
- 1 cup milk
- 1/2 cup granulated sugar
- 4 large egg yolks
- 2 tablespoons cornstarch
- 1/4 cup cognac
- 1 teaspoon vanilla extract
- Powdered sugar for dusting
- Gold leaf for garnish (optional)
Instructions
- Make the Pastry: In a saucepan, combine water and butter over medium heat, stirring until the butter melts. Add flour and salt all at once, stirring vigorously until the mixture forms a ball. Remove from heat and let it cool slightly.
- Add Eggs: Beat in the eggs one at a time, ensuring each is fully incorporated before adding the next. The dough should be smooth and glossy.
- Shape and Bake: Preheat the oven to 400°F (200°C). Pipe or spoon the dough onto a baking sheet lined with parchment paper, making small mounds. Bake for 20-25 minutes until golden and puffed. Let them cool completely.
- Prepare the Custard: In a saucepan, heat milk and sugar over medium heat. In a bowl, whisk egg yolks and cornstarch together until smooth. Slowly add the warm milk mixture to the yolks, whisking constantly. Return to the heat and cook until thickened. Remove from heat and stir in cognac and vanilla.
- Fill the Profiteroles: Once the pastry puffs are cool, slice them in half and fill with cognac custard. Replace the tops and dust with powdered sugar. Garnish with gold leaf if desired. Serve immediately and enjoy!
Black Tie Branzino With Burnt Citrus Relish
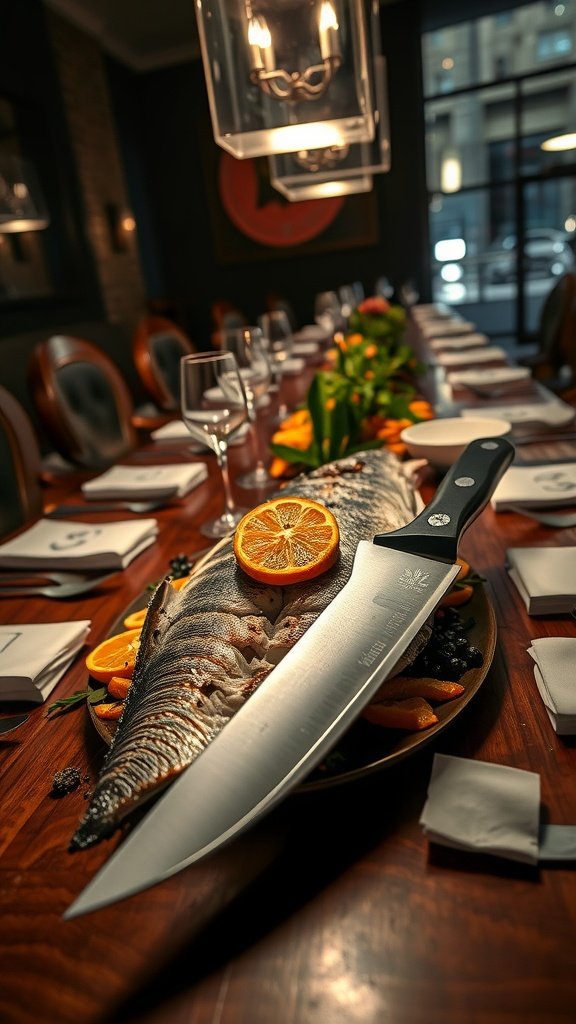
Black Tie Branzino with Burnt Citrus Relish is a stunning dish that brings sophistication to any dining occasion. The delicate flavor of branzino pairs beautifully with the zesty kick of burnt citrus, creating a delightful contrast that is both refreshing and savory. This recipe is simple enough for home cooks yet impressive enough to serve at a high-end dinner.
With just a few key ingredients and straightforward steps, you can easily prepare this elegant entrée. The combination of perfectly cooked fish and a unique citrus relish will tantalize your taste buds and impress your guests. Let’s get cooking!
Ingredients
- 2 whole branzino, cleaned and scaled
- 2 tablespoons olive oil
- 1 teaspoon sea salt
- 1/2 teaspoon black pepper
- 1 lemon, sliced
- 1 orange, sliced
- 1 grapefruit, sliced
- 1 tablespoon honey
- Fresh herbs (like dill or parsley) for garnish
Instructions
- Preheat your oven to 400°F (200°C). Line a baking sheet with parchment paper.
- Place the branzino on the prepared baking sheet. Drizzle with olive oil, and season with sea salt and black pepper. Stuff the cavity of each fish with lemon slices and fresh herbs.
- In a separate pan, heat over medium-high. Add the citrus slices and honey, allowing them to caramelize slightly, about 2-3 minutes per side.
- Once caramelized, remove the citrus from the heat and set aside. Place the branzino in the oven and bake for 20-25 minutes, or until the fish flakes easily with a fork.
- Serve the branzino topped with the burnt citrus relish and garnish with extra fresh herbs. Enjoy your elegant dish!
Chocolate Nemesis Cake With Liquid Caramel Core

The Chocolate Nemesis Cake is a rich and indulgent dessert that captivates chocolate lovers everywhere. With its dense, moist texture and a delightful liquid caramel core, this cake is a perfect blend of bittersweet chocolate and sweet caramel. While it sounds fancy, the recipe is quite straightforward, making it an ideal choice for both novice and seasoned bakers.
This cake is not just visually stunning; it also delivers a mouthful of flavor. The outer layer is smooth and luscious, while the hidden caramel adds a surprising burst of sweetness. Whether you’re hosting a dinner party or simply treating yourself, this cake is sure to impress.
Ingredients
- 8 oz dark chocolate (70% cocoa), chopped
- 1/2 cup unsalted butter
- 3/4 cup granulated sugar
- 3 large eggs
- 1/2 cup heavy cream
- 1/2 cup caramel sauce
- 1 teaspoon vanilla extract
- Pinch of salt
Instructions
- Preheat the oven to 350°F (175°C). Grease a round cake pan and line the bottom with parchment paper.
- In a saucepan, melt the dark chocolate and butter together over low heat, stirring until smooth. Remove from heat and let it cool slightly.
- In a mixing bowl, whisk together the sugar and eggs until light and fluffy. Gradually add the melted chocolate mixture, followed by heavy cream, caramel sauce, vanilla extract, and salt. Mix until well combined.
- Pour the batter into the prepared cake pan. Bake for 25-30 minutes or until the edges are set but the center remains slightly jiggly.
- Allow the cake to cool in the pan for 10 minutes before transferring it to a wire rack. Once completely cool, drizzle with additional caramel sauce before serving.
Echo Chamber Escargot With Charred Herb Butter
Echo Chamber Escargot is a delightful blend of tender snails and rich flavors. The dish surprises your palate with a subtle earthiness complemented by the charred herb butter that brings everything together. This recipe is simple enough for a home cook yet sophisticated enough to impress your guests.
The snails are baked in their shells, soaking up all the buttery goodness, while the charred herbs add a smoky depth. It’s a dish that embodies both elegance and comfort, making it a standout choice for any high-end culinary occasion.
Ingredients
- 1 can of escargot (about 12 snails)
- 1/2 cup unsalted butter, softened
- 2 tablespoons fresh parsley, finely chopped
- 1 tablespoon fresh thyme, finely chopped
- 1 tablespoon garlic, minced
- Salt and pepper to taste
- 1 tablespoon lemon juice
- 1/4 teaspoon smoked paprika
- 12 escargot shells or small ramekins
Instructions
- Preheat your oven to 375°F (190°C).
- In a bowl, mix the softened butter with parsley, thyme, garlic, lemon juice, smoked paprika, salt, and pepper until well combined.
- Place each escargot into their shells and spoon a generous amount of the herb butter mixture on top of each snail.
- Arrange the filled shells in a baking dish and cover with aluminum foil.
- Bake for 10-12 minutes, then remove the foil and broil for an additional 2-3 minutes until the tops are golden and bubbling.
- Serve immediately with crusty bread for dipping into the decadent herb butter.
Death In The Afternoon Sorbet Bomb

Death In The Afternoon Sorbet Bomb is a playful twist on dessert that’s sure to impress. This refreshing sorbet, encased in a delicate shell, offers a burst of flavor with every spoonful. Light and airy, it’s perfect for those warmer nights when you want something cool yet satisfying. The process might sound a bit advanced, but with a little patience, you’ll have a stunning dessert that stands out on any table.
The sorbet base can be tailored to your taste; think fruity, herbal, or even floral notes. Once you master the sorbet, the showstopper is the outer shell, which adds a dramatic flair to your presentation. It’s a fun way to end a meal and will leave your guests talking about it long after they’ve left!
Ingredients
- 2 cups of your favorite fruit puree (e.g., raspberry, mango, or lemon)
- 1 cup sugar
- 1 cup water
- 1 tablespoon lemon juice
- 1 cup heavy cream
- 1/4 cup gelatin (for the shell)
- 1 cup water (for the shell)
- 1 tablespoon corn syrup
- Ice for serving
Instructions
- Make the Sorbet: In a saucepan, combine water and sugar, then heat until the sugar dissolves. Remove from heat and mix in the fruit puree and lemon juice. Chill in the refrigerator for at least 2 hours. Once cold, churn in an ice cream maker according to manufacturer instructions until it reaches a soft-serve consistency.
- Prepare the Shell: In a separate saucepan, combine gelatin, water, and corn syrup. Heat gently until the gelatin is fully dissolved. Allow it to cool slightly before using.
- Mold the Shell: Using a balloon or mold, dip it into the gelatin mixture, allowing it to coat the outside evenly. Let it set in the fridge until firm.
- Assemble: Once the sorbet is ready and the shell has set, carefully remove the shell from the mold. Fill it with the sorbet and return it to the freezer for a couple of hours to firm up.
- Serve: To present, place the sorbet bomb on a plate with a bit of ice. When ready to serve, you can crack the shell open for a dramatic reveal, letting everyone enjoy the sorbet inside!
Noir Noodles: Ink-Black Pasta With Velvet Tomato Foam
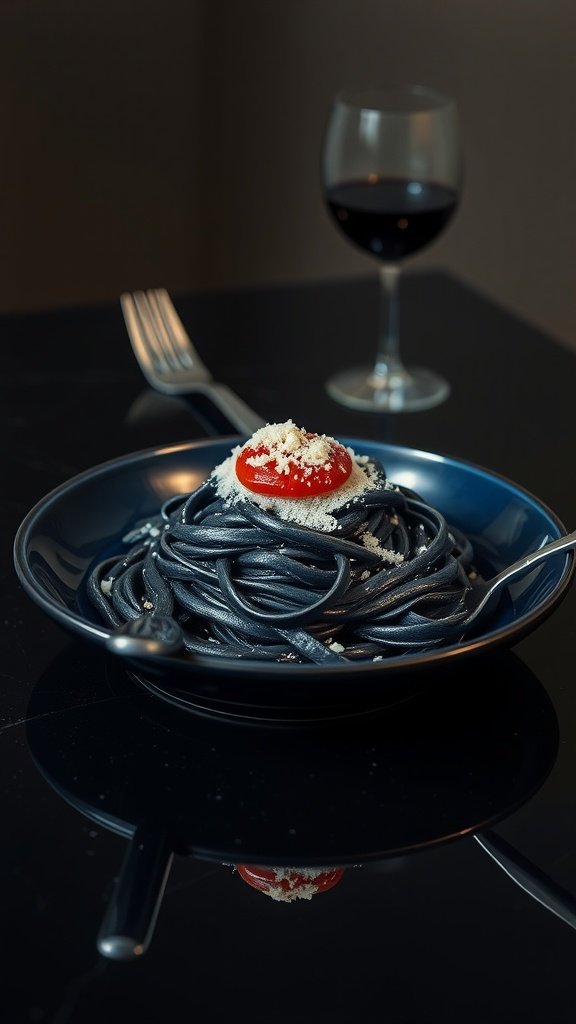
Noir noodles are a striking dish that combines the boldness of squid ink pasta with the lightness of a velvet tomato foam. This unique recipe tantalizes your taste buds with a rich, oceanic flavor, complemented by the freshness of tomatoes. It’s surprisingly easy to make, making it a perfect choice for both novice cooks and seasoned chefs looking to impress.
The ink-black pasta offers a visually stunning contrast to the bright foam, creating a plate that’s as much a feast for the eyes as it is for the palate. Add a sprinkle of cheese and a glass of red wine to elevate your dining experience.
Ingredients
- 200g squid ink pasta
- 1 cup cherry tomatoes
- 1/2 cup heavy cream
- 2 tablespoons olive oil
- 2 cloves garlic, minced
- Salt and black pepper, to taste
- Fresh basil leaves, for garnish
- Grated Parmesan cheese, for serving
Instructions
- Cook the Pasta: Boil water in a large pot, add salt, and cook the squid ink pasta according to package instructions. Drain and set aside.
- Make the Sauce: In a skillet, heat olive oil over medium heat. Add minced garlic and sauté until fragrant. Then, add cherry tomatoes and cook until they start to burst, about 5-7 minutes.
- Prepare the Foam: Transfer the cooked tomatoes to a blender, add heavy cream, and blend until smooth. Season with salt and pepper to taste.
- Combine: Toss the cooked pasta with the tomato foam, ensuring every strand is coated.
- Serve: Plate the pasta and garnish with fresh basil and grated Parmesan cheese. Enjoy with a glass of red wine!
Killer Caprese With Poison Apple Reduction

This Killer Caprese takes the classic salad to new heights with a bold twist. Instead of the usual mozzarella, we layer creamy ricotta, which adds a delightful richness. The fresh tomatoes, drizzled with a sweet and tangy poison apple reduction, create a memorable flavor profile that’s both refreshing and indulgent. It’s surprisingly simple to whip up, making it an impressive dish for any occasion.
The contrasting flavors of the ripe tomatoes and tart reduction delight the palate, while the creamy texture complements the vibrant elements beautifully. This dish not only looks stunning but also showcases the brilliance of high-end culinary creativity. Ready to impress your guests? Let’s get started!
Ingredients
- 4 ripe heirloom tomatoes, sliced
- 1 cup fresh ricotta cheese
- 1/4 cup balsamic glaze
- 2 tablespoons honey
- 1 tablespoon apple cider vinegar
- Fresh basil leaves for garnish
- Salt and pepper to taste
Instructions
- Prepare the Poison Apple Reduction: In a small saucepan, combine balsamic glaze, honey, and apple cider vinegar. Bring to a simmer over medium heat, stirring occasionally. Let it reduce until it thickens slightly, about 5-7 minutes. Remove from heat and set aside.
- Layer the Caprese: On a serving plate, alternate layers of sliced tomatoes and dollops of ricotta cheese, creating a tower effect. Season each layer with a sprinkle of salt and pepper.
- Drizzle the Reduction: Once layered, generously drizzle the poison apple reduction over the stack, allowing it to cascade down the sides.
- Garnish: Finish with fresh basil leaves on top for a burst of color and flavor.
- Serve: Enjoy immediately as a stunning appetizer or as a side dish with your favorite protein.
The Penguin’S Pickled Trio
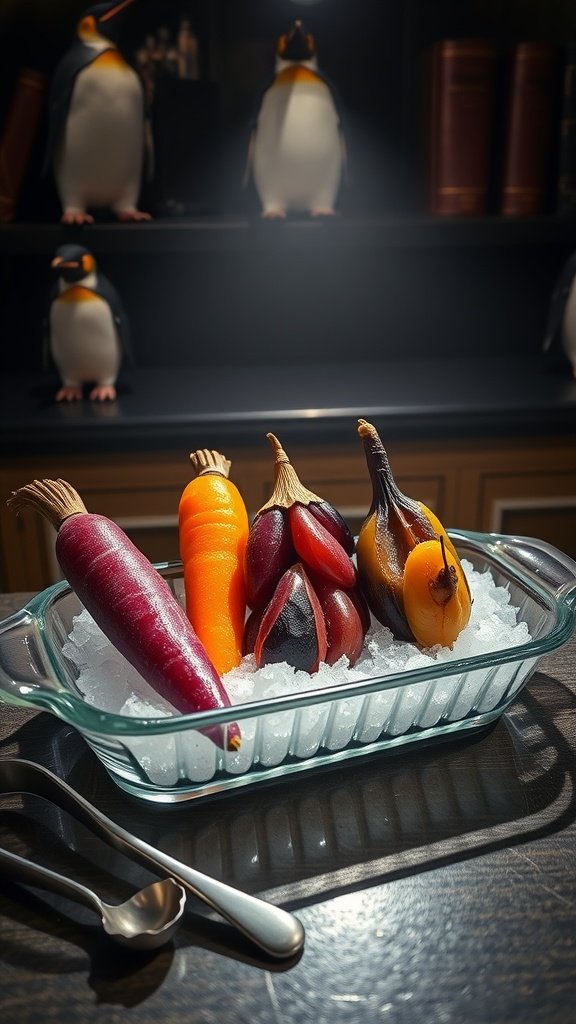
This recipe features a delightful trio of pickled vegetables that brings a burst of flavor to any plate. Each vegetable—vibrant carrots, rich eggplant, and crisp radishes—has its own unique taste, making this dish a colorful and tangy addition to your meal. Preparing these pickles is straightforward, requiring minimal ingredients and a bit of patience for the pickling process.
The combination of sweet and sour flavors alongside the crunchiness of the veggies creates a refreshing palate cleanser. Perfect as an appetizer or a side dish, these pickled veggies elevate your dining experience with their bold taste and aesthetic appeal.
Ingredients
- 1 cup sliced carrots
- 1 cup sliced eggplant
- 1 cup sliced radishes
- 1 cup white vinegar
- 1/2 cup water
- 1/4 cup granulated sugar
- 1 tablespoon salt
- 1 tablespoon mustard seeds
- 1 teaspoon peppercorns
- 1 teaspoon crushed red pepper flakes (optional)
Instructions
- Prepare the Vegetables: Slice the carrots, eggplant, and radishes into thin rounds or desired shapes.
- Make the Pickling Brine: In a pot, combine the vinegar, water, sugar, salt, mustard seeds, peppercorns, and red pepper flakes. Bring to a boil, stirring to dissolve the sugar and salt.
- Pack the Vegetables: Place the sliced vegetables into clean jars, packing them tightly.
- Add the Brine: Pour the hot pickling brine over the vegetables, ensuring they are fully submerged. Leave a little space at the top of the jars.
- Seal and Refrigerate: Seal the jars with lids and let them cool to room temperature. Once cooled, store them in the refrigerator for at least 24 hours before serving to allow the flavors to develop.
Final Course: Smoked Cheese Bombe With Honey Comb Glass
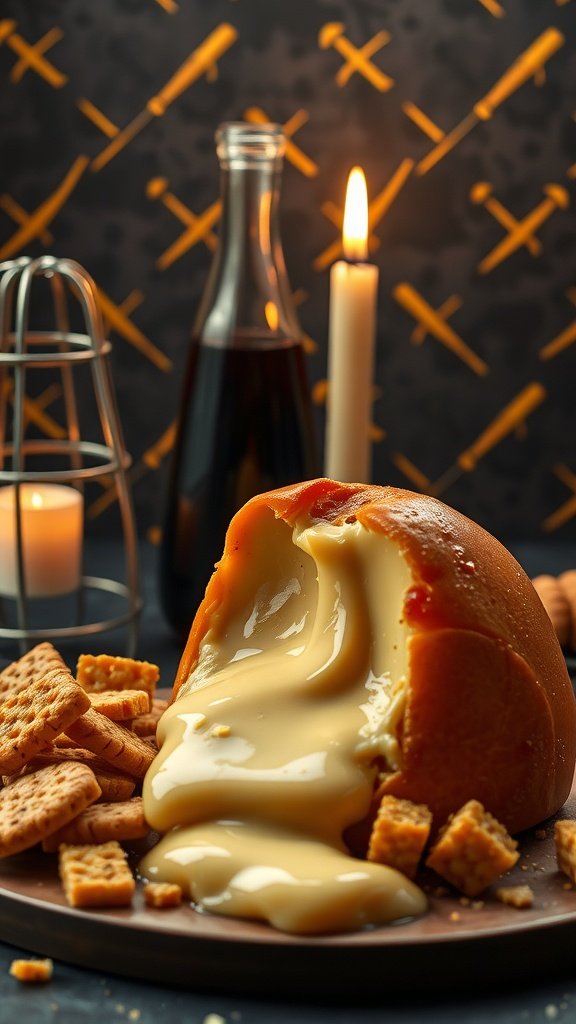
The Smoked Cheese Bombe with Honey Comb Glass is a rich and indulgent dessert that merges sweet and savory flavors. Picture a luscious, creamy cheese encapsulated in a beautiful bombe shape, which melts magnificently when cut. The smoky undertone adds depth, while the honeycomb glass offers a delightful crunch. This dish is perfect for impressing guests and elevating your dining experience.
Despite its gourmet allure, it’s surprisingly simple to prepare, making it accessible even for novice cooks. With just a few ingredients and a little patience, you can create this stunning dessert that will leave everyone asking for seconds.
Ingredients
- 1 cup smoked cheese (like Gouda or cheddar), finely shredded
- 1 cup cream cheese, softened
- 1/4 cup heavy cream
- 2 tablespoons honey
- 1/2 cup sugar
- 1/4 cup water
- 1 tablespoon lemon juice
- 1/2 teaspoon baking soda
- Crackers or bread, for serving
Instructions
- Prepare the Cheese Mixture: In a bowl, mix the smoked cheese and cream cheese until well combined. Gradually add in the heavy cream and honey, stirring until smooth. Transfer this mixture to a bowl lined with plastic wrap, shaping it into a bombe. Refrigerate for at least 2 hours to set.
- Create the Honey Comb Glass: In a saucepan, combine sugar, water, and lemon juice. Cook over medium heat, stirring until the sugar dissolves. Bring to a boil without stirring until it turns a golden color. Remove from heat and quickly add baking soda, stirring until foamy. Pour this mixture onto a lined baking sheet and let it cool completely.
- Serve: Once the bombe has set, carefully remove it from the bowl and unwrap the plastic. Place it on a serving platter. Break the honeycomb glass into shards and arrange them around the bombe. Serve with crackers or bread for that perfect balance of flavors.
You may also like:
– 21 Children’s Birthday Cakes Inspired by Gotham City
– 19 Vintage Appetizers Inspired by the 1960s Mad Men Era
– 30 Recipes for the Ultimate Trooper’s Space Journey
If you enjoyed this blog you can visit us or check out our other blogs and learn a bit about us.
Disclaimer: This blog post is inspired by fictional universes and characters created by their respective rights holders. All related content and imagery remain the property of their respective rights holder. This fan-inspired content is for entertainment and commentary purposes only and is not affiliated with or endorsed by HBO, Disney, Warner Bros., Lionsgate, or any other rights holders. To explore the official source material, please visit:
HBO