

These lunch party recipes are crafted to impress and satisfy your colleagues, bringing a splash of elegance reminiscent of the Mad Men era. Each dish is designed to highlight classic flavors with a modern twist, featuring techniques that elevate everyday ingredients into memorable meals. From smoky charcuterie boards to vibrant salads, these recipes will guide you in preparing a spread that’s not only delicious but also perfectly suited for a stylish midday gathering.
Classic Shrimp Cocktail with Zesty Cocktail Sauce

This classic shrimp cocktail is a timeless appetizer that never fails to impress. With its fresh, succulent shrimp paired with a tangy cocktail sauce, it’s a delightful treat that’s simple to whip up. Perfect for your lunch party recipes, this dish brings a touch of elegance without requiring hours in the kitchen.
The combination of chilled shrimp and zesty sauce creates a refreshing taste that’s sure to please your guests. Plus, it’s easy to prepare ahead of time, allowing you to focus on enjoying the party!
Ingredients
- 1 pound large shrimp, peeled and deveined
- 1 lemon, cut into wedges
- 1 cup cocktail sauce
- Fresh parsley for garnish
Instructions
- Boil the Shrimp: In a large pot of salted water, bring to a boil. Add the shrimp and cook for about 2-3 minutes until they turn pink and opaque. Drain and transfer to an ice bath to stop the cooking process.
- Chill: Once the shrimp are cooled, drain again and pat dry with paper towels. Refrigerate until ready to serve.
- Prepare the Platter: Arrange the chilled shrimp on a serving platter. Add lemon wedges around the shrimp and a small bowl of cocktail sauce in the center.
- Garnish: Sprinkle fresh parsley over the shrimp for a pop of color.
- Serve: Enjoy your shrimp cocktail chilled, dipping each shrimp into the cocktail sauce!
Roasted Vegetable Quiche with Fresh Herbs

This roasted vegetable quiche is a delightful addition to any lunch party. Packed with colorful veggies and fresh herbs, it offers a burst of flavor in every bite. The creamy filling and flaky crust make it a satisfying dish that’s surprisingly simple to whip up.
Perfect for impressing guests, this quiche is not only tasty but also versatile. You can customize the vegetables based on what you have on hand. Serve it warm or at room temperature, and watch it disappear from the table!
Ingredients
- 1 pre-made pie crust
- 1 cup cherry tomatoes, halved
- 1 cup zucchini, diced
- 1/2 cup bell pepper, diced
- 1/2 cup onion, chopped
- 4 large eggs
- 1 cup heavy cream
- 1 cup shredded cheese (cheddar or your choice)
- 1/4 cup fresh herbs (like thyme and parsley), chopped
- Salt and pepper to taste
Instructions
- Preheat the oven to 375°F (190°C). Place the pie crust in a pie dish and set aside.
- In a large bowl, whisk together the eggs, heavy cream, salt, and pepper until well combined.
- Add the cherry tomatoes, zucchini, bell pepper, onion, cheese, and fresh herbs to the egg mixture. Stir until everything is evenly coated.
- Pour the vegetable mixture into the prepared pie crust, spreading it out evenly.
- Bake for 35-40 minutes, or until the quiche is set and lightly golden on top. Let it cool for a few minutes before slicing.
- Serve warm or at room temperature, and enjoy your delicious lunch party recipe!
Savory Beef Wellington Bites

These Savory Beef Wellington Bites are a delightful twist on a classic dish. They pack all the rich flavors of traditional Beef Wellington into bite-sized portions, making them perfect for a lunch party. The combination of tender beef, earthy mushrooms, and flaky pastry creates a mouthwatering experience that will impress your guests.
Making these bites is simpler than you might think! With just a few ingredients and some straightforward steps, you can whip up these tasty treats in no time. They’re sure to be a hit at your next gathering!
Ingredients
- 1 pound beef tenderloin, trimmed and cut into small cubes
- 8 ounces mushrooms, finely chopped
- 2 tablespoons olive oil
- 1 tablespoon Dijon mustard
- 1 sheet puff pastry, thawed
- 1 egg, beaten (for egg wash)
- Salt and pepper to taste
- Fresh parsley, chopped (for garnish)
Instructions
- Preheat your oven to 400°F (200°C).
- In a skillet, heat olive oil over medium heat. Add the chopped mushrooms and sauté until they are browned and all moisture has evaporated. Season with salt and pepper, then set aside to cool.
- In the same skillet, quickly sear the beef cubes for about 1-2 minutes until browned. Remove from heat and let cool slightly. Mix in the Dijon mustard.
- Roll out the puff pastry on a floured surface and cut it into squares, about 3 inches wide.
- Place a spoonful of the mushroom mixture and a few pieces of beef in the center of each pastry square. Fold the corners over to seal and place them seam-side down on a baking sheet.
- Brush the tops with the beaten egg for a golden finish.
- Bake for 15-20 minutes or until the pastry is golden brown and puffed up.
- Garnish with chopped parsley before serving.
Gourmet BLT Sliders with Avocado

These Gourmet BLT Sliders with Avocado are a fresh twist on the classic sandwich. Packed with crispy bacon, ripe tomatoes, crunchy lettuce, and creamy avocado, they deliver a burst of flavor in every bite. Perfect for lunch parties, these sliders are simple to whip up and sure to impress your guests.
With their delightful combination of textures and tastes, these sliders are not only satisfying but also visually appealing. They’re easy to make, allowing you to focus on enjoying the party rather than spending all your time in the kitchen.
Ingredients
- 12 slider buns
- 12 slices of bacon
- 1 large avocado, sliced
- 1 large tomato, sliced
- 1 cup lettuce leaves
- Salt and pepper to taste
- Optional: mayonnaise or aioli
Instructions
- Cook the Bacon: In a skillet over medium heat, cook the bacon until crispy. Remove and place on paper towels to drain excess grease.
- Prepare the Buns: Lightly toast the slider buns in the same skillet or a toaster.
- Assemble the Sliders: On the bottom half of each bun, layer lettuce, a slice of tomato, a few pieces of bacon, and avocado slices. Season with salt and pepper. If desired, spread a thin layer of mayonnaise or aioli on the top half of the bun.
- Finish and Serve: Place the top half of the bun on each slider and secure with a toothpick. Arrange on a platter and serve immediately.
Mini Crab Cakes with Spicy Remoulade

These mini crab cakes are a delightful treat for any lunch party. They are crispy on the outside and tender on the inside, bursting with the fresh taste of crab. Paired with a spicy remoulade, they bring a kick that will impress your guests.
Making these crab cakes is simple and quick, perfect for those who want to whip up something special without spending all day in the kitchen. They’re a great addition to your lunch party recipes, offering a touch of elegance with minimal effort.
Ingredients
- 1 pound lump crab meat
- 1/2 cup breadcrumbs
- 1/4 cup mayonnaise
- 1 large egg
- 1 tablespoon Dijon mustard
- 1 tablespoon Worcestershire sauce
- 1 teaspoon Old Bay seasoning
- 1/4 cup chopped green onions
- Salt and pepper to taste
- Oil for frying
Instructions
- In a large bowl, combine crab meat, breadcrumbs, mayonnaise, egg, Dijon mustard, Worcestershire sauce, Old Bay seasoning, green onions, salt, and pepper. Mix gently to combine.
- Form the mixture into small patties, about 2 inches in diameter.
- Heat oil in a skillet over medium heat. Fry the crab cakes for about 3-4 minutes on each side until golden brown.
- Remove from the skillet and drain on paper towels.
- Serve warm with spicy remoulade on the side.
Smoked Salmon and Cream Cheese Canapés

These smoked salmon and cream cheese canapés are a delightful addition to any lunch party. They are light, fresh, and bursting with flavor, making them perfect for impressing your guests. The combination of creamy cheese and smoky salmon on a crispy base creates a wonderful taste sensation that’s hard to resist.
Not only are these canapés delicious, but they are also simple to prepare. With just a few ingredients and minimal effort, you can whip up a platter that looks as good as it tastes. They’re sure to be a hit at your next gathering!
Ingredients
- 8 oz smoked salmon, sliced
- 8 oz cream cheese, softened
- 1 tablespoon fresh dill, chopped
- 1 tablespoon lemon juice
- 1 package of mini tart shells
- Capers for garnish (optional)
Instructions
- In a bowl, mix the softened cream cheese, chopped dill, and lemon juice until smooth.
- Take the mini tart shells and fill each one with a generous amount of the cream cheese mixture.
- Top each filled tart with a slice of smoked salmon.
- If desired, add a caper on top for an extra touch.
- Garnish with a small sprig of dill for presentation.
- Serve immediately or chill in the refrigerator until ready to serve.
Artisan Charcuterie Board with Gourmet Cheeses
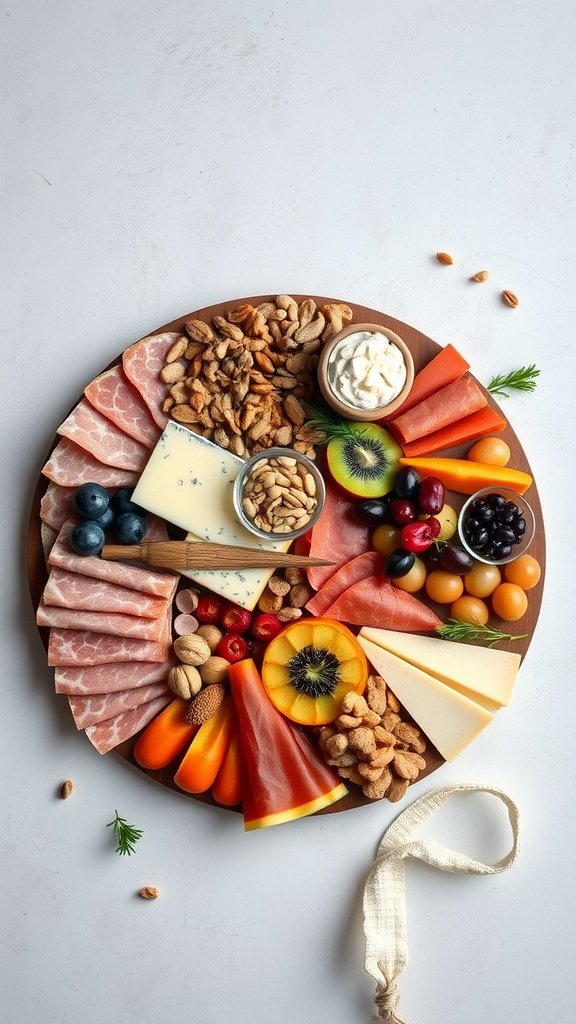
Creating an artisan charcuterie board is a delightful way to impress your guests at a lunch party. This recipe combines a variety of gourmet cheeses, cured meats, fresh fruits, and crunchy nuts, making it a feast for the eyes and the palate. The flavors blend beautifully, offering a mix of savory, sweet, and creamy textures that everyone will love.
Assembling this board is simple and fun, allowing you to get creative with your selections. You can customize it based on your preferences or what you have on hand, making it a versatile option for any gathering.
Ingredients
- 1 cup assorted gourmet cheeses (e.g., Brie, Gouda, Blue cheese)
- 1 cup cured meats (e.g., prosciutto, salami, chorizo)
- 1 cup fresh fruits (e.g., grapes, berries, sliced apples)
- 1/2 cup mixed nuts (e.g., almonds, walnuts, pecans)
- 1/2 cup olives
- 1/2 cup honey or fig jam
- 1 baguette, sliced
- Fresh herbs for garnish (e.g., rosemary, thyme)
Instructions
- Prepare the Board: Choose a large wooden or slate board as your base. Start by placing the cheeses in different sections of the board.
- Add the Meats: Arrange the cured meats around the cheeses, folding or rolling them for a nice presentation.
- Incorporate Fruits: Fill in gaps with fresh fruits, creating a colorful display.
- Scatter Nuts and Olives: Add mixed nuts and olives to bring in some crunch and saltiness.
- Include Sweet Elements: Place a small bowl of honey or fig jam on the board for a sweet contrast.
- Finish with Bread: Add the sliced baguette around the edges for easy access.
- Garnish: Sprinkle fresh herbs over the board for a pop of color and freshness.
Truffle Mac and Cheese with Crispy Breadcrumbs
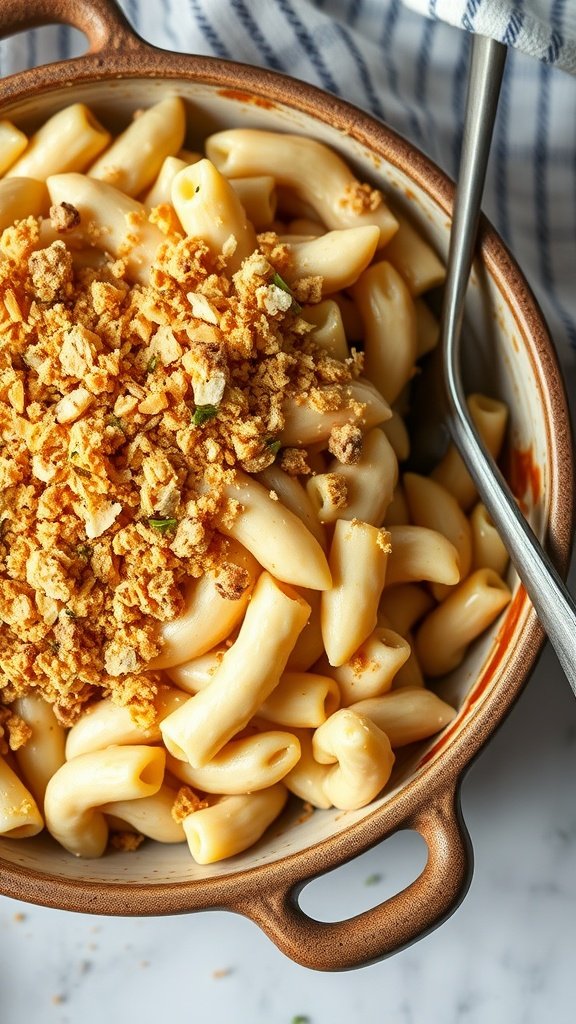
Truffle Mac and Cheese is a creamy, indulgent dish that takes the classic comfort food to a whole new level. The rich flavors of truffle oil blend perfectly with gooey cheese, creating a dish that’s both luxurious and satisfying. Plus, it’s simple to whip up, making it a great choice for your lunch party recipes.
This recipe features a crispy breadcrumb topping that adds a delightful crunch, balancing the creaminess of the mac and cheese. It’s sure to impress your guests and leave them wanting more!
Ingredients
- 8 ounces elbow macaroni
- 2 tablespoons unsalted butter
- 2 tablespoons all-purpose flour
- 2 cups milk
- 2 cups shredded sharp cheddar cheese
- 1/2 cup grated Parmesan cheese
- 2 tablespoons truffle oil
- 1/2 teaspoon garlic powder
- Salt and pepper to taste
- 1 cup panko breadcrumbs
- 2 tablespoons olive oil
- 1 tablespoon chopped fresh parsley (optional)
Instructions
- Cook the Pasta: In a large pot, boil salted water and cook the macaroni according to package instructions. Drain and set aside.
- Make the Cheese Sauce: In the same pot, melt butter over medium heat. Stir in flour and cook for about 1 minute. Gradually whisk in milk, cooking until the mixture thickens. Remove from heat and stir in cheddar and Parmesan until melted. Add truffle oil, garlic powder, salt, and pepper.
- Combine: Add the cooked macaroni to the cheese sauce, mixing until well coated.
- Prepare the Topping: In a small bowl, combine panko breadcrumbs with olive oil, mixing until evenly coated.
- Assemble: Preheat your oven to 350°F (175°C). Transfer the mac and cheese to a baking dish, sprinkle the breadcrumb mixture on top, and bake for 20-25 minutes until golden brown.
- Garnish: Remove from the oven and sprinkle with fresh parsley if desired. Serve warm and enjoy!
Herbed Goat Cheese and Fig Crostini

Herbed goat cheese and fig crostini are a delightful treat that combines creamy, tangy cheese with the sweetness of figs. This simple recipe is perfect for a lunch party, offering a balance of flavors that will impress your guests without requiring hours in the kitchen.
The crunchy crostini topped with smooth cheese and luscious figs create a beautiful presentation. Plus, it’s easy to whip up, making it a go-to choice for any gathering.
Ingredients
- 1 baguette, sliced into 1/2-inch pieces
- 8 oz goat cheese, softened
- 2 tablespoons fresh herbs (like thyme or rosemary), chopped
- 1 cup fresh figs, sliced
- 1 tablespoon honey
- Olive oil for drizzling
- Salt and pepper to taste
Instructions
- Preheat the oven to 400°F (200°C). Arrange baguette slices on a baking sheet and drizzle with olive oil. Bake for about 5-7 minutes until golden and crispy.
- In a bowl, mix the softened goat cheese with chopped herbs, salt, and pepper until well combined.
- Spread a generous amount of the herbed goat cheese on each crostini.
- Top with sliced figs and drizzle with honey for added sweetness.
- Serve immediately and enjoy the delightful flavors!
Elegant Spinach and Feta Stuffed Puff Pastry

This Spinach and Feta Stuffed Puff Pastry is a delightful addition to any lunch party. With its flaky, golden crust and savory filling, it brings a touch of sophistication to your table. The combination of fresh spinach and creamy feta creates a delicious flavor that everyone will love.
Not only does this recipe taste amazing, but it’s also quite simple to make. You can whip it up in no time, making it perfect for a casual gathering or a more formal affair. Serve it warm, and watch your guests enjoy every bite!
Ingredients
- 1 sheet of puff pastry, thawed
- 2 cups fresh spinach, chopped
- 1 cup feta cheese, crumbled
- 1 egg, beaten (for egg wash)
- 1 tablespoon olive oil
- 1 clove garlic, minced
- Salt and pepper to taste
Instructions
- Preheat the oven to 400°F (200°C).
- In a skillet, heat olive oil over medium heat. Add minced garlic and sauté for about 1 minute until fragrant.
- Add chopped spinach to the skillet and cook until wilted, about 2-3 minutes. Season with salt and pepper, then remove from heat.
- In a bowl, combine the cooked spinach and crumbled feta cheese. Mix well.
- Roll out the puff pastry on a floured surface and cut it into squares or circles, depending on your preference.
- Place a spoonful of the spinach and feta mixture in the center of each pastry piece. Fold over and seal the edges with a fork.
- Brush the tops with the beaten egg for a golden finish.
- Place the pastries on a baking sheet lined with parchment paper and bake for 15-20 minutes, or until golden brown.
- Let cool slightly before serving. Enjoy your elegant spinach and feta stuffed puff pastry!
Crispy Duck Confit Tacos with Mango Salsa

Crispy Duck Confit Tacos with Mango Salsa are a delightful twist on traditional tacos. The rich, tender duck pairs perfectly with the fresh, zesty mango salsa, creating a balance of flavors that will impress your guests. This recipe is simple enough for a casual lunch party, yet sophisticated enough to make you feel like a culinary star.
The combination of crispy duck and sweet mango is a treat for the taste buds. Each bite is a burst of flavor, making these tacos a standout dish. They are easy to assemble, allowing you to enjoy your time with friends while serving something truly special.
Ingredients
- 2 duck legs, confit
- 8 small corn tortillas
- 1 ripe mango, diced
- 1/4 red onion, finely chopped
- 1 jalapeño, seeded and minced
- 1/4 cup fresh cilantro, chopped
- Juice of 1 lime
- Salt and pepper to taste
- Avocado slices for garnish
Instructions
- Prepare the Duck: Remove the duck legs from the confit and shred the meat, discarding the bones and skin. Heat a skillet over medium heat and crisp the duck for about 5 minutes.
- Make the Salsa: In a bowl, combine the diced mango, red onion, jalapeño, cilantro, lime juice, salt, and pepper. Mix well and set aside.
- Warm the Tortillas: In a dry skillet, warm the corn tortillas for about 30 seconds on each side until pliable.
- Assemble the Tacos: Place a generous amount of crispy duck on each tortilla, top with mango salsa, and add avocado slices.
- Serve: Enjoy your tacos immediately, garnished with extra cilantro if desired.
Pesto Chicken Flatbreads with Arugula

Pesto Chicken Flatbreads with Arugula are a delightful option for your lunch party recipes. These flatbreads combine the rich flavors of pesto with tender chicken, fresh arugula, and juicy tomatoes. The taste is a perfect balance of savory and fresh, making them a crowd-pleaser.
Not only are they delicious, but they are also simple to prepare. With just a few ingredients and minimal cooking time, you can whip these up in no time, leaving you free to enjoy your gathering.
Ingredients
- 4 flatbreads
- 1 cup cooked chicken, sliced
- 1/2 cup pesto sauce
- 1 cup cherry tomatoes, halved
- 2 cups fresh arugula
- 1/2 cup mozzarella balls (optional)
- Olive oil, for drizzling
- Salt and pepper, to taste
Instructions
- Preheat your oven to 400°F (200°C).
- Place the flatbreads on a baking sheet and spread a generous layer of pesto sauce over each one.
- Top with sliced chicken, halved cherry tomatoes, and mozzarella balls if using.
- Drizzle with olive oil and season with salt and pepper.
- Bake in the oven for about 10-12 minutes, or until the flatbreads are golden and crispy.
- Remove from the oven and top with fresh arugula before serving.
Roasted Beet and Goat Cheese Salad
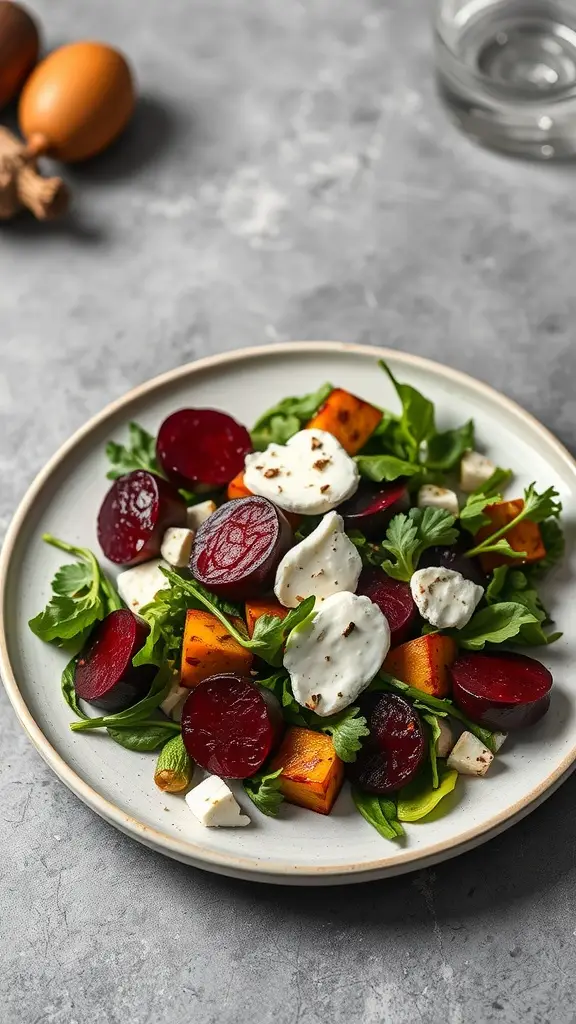
This Roasted Beet and Goat Cheese Salad is a delightful mix of earthy flavors and creamy textures. The sweetness of the roasted beets pairs perfectly with tangy goat cheese, making it a refreshing option for your lunch party recipes.
Not only is it simple to prepare, but it also adds a touch of elegance to any table. With vibrant colors and a burst of flavor, this salad is sure to impress your guests without requiring hours in the kitchen.
Ingredients
- 4 medium beets, roasted and sliced
- 4 cups mixed greens (arugula, spinach, and kale)
- 1/2 cup goat cheese, crumbled
- 1/2 cup walnuts, toasted
- 1/4 cup balsamic vinaigrette
- Salt and pepper to taste
Instructions
- Preheat your oven to 400°F (200°C). Wrap each beet in aluminum foil and roast for about 45-60 minutes, or until tender. Let them cool, then peel and slice.
- In a large bowl, combine the mixed greens, roasted beets, and walnuts.
- Drizzle the balsamic vinaigrette over the salad and toss gently to combine.
- Top with crumbled goat cheese and season with salt and pepper to taste.
- Serve immediately and enjoy this vibrant salad at your lunch party!
Savory Chicken Satay Skewers with Peanut Sauce

Chicken satay skewers are a delightful addition to any lunch party. They are tender, juicy, and packed with flavor, making them a hit with guests. The combination of grilled chicken and a rich peanut sauce creates a mouthwatering experience that’s both satisfying and easy to prepare.
This recipe is simple enough for anyone to tackle, whether you’re a seasoned cook or just starting out. With a few basic ingredients and minimal prep time, you can serve up these tasty skewers that will impress your friends and family.
Ingredients
- 1 pound boneless, skinless chicken breasts, cut into bite-sized pieces
- 2 tablespoons soy sauce
- 1 tablespoon brown sugar
- 1 tablespoon vegetable oil
- 1 teaspoon ground coriander
- 1 teaspoon ground cumin
- 1/2 teaspoon turmeric
- 1/4 teaspoon black pepper
- Wooden skewers, soaked in water
- Fresh cilantro, for garnish
Instructions
- Marinate the Chicken: In a bowl, mix soy sauce, brown sugar, vegetable oil, coriander, cumin, turmeric, and black pepper. Add chicken pieces and toss to coat. Cover and refrigerate for at least 30 minutes.
- Prepare the Skewers: Preheat your grill or grill pan over medium-high heat. Thread marinated chicken onto soaked skewers.
- Grill the Skewers: Place skewers on the grill and cook for about 5-7 minutes on each side, or until the chicken is cooked through and has nice grill marks.
- Make the Peanut Sauce: In a small bowl, mix 1/2 cup peanut butter, 2 tablespoons soy sauce, 1 tablespoon lime juice, and a little water to reach desired consistency.
- Serve: Arrange skewers on a platter, drizzle with peanut sauce, and garnish with fresh cilantro. Enjoy!
Classic Caesar Salad with Grilled Chicken
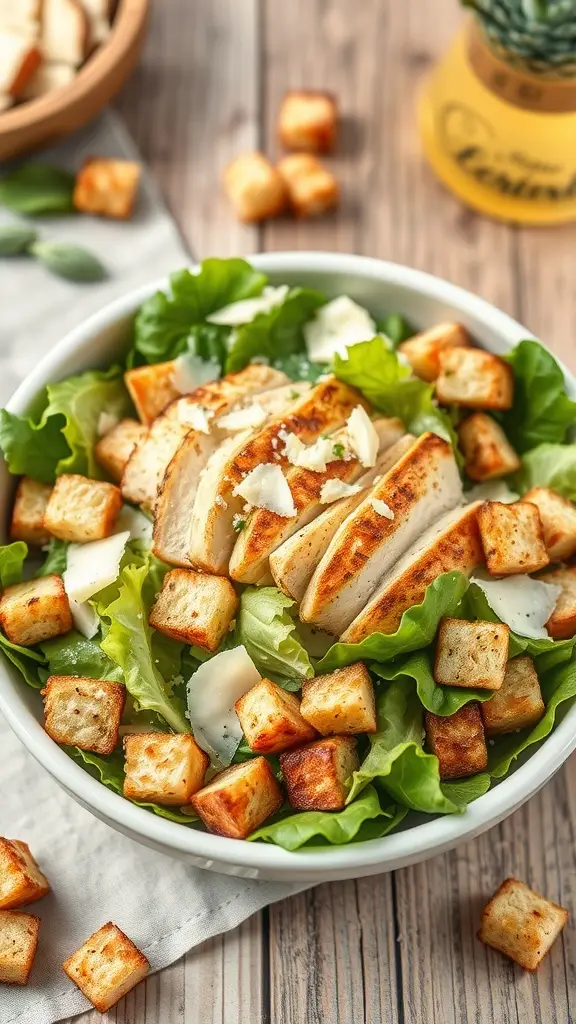
This Classic Caesar Salad with Grilled Chicken is a perfect blend of crisp greens, savory chicken, and crunchy croutons. It’s a simple yet satisfying dish that’s sure to impress your lunch party guests. The creamy dressing adds a rich flavor that complements the grilled chicken beautifully.
Making this salad is straightforward and doesn’t require any fancy techniques. Just grill the chicken, toss everything together, and you’re ready to serve a delicious meal that feels special without the fuss.
Ingredients
- 2 boneless, skinless chicken breasts
- 1 tablespoon olive oil
- Salt and pepper to taste
- 6 cups romaine lettuce, chopped
- 1 cup croutons
- 1/2 cup grated Parmesan cheese
- 1/4 cup Caesar dressing
Instructions
- Prepare the Chicken: Preheat your grill to medium-high heat. Brush the chicken breasts with olive oil and season with salt and pepper.
- Grill the Chicken: Place the chicken on the grill and cook for about 6-7 minutes on each side, or until fully cooked. Remove from the grill and let it rest for a few minutes before slicing.
- Assemble the Salad: In a large bowl, combine the chopped romaine lettuce, croutons, and grated Parmesan cheese. Drizzle with Caesar dressing and toss until everything is well coated.
- Add the Chicken: Slice the grilled chicken and place it on top of the salad. Serve immediately and enjoy your delicious lunch party recipe!
Bourbon Glazed Meatballs with Sesame Seeds

Bourbon glazed meatballs are a delightful addition to any lunch party. These bite-sized treats are sweet, savory, and packed with flavor, making them a crowd-pleaser. The bourbon glaze adds a unique twist that elevates the classic meatball to something truly special.
Making these meatballs is simple and straightforward, perfect for those who want to impress without spending hours in the kitchen. With just a few ingredients and easy steps, you’ll have a delicious dish that will have everyone coming back for seconds!
Ingredients
- 1 pound ground beef
- 1/2 cup breadcrumbs
- 1/4 cup grated Parmesan cheese
- 1/4 cup chopped green onions
- 1 large egg
- 1 teaspoon garlic powder
- 1 teaspoon onion powder
- 1/2 teaspoon salt
- 1/4 teaspoon black pepper
- 1/2 cup bourbon
- 1/2 cup barbecue sauce
- 1 tablespoon soy sauce
- 1 tablespoon honey
- 2 tablespoons sesame seeds
Instructions
- Preheat the oven to 400°F (200°C). Line a baking sheet with parchment paper.
- In a large bowl, combine ground beef, breadcrumbs, Parmesan cheese, green onions, egg, garlic powder, onion powder, salt, and pepper. Mix until well combined.
- Form the mixture into small meatballs, about 1 inch in diameter, and place them on the prepared baking sheet.
- In a separate bowl, whisk together bourbon, barbecue sauce, soy sauce, and honey. Pour half of the sauce over the meatballs.
- Bake the meatballs for 20-25 minutes, or until cooked through. In the last 5 minutes, brush the remaining sauce over the meatballs and sprinkle with sesame seeds.
- Remove from the oven and let cool slightly before serving. Enjoy your bourbon glazed meatballs!
Spicy Tuna Tartare with Avocado and Sesame
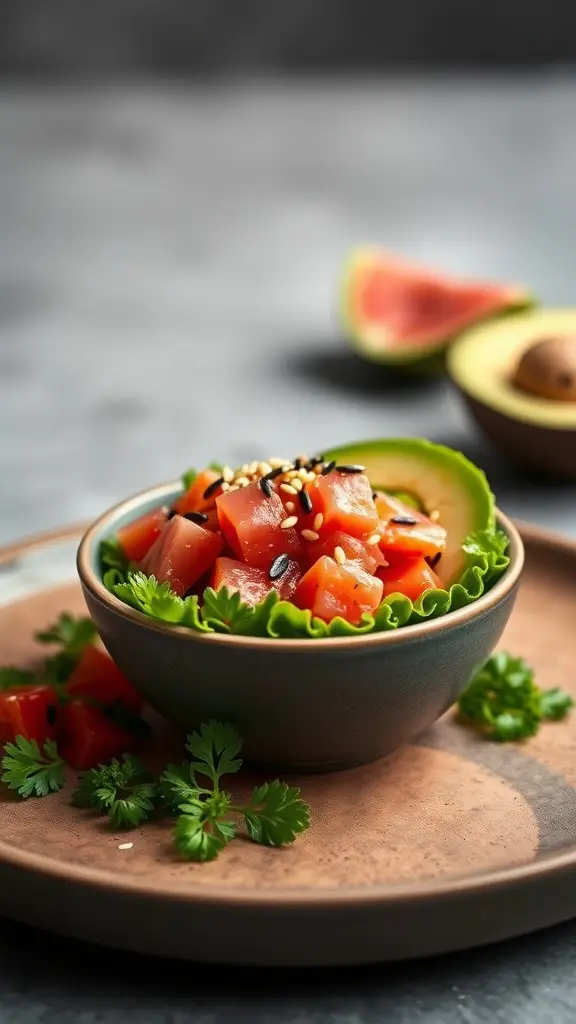
This Spicy Tuna Tartare with Avocado and Sesame is a fresh and vibrant dish that packs a punch. The combination of creamy avocado and zesty tuna creates a delightful balance of flavors that will impress your guests at any lunch party.
Not only is it delicious, but it’s also simple to whip up. With just a few ingredients and minimal prep time, you can serve a dish that looks and tastes gourmet without the fuss.
Ingredients
- 8 oz sushi-grade tuna, diced
- 1 ripe avocado, diced
- 2 tablespoons soy sauce
- 1 tablespoon sesame oil
- 1 teaspoon sriracha (adjust to taste)
- 1 tablespoon green onions, chopped
- 1 tablespoon sesame seeds
- Salt and pepper to taste
- Fresh cilantro for garnish
- Butter lettuce leaves for serving
Instructions
- Prepare the Tuna: In a bowl, combine diced tuna, soy sauce, sesame oil, sriracha, and green onions. Mix gently to combine.
- Season: Taste the mixture and add salt and pepper as needed. Adjust the sriracha for more heat if desired.
- Assemble: In serving bowls, layer the diced avocado at the bottom. Top with the spicy tuna mixture.
- Garnish: Sprinkle sesame seeds over the top and add fresh cilantro for a pop of color.
- Serve: Use butter lettuce leaves as cups to scoop up the tartare. Enjoy your delicious creation!
Lemon Herb Grilled Shrimp Skewers

Lemon Herb Grilled Shrimp Skewers are a delightful addition to any lunch party. These skewers are light, zesty, and packed with flavor, making them a perfect choice for a gathering. The combination of fresh herbs and lemon creates a refreshing taste that pairs wonderfully with the succulent shrimp.
This recipe is simple to make, requiring just a few ingredients and minimal prep time. Whether you’re a seasoned cook or a beginner, you’ll find this dish easy to whip up, ensuring your lunch party is a hit!
Ingredients
- 1 pound large shrimp, peeled and deveined
- 1/4 cup olive oil
- 2 tablespoons fresh lemon juice
- 2 cloves garlic, minced
- 1 tablespoon fresh parsley, chopped
- 1 tablespoon fresh cilantro, chopped
- 1 teaspoon salt
- 1/2 teaspoon black pepper
- Skewers (if using wooden skewers, soak in water for 30 minutes)
Instructions
- Marinate the Shrimp: In a bowl, combine olive oil, lemon juice, garlic, parsley, cilantro, salt, and pepper. Add the shrimp and toss to coat. Let it marinate for 15-30 minutes.
- Prepare the Skewers: Thread the marinated shrimp onto the skewers, leaving a little space between each shrimp for even cooking.
- Preheat the Grill: Heat your grill to medium-high heat. Lightly oil the grill grates to prevent sticking.
- Grill the Shrimp: Place the skewers on the grill and cook for about 2-3 minutes on each side, or until the shrimp are opaque and cooked through.
- Serve: Remove from the grill and serve immediately with extra lemon wedges on the side.
Zucchini Noodles with Pesto and Cherry Tomatoes

This Zucchini Noodles with Pesto and Cherry Tomatoes dish is a fresh and vibrant option for your lunch party recipes. The combination of zucchini noodles, homemade pesto, and juicy cherry tomatoes creates a light and flavorful meal that’s sure to impress your guests.
Not only is this recipe simple to make, but it also packs a punch of taste with its bright flavors. The creamy pesto complements the tender zucchini, while the cherry tomatoes add a burst of sweetness. It’s a perfect choice for a quick yet elegant dish that fits right into a sophisticated lunch gathering.
Ingredients
- 4 medium zucchinis, spiralized
- 1 cup fresh basil leaves
- 1/2 cup grated Parmesan cheese
- 1/3 cup pine nuts
- 2 cloves garlic
- 1/2 cup olive oil
- 1 cup cherry tomatoes, halved
- Salt and pepper to taste
Instructions
- Make the Pesto: In a food processor, combine basil, Parmesan, pine nuts, and garlic. Pulse until finely chopped. With the processor running, slowly add olive oil until smooth. Season with salt and pepper.
- Prepare the Zucchini Noodles: Spiralize the zucchinis and place them in a large bowl.
- Mix Together: Add the pesto to the zucchini noodles and toss until well coated. Gently fold in the halved cherry tomatoes.
- Serve: Plate the zucchini noodles and garnish with extra basil and Parmesan if desired. Enjoy your fresh and tasty dish!
Stuffed Bell Peppers with Quinoa and Black Beans
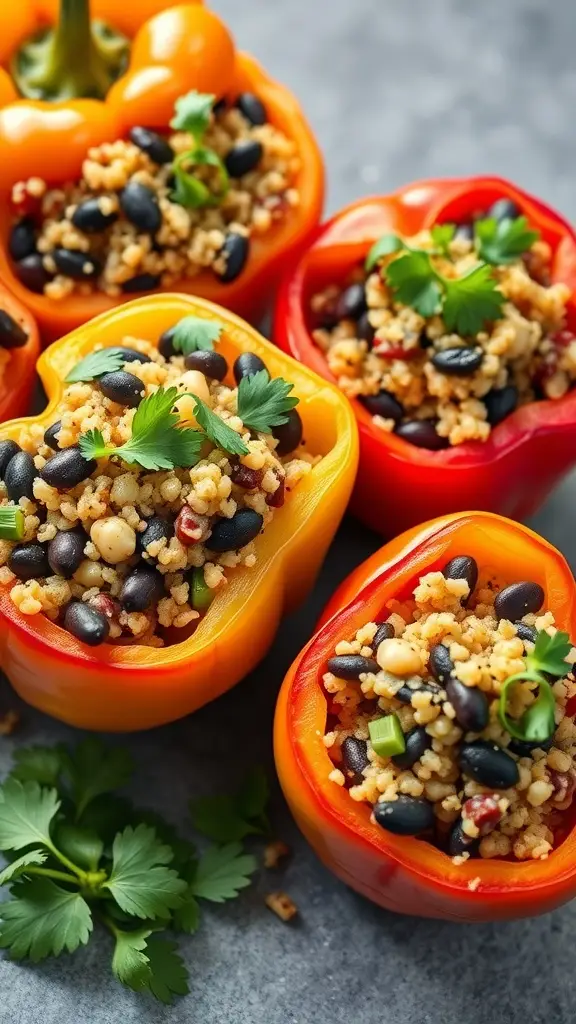
Stuffed bell peppers are a colorful and satisfying dish that brings together the goodness of quinoa and black beans. This recipe is not only simple to make, but it also packs a punch of flavor with every bite. The combination of spices and fresh ingredients makes these peppers a delightful addition to any lunch party menu.
The taste is a perfect balance of savory and slightly sweet, thanks to the bell peppers. Plus, they are easy to prepare, making them a great option for both novice and experienced cooks. Serve these at your next gathering, and watch them disappear!
Ingredients
- 4 large bell peppers (any color)
- 1 cup quinoa, rinsed
- 2 cups vegetable broth
- 1 can (15 oz) black beans, drained and rinsed
- 1 cup corn (fresh or frozen)
- 1 teaspoon cumin
- 1 teaspoon chili powder
- 1/2 teaspoon garlic powder
- Salt and pepper to taste
- 1/4 cup fresh cilantro, chopped
- 1 cup shredded cheese (optional)
Instructions
- Preheat your oven to 375°F (190°C).
- Cut the tops off the bell peppers and remove the seeds. Place them upright in a baking dish.
- In a medium saucepan, combine quinoa and vegetable broth. Bring to a boil, then reduce heat to low, cover, and simmer for about 15 minutes or until the quinoa is fluffy.
- In a large bowl, mix the cooked quinoa, black beans, corn, cumin, chili powder, garlic powder, salt, pepper, and half of the cilantro.
- Stuff each bell pepper with the quinoa mixture, pressing down gently to pack it in. If using cheese, sprinkle it on top of the stuffed peppers.
- Cover the baking dish with foil and bake for 25 minutes. Remove the foil and bake for an additional 10 minutes, or until the peppers are tender.
- Garnish with the remaining cilantro before serving. Enjoy!
Caprese Salad Skewers with Balsamic Glaze

Caprese Salad Skewers are a fun twist on the classic Italian dish. These bite-sized delights combine fresh mozzarella, juicy cherry tomatoes, and fragrant basil, all drizzled with a rich balsamic glaze. They are not only visually appealing but also bursting with flavor, making them a perfect addition to your lunch party recipes.
Simple to prepare, these skewers require minimal ingredients and can be assembled in just a few minutes. They are a great option for impressing guests without spending hours in the kitchen. Enjoy the fresh taste of summer with every bite!
Ingredients
- 1 pint cherry tomatoes
- 8 ounces fresh mozzarella balls
- 1 bunch fresh basil leaves
- 1/2 cup balsamic glaze
- Salt and pepper to taste
- Skewers (6-inch or 8-inch)
Instructions
- Prepare the Skewers: Take a skewer and thread a cherry tomato onto it, followed by a basil leaf, then a mozzarella ball. Repeat this pattern until the skewer is filled, leaving a little space at the end.
- Season: Once all the skewers are assembled, drizzle them with balsamic glaze and sprinkle with salt and pepper to taste.
- Serve: Arrange the skewers on a platter and enjoy immediately, or refrigerate until ready to serve.
Savory Mushroom Risotto with Parmesan
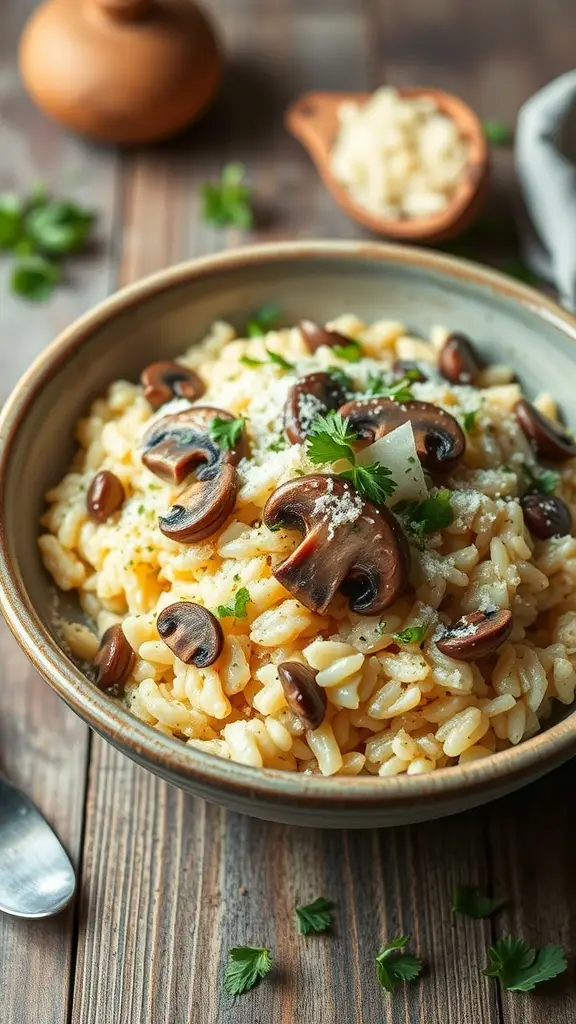
Mushroom risotto is a classic dish that brings comfort and warmth to any lunch party. Creamy and rich, it features the earthy flavors of mushrooms paired with the nutty taste of Parmesan cheese. This recipe is simple enough for anyone to tackle, making it a perfect choice for both novice and experienced cooks.
The combination of Arborio rice and broth creates a luscious texture that is hard to resist. Each bite is a delightful blend of flavors, making it a standout dish for your gathering. Serve it warm, and watch your guests savor every spoonful!
Ingredients
- 1 cup Arborio rice
- 4 cups vegetable or chicken broth
- 1 cup mushrooms, sliced
- 1 small onion, finely chopped
- 2 cloves garlic, minced
- 1/2 cup dry white wine
- 1/2 cup grated Parmesan cheese
- 2 tablespoons olive oil
- 2 tablespoons butter
- Salt and pepper to taste
- Fresh parsley for garnish
Instructions
- Prepare the Broth: In a saucepan, heat the broth over low heat to keep it warm.
- Sauté the Vegetables: In a large skillet, heat olive oil and butter over medium heat. Add the chopped onion and garlic, cooking until softened. Then, add the sliced mushrooms and cook until they are tender.
- Add the Rice: Stir in the Arborio rice, allowing it to toast for about 2 minutes. This step enhances the flavor.
- Deglaze with Wine: Pour in the white wine and stir until it has mostly evaporated.
- Cook the Risotto: Begin adding the warm broth, one ladle at a time, stirring frequently. Wait until the liquid is mostly absorbed before adding more. Continue this process for about 18-20 minutes until the rice is creamy and al dente.
- Finish with Cheese: Remove from heat and stir in the grated Parmesan cheese. Season with salt and pepper to taste.
- Serve: Garnish with fresh parsley and enjoy your savory mushroom risotto!
Buffalo Cauliflower Bites with Blue Cheese Dip

Buffalo Cauliflower Bites are a fun twist on the classic buffalo wings. These bites pack a punch with their spicy flavor while being a healthier option. They’re crispy, tangy, and perfect for sharing at your lunch party.
Making these bites is super simple. Just toss cauliflower florets in a spicy buffalo sauce, bake them until crispy, and serve with a creamy blue cheese dip. It’s a crowd-pleaser that everyone will love!
Ingredients
- 1 head of cauliflower, cut into florets
- 1 cup all-purpose flour
- 1 cup water
- 1 teaspoon garlic powder
- 1 teaspoon onion powder
- 1 teaspoon paprika
- 1/2 teaspoon salt
- 1 cup buffalo sauce
- 1/2 cup blue cheese, crumbled
- 1/2 cup sour cream
- 1 tablespoon lemon juice
- Celery sticks, for serving
Instructions
- Preheat the oven to 450°F (230°C). Line a baking sheet with parchment paper.
- In a bowl, mix flour, water, garlic powder, onion powder, paprika, and salt until smooth. Dip each cauliflower floret into the batter, letting the excess drip off.
- Place the battered florets on the baking sheet and bake for 20 minutes, flipping halfway through, until golden and crispy.
- Remove from the oven and toss the cauliflower in buffalo sauce until well coated. Return to the oven for another 10 minutes.
- While the cauliflower bakes, prepare the blue cheese dip by mixing blue cheese, sour cream, and lemon juice in a bowl until smooth.
- Serve the buffalo cauliflower bites hot with the blue cheese dip and celery sticks on the side.
Caramelized Onion and Gruyère Tart
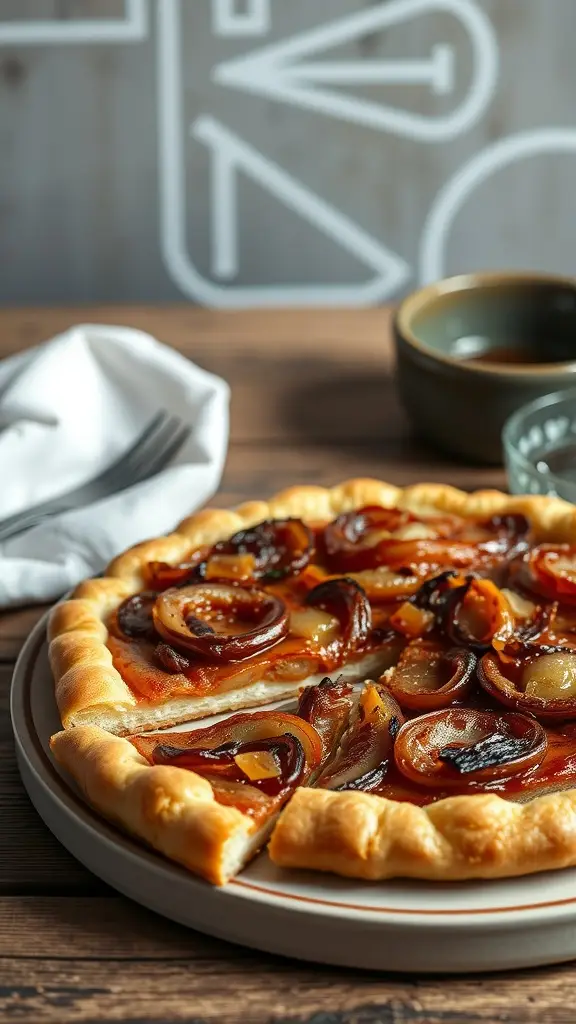
This Caramelized Onion and Gruyère Tart is a delightful addition to any lunch party. With its rich, sweet onions and creamy Gruyère cheese, it offers a perfect balance of flavors that will impress your guests. Plus, it’s surprisingly simple to make, making it a great choice for those who want to serve something special without spending all day in the kitchen.
The tart features a flaky crust that holds a luscious filling, making each bite a treat. Whether you’re hosting a casual gathering or a more sophisticated affair, this dish is sure to be a hit. Serve it warm or at room temperature, and watch it disappear!
Ingredients
- 1 sheet of puff pastry, thawed
- 3 large onions, thinly sliced
- 2 tablespoons olive oil
- 1 tablespoon butter
- 1 teaspoon sugar
- Salt and pepper to taste
- 1 cup Gruyère cheese, grated
- 2 large eggs
- 1/2 cup heavy cream
- 1 teaspoon fresh thyme leaves (optional)
Instructions
- Preheat your oven to 400°F (200°C).
- In a large skillet, heat olive oil and butter over medium heat. Add the sliced onions, sugar, salt, and pepper. Cook, stirring occasionally, for about 25-30 minutes until the onions are golden brown and caramelized.
- Roll out the puff pastry and place it in a tart pan. Trim any excess pastry hanging over the edges.
- Spread the caramelized onions evenly over the pastry. Sprinkle the grated Gruyère cheese on top.
- In a bowl, whisk together the eggs, heavy cream, and thyme (if using). Pour this mixture over the onions and cheese.
- Bake the tart for 25-30 minutes, or until the filling is set and the pastry is golden brown.
- Let it cool slightly before slicing and serving. Enjoy!
Honey Garlic Glazed Carrots with Thyme

Honey garlic glazed carrots are a delightful addition to any lunch party. They bring a sweet and savory flavor that pairs perfectly with a variety of dishes. The natural sweetness of the carrots shines through, enhanced by the rich honey and the aromatic thyme.
This recipe is simple to make, requiring just a few ingredients and minimal prep time. You can whip these up in no time, making them a great choice for your lunch party recipes.
Ingredients
- 1 pound baby carrots
- 2 tablespoons honey
- 2 tablespoons unsalted butter
- 2 cloves garlic, minced
- 1 teaspoon fresh thyme leaves
- Salt and pepper to taste
- 1 tablespoon sesame seeds (optional)
Instructions
- Prepare the Carrots: In a large skillet, melt the butter over medium heat. Add the baby carrots and sauté for about 5 minutes until they start to soften.
- Add Honey and Garlic: Stir in the honey and minced garlic. Cook for another 5-7 minutes, stirring occasionally, until the carrots are tender and glazed.
- Season: Sprinkle with fresh thyme, salt, and pepper. Toss to combine and cook for an additional minute.
- Serve: Transfer the glazed carrots to a serving dish and sprinkle with sesame seeds if desired. Enjoy!
Roasted Garlic and Herb Hummus with Pita Chips

This roasted garlic and herb hummus is a delightful addition to any lunch party. It’s creamy, flavorful, and has a hint of sweetness from the roasted garlic. Perfect for dipping, this recipe is simple to make and will impress your guests.
The combination of herbs adds a fresh touch, making it a great appetizer. Serve it with crispy pita chips for a satisfying crunch. It’s a crowd-pleaser that pairs well with other lunch party recipes!
Ingredients
- 1 can (15 oz) chickpeas, drained and rinsed
- 1/4 cup tahini
- 2 tablespoons olive oil
- 2 cloves roasted garlic
- 1 tablespoon lemon juice
- 1 teaspoon ground cumin
- Salt and pepper to taste
- Fresh herbs (parsley, cilantro, or dill) for garnish
- Pita chips for serving
Instructions
- Blend Ingredients: In a food processor, combine chickpeas, tahini, olive oil, roasted garlic, lemon juice, cumin, salt, and pepper. Blend until smooth.
- Adjust Consistency: If the hummus is too thick, add a little water or more olive oil to reach your desired consistency.
- Garnish: Transfer the hummus to a serving bowl. Drizzle with olive oil and sprinkle fresh herbs on top.
- Serve: Enjoy with pita chips or fresh veggies.
Chocolate Espresso Mousse Cups

Chocolate Espresso Mousse Cups are a delightful treat that combines rich chocolate with a hint of coffee. The creamy texture and bold flavors make these cups a perfect dessert for any lunch party. They are surprisingly simple to whip up, requiring just a few ingredients and minimal time.
Each spoonful offers a luscious taste that balances sweetness with a touch of bitterness from the espresso. These mousse cups are sure to impress your guests and leave them wanting more!
Ingredients
- 1 cup heavy cream
- 1/2 cup semi-sweet chocolate chips
- 2 tablespoons espresso or strong coffee
- 2 tablespoons granulated sugar
- 1 teaspoon vanilla extract
- Pinch of salt
- Whipped cream and cocoa powder for garnish
Instructions
- Melt the Chocolate: In a microwave-safe bowl, combine the chocolate chips and espresso. Heat in 30-second intervals, stirring until smooth.
- Whip the Cream: In a separate bowl, whip the heavy cream, sugar, vanilla, and salt until soft peaks form.
- Combine: Gently fold the melted chocolate mixture into the whipped cream until fully incorporated.
- Chill: Spoon the mousse into serving cups and refrigerate for at least 2 hours to set.
- Serve: Top with whipped cream and a sprinkle of cocoa powder before serving.
Coconut Curry Chicken Salad Lettuce Wraps
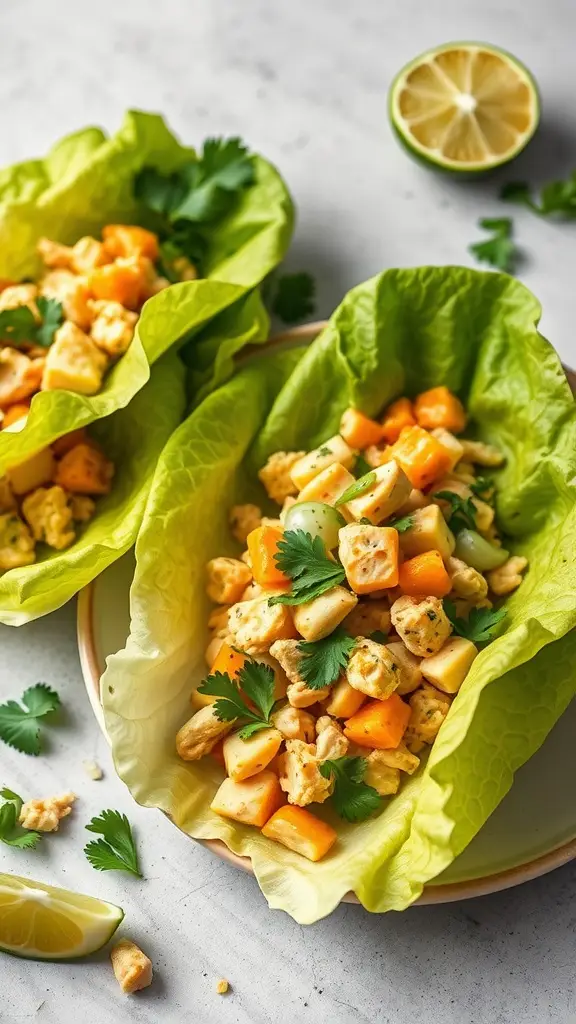
Coconut Curry Chicken Salad Lettuce Wraps are a refreshing and tasty option for your lunch party recipes. The combination of tender chicken, creamy coconut, and aromatic curry spices creates a delightful flavor that’s both satisfying and light. These wraps are easy to prepare, making them perfect for entertaining or a quick meal at home.
Each bite is a burst of flavor, with the crisp lettuce providing a nice crunch. Plus, they’re a fun way to enjoy a healthy dish without the fuss of traditional sandwiches. Your guests will love the unique twist on a classic chicken salad!
Ingredients
- 2 cups cooked chicken, shredded
- 1/2 cup plain Greek yogurt
- 1/4 cup coconut milk
- 2 tablespoons curry powder
- 1/2 cup diced mango
- 1/4 cup chopped cilantro
- 1 tablespoon lime juice
- Salt and pepper to taste
- 8 large lettuce leaves (such as romaine or butter lettuce)
Instructions
- In a large bowl, combine the shredded chicken, Greek yogurt, coconut milk, and curry powder. Mix well until the chicken is fully coated.
- Add the diced mango, chopped cilantro, lime juice, salt, and pepper. Stir gently to combine all the ingredients.
- Lay out the lettuce leaves on a serving platter. Spoon the coconut curry chicken salad into each leaf.
- Serve immediately, garnished with extra cilantro if desired. Enjoy your delicious wraps!
Baked Brie with Cranberries and Walnuts

Baked Brie with cranberries and walnuts is a delightful treat that brings a touch of elegance to any lunch party. The creamy, warm cheese pairs beautifully with the sweet-tart cranberries and crunchy walnuts, creating a perfect balance of flavors and textures. Plus, it’s super easy to whip up, making it a go-to choice for impressing your guests without spending hours in the kitchen.
This dish is not just about taste; it also looks stunning on the table. Serve it with slices of crusty bread or crackers, and watch it disappear in no time. It’s a fantastic addition to your lunch party recipes that will have everyone raving!
Ingredients
- 1 round of Brie cheese (about 8 ounces)
- 1/2 cup fresh cranberries
- 1/4 cup walnuts, chopped
- 2 tablespoons brown sugar
- 1 tablespoon honey
- 1 teaspoon fresh rosemary, chopped (optional)
- 1 baguette or crackers for serving
Instructions
- Preheat your oven to 350°F (175°C).
- Place the Brie on a baking sheet lined with parchment paper.
- In a small bowl, mix the cranberries, walnuts, brown sugar, honey, and rosemary (if using).
- Spread the cranberry mixture over the top of the Brie.
- Bake for 15-20 minutes, or until the cheese is soft and gooey.
- Remove from the oven and let it cool slightly before serving.
- Serve warm with slices of baguette or your favorite crackers.
Pork Tenderloin Medallions with Apple Chutney

Pork tenderloin medallions with apple chutney is a delightful dish that combines savory and sweet flavors. The tender pork pairs perfectly with the tangy apple chutney, creating a balance that’s sure to impress your guests. This recipe is simple to make, making it a great choice for your lunch party recipes.
The dish is not only visually appealing but also bursting with flavor. The juicy pork, complemented by the fresh apples, brings a touch of elegance to any gathering without requiring hours in the kitchen. Your guests will love the combination of textures and tastes!
Ingredients
- 1 pound pork tenderloin
- 2 tablespoons olive oil
- Salt and pepper to taste
- 1 cup diced apples (preferably Granny Smith)
- 1/2 cup onion, finely chopped
- 1/4 cup brown sugar
- 1/4 cup apple cider vinegar
- 1 teaspoon ground cinnamon
- 1/2 teaspoon ground ginger
- 1/4 teaspoon nutmeg
- Fresh chives for garnish
Instructions
- Prepare the Pork: Preheat your oven to 400°F (200°C). Season the pork tenderloin with salt and pepper. Heat olive oil in an oven-safe skillet over medium-high heat. Sear the pork on all sides until browned, about 5-7 minutes.
- Make the Chutney: In a separate saucepan, combine diced apples, onion, brown sugar, apple cider vinegar, cinnamon, ginger, and nutmeg. Cook over medium heat until the apples are soft and the mixture thickens, about 10-15 minutes.
- Finish Cooking: Transfer the skillet with the pork to the preheated oven. Roast for 15-20 minutes, or until the internal temperature reaches 145°F (63°C). Let it rest for 5 minutes before slicing into medallions.
- Serve: Plate the pork medallions and top with the apple chutney. Garnish with fresh chives and enjoy!
You may also like:
– 21 Children’s Birthday Cakes Inspired by Gotham City
– 19 Vintage Appetizers Inspired by the 1960s Mad Men Era
– 30 Recipes for the Ultimate Trooper’s Space Journey
If you enjoyed this blog you can visit us or check out our other blogs and learn a bit about us.
Disclaimer: This blog post is inspired by fictional universes and characters created by their respective rights holders. All related content and imagery remain the property of their respective rights holder. This fan-inspired content is for entertainment and commentary purposes only and is not affiliated with or endorsed by HBO, Disney, Warner Bros., Lionsgate, or any other rights holders. To explore the official source material, please visit:
HBO