

Get ready to channel your inner Gotham with these Halloween-inspired desserts that combine the allure of dark chocolate, the richness of black velvet cupcakes, and the excitement of neon-glow cocktails. Perfect for your spooky celebrations, these treats not only look incredible but also pack a punch of flavor. Don’t forget that you can swap out ingredients like using almond flour for a gluten-free option or adding a splash of club soda to brighten up your cocktails. Dive into these recipes to impress your guests with a festively dark twist this Halloween!
Indulgent Dark Chocolate Bat Truffles
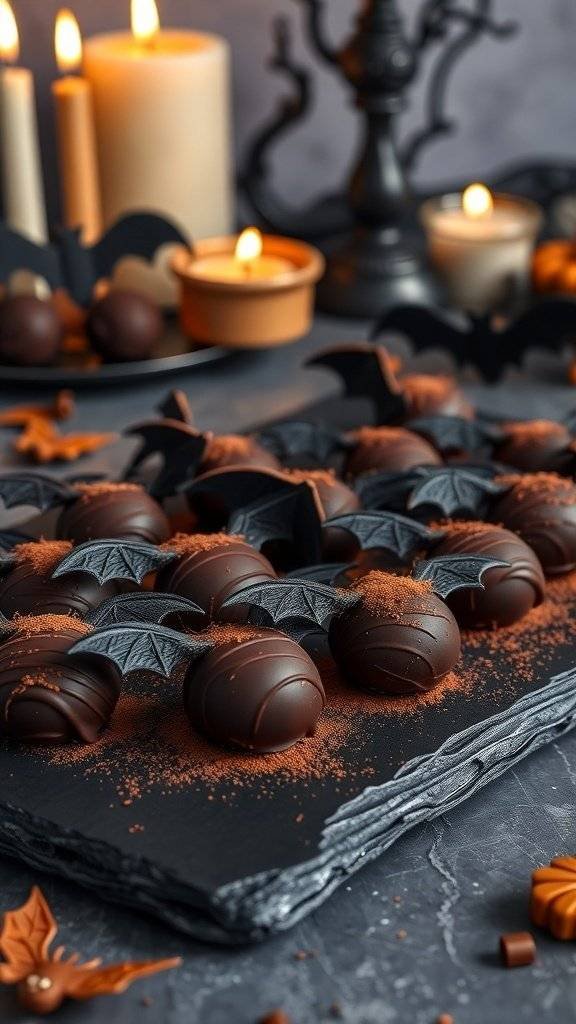
These dark chocolate bat truffles are a perfect treat for Halloween. They look spooky and taste amazing! The rich chocolate flavor combined with a creamy filling makes them irresistible. The bat-shaped decorations add a fun touch, making them ideal for any Halloween gathering.
To make these truffles, you’ll need just a few ingredients. Start with high-quality dark chocolate for the best flavor. The creamy filling can be made with cream cheese or a chocolate ganache, depending on your preference. Don’t forget to add some cocoa powder for that extra touch of decadence!
When it comes to decorating, you can use bat-shaped molds or simply shape the truffles by hand. Dust them with cocoa powder or edible glitter to give them a magical glow. These treats are not just delicious; they also add an exciting visual element to your Halloween desserts.
Ingredients
- 8 oz dark chocolate, chopped
- 4 oz cream cheese, softened
- 1/2 cup powdered sugar
- 1 tsp vanilla extract
- Cocoa powder for dusting
- Bat-shaped chocolate molds (optional)
Instructions
- Melt the dark chocolate in a microwave-safe bowl, stirring every 30 seconds until smooth.
- In a separate bowl, mix the softened cream cheese, powdered sugar, and vanilla extract until creamy.
- Once the chocolate is melted, let it cool slightly. Then, mix it into the cream cheese mixture until well combined.
- Chill the mixture in the refrigerator for about 30 minutes until firm.
- Once chilled, scoop out small portions and shape them into balls or use bat-shaped molds.
- Dust the truffles with cocoa powder for a finishing touch.
- Refrigerate until ready to serve. Enjoy your spooky treats!
Cooking Tip: If you want a richer flavor, try adding a splash of espresso or a pinch of sea salt to the mixture. For a dairy-free option, substitute cream cheese with coconut cream.
Ingredient Substitution: If you don’t have dark chocolate, semi-sweet chocolate works too. You can also use almond flour instead of powdered sugar for a different texture.
Sinister Black Velvet Cupcakes With Cream Cheese Frosting
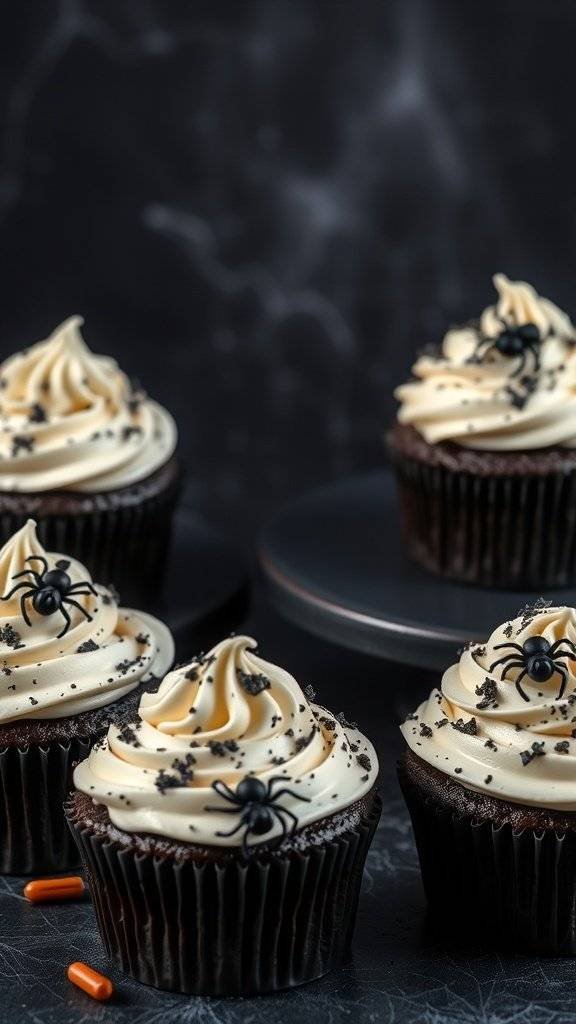
These black velvet cupcakes are perfect for Halloween desserts. They have a rich, dark color that adds a spooky touch to your celebration. Topped with creamy frosting and a sprinkle of black crumbs, they look as good as they taste. The little spiders on top add a fun, creepy vibe that everyone will love.
Making these cupcakes is simple. Start with the classic ingredients for a moist cupcake, and then add a bit of cocoa powder for that deep color. The cream cheese frosting is smooth and tangy, balancing the sweetness of the cake. You can even use food coloring to make the frosting more vibrant if you like.
For a twist, consider using almond flour instead of regular flour for a gluten-free option. You can also swap out the cream cheese for a dairy-free alternative if needed. These cupcakes are sure to impress your guests and make your Halloween party a hit!
Ingredients
- 1 ½ cups all-purpose flour
- 1 cup granulated sugar
- ½ cup unsweetened cocoa powder
- 1 teaspoon baking soda
- ½ teaspoon salt
- 1 cup buttermilk
- ½ cup vegetable oil
- 2 large eggs
- 1 teaspoon vanilla extract
- 1 tablespoon white vinegar
- 8 oz cream cheese, softened
- 4 cups powdered sugar
- 1 teaspoon vanilla extract (for frosting)
- Black cookie crumbs (for decoration)
- Edible spiders (for decoration)
Instructions
- Preheat your oven to 350°F (175°C) and line a cupcake pan with liners.
- In a large bowl, mix flour, sugar, cocoa powder, baking soda, and salt.
- In another bowl, whisk together buttermilk, oil, eggs, vanilla, and vinegar. Combine the wet and dry ingredients until smooth.
- Fill each cupcake liner about two-thirds full with batter. Bake for 18-20 minutes or until a toothpick comes out clean.
- Let the cupcakes cool completely before frosting.
- For the frosting, beat cream cheese, powdered sugar, and vanilla until smooth. Spread or pipe the frosting onto the cooled cupcakes.
- Top with black cookie crumbs and edible spiders for decoration.
Cooking Tip: If you want a richer flavor, try adding a tablespoon of espresso powder to the batter. For a lighter frosting, you can mix in some whipped cream to the cream cheese mixture.
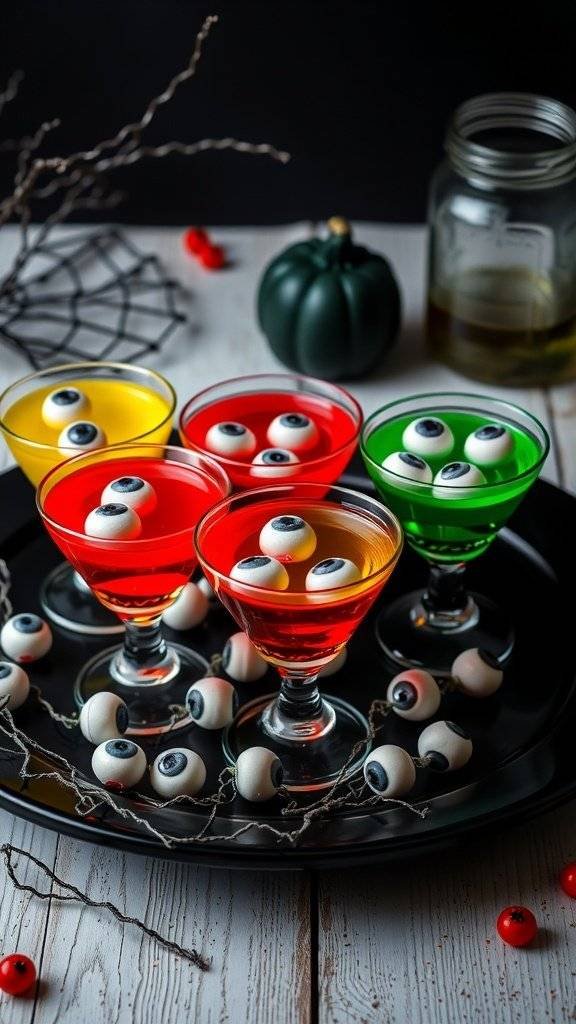
Eerie Neon-Glow Halloween Cocktails

These Halloween cocktails are a feast for the eyes and the taste buds! Picture vibrant drinks glowing in eerie colors, perfect for a spooky gathering. The neon hues of green, pink, and orange stand out against the dark backdrop, creating an atmosphere that screams Halloween fun. The drinks are garnished with gummy worms and served in elegant glasses, adding a playful touch to the eerie vibe.
To make these cocktails, you can mix various spirits and mixers to achieve that glowing effect. Using tonic water is a great trick, as it glows under black light. Pair it with flavored vodkas or fruit juices for a delicious twist. Don’t forget to add some dry ice for that smoky, mysterious look!
Ingredients
- 1 cup vodka (any flavor)
- 1 cup tonic water
- 1/2 cup fruit juice (like lime or orange)
- 1/4 cup grenadine
- Gummy worms for garnish
- Ice cubes
Instructions
- In a shaker, combine vodka, tonic water, and fruit juice. Shake well.
- Fill glasses with ice cubes and pour the mixture over the ice.
- Add a splash of grenadine for a spooky effect.
- Garnish with gummy worms on the rim of the glass.
- If using dry ice, add a small piece to each glass for a smoky effect (handle with care!).
Cooking Tip: Feel free to substitute vodka with rum or gin for different flavor profiles. You can also use flavored sparkling water instead of tonic for a lighter drink. Adjust the sweetness by adding more or less grenadine based on your taste!
Wicked Witch’S Brew Chocolate Mousse
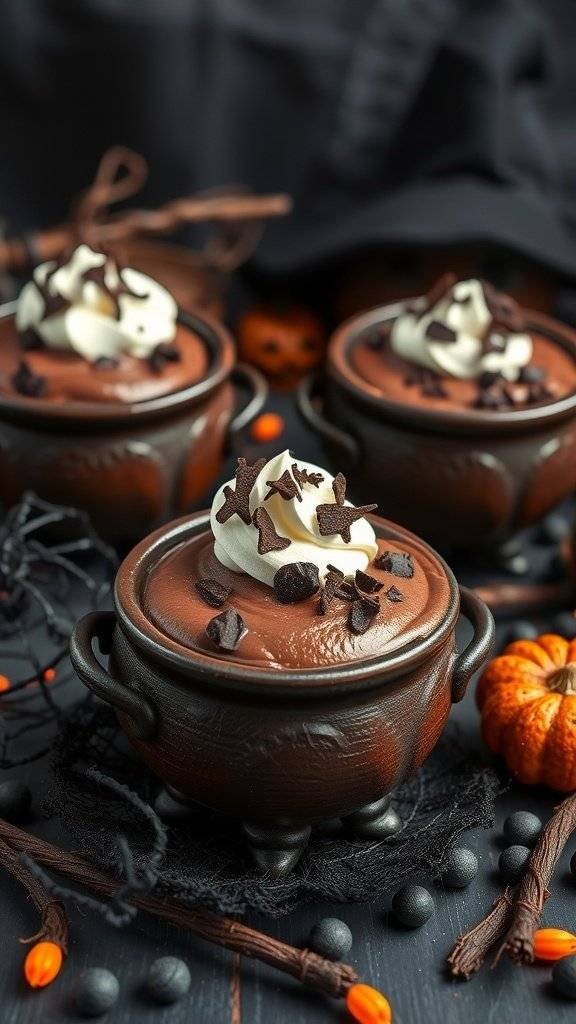
Get ready to enchant your Halloween gathering with this Wicked Witch’s Brew Chocolate Mousse! This dessert is not only delicious but also visually striking, served in little cauldrons that add a fun touch to your Halloween Desserts. The rich, dark chocolate mousse is topped with whipped cream and chocolate shavings, making it irresistible.
To make this treat, you’ll need a few simple ingredients. The combination of dark chocolate and cream creates a smooth, velvety texture that melts in your mouth. Plus, the spooky presentation will surely impress your guests!
Ingredients
- 8 oz dark chocolate, chopped
- 2 cups heavy cream
- 1/4 cup granulated sugar
- 1 teaspoon vanilla extract
- Chocolate shavings for garnish
- Whipped cream for topping
Instructions
- Melt the Chocolate: In a heatproof bowl, melt the chopped dark chocolate over a pot of simmering water. Stir until smooth and let it cool slightly.
- Whip the Cream: In a separate bowl, whip the heavy cream with sugar and vanilla extract until soft peaks form.
- Combine: Gently fold the melted chocolate into the whipped cream until fully combined. Be careful not to deflate the mixture.
- Chill: Spoon the mousse into small cauldrons or dessert cups and refrigerate for at least 2 hours to set.
- Serve: Top with whipped cream and sprinkle with chocolate shavings before serving.
Cooking Tips: If you want a sweeter mousse, feel free to adjust the sugar to your taste. For a lighter version, you can substitute half of the heavy cream with Greek yogurt. Enjoy this spooky dessert at your Halloween party!
Ghostly White Chocolate Meringue Cookies
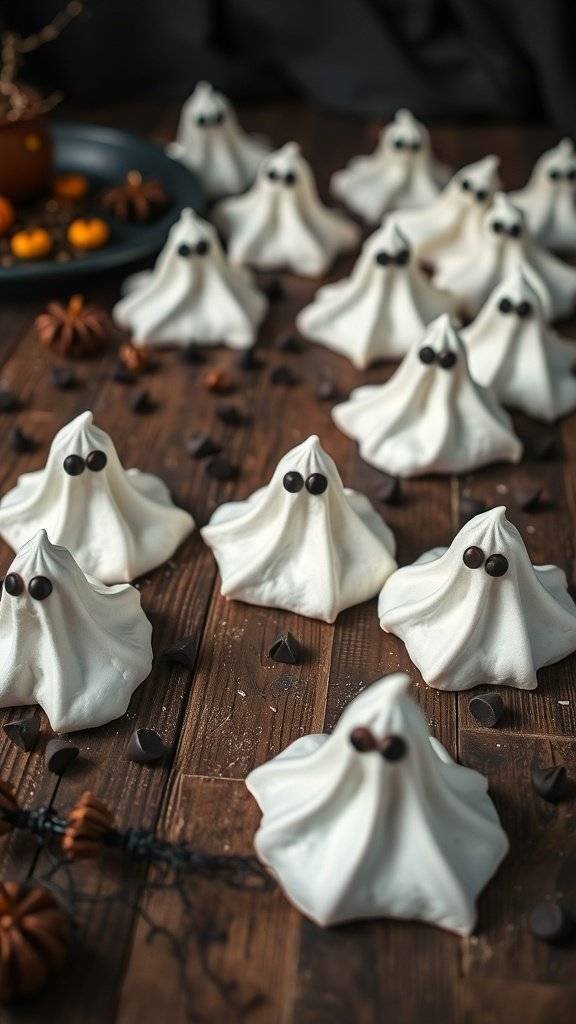
These Ghostly White Chocolate Meringue Cookies are a perfect treat for Halloween. They look like cute little ghosts, making them a fun addition to any spooky gathering. The light and airy texture of meringue pairs wonderfully with the sweetness of white chocolate, creating a delightful treat that everyone will love.
To make these cookies, you’ll need just a few simple ingredients. The best part? They’re easy to whip up and can be made ahead of time. These cookies are not only visually appealing but also light enough to enjoy without feeling guilty. Plus, they add a touch of whimsy to your Halloween Desserts table!
Ingredients
- 4 large egg whites
- 1 cup granulated sugar
- 1/4 teaspoon cream of tartar
- 1 teaspoon vanilla extract
- 1/2 cup white chocolate chips
- Chocolate chips for eyes
Instructions
- Preheat your oven to 200°F (93°C) and line a baking sheet with parchment paper.
- In a mixing bowl, beat the egg whites and cream of tartar until soft peaks form. Gradually add the sugar while continuing to beat until stiff peaks form.
- Mix in the vanilla extract and melted white chocolate until well combined.
- Using a piping bag, pipe ghost shapes onto the prepared baking sheet. Add chocolate chips as eyes.
- Bake for 1.5 to 2 hours until the meringues are dry and easily lift off the parchment.
- Let them cool completely before serving.
Cooking Tips: Make sure your mixing bowl is clean and free of any grease for the egg whites to whip properly. If you don’t have cream of tartar, lemon juice can be a substitute. For a twist, you can add a few drops of food coloring to the meringue before piping.
These Ghostly White Chocolate Meringue Cookies are sure to be a hit at your Halloween festivities. Enjoy the spooky fun!
Creepy Crawly Spiderweb Cheesecake

This Spiderweb Cheesecake is a perfect treat for Halloween. It combines a rich, creamy filling with a chocolate cookie crust, topped with a spooky spiderweb design. The cheesecake is not only delicious but also visually striking, making it a great centerpiece for your Halloween dessert table.
The cheesecake features a smooth, creamy texture that contrasts beautifully with the crunchy crust. The chocolate drizzle adds a fun touch, creating the spiderweb effect that’s sure to impress your guests. Plus, it’s easy to make, so you can spend more time enjoying the festivities!
For a fun twist, you can add gummy spiders on top for an extra creepy effect. This dessert is sure to be a hit at any Halloween gathering.
Ingredients
- 1 ½ cups chocolate cookie crumbs
- ½ cup unsalted butter, melted
- 2 (8 oz) packages cream cheese, softened
- 1 cup granulated sugar
- 1 teaspoon vanilla extract
- 3 large eggs
- 1 cup sour cream
- ¼ cup heavy cream
- ½ cup semi-sweet chocolate chips
Instructions
- Prepare the Crust: Preheat your oven to 325°F (160°C). In a bowl, mix chocolate cookie crumbs and melted butter until combined. Press the mixture into the bottom of a 9-inch springform pan. Bake for 10 minutes, then let it cool.
- Make the Filling: In a large bowl, beat the cream cheese until smooth. Add sugar and vanilla, mixing until well combined. Add eggs one at a time, mixing on low speed after each addition. Stir in sour cream and heavy cream until smooth.
- Pour and Bake: Pour the filling over the cooled crust. Bake for 50-60 minutes, or until the center is set but still slightly jiggly. Turn off the oven and let the cheesecake cool inside for 1 hour.
- Chill: Remove the cheesecake from the oven and let it cool completely at room temperature. Refrigerate for at least 4 hours, preferably overnight.
- Decorate: Melt the chocolate chips in a microwave-safe bowl. Use a piping bag or a zip-top bag with the corner snipped off to drizzle the melted chocolate in a spiderweb pattern on top of the cheesecake. Add gummy spiders for decoration if desired.
Cooking Tips: Make sure your cream cheese is at room temperature for a smooth filling. If you don’t have chocolate cookie crumbs, you can use graham cracker crumbs mixed with cocoa powder as a substitute. For a richer flavor, consider adding a tablespoon of espresso powder to the filling.
Gory Red Velvet Cake With Black Buttercream
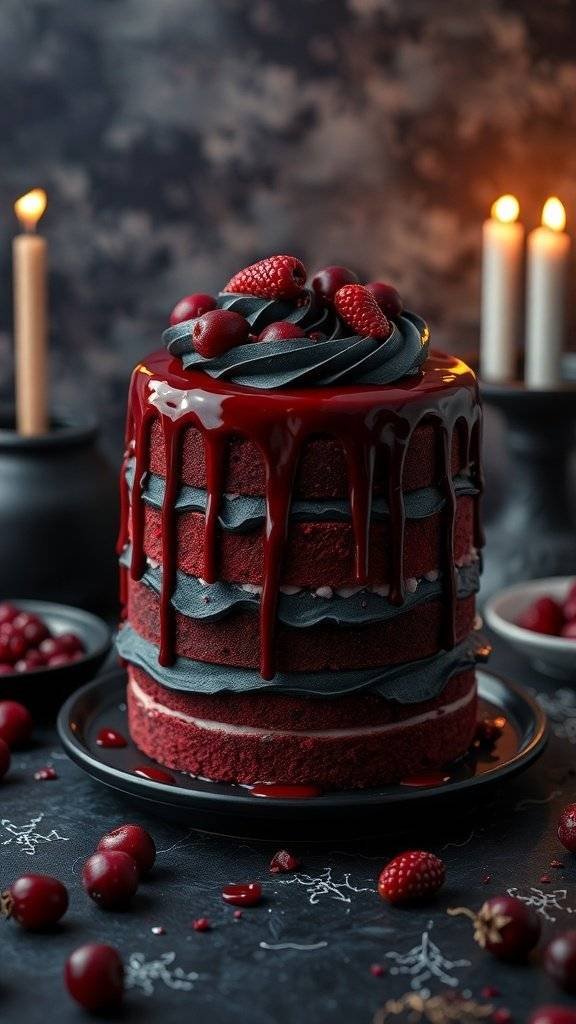
This Gory Red Velvet Cake is a perfect fit for your Halloween Desserts lineup. The striking contrast of deep red cake layers and black buttercream creates a dramatic look that’s sure to impress your guests. Topped with a glossy red glaze and fresh berries, it’s both spooky and delicious.
The rich red velvet flavor pairs beautifully with the dark, creamy frosting. This cake not only looks great but tastes amazing too! It’s a fun way to celebrate the Halloween season while satisfying your sweet tooth.
For those who want to try their hand at making this cake, here’s a simple recipe to follow. You can also switch things up by using different berries or even adding a splash of your favorite liqueur to the glaze for an adult twist!
Ingredients
- 2 1/2 cups all-purpose flour
- 1 1/2 cups granulated sugar
- 1 teaspoon baking soda
- 1 teaspoon salt
- 1 teaspoon cocoa powder
- 1 1/2 cups vegetable oil
- 1 cup buttermilk, room temperature
- 2 large eggs
- 2 tablespoons red food coloring
- 1 teaspoon vanilla extract
- 1 teaspoon white vinegar
- 1 cup unsweetened cocoa powder (for buttercream)
- 1 cup unsalted butter, softened
- 4 cups powdered sugar
- 1/4 cup heavy cream
- 1 cup raspberry or cherry sauce (for glaze)
Instructions
- Preheat your oven to 350°F (175°C). Grease and flour three 8-inch round cake pans.
- In a large bowl, whisk together flour, sugar, baking soda, salt, and cocoa powder.
- In another bowl, mix oil, buttermilk, eggs, food coloring, vanilla, and vinegar until well combined.
- Gradually add the wet ingredients to the dry ingredients, mixing until just combined.
- Divide the batter evenly among the prepared pans and bake for 25-30 minutes, or until a toothpick comes out clean.
- Let the cakes cool in the pans for 10 minutes, then transfer to wire racks to cool completely.
- For the buttercream, beat the softened butter until creamy. Gradually add cocoa powder and powdered sugar, alternating with heavy cream, until you reach your desired consistency.
- Once the cakes are cool, layer them with buttercream in between. Frost the top and sides of the cake with the remaining buttercream.
- Drizzle the raspberry or cherry sauce over the top for a gory effect. Garnish with fresh berries if desired.
Cooking Tip: If you want to make this cake gluten-free, substitute the all-purpose flour with a gluten-free blend. For a dairy-free version, use almond milk and a dairy-free butter substitute.
Macabre Marshmallow Eyeball Pops
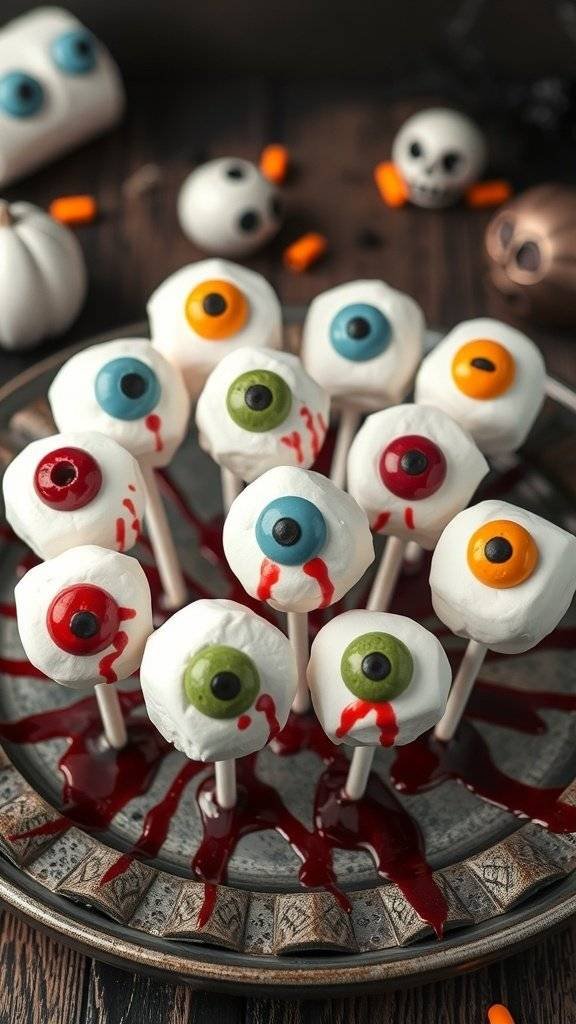
These Macabre Marshmallow Eyeball Pops are a fun and spooky addition to your Halloween Desserts lineup. They look creepy yet inviting, making them perfect for any Halloween gathering. The pops are made from marshmallows, decorated to resemble eyeballs, and served on sticks for easy handling.
To create these treats, start with large marshmallows. Dip them in melted white chocolate for a smooth finish. Once set, use edible gel or food coloring to add details like pupils and veins. The result is a dessert that’s both playful and a little unsettling, sure to impress your guests.
Don’t forget to add some fake blood for that extra spooky touch! You can use raspberry sauce or a simple mix of corn syrup and red food coloring. These pops are not just visually striking; they are also deliciously sweet!
Ingredients
- 10 large marshmallows
- 1 cup white chocolate chips
- Blue and black edible gel or food coloring
- 10 lollipop sticks
- 1/4 cup raspberry sauce (for blood effect)
Instructions
- Melt the white chocolate chips in a microwave-safe bowl, stirring every 30 seconds until smooth.
- Insert a lollipop stick into each marshmallow, then dip each marshmallow into the melted chocolate, ensuring it’s fully coated.
- Place the dipped marshmallows on a baking sheet lined with parchment paper and let them set.
- Once set, use the edible gel to create pupils and veins on the marshmallows.
- Drizzle raspberry sauce around the base for a bloody effect.
- Serve on a platter and enjoy the spooky fun!
Cooking Tips: If you want to add a twist, consider using colored chocolate melts instead of white chocolate for a more vibrant look. You can also use mini chocolate chips for pupils instead of gel. For a vegan option, use dairy-free chocolate and marshmallows.
These Macabre Marshmallow Eyeball Pops are sure to be a hit at your Halloween party. They’re easy to make and will add a fun, creepy element to your dessert table!
Chilling Poison Apple Cupcakes
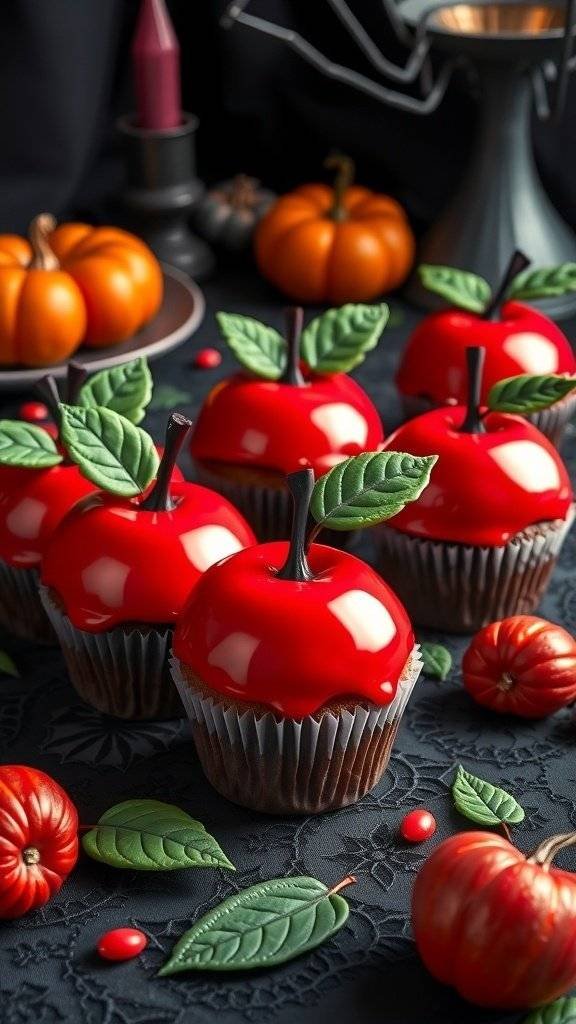
These Poison Apple Cupcakes are a fun twist on Halloween desserts that will surely impress your guests. The cupcakes are topped with a shiny red glaze, resembling a forbidden fruit, and are perfect for a spooky celebration. The dark chocolate base adds a rich flavor, while the vibrant red coating makes them visually striking.
To make these cupcakes, you’ll need basic baking ingredients along with some creativity. The combination of chocolate and the glossy red finish creates a delightful contrast that captures the Halloween spirit.
Ingredients
- 1 cup all-purpose flour
- 1/2 cup unsweetened cocoa powder
- 1 cup granulated sugar
- 1/2 teaspoon baking powder
- 1/2 teaspoon baking soda
- 1/4 teaspoon salt
- 1/2 cup unsalted butter, softened
- 2 large eggs
- 1 teaspoon vanilla extract
- 1/2 cup buttermilk
- 1 cup red candy melts
- Green fondant or leaves for decoration
- Chocolate sticks for stems
Instructions
- Preheat your oven to 350°F (175°C) and line a cupcake pan with liners.
- In a bowl, mix flour, cocoa powder, sugar, baking powder, baking soda, and salt.
- Add softened butter, eggs, vanilla, and buttermilk. Mix until smooth.
- Pour the batter into the cupcake liners, filling them about 2/3 full.
- Bake for 18-20 minutes or until a toothpick comes out clean. Let them cool completely.
- Melt the red candy melts in a microwave-safe bowl, stirring until smooth.
- Dip the cooled cupcakes into the melted candy, allowing excess to drip off.
- Once set, decorate with green fondant leaves and chocolate sticks for the stems.
Cooking Tips: If you don’t have buttermilk, you can substitute it with regular milk mixed with a tablespoon of vinegar or lemon juice. For a gluten-free option, use a gluten-free flour blend.
These Poison Apple Cupcakes are not just tasty; they also add a spooky flair to your Halloween desserts. Enjoy making them and watch them disappear at your Halloween party!
Freaky Chocolate Pumpkin Spice Cookies

These Freaky Chocolate Pumpkin Spice Cookies are a fun twist on traditional Halloween desserts. The cookies are shaped like pumpkins, with a rich chocolate base and a vibrant orange icing that captures the spirit of the season. They’re perfect for any Halloween gathering or just a cozy night in.
The combination of chocolate and pumpkin spice creates a delightful flavor that’s both comforting and festive. The cookies are soft and chewy, making them a hit with kids and adults alike. Plus, they look fantastic on any dessert table!
For a little extra fun, you can add sprinkles or edible glitter to the icing. This adds a pop of color and makes them even more festive. Don’t forget to share them with friends or family, as they’re sure to be a crowd-pleaser!
Ingredients
- 2 cups all-purpose flour
- 1/2 cup cocoa powder
- 1 teaspoon baking soda
- 1/2 teaspoon salt
- 1 teaspoon pumpkin spice
- 1/2 cup unsalted butter, softened
- 1 cup granulated sugar
- 1/2 cup brown sugar, packed
- 1 large egg
- 1 teaspoon vanilla extract
- 1 cup pumpkin puree
- 1 cup orange icing (store-bought or homemade)
Instructions
- Preheat the oven to 350°F (175°C). Line a baking sheet with parchment paper.
- In a bowl, whisk together flour, cocoa powder, baking soda, salt, and pumpkin spice.
- In another bowl, cream together the butter, granulated sugar, and brown sugar until light and fluffy. Add the egg and vanilla extract, mixing well.
- Stir in the pumpkin puree until combined. Gradually add the dry ingredients to the wet ingredients, mixing until just combined.
- Using a cookie scoop or spoon, drop dough onto the prepared baking sheet, shaping them into pumpkin shapes if desired.
- Bake for 10-12 minutes, or until the edges are set. Let them cool on the baking sheet for a few minutes before transferring to a wire rack.
- Once cooled, decorate with orange icing to resemble pumpkins. Add sprinkles for extra flair!
Cooking Tips: If you want a more intense chocolate flavor, consider adding chocolate chips to the dough. For a lighter cookie, you can substitute half of the all-purpose flour with whole wheat flour.
Enjoy these spooky treats at your next Halloween party!
Gothic Black Forest Cake
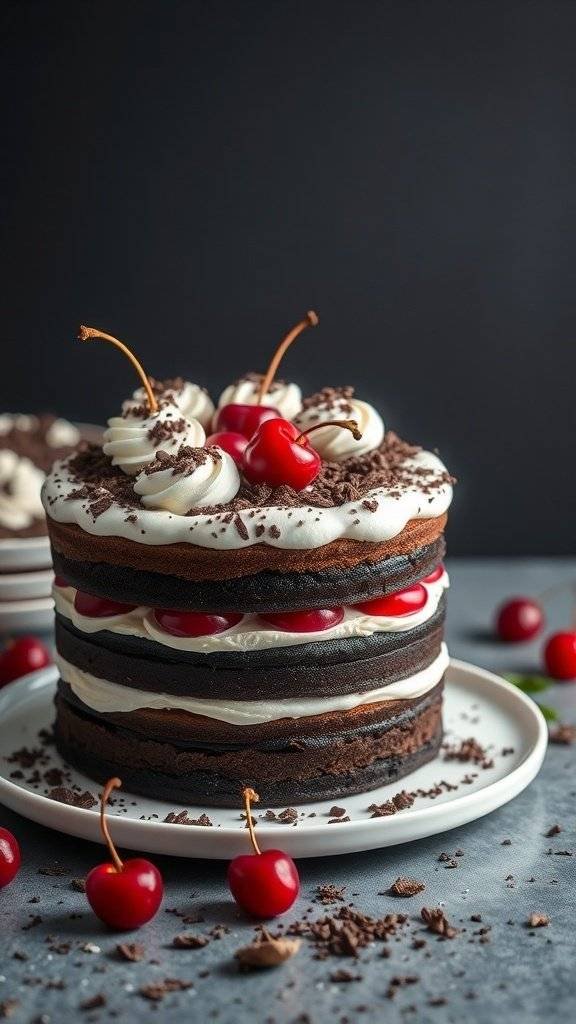
The Gothic Black Forest Cake is a stunning centerpiece for your Halloween Desserts table. This cake features rich layers of dark chocolate, fluffy whipped cream, and vibrant cherries. The contrast of dark and bright colors makes it visually striking, perfect for a spooky celebration.
Each slice reveals a delicious combination of flavors. The chocolate layers are moist and decadent, while the cherries add a tart sweetness. Topped with whipped cream and chocolate shavings, this cake is sure to impress your guests.
For a fun twist, consider adding a splash of cherry liqueur to the cake layers for an adult version. You can also swap out the cherries for raspberries or strawberries if you prefer a different fruit. This cake is versatile and can be adjusted to fit your taste.
Ingredients
- 1 ¾ cups all-purpose flour
- 1 ½ cups granulated sugar
- ¾ cup unsweetened cocoa powder
- 1 ½ teaspoons baking powder
- 1 ½ teaspoons baking soda
- 1 teaspoon salt
- 2 large eggs
- 1 cup whole milk
- ½ cup vegetable oil
- 2 teaspoons vanilla extract
- 1 cup boiling water
- 2 cups heavy cream
- ¼ cup powdered sugar
- 1 jar (about 24 oz) morello cherries, drained
- Chocolate shavings for garnish
Instructions
- Preheat your oven to 350°F (175°C). Grease and flour two 9-inch round cake pans.
- In a large bowl, mix flour, sugar, cocoa powder, baking powder, baking soda, and salt. Add eggs, milk, oil, and vanilla. Beat on medium speed for 2 minutes. Stir in boiling water until well combined.
- Pour the batter evenly into the prepared pans. Bake for 30-35 minutes or until a toothpick comes out clean. Let the cakes cool in the pans for 10 minutes before transferring to wire racks to cool completely.
- Once cooled, whip the heavy cream with powdered sugar until soft peaks form.
- To assemble, place one cake layer on a serving plate. Spread a layer of whipped cream on top and add a layer of cherries. Place the second cake layer on top and repeat the process. Finish with whipped cream and garnish with chocolate shavings and more cherries.
Cooking Tips: If you want a richer flavor, use dark chocolate cocoa powder. For a lighter version, you can substitute half of the heavy cream with Greek yogurt. Enjoy this delightful cake at your Halloween gathering!
Vile Vampire Blood Pudding Cups
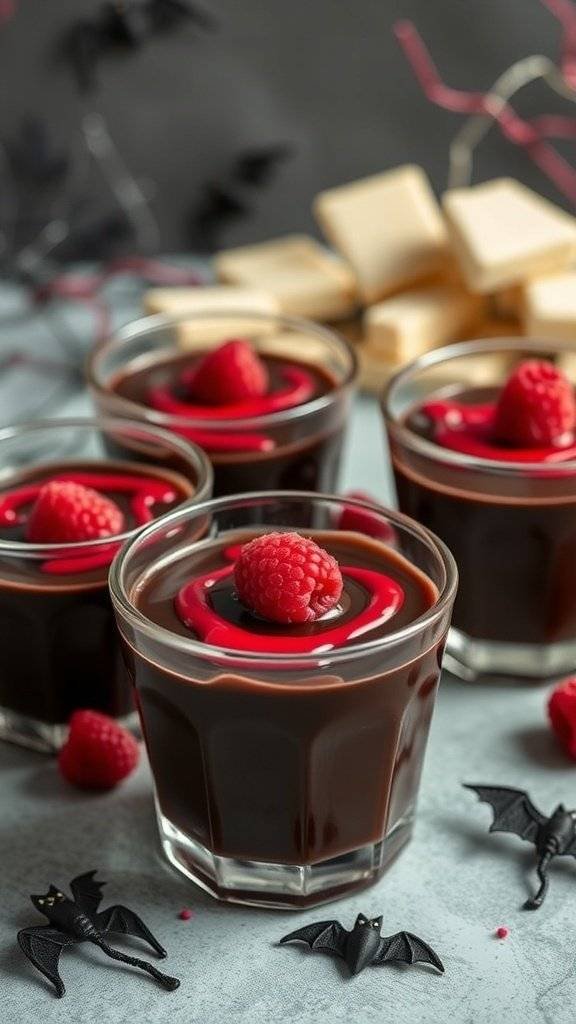
These Vile Vampire Blood Pudding Cups are a spooky twist on traditional desserts. The rich, dark chocolate pudding looks like something straight out of a Gotham-inspired Halloween party. Topped with vibrant raspberry sauce and fresh raspberries, they create a striking visual that’s perfect for the season.
The pudding is smooth and creamy, while the raspberry sauce adds a tangy sweetness. The combination is not just delicious but also fun to serve at Halloween gatherings. You can even add some creepy decorations like plastic bats or spider webs to enhance the theme.
Making these cups is simple and requires just a few ingredients. You can easily customize the recipe to suit your taste. If you prefer a different fruit topping, feel free to swap out the raspberries for strawberries or cherries. You can also use dark chocolate chips or cocoa powder based on what you have on hand.
Ingredients
- 1 cup heavy cream
- 1 cup milk
- 1/2 cup granulated sugar
- 1/3 cup unsweetened cocoa powder
- 1/4 cup cornstarch
- 1/4 teaspoon salt
- 1 teaspoon vanilla extract
- Raspberry sauce (store-bought or homemade)
- Fresh raspberries for topping
Instructions
- In a saucepan, combine the heavy cream, milk, sugar, cocoa powder, cornstarch, and salt. Whisk until smooth.
- Heat the mixture over medium heat, stirring constantly until it thickens and starts to bubble, about 5-7 minutes.
- Remove from heat and stir in the vanilla extract.
- Pour the pudding into individual cups and let it cool to room temperature. Once cooled, refrigerate for at least 2 hours.
- Before serving, drizzle raspberry sauce on top and add fresh raspberries for garnish.
Cooking Tips: For a lighter version, you can use low-fat milk instead of heavy cream. If you want a richer flavor, try adding a splash of coffee or espresso to the pudding mixture.
Ingredient Substitutions: If you don’t have cocoa powder, melted dark chocolate can work as a substitute. For a non-dairy option, use almond or coconut milk in place of regular milk.
Haunting Pumpkin Spice Latte Cheesecake
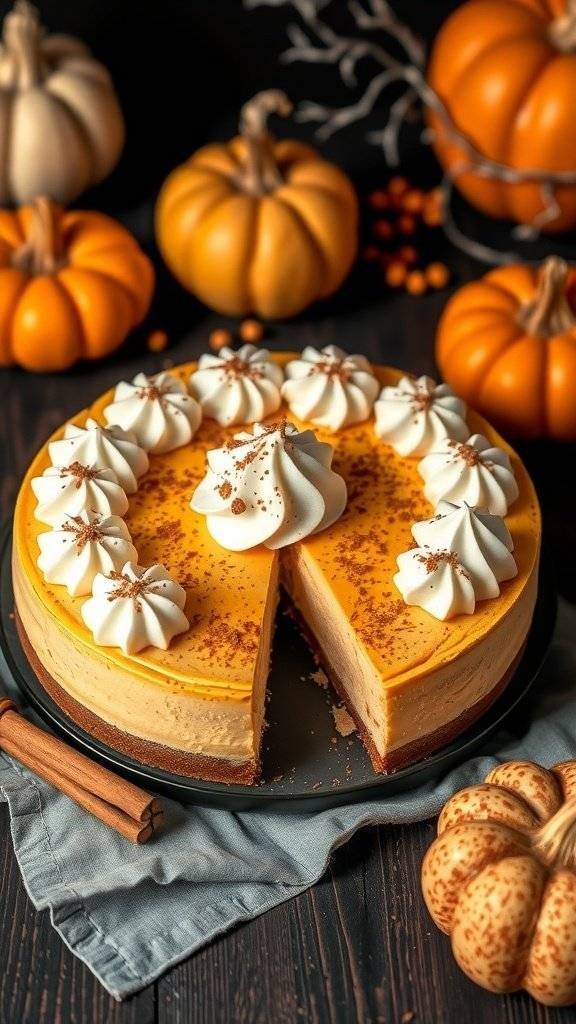
This Pumpkin Spice Latte Cheesecake is the perfect treat for Halloween. The rich, creamy filling is infused with pumpkin and warm spices, making it a delightful dessert for the spooky season. The cheesecake sits on a crunchy graham cracker crust, which adds a nice texture contrast. Topped with a swirl of whipped cream and a sprinkle of cinnamon, it’s sure to impress your guests.
The dark backdrop in the image highlights the vibrant orange of the cheesecake, creating a striking visual that fits the Halloween theme. The small pumpkins and cinnamon sticks scattered around add to the festive feel, making this dessert not just tasty but also a beautiful centerpiece.
For those looking to make this cheesecake, here’s a simple recipe to follow:
Ingredients
- 1 ½ cups graham cracker crumbs
- ½ cup unsalted butter, melted
- 2 cups cream cheese, softened
- 1 cup pumpkin puree
- 1 cup granulated sugar
- 3 large eggs
- 1 teaspoon vanilla extract
- 1 teaspoon ground cinnamon
- ½ teaspoon ground nutmeg
- ½ teaspoon ground ginger
- 1 cup heavy whipping cream
- 2 tablespoons powdered sugar
- Cinnamon for garnish
Instructions
- Prepare the Crust: Preheat your oven to 325°F (160°C). In a bowl, mix graham cracker crumbs and melted butter until combined. Press the mixture firmly into the bottom of a 9-inch springform pan.
- Make the Filling: In a large bowl, beat the cream cheese until smooth. Add pumpkin puree, granulated sugar, eggs, vanilla, cinnamon, nutmeg, and ginger. Mix until well combined.
- Bake: Pour the filling over the crust in the springform pan. Bake for about 50-60 minutes, or until the center is set but still slightly jiggly. Turn off the oven and leave the cheesecake inside for an hour.
- Cool: Remove the cheesecake from the oven and let it cool to room temperature. Refrigerate for at least 4 hours or overnight.
- Prepare the Topping: Whip the heavy cream with powdered sugar until soft peaks form. Spread or pipe the whipped cream on top of the chilled cheesecake and sprinkle with cinnamon before serving.
Cooking Tips: If you want to make this dessert gluten-free, use gluten-free graham crackers for the crust. You can also substitute the granulated sugar with a sugar alternative if you’re looking for a lower-calorie option.
Enjoy this spooky yet delicious cheesecake at your Halloween gathering!
Chilling Chocolate-Covered Pretzel Broomsticks
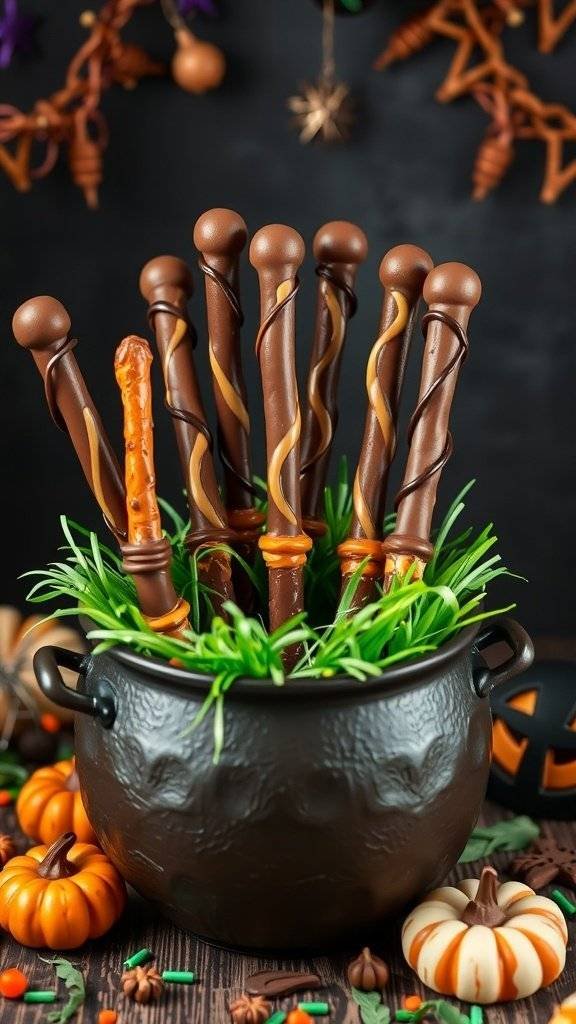
These chocolate-covered pretzel broomsticks are a fun and spooky treat for Halloween. They look just like broomsticks, making them perfect for any Halloween gathering. The combination of salty pretzels and sweet chocolate creates a delightful snack that everyone will love.
To make these broomsticks, you’ll need some simple ingredients. Start with pretzel rods, which serve as the broomsticks. Melt some dark chocolate and dip the pretzels in it. For added flair, you can drizzle some caramel or white chocolate on top to create the broom bristles. These treats not only taste great but also look fantastic on any Halloween dessert table.
These broomsticks can be made ahead of time and stored in an airtight container. They also make great party favors or gifts. Just wrap them in clear bags and tie with a spooky ribbon!
Ingredients
- 1 cup pretzel rods
- 1 cup dark chocolate chips
- 1/2 cup caramel sauce (optional)
- 1/2 cup white chocolate chips (optional)
- Sprinkles or edible glitter (for decoration)
Instructions
- Melt the dark chocolate in a microwave-safe bowl in 30-second intervals, stirring until smooth.
- Dip each pretzel rod into the melted chocolate, covering about two-thirds of the rod.
- Place the coated pretzels on a baking sheet lined with parchment paper.
- If using, drizzle caramel or melted white chocolate over the pretzels for added decoration.
- Sprinkle with edible glitter or sprinkles while the chocolate is still wet.
- Let the pretzels cool at room temperature until the chocolate hardens.
- Once set, serve them in a cauldron or a spooky bowl for a festive touch!
Cooking Tips: If you want to make these treats even more festive, consider using colored chocolate melts instead of dark chocolate. You can also substitute the pretzel rods with regular pretzels for a different shape. Enjoy these Halloween desserts!
Sinister Black Licorice Ice Cream
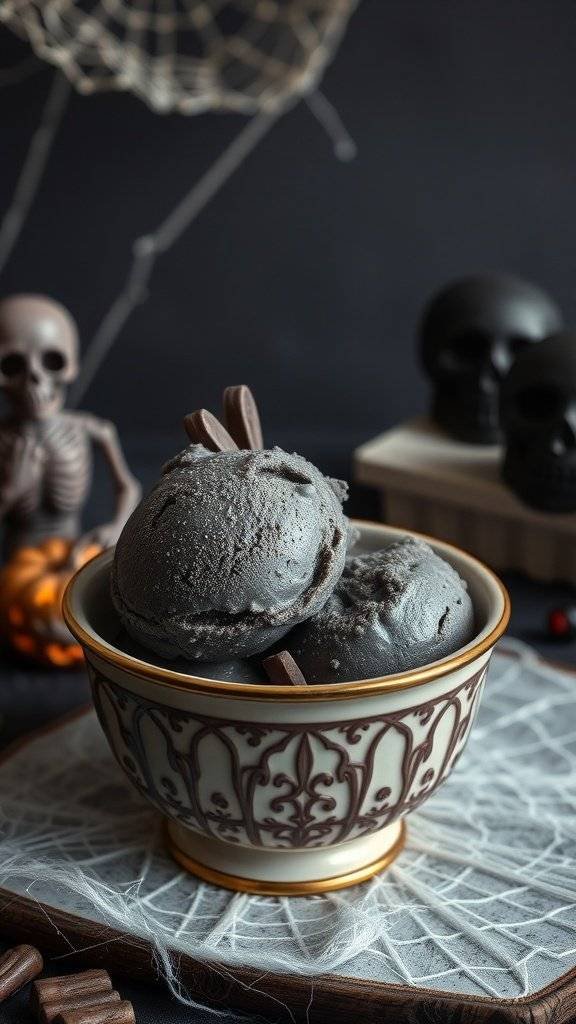
This Halloween, treat yourself to a scoop of something truly unique: Sinister Black Licorice Ice Cream. The deep black color gives it a spooky vibe, perfect for your Halloween desserts table. Imagine serving this at your Halloween party, where guests are intrigued by its dark hue and bold flavor.
The ice cream is smooth and creamy, with a distinct taste that combines the sweetness of cream and the anise flavor of black licorice. It’s a delightful contrast to the usual pumpkin spice treats that flood the season. Plus, it pairs wonderfully with other Halloween-themed desserts.
For those who might not be fans of licorice, you can easily swap it out for a different flavor, like vanilla or chocolate, while keeping the dark color with food coloring. This way, everyone can enjoy a spooky dessert!
Ingredients
- 2 cups heavy cream
- 1 cup whole milk
- 3/4 cup granulated sugar
- 1/2 cup black licorice syrup
- 1 teaspoon vanilla extract
- 1/4 teaspoon salt
Instructions
- Mix Ingredients: In a large bowl, whisk together the heavy cream, whole milk, sugar, black licorice syrup, vanilla extract, and salt until the sugar is dissolved.
- Chill Mixture: Cover the bowl and refrigerate for at least 2 hours, or until well chilled.
- Churn Ice Cream: Pour the chilled mixture into an ice cream maker and churn according to the manufacturer’s instructions until it reaches a soft-serve consistency.
- Freeze: Transfer the ice cream to an airtight container and freeze for at least 4 hours, or until firm.
- Serve: Scoop into bowls and enjoy your spooky treat!
Cooking Tip: If you don’t have an ice cream maker, you can pour the mixture into a shallow dish and freeze it. Stir every 30 minutes until it’s fully frozen for a creamy texture.
Ingredient Substitution: If black licorice isn’t your thing, try using chocolate syrup or even a fruit puree to create a different flavor while keeping the dark color.
Eerie Eyeball Gelatin Cups
These Eerie Eyeball Gelatin Cups are a fun and spooky addition to your Halloween Desserts lineup. The vibrant colors of the gelatin, paired with the creepy candy eyeballs, create a treat that’s both playful and a bit unsettling. Perfect for parties, these cups will surely be a hit among guests of all ages.
To make these gelatin cups, you can choose different flavors and colors to match your Halloween theme. The combination of red, green, and yellow gelatin adds a festive touch. The candy eyeballs float on top, giving the illusion of watching you as you enjoy your treat!
For a twist, consider using flavored gelatin that complements the eyeballs. You can even layer the colors for a more dramatic effect. Just remember to let each layer set before adding the next one.
Ingredients
- 1 package (3 oz) of red gelatin
- 1 package (3 oz) of green gelatin
- 1 package (3 oz) of yellow gelatin
- 2 cups boiling water
- 1 cup cold water
- Candy eyeballs (available at most stores)
- Clear plastic cups
Instructions
- Prepare the Gelatin: In separate bowls, dissolve each gelatin flavor in 1 cup of boiling water. Stir until fully dissolved.
- Add Cold Water: Mix in 1/3 cup of cold water into each bowl. Let the mixtures cool slightly.
- Layer the Gelatin: Pour a small amount of the red gelatin into the bottom of each cup. Refrigerate for about 30 minutes or until set.
- Add More Layers: Once the red layer is set, pour in the green gelatin and refrigerate again until set. Repeat with the yellow gelatin.
- Finish with Eyeballs: Once all layers are set, place a candy eyeball on top of each cup. Serve chilled and enjoy the spooky fun!
Cooking Tips: If you want to make these cups even more fun, try adding whipped cream on top or using flavored whipped topping. For a healthier option, consider using fruit juice instead of flavored gelatin.
Ingredient Substitutions: You can use sugar-free gelatin if you prefer a lighter option. Also, feel free to swap out the candy eyeballs for gummy worms or other spooky candies!
Macabre Marshmallow Ghosts
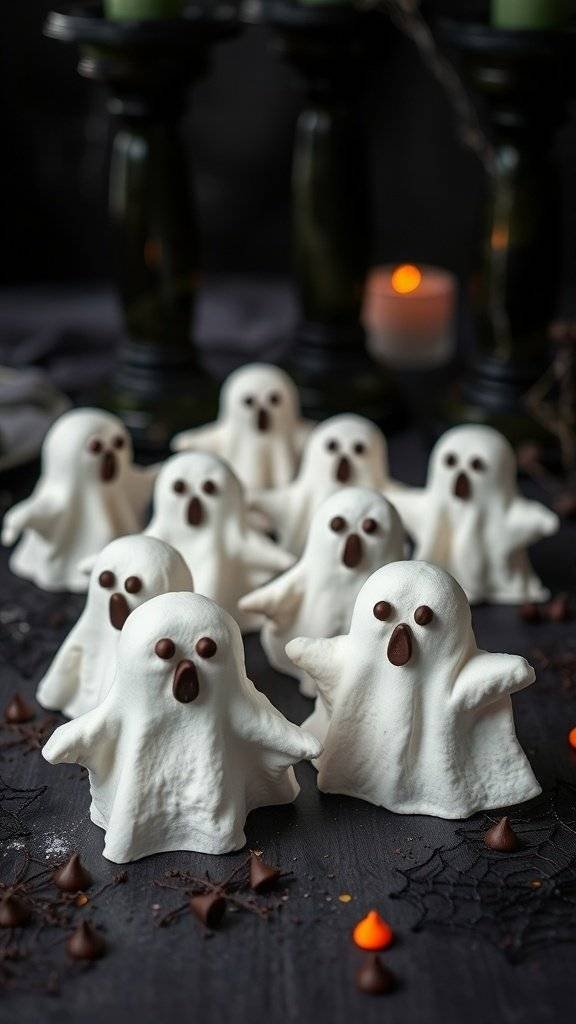
These spooky marshmallow ghosts are a fun and easy treat for Halloween. With their fluffy white bodies and chocolate chip eyes, they bring a playful twist to your dessert table. Perfect for parties or just a fun family activity, these ghosts are sure to delight everyone.
To make these treats, you only need a few ingredients. The marshmallows provide a soft texture, while the chocolate chips add a touch of sweetness. You can even get creative with decorations, using edible glitter or colored sprinkles to give your ghosts a unique flair.
Ingredients
- 1 bag of large marshmallows
- 1 cup of white chocolate chips
- Chocolate chips for eyes
- Cooking spray or oil for greasing
Instructions
- Prepare Your Workspace: Lightly grease a baking sheet with cooking spray or oil.
- Melt the Chocolate: In a microwave-safe bowl, melt the white chocolate chips in 30-second intervals, stirring in between until smooth.
- Coat the Marshmallows: Dip each marshmallow into the melted chocolate, ensuring it’s fully coated. Let the excess chocolate drip off.
- Shape the Ghosts: Place the coated marshmallows on the baking sheet. While the chocolate is still wet, press two chocolate chips onto each marshmallow to create eyes.
- Let Set: Allow the chocolate to harden at room temperature or in the fridge for about 30 minutes.
Cooking Tips: If you want to add a bit of flavor, consider using flavored chocolate chips or adding a drop of vanilla extract to the melted chocolate. For a fun twist, you can use mini marshmallows for smaller ghosts!
Ingredient Substitutions: If you don’t have white chocolate, you can use regular chocolate chips or even colored candy melts for a different look. You can also use edible markers to draw faces instead of using chocolate chips.
Gothic Chocolate Pumpkin Tart
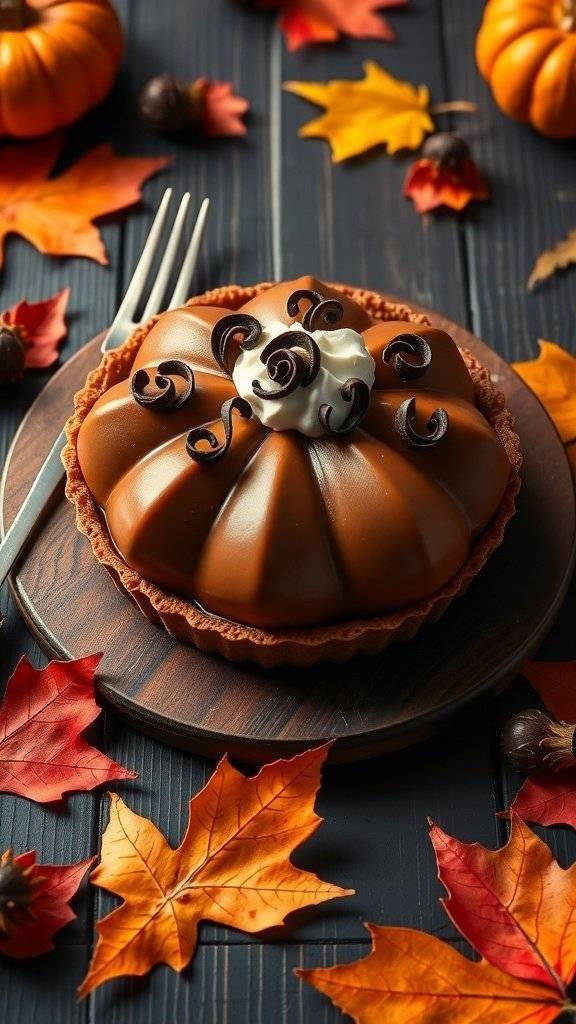
This Gothic Chocolate Pumpkin Tart is the perfect Halloween dessert to impress your guests. Its rich chocolate flavor combined with the classic pumpkin taste creates a delightful treat that fits right into the spooky season. The tart is beautifully shaped like a pumpkin, making it not only delicious but also visually stunning.
The dark chocolate glaze adds a touch of elegance, while the whipped cream and chocolate curls on top make it feel extra special. Surrounding the tart with autumn leaves and mini pumpkins gives it a festive look, perfect for your Halloween gatherings.
To make this dessert, you’ll need a few simple ingredients that come together to create a show-stopping dish. Let’s get into the details!
Ingredients
- 1 pre-made tart shell
- 1 cup pumpkin puree
- 1 cup heavy cream
- 1/2 cup dark chocolate chips
- 1/2 cup granulated sugar
- 2 large eggs
- 1 teaspoon vanilla extract
- 1 teaspoon pumpkin spice
- 1/4 teaspoon salt
- Whipped cream for topping
- Chocolate curls for garnish
Instructions
- Preheat your oven to 350°F (175°C).
- In a saucepan, heat the heavy cream over medium heat until it starts to simmer. Remove from heat and add dark chocolate chips. Stir until smooth.
- In a bowl, mix pumpkin puree, sugar, eggs, vanilla extract, pumpkin spice, and salt until well combined.
- Combine the chocolate mixture with the pumpkin mixture and stir until fully blended.
- Pour the filling into the pre-made tart shell and smooth the top.
- Bake for 30-35 minutes or until the filling is set. Let it cool completely before serving.
- Top with whipped cream and chocolate curls before serving.
Cooking Tips: If you want to make your own tart shell, use a simple recipe with flour, butter, and sugar. For a twist, try adding a bit of cinnamon to the crust. You can also substitute the heavy cream with coconut cream for a dairy-free option.
Enjoy this Gothic Chocolate Pumpkin Tart at your Halloween party, and watch it disappear!
You may also like:
– 23 Easy Dinner Recipes Inspired by Qarth – GOT
– 19 Breakfast Recipes Inspired by the Gatsby Roaring 1920s
– 21 Children’s Birthday Cakes Inspired by Gotham City
If you enjoyed this blog you can visit us or check out our other blogs and learn a bit about us.
Disclaimer: This blog post is inspired by fictional universes and characters created by their respective rights holders. All related content and imagery remain the property of their respective rights holder. This fan-inspired content is for entertainment and commentary purposes only and is not affiliated with or endorsed by HBO, Disney, Warner Bros., Lionsgate, or any other rights holders. To explore the official source material, please visit:
HBO