

This Easter, take a delightful stroll back to the roaring 1920s with recipes that capture the spirit and flavors of the era. Think of classic dishes that were all the rage at festive gatherings, infused with a modern twist. Get inspired by timeless ingredients and retro cooking techniques, while we also sprinkle in some handy cooking tips and ingredient substitutions to make your holiday preparations seamless and enjoyable.
Reviving The Charm Of Vintage Lemon Meringue Pie

Lemon meringue pie is a classic dessert that brings a touch of nostalgia, especially when you think of the 1920s. This pie features a zesty lemon filling topped with fluffy meringue, creating a delightful contrast of flavors and textures. The vibrant yellow of the lemons is a cheerful reminder of spring, making it a perfect choice for Easter recipes.
The image captures a beautifully baked lemon meringue pie, resting on a delicate lace tablecloth. The golden meringue is lightly toasted, giving it an inviting look. Surrounding the pie are fresh lemons, emphasizing the key ingredient that makes this dessert so refreshing. The pie is not just a treat for the taste buds; it’s also a feast for the eyes!
Making this pie is a fun way to connect with the past while creating new memories. The combination of the tart lemon filling and the sweet, airy meringue is sure to impress your family and friends this Easter.
Ingredients
- 1 pre-made pie crust
- 1 cup granulated sugar
- 2 tablespoons cornstarch
- 1/4 teaspoon salt
- 1 1/2 cups water
- 3 large egg yolks, beaten
- 1/4 cup fresh lemon juice
- 1 tablespoon lemon zest
- 2 tablespoons unsalted butter
- 3 large egg whites
- 1/4 teaspoon cream of tartar
- 1/2 cup granulated sugar (for meringue)
Instructions
- Preheat your oven to 350°F (175°C). Place the pie crust in a pie dish and bake according to package instructions until golden brown.
- In a saucepan, combine 1 cup sugar, cornstarch, and salt. Gradually stir in water and cook over medium heat, stirring constantly until thickened.
- Once thickened, remove from heat. Stir a small amount of the hot mixture into the beaten egg yolks, then return it all to the saucepan. Cook for an additional 2 minutes. Remove from heat and mix in lemon juice, zest, and butter.
- Pour the lemon filling into the baked pie crust.
- In a clean bowl, beat egg whites and cream of tartar until soft peaks form. Gradually add 1/2 cup sugar and continue beating until stiff peaks form.
- Spread the meringue over the lemon filling, making sure to seal the edges. Use a spatula to create peaks and swirls.
- Bake for 10-12 minutes or until the meringue is golden brown. Allow to cool before serving.
Cooking Tips: If you prefer a sweeter meringue, you can add a bit more sugar. For a more intense lemon flavor, increase the lemon juice and zest slightly. If you’re short on time, a store-bought crust works just fine!
Decadent Chocolate Layer Cake: A Roaring Twenties Delight

The 1920s were a time of glamour and indulgence, and what better way to celebrate Easter than with a rich chocolate layer cake? This dessert captures the spirit of the Roaring Twenties with its towering layers and luscious frosting. Picture a cake that stands tall, showcasing dark, moist chocolate layers separated by creamy chocolate frosting. It’s a showstopper that will impress your guests and make your Easter gathering memorable.
To make this delightful cake, gather your ingredients and prepare for a fun baking session. The combination of chocolate and frosting creates a perfect balance of flavors. Plus, it’s a great centerpiece for your Easter table!
Ingredients
- 2 cups all-purpose flour
- 2 cups granulated sugar
- 3/4 cup unsweetened cocoa powder
- 1 1/2 teaspoons baking powder
- 1 1/2 teaspoons baking soda
- 1 teaspoon salt
- 2 large eggs
- 1 cup whole milk
- 1/2 cup vegetable oil
- 2 teaspoons vanilla extract
- 1 cup boiling water
- 1 cup unsalted butter, softened
- 4 cups powdered sugar
- 1/2 cup unsweetened cocoa powder (for frosting)
- 1/4 cup heavy cream (for frosting)
Instructions
- Preheat your oven to 350°F (175°C). Grease and flour three 9-inch round cake pans.
- In a large bowl, mix flour, sugar, cocoa powder, baking powder, baking soda, and salt. Add eggs, milk, oil, and vanilla. Beat on medium speed for 2 minutes. Stir in boiling water until well combined.
- Pour the batter evenly into the prepared pans. Bake for 30-35 minutes or until a toothpick inserted in the center comes out clean. Let the cakes cool in the pans for 10 minutes, then transfer to wire racks to cool completely.
- For the frosting, beat the softened butter until creamy. Gradually add powdered sugar and cocoa powder, mixing until smooth. Add heavy cream and beat until fluffy.
- Once the cakes are cool, place one layer on a serving plate. Spread a layer of frosting on top. Repeat with the second layer and top with the third layer. Frost the top and sides of the cake.
- Decorate with chocolate shavings or any toppings you like. Slice and serve!
Cooking tips: If you want a richer flavor, consider using dark chocolate cocoa powder. For a lighter version, you can substitute half of the butter with applesauce. Enjoy this cake as a delightful treat for your Easter celebrations!
Old-Fashioned Strawberry Shortcake With Whipped Cream

Strawberry shortcake is a classic dessert that brings a taste of nostalgia, especially when inspired by the 1920s. This delightful treat features layers of fluffy shortcake, fresh strawberries, and a generous dollop of whipped cream. The image captures this scrumptious dessert beautifully, showcasing the vibrant red strawberries nestled between soft, golden cake layers.
Perfect for Easter gatherings, this recipe is simple yet elegant. The bright colors and fresh flavors make it a standout on any dessert table. Plus, it’s a great way to celebrate the season with family and friends.
When making this dessert, feel free to switch things up. You can use different berries or even add a splash of vanilla to your whipped cream for extra flavor. If you’re short on time, store-bought shortcake can work in a pinch!
Ingredients
- 2 cups all-purpose flour
- 1/4 cup granulated sugar
- 1 tablespoon baking powder
- 1/2 teaspoon salt
- 1/2 cup unsalted butter, cold and cubed
- 1 cup heavy cream
- 2 cups fresh strawberries, hulled and sliced
- 1/4 cup powdered sugar (for whipped cream)
- 1 teaspoon vanilla extract
Instructions
- Preheat the oven to 425°F (220°C). In a bowl, mix flour, sugar, baking powder, and salt.
- Add the cold butter and mix until the mixture resembles coarse crumbs. Stir in the heavy cream until just combined.
- Turn the dough onto a floured surface and gently knead it a few times. Roll out to about 1-inch thickness and cut into rounds.
- Place the rounds on a baking sheet and bake for 12-15 minutes until golden. Let them cool.
- While the cakes cool, whip the heavy cream with powdered sugar and vanilla until soft peaks form.
- To assemble, slice the shortcakes in half, layer with strawberries and whipped cream, and top with the other half. Serve immediately.
Cooking Tips: For a lighter version, use Greek yogurt instead of whipped cream. You can also substitute the strawberries with blueberries or raspberries for a different twist. Enjoy this delightful dessert at your Easter celebration!
Classic Deviled Eggs: A Party Favorite From The 1920S

Deviled eggs have been a staple at gatherings for decades, and their popularity soared in the 1920s. This classic dish is simple yet elegant, making it perfect for Easter celebrations. The image showcases a beautiful platter of deviled eggs, each topped with a swirl of creamy filling and garnished with fresh herbs and a sprinkle of paprika. The vibrant yellow filling hints at the delicious flavors inside, inviting everyone to take a bite.
Making deviled eggs is easy and fun. Start by hard-boiling your eggs, then slice them in half and scoop out the yolks. Mix the yolks with mayonnaise, mustard, and a dash of salt and pepper. For a twist, you can add ingredients like pickle relish or hot sauce. Once your filling is ready, pipe it back into the egg whites for a beautiful presentation.
These deviled eggs are not just tasty; they also add a touch of nostalgia to your Easter table. They remind us of gatherings filled with laughter and good food. Plus, they are easy to customize. You can experiment with different toppings like bacon bits, olives, or even caviar to give them a unique flair.
Ingredients
- 6 large eggs
- 1/4 cup mayonnaise
- 1 teaspoon Dijon mustard
- Salt and pepper to taste
- Paprika for garnish
- Fresh herbs (like parsley or dill) for garnish
Instructions
- Hard-Boil the Eggs: Place the eggs in a pot and cover them with water. Bring to a boil, then cover and remove from heat. Let sit for 12 minutes, then cool in ice water.
- Prepare the Filling: Once cooled, peel the eggs and slice them in half. Remove the yolks and place them in a bowl. Mash the yolks with mayonnaise, Dijon mustard, salt, and pepper until smooth.
- Fill the Egg Whites: Spoon or pipe the yolk mixture back into the egg whites. Use a piping bag for a decorative touch.
- Garnish: Sprinkle paprika on top and add fresh herbs for a pop of color.
- Serve: Arrange on a platter and enjoy your delicious deviled eggs!
Cooking Tips: For creamier filling, use a bit more mayonnaise. If you want a spicy kick, add a few drops of hot sauce. You can also substitute Greek yogurt for mayonnaise for a healthier option.
Timeless Potato Salad With A Twist

This potato salad brings a fresh twist to a classic dish, perfect for your Easter table. Inspired by the 1920s, it combines simple ingredients with a touch of flair. The vibrant colors of cherry tomatoes and fresh herbs make it not just tasty but also visually appealing.
The base of this salad is tender potatoes, cut into bite-sized pieces. They are mixed with juicy cherry tomatoes and a creamy dressing that adds a delightful richness. The herbs bring a burst of flavor, making each bite refreshing.
For a fun twist, consider adding diced pickles or a sprinkle of paprika for a little heat. This recipe is versatile, so feel free to swap in your favorite veggies or herbs. Enjoy this timeless dish at your Easter gathering!
Ingredients
- 2 pounds potatoes, peeled and diced
- 1 cup cherry tomatoes, halved
- 1/2 cup mayonnaise
- 1 tablespoon Dijon mustard
- 1 tablespoon apple cider vinegar
- 1/4 cup fresh parsley, chopped
- Salt and pepper to taste
- Optional: diced pickles or paprika for garnish
Instructions
- Cook the Potatoes: In a large pot, boil the diced potatoes until tender, about 10-15 minutes. Drain and let cool.
- Mix the Dressing: In a bowl, whisk together mayonnaise, Dijon mustard, apple cider vinegar, salt, and pepper.
- Combine Ingredients: In a large bowl, combine the cooled potatoes, cherry tomatoes, and dressing. Mix gently to coat.
- Add Herbs: Fold in the chopped parsley, adjusting seasoning as needed.
- Chill and Serve: Refrigerate for at least 30 minutes before serving to let the flavors meld. Garnish with optional pickles or paprika if desired.
Refreshing Fruit Salad With Honey And Mint

This refreshing fruit salad is a delightful nod to the 1920s, a time when fresh ingredients and simple flavors were celebrated. The vibrant colors of strawberries, blueberries, and mango create a feast for the eyes, while the honey and mint add a touch of sweetness and freshness. Perfect for Easter gatherings, this dish is easy to prepare and sure to impress your guests.
The combination of fruits not only tastes great but also provides a variety of nutrients. Strawberries are rich in vitamin C, while blueberries are packed with antioxidants. Mango adds a tropical flair and sweetness that ties everything together. This salad is a fantastic way to celebrate the season and enjoy the flavors of spring.
When making this salad, feel free to mix and match your favorite fruits. You can substitute any seasonal fruit you have on hand. If you prefer a different sweetener, agave syrup or maple syrup can work just as well as honey. For a little extra crunch, consider adding some chopped nuts or seeds.
Ingredients
- 2 cups strawberries, hulled and sliced
- 1 cup blueberries
- 1 cup mango, diced
- 1 tablespoon honey
- 1 tablespoon fresh mint, chopped
- 1 tablespoon lime juice (optional)
Instructions
- Prepare the Fruit: In a large bowl, combine the sliced strawberries, blueberries, and diced mango.
- Add the Dressing: In a small bowl, whisk together honey, lime juice, and chopped mint. Pour this mixture over the fruit.
- Toss Gently: Carefully toss the fruit with the dressing until well coated.
- Chill: Let the salad sit in the refrigerator for about 30 minutes to allow the flavors to meld.
- Serve: Garnish with extra mint leaves before serving for a fresh touch.
Cooking Tip: For a creamier texture, consider adding a dollop of yogurt on top before serving. You can also add a sprinkle of cinnamon for a warm flavor contrast. Enjoy this refreshing fruit salad as part of your Easter recipes!
Classic Buttermilk Biscuits: A Southern Staple

Buttermilk biscuits are a timeless favorite, especially during Easter gatherings. These fluffy, golden treats have a rich history that dates back to the 1920s. They embody the warmth and comfort of Southern cooking, making them perfect for any festive table.
The image showcases a basket filled with freshly baked biscuits, golden brown and inviting. They sit alongside butter and jam, ready to be enjoyed. The simplicity of this dish is what makes it so special. You can serve them warm, slathered in butter or topped with your favorite preserves.
Making these biscuits is straightforward, and they can be a delightful addition to your Easter recipes. Whether you enjoy them with breakfast or as a side at dinner, they are sure to please everyone.
Ingredients
- 2 cups all-purpose flour
- 1 tablespoon baking powder
- 1/2 teaspoon baking soda
- 1 teaspoon salt
- 1/4 cup unsalted butter, cold and cubed
- 3/4 cup buttermilk
Instructions
- Preheat your oven to 450°F (230°C). Line a baking sheet with parchment paper.
- In a large bowl, mix the flour, baking powder, baking soda, and salt.
- Add the cold butter to the flour mixture. Use a pastry cutter or your fingers to mix until it resembles coarse crumbs.
- Pour in the buttermilk and stir until just combined. Don’t overmix!
- Turn the dough onto a floured surface and gently knead it a few times until it comes together. Pat it into a 1-inch thick rectangle.
- Cut out biscuits using a round cutter and place them on the prepared baking sheet.
- Bake for 12-15 minutes, or until golden brown. Serve warm with butter and jam.
Cooking Tip: For extra flaky biscuits, make sure your butter is very cold. You can even freeze it for a few minutes before using. If you don’t have buttermilk, you can make a substitute by mixing regular milk with a tablespoon of vinegar or lemon juice and letting it sit for a few minutes.
Elegant Shrimp Cocktail: A Retro Appetizer

The shrimp cocktail is a classic dish that takes us back to the 1920s, a time when elegance and style were paramount. This retro appetizer is not just about taste; it’s about presentation too. Picture a beautiful glass filled with plump shrimp, vibrant cocktail sauce, and a slice of lemon. It’s a dish that brings a touch of sophistication to any Easter gathering.
To make this delightful shrimp cocktail, you’ll need fresh shrimp, cocktail sauce, and some garnishes. The shrimp should be cooked just right—tender and juicy, not rubbery. The cocktail sauce adds a zesty kick, making every bite a burst of flavor. Pair it with a lemon wedge for that extra zing!
Cooking tips include using large shrimp for a more impressive presentation. If you can’t find fresh shrimp, frozen ones work just fine; just make sure to thaw them properly. You can also customize the cocktail sauce by adding a dash of hot sauce or horseradish for a spicy twist.
Now, let’s get to the recipe!
Wholesome Cornbread To Complement Any Meal
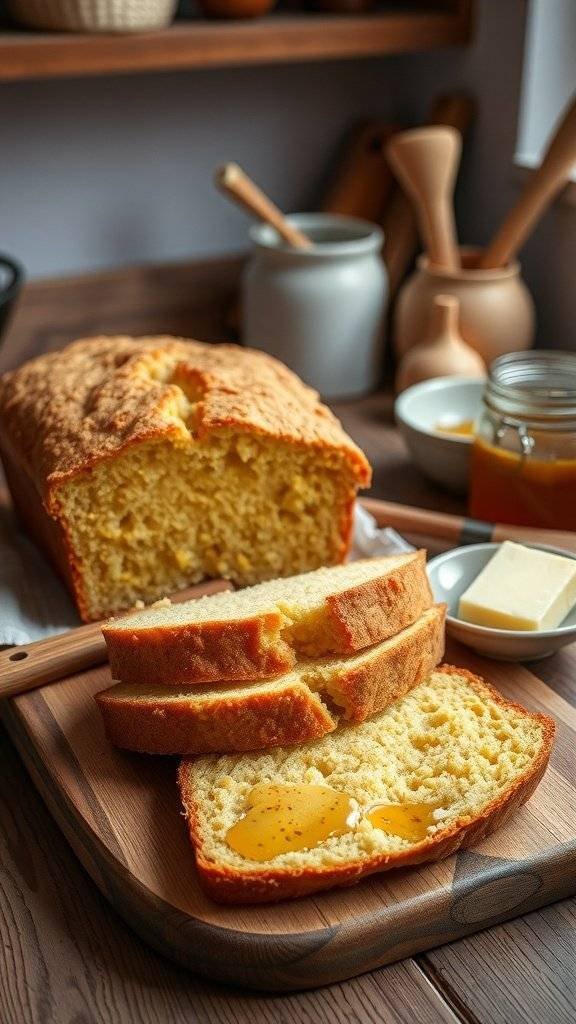
Cornbread is a classic dish that brings warmth and comfort to any table. Inspired by the 1920s, this wholesome recipe captures the essence of that era while being perfect for Easter gatherings. The golden crust and soft, fluffy interior make it a delightful side for any meal.
This cornbread pairs wonderfully with savory dishes like ham or roasted vegetables. It’s also great with a drizzle of honey or a pat of butter, making it versatile for any occasion. Plus, it’s easy to whip up, so you can spend more time enjoying your company.
For those looking to make it a bit healthier, consider using whole wheat flour instead of all-purpose flour. You can also swap out some of the sugar for honey or maple syrup for a natural sweetness. If you want to add a little kick, throw in some jalapeños or cheese!
Ingredients
- 1 cup cornmeal
- 1 cup all-purpose flour
- 1/4 cup granulated sugar
- 1 tablespoon baking powder
- 1/2 teaspoon salt
- 1 cup milk
- 2 large eggs
- 1/4 cup unsalted butter, melted
Instructions
- Preheat your oven to 400°F (200°C). Grease an 8-inch square baking dish.
- In a large bowl, mix together the cornmeal, flour, sugar, baking powder, and salt.
- In another bowl, whisk together the milk, eggs, and melted butter.
- Pour the wet ingredients into the dry ingredients and stir until just combined. Avoid overmixing.
- Pour the batter into the prepared baking dish and smooth the top.
- Bake for 20-25 minutes or until golden brown and a toothpick inserted in the center comes out clean.
- Let it cool slightly before slicing. Serve warm with butter or honey.
Traditional New England Clam Chowder: A Comforting Bowl

New England clam chowder is a classic dish that brings warmth and comfort, especially during the Easter season. This creamy soup is filled with tender clams, potatoes, and a hint of seasoning, making it a delightful addition to any Easter table. The image shows a hearty bowl of clam chowder, garnished with fresh parsley, alongside some crunchy crackers. It perfectly captures the essence of a comforting meal.
This recipe is simple and perfect for sharing with family and friends. You can easily adjust the ingredients based on what you have on hand. For instance, if you don’t have clams, you can substitute them with shrimp or even chicken for a different twist. Let’s dive into the recipe!
Ingredients
- 4 slices of bacon, chopped
- 1 medium onion, diced
- 2 cups diced potatoes
- 2 cups clam juice
- 1 can (10 oz) chopped clams, drained
- 1 cup heavy cream
- 1 cup milk
- Salt and pepper to taste
- Fresh parsley for garnish
Instructions
- Cook the Bacon: In a large pot, cook the chopped bacon over medium heat until crispy. Remove and set aside, leaving the drippings in the pot.
- Sauté the Onion: Add the diced onion to the pot and cook until softened, about 5 minutes.
- Add Potatoes and Clam Juice: Stir in the diced potatoes and clam juice. Bring to a boil, then reduce heat and simmer until the potatoes are tender, about 15 minutes.
- Add Clams and Cream: Stir in the chopped clams, heavy cream, and milk. Heat through but do not boil. Season with salt and pepper.
- Serve: Ladle the chowder into bowls, top with crispy bacon and fresh parsley. Enjoy with crackers on the side!
Cooking Tips: For a thicker chowder, mash some of the potatoes before adding the cream. If you prefer a lighter version, use half-and-half instead of heavy cream. You can also add celery or carrots for extra flavor and nutrition.
Homestyle Chicken Pot Pie: A Family Favorite

Chicken pot pie is a classic dish that brings warmth and comfort to any table. Inspired by the 1920s, this homestyle recipe captures the essence of family gatherings and hearty meals. The golden crust, filled with tender chicken and vegetables, is a true delight for the senses.
This dish is perfect for Easter celebrations, offering a nostalgic touch that everyone will love. The rich flavors and creamy filling make it a standout choice among Easter recipes. Plus, it’s a great way to use up leftover chicken!
To make your chicken pot pie even better, consider using fresh herbs like thyme or parsley for added flavor. You can also swap out vegetables based on what you have on hand. Carrots, peas, and potatoes work wonderfully, but feel free to get creative!
Ingredients
- 1 pound cooked chicken, shredded
- 1 cup carrots, diced
- 1 cup peas
- 1 cup potatoes, diced
- 1/2 cup onion, chopped
- 1/3 cup butter
- 1/3 cup all-purpose flour
- 1 3/4 cups chicken broth
- 2/3 cup milk
- 1 teaspoon salt
- 1/4 teaspoon black pepper
- 1 teaspoon dried thyme
- 1 pie crust (store-bought or homemade)
Instructions
- Preheat the oven to 425°F (220°C).
- In a large saucepan, melt the butter over medium heat. Add the onion and cook until soft.
- Stir in the flour, salt, pepper, and thyme. Gradually whisk in the chicken broth and milk. Cook until the mixture thickens.
- Add the chicken, carrots, peas, and potatoes. Mix well and remove from heat.
- Pour the filling into a pie crust in a pie dish. Cover with the second pie crust, sealing the edges. Cut slits in the top crust to allow steam to escape.
- Bake for 30-35 minutes, or until the crust is golden brown. Let it cool for a few minutes before serving.
Cooking Tip: If you want a richer flavor, try adding a splash of white wine to the filling. For a healthier option, use whole wheat flour for the crust.
Ingredient Substitution: If you don’t have chicken, turkey works just as well. You can also use frozen vegetables to save time!
Elegant Beef Wellington For Special Occasions

Beef Wellington is a classic dish that brings a touch of sophistication to any gathering. This recipe is perfect for Easter celebrations, inspired by the elegance of the 1920s. The flaky pastry encases tender beef, making it a showstopper on your table.
The image showcases a beautifully baked Beef Wellington, golden and inviting. It’s garnished with herbs, hinting at the rich flavors inside. This dish not only looks stunning but also tastes incredible, combining savory beef with earthy mushrooms and a hint of mustard.
When preparing Beef Wellington, it’s important to use high-quality ingredients. A good cut of beef, like tenderloin, will make all the difference. You can also substitute mushrooms with spinach or other greens for a different twist. If you want a lighter version, consider using chicken instead of beef.
Cooking tips include allowing the beef to rest before wrapping it in pastry. This helps retain its juices. Also, be sure to chill the wrapped Wellington before baking to keep the pastry crisp.
Ingredients
- 1 pound beef tenderloin
- 8 ounces mushrooms, finely chopped
- 2 tablespoons Dijon mustard
- 1 sheet puff pastry, thawed
- 1 egg, beaten (for egg wash)
- Salt and pepper to taste
- Olive oil for searing
- Fresh thyme for garnish
Instructions
- Preheat your oven to 400°F (200°C).
- Season the beef with salt and pepper. Heat olive oil in a skillet and sear the beef on all sides until browned. Remove and let it cool.
- In the same skillet, add chopped mushrooms and cook until moisture evaporates. Stir in Dijon mustard and let cool.
- Roll out the puff pastry on a floured surface. Spread the mushroom mixture in the center, then place the beef on top.
- Wrap the pastry around the beef, sealing the edges. Brush with beaten egg.
- Chill the wrapped Wellington for 15 minutes, then bake for 25-30 minutes until golden brown.
- Let it rest for 10 minutes before slicing. Garnish with fresh thyme and serve.
Classic Baked Ham With A Sweet Glaze
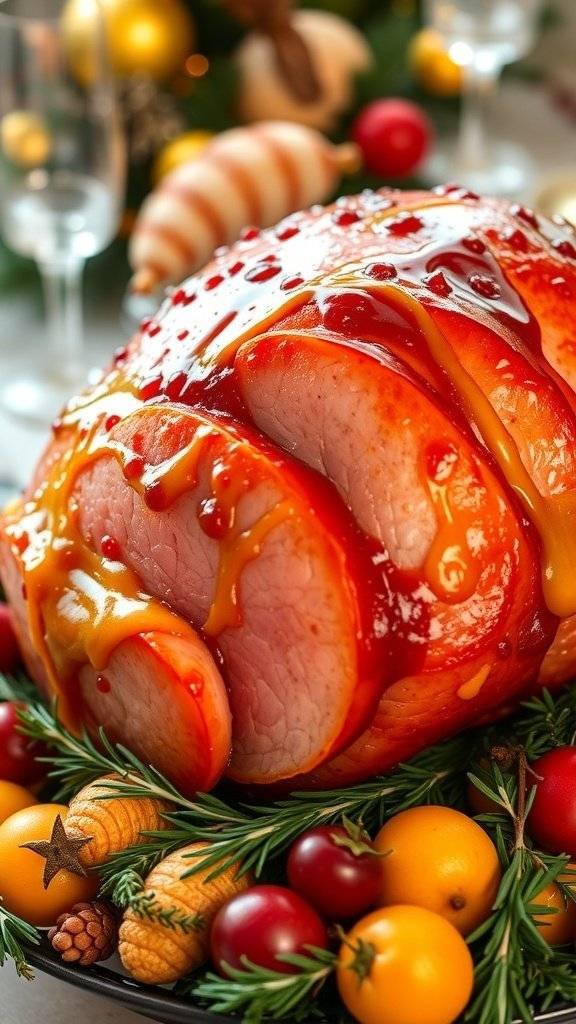
This classic baked ham is a delightful centerpiece for your Easter table, inspired by the 1920s. The image showcases a beautifully glazed ham, adorned with slices of lemon and garnished with fresh herbs. The shiny glaze hints at a sweet and tangy flavor that pairs perfectly with the savory meat.
The 1920s brought a sense of celebration and joy, making this dish a fitting tribute to that era. The combination of flavors in this recipe will transport you back in time while creating new memories with family and friends.
Ingredients
- 1 fully cooked bone-in ham (about 8-10 pounds)
- 1 cup brown sugar
- 1/2 cup honey
- 1/4 cup Dijon mustard
- 1/4 cup apple cider vinegar
- 1 teaspoon ground cloves
- 1 teaspoon ground cinnamon
- 1/4 cup water
- Slices of lemon and fresh herbs for garnish
Instructions
- Preheat your oven to 325°F (165°C). Place the ham in a roasting pan, cut side down.
- In a bowl, mix brown sugar, honey, Dijon mustard, apple cider vinegar, ground cloves, ground cinnamon, and water until well combined.
- Brush the glaze generously over the ham, ensuring it gets into the cuts.
- Cover the ham loosely with foil and bake for about 1.5 to 2 hours, basting with the glaze every 30 minutes.
- Remove the foil for the last 30 minutes of baking to allow the glaze to caramelize.
- Once done, let the ham rest for 15 minutes before slicing. Garnish with lemon slices and fresh herbs.
Cooking Tips: For a twist, try adding orange juice to the glaze for a citrusy kick. If you prefer a spicier flavor, consider adding a pinch of cayenne pepper to the glaze.
Ingredient Substitutions: If you don’t have Dijon mustard, yellow mustard works too. Maple syrup can replace honey for a different sweetness.
Delightful Coconut Cream Pie: A Sweet Indulgence
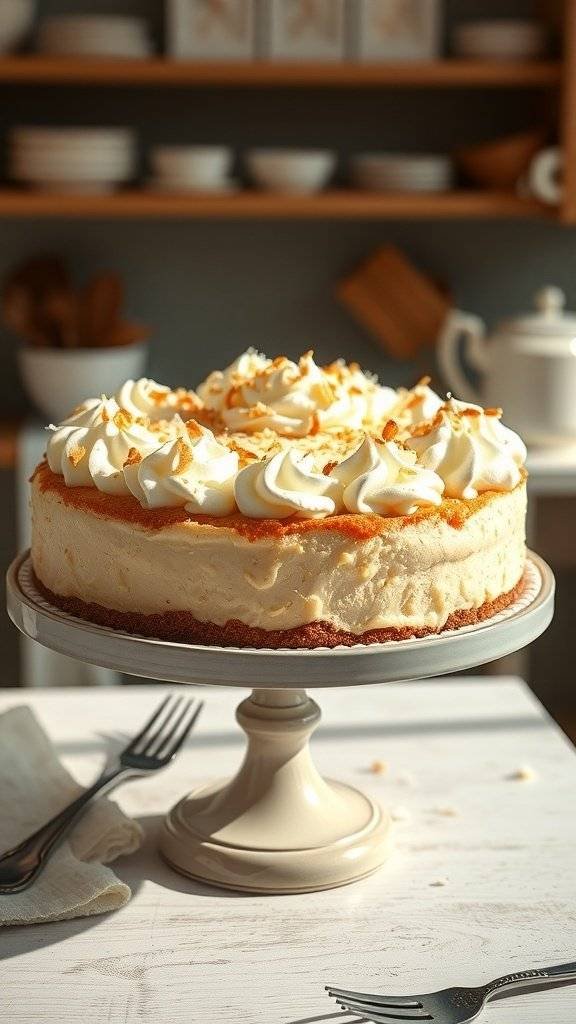
Coconut cream pie is a classic dessert that brings a touch of nostalgia. This delightful treat was popular in the 1920s, making it a perfect addition to your Easter recipes. With its creamy coconut filling and fluffy whipped topping, it’s a dessert that everyone will love.
The image showcases a beautifully crafted coconut cream pie, sitting elegantly on a cake stand. The pie features a golden crust, topped with swirls of whipped cream and a sprinkle of toasted coconut. This presentation not only looks inviting but also hints at the delicious flavors waiting to be enjoyed.
Making this pie is simpler than you might think. You can use store-bought crust or make your own for an extra touch. The creamy filling is made with coconut milk, making it rich and flavorful. Plus, it’s a great way to celebrate the season with a dessert that feels both festive and comforting.
Ingredients
- 1 pre-made pie crust (or homemade)
- 1 cup coconut milk
- 1 cup heavy cream
- 1/2 cup granulated sugar
- 1/4 cup cornstarch
- 1/4 teaspoon salt
- 3 large egg yolks
- 1 teaspoon vanilla extract
- 1 cup shredded coconut (toasted)
- Whipped cream for topping
- Extra toasted coconut for garnish
Instructions
- Prepare the Crust: If using a homemade crust, bake it according to the recipe and let it cool completely.
- Make the Filling: In a saucepan, whisk together coconut milk, heavy cream, sugar, cornstarch, and salt. Cook over medium heat, stirring constantly until it thickens, about 5-7 minutes.
- Add Egg Yolks: In a separate bowl, whisk the egg yolks. Slowly add a bit of the hot mixture to the yolks to temper them, then stir the yolk mixture back into the saucepan. Cook for an additional 2 minutes.
- Flavor It: Remove from heat and stir in vanilla extract and toasted coconut. Pour the filling into the cooled pie crust and let it cool to room temperature, then refrigerate for at least 4 hours.
- Serve: Top with whipped cream and sprinkle extra toasted coconut before serving.
Cooking Tips: If you want a richer flavor, consider using full-fat coconut milk. For a lighter version, you can substitute half of the heavy cream with more coconut milk.
Ingredient Substitutions: If you don’t have coconut milk, almond milk can work in a pinch, though it will change the flavor slightly. For a gluten-free option, use a gluten-free pie crust.
Homemade Vanilla Pudding: A Classic Dessert
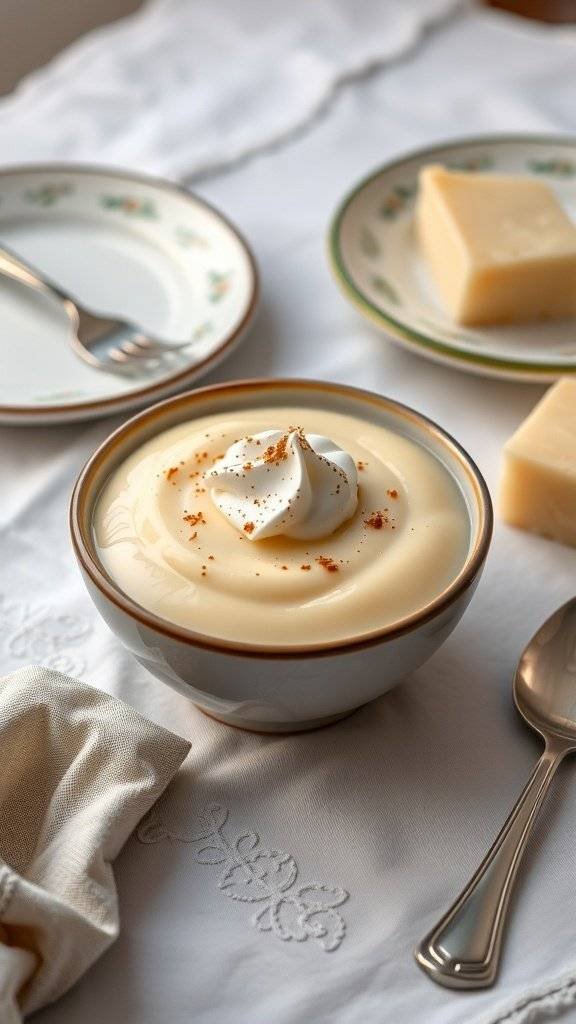
Homemade vanilla pudding is a delightful treat that brings a touch of nostalgia to any Easter gathering. This creamy dessert was a staple in the 1920s, and it continues to charm dessert lovers today. The smooth texture and rich flavor make it a perfect addition to your Easter recipes.
Making vanilla pudding from scratch is simple and rewarding. You can enjoy it on its own or use it as a filling for cakes and pastries. The image captures a bowl of velvety pudding topped with whipped cream, showcasing its inviting appearance. The soft, pale color and glossy finish hint at the deliciousness within.
For a twist, consider adding a hint of nutmeg or cinnamon on top. These spices can elevate the flavor and add a festive touch to your Easter table. If you’re feeling adventurous, try incorporating some chocolate or fruit purees for a different flavor profile.
Ingredients
- 2 cups whole milk
- 1/2 cup granulated sugar
- 1/4 cup cornstarch
- 1/4 teaspoon salt
- 2 large egg yolks
- 2 tablespoons unsalted butter
- 1 tablespoon vanilla extract
Instructions
- In a medium saucepan, whisk together the sugar, cornstarch, and salt.
- Gradually add the milk while whisking to combine. Cook over medium heat, stirring constantly until the mixture thickens and begins to bubble.
- In a small bowl, whisk the egg yolks. Slowly pour a bit of the hot pudding mixture into the yolks to temper them, then return the yolk mixture to the saucepan.
- Cook for an additional 2 minutes, stirring constantly. Remove from heat and stir in the butter and vanilla extract.
- Pour the pudding into serving dishes and cover with plastic wrap to prevent a skin from forming. Chill in the refrigerator for at least 2 hours before serving.
Cooking Tips: For a richer flavor, use half-and-half instead of whole milk. If you prefer a dairy-free option, almond or coconut milk can work well too. You can also substitute the granulated sugar with honey or maple syrup for a natural sweetener.
Nutritious Quinoa Salad With Fresh Vegetables

This quinoa salad is a delightful nod to the 1920s, a time when fresh ingredients were celebrated. The vibrant colors of the vegetables make it visually appealing, perfect for an Easter gathering. The combination of quinoa and fresh veggies not only looks great but also packs a nutritious punch.
Quinoa is a fantastic source of protein and fiber, making this salad a healthy choice. Toss in some seasonal vegetables like bell peppers, tomatoes, and green onions for a fresh crunch. You can also add herbs like cilantro for an extra burst of flavor.
Cooking quinoa is simple. Just rinse it under cold water, then simmer it in water or broth until fluffy. This salad can be served warm or cold, making it versatile for any occasion. Plus, it’s easy to customize based on what you have on hand.
Ingredients
- 1 cup quinoa
- 2 cups water or vegetable broth
- 1 cup cherry tomatoes, halved
- 1 bell pepper, diced
- 1 cucumber, diced
- 1/2 cup green onions, chopped
- 1/4 cup fresh cilantro, chopped
- 1/4 cup olive oil
- 2 tablespoons lemon juice
- Salt and pepper to taste
Instructions
- Rinse the quinoa under cold water. In a saucepan, combine quinoa and water or broth. Bring to a boil, then reduce heat and simmer for about 15 minutes, or until the quinoa is fluffy.
- In a large bowl, combine the cooked quinoa with cherry tomatoes, bell pepper, cucumber, green onions, and cilantro.
- In a small bowl, whisk together olive oil, lemon juice, salt, and pepper. Pour the dressing over the salad and toss to combine.
- Serve immediately or chill in the refrigerator for an hour before serving.
Cooking Tips: If you prefer a different grain, try substituting quinoa with couscous or farro. You can also add beans for extra protein. For a creamier texture, consider mixing in some avocado.
Classic Carrot Cake With Cream Cheese Frosting

This classic carrot cake is a delightful nod to the 1920s, a time when home baking became a cherished tradition. With its moist layers and rich cream cheese frosting, it’s perfect for Easter celebrations. The cake is adorned with fresh carrots and walnuts, making it not just tasty but also visually appealing.
Carrot cake has a unique charm. The sweetness of the carrots blends beautifully with warm spices like cinnamon and nutmeg. It’s a wonderful way to celebrate the season, bringing a touch of nostalgia to your Easter recipes.
For those looking to make this cake, here’s what you’ll need:
Ingredients
- 2 cups all-purpose flour
- 2 cups granulated sugar
- 1 teaspoon baking powder
- 1 teaspoon baking soda
- 1 teaspoon ground cinnamon
- 1/2 teaspoon ground nutmeg
- 1/2 teaspoon salt
- 1 cup vegetable oil
- 4 large eggs
- 3 cups grated carrots
- 1 cup chopped walnuts (optional)
- 1 teaspoon vanilla extract
- 8 oz cream cheese, softened
- 1/2 cup unsalted butter, softened
- 4 cups powdered sugar
Instructions
- Preheat your oven to 350°F (175°C). Grease and flour two 9-inch round cake pans.
- In a large bowl, mix flour, sugar, baking powder, baking soda, cinnamon, nutmeg, and salt.
- In another bowl, whisk together oil, eggs, grated carrots, and vanilla. Combine the wet and dry ingredients until just mixed.
- Fold in walnuts if using. Divide the batter evenly between the prepared pans.
- Bake for 25-30 minutes or until a toothpick inserted in the center comes out clean. Let the cakes cool in the pans for 10 minutes, then transfer to wire racks to cool completely.
- For the frosting, beat together cream cheese and butter until smooth. Gradually add powdered sugar and mix until creamy.
- Once the cakes are cool, spread frosting between the layers and on top. Decorate with additional walnuts and small carrot decorations if desired.
Cooking tips: If you want a lighter cake, you can substitute half the oil with unsweetened applesauce. For a nut-free version, simply omit the walnuts. Enjoy this classic treat as part of your Easter recipes!
Delicious Chocolate Chip Cookies: A Timeless Treat

Chocolate chip cookies are a classic dessert that never goes out of style. Inspired by the 1920s, these cookies bring a touch of nostalgia to any Easter gathering. The image shows a plate piled high with golden-brown cookies, dotted with rich chocolate chips, ready to be enjoyed with a glass of cold milk.
Making these cookies is simple and fun. You can easily involve the kids in the kitchen, creating sweet memories while whipping up a batch. The aroma of freshly baked cookies will fill your home, making it feel warm and inviting.
For a twist, consider using dark chocolate chips or adding nuts for extra crunch. You can even swap out some of the all-purpose flour for whole wheat flour for a healthier option. These small changes can make a big difference!
Ingredients
- 2 1/4 cups all-purpose flour
- 1/2 teaspoon baking soda
- 1 cup unsalted butter, softened
- 3/4 cup granulated sugar
- 3/4 cup brown sugar, packed
- 1 teaspoon salt
- 2 teaspoons vanilla extract
- 2 large eggs
- 2 cups chocolate chips
Instructions
- Preheat the oven to 350°F (175°C). Line a baking sheet with parchment paper.
- In a bowl, whisk together the flour and baking soda. Set aside.
- In a large mixing bowl, cream the softened butter, granulated sugar, brown sugar, and salt until smooth. Add the vanilla extract and eggs, mixing well.
- Gradually add the flour mixture to the wet ingredients, stirring until just combined. Fold in the chocolate chips.
- Drop spoonfuls of dough onto the prepared baking sheet, spacing them about 2 inches apart.
- Bake for 10-12 minutes or until the edges are golden brown. Let them cool on the baking sheet for a few minutes before transferring to a wire rack.
Cooking tips: If you prefer softer cookies, take them out of the oven a minute or two early. For a fun variation, try adding a pinch of cinnamon or using different types of chocolate. Enjoy these delightful treats at your Easter celebration!
Refreshing Iced Tea With Lemon And Mint

As Easter approaches, it’s the perfect time to enjoy refreshing drinks that capture the spirit of spring. Iced tea with lemon and mint is a classic choice that brings a touch of the 1920s charm to your table. This drink is not just about quenching your thirst; it’s about savoring the flavors of the season.
The vibrant colors of the iced tea, combined with the bright lemon slices and fresh mint leaves, create a visual treat. Picture yourself sipping this delightful beverage on a sunny afternoon, surrounded by friends and family. It’s a simple yet elegant addition to your Easter recipes.
To make this iced tea, you’ll need just a few ingredients. The combination of tea, lemon, and mint is refreshing and invigorating. You can easily adjust the sweetness to your liking, making it a versatile drink for everyone.
Ingredients
- 4 cups brewed black tea (cooled)
- 1/2 cup fresh lemon juice
- 1/4 cup honey or sugar (adjust to taste)
- 1 cup fresh mint leaves
- Ice cubes
- Lemon slices for garnish
Instructions
- Brew the Tea: Start by brewing your black tea. Let it cool completely before using.
- Mix Ingredients: In a large pitcher, combine the cooled tea, fresh lemon juice, and honey or sugar. Stir well until the sweetener is dissolved.
- Add Mint: Gently bruise the mint leaves by pressing them with a spoon. Add them to the pitcher for an aromatic touch.
- Serve: Fill glasses with ice cubes, pour the iced tea over, and garnish with lemon slices and extra mint leaves.
Cooking Tips: If you prefer a sweeter drink, add more honey or sugar. For a twist, try using flavored teas like peach or raspberry. You can also substitute fresh mint with basil for a unique flavor.
Enjoy this refreshing iced tea as part of your Easter celebration. It’s a delightful way to toast to spring!
You may also like:
– Sinister Candy Station Ideas for an Unforgettable Halloween Party
– Gothic Hors D’Oeuvres To Impress Your Gotham Guests
– 21 Children’s Birthday Cakes Inspired by Gotham City
If you enjoyed this blog you can visit us or check out our other blogs and learn a bit about us.
Disclaimer: This blog post is inspired by fictional universes and characters created by their respective rights holders. All related content and imagery remain the property of their respective rights holder. This fan-inspired content is for entertainment and commentary purposes only and is not affiliated with or endorsed by HBO, Disney, Warner Bros., Lionsgate, or any other rights holders. To explore the official source material, please visit:
HBO