

Get ready to whip up some delightful Christmas desserts inspired by the glamorous 1920s! From classic fruitcakes to creamy puddings, these recipes capture the spirit of the Roaring Twenties, making your holiday spread both festive and nostalgic. Don’t forget to experiment with ingredient substitutions like using almond flour in place of regular flour or sweetening with honey instead of sugar for a unique twist! Along the way, you’ll find helpful cooking tips to make your baking experience even easier and more enjoyable.
Timeless Trifle: A 1920s Classic Revived
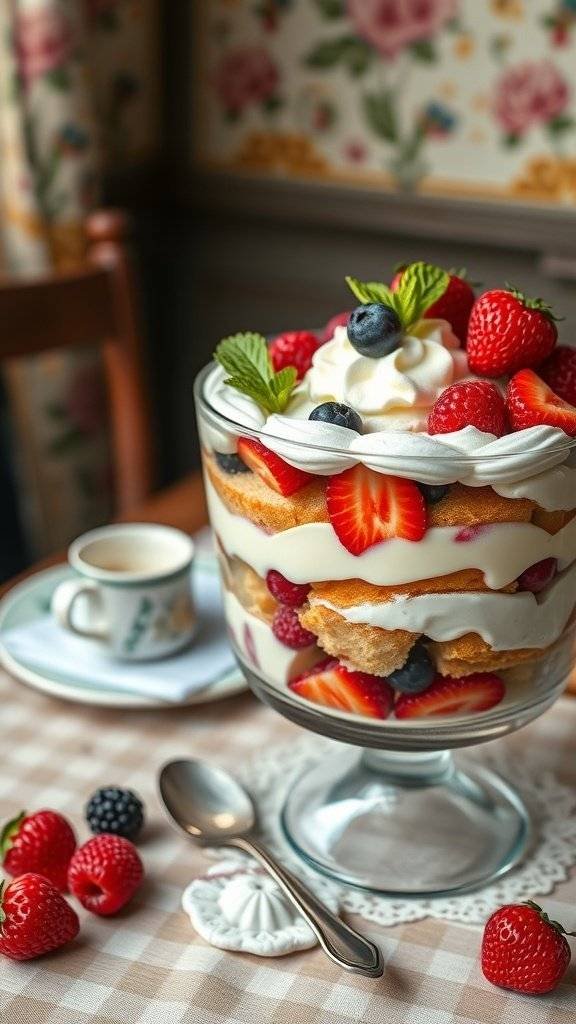
Trifle is a dessert that has stood the test of time, and its roots can be traced back to the 1920s. This delightful layered treat combines sponge cake, custard, fruit, and whipped cream, making it a perfect addition to any holiday table. The image captures a beautiful trifle, showcasing vibrant layers of strawberries, blueberries, and raspberries, topped with a generous dollop of whipped cream and a sprig of mint. The presentation is inviting and festive, embodying the spirit of Christmas dessert recipes.
Creating a trifle is simple and allows for plenty of creativity. You can use store-bought cake or make your own. The key is to layer the ingredients beautifully to create an eye-catching dessert. This recipe is not only delicious but also a wonderful way to celebrate the flavors of the season.
Ingredients
- 1 pound sponge cake or ladyfingers
- 2 cups mixed berries (strawberries, blueberries, raspberries)
- 2 cups vanilla custard (store-bought or homemade)
- 1 cup heavy whipping cream
- 1/4 cup powdered sugar
- Fresh mint leaves for garnish
Instructions
- Prepare the Cake: If using sponge cake, slice it into layers. If using ladyfingers, you can leave them whole.
- Layer the Ingredients: In a large glass bowl or trifle dish, start with a layer of cake at the bottom. Add a layer of custard, followed by a layer of mixed berries. Repeat the layers until you reach the top of the dish.
- Whip the Cream: In a mixing bowl, beat the heavy cream with powdered sugar until soft peaks form. Spread or pipe the whipped cream on top of the trifle.
- Garnish: Add a few fresh berries and mint leaves on top for decoration.
- Chill: Refrigerate the trifle for at least 2 hours before serving to allow the flavors to meld.
Cooking Tips: You can substitute the mixed berries with any seasonal fruit you like, such as peaches or cherries. If you’re short on time, ready-made custard works perfectly. For a twist, consider adding a splash of liqueur to the custard for an adult version.
Decadent Chocolate Mousse: A Luxurious Indulgence
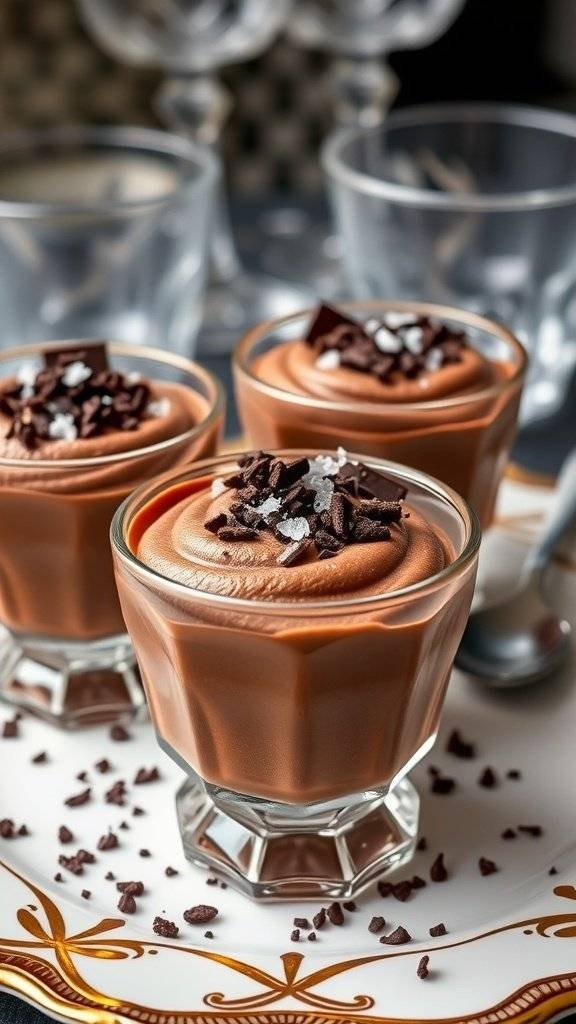
Chocolate mousse has a rich history, especially during the 1920s when it became a popular dessert at lavish parties. The image captures this classic treat beautifully, showcasing individual servings topped with chocolate shavings and a sprinkle of sea salt. The elegant presentation makes it a perfect choice for Christmas dessert recipes, adding a touch of sophistication to any holiday gathering.
This mousse is not only delicious but also easy to make. With its creamy texture and deep chocolate flavor, it’s sure to impress your guests. Plus, it can be prepared ahead of time, allowing you to enjoy the festivities without stress.
For those looking to switch things up, consider using dark chocolate for a richer taste or adding a splash of espresso for a coffee twist. You can also substitute heavy cream with coconut cream for a dairy-free option. Let’s get to the recipe!
Ingredients
- 8 ounces dark chocolate, chopped
- 3 tablespoons unsalted butter
- 3 large eggs, separated
- 1/4 cup granulated sugar
- 1 cup heavy cream
- 1 teaspoon vanilla extract
- Pinch of salt
- Chocolate shavings and sea salt for garnish
Instructions
- Melt Chocolate: In a heatproof bowl, combine the chopped chocolate and butter. Place over a pot of simmering water, stirring until melted and smooth. Remove from heat and let cool slightly.
- Whip Egg Whites: In a separate bowl, beat the egg whites with a pinch of salt until soft peaks form. Gradually add the sugar and continue beating until stiff peaks form.
- Mix Egg Yolks: Stir the egg yolks into the cooled chocolate mixture until well combined.
- Combine Mixtures: Gently fold the whipped egg whites into the chocolate mixture in three additions, being careful not to deflate the mixture.
- Whip Cream: In another bowl, whip the heavy cream with vanilla extract until soft peaks form. Fold the whipped cream into the chocolate mixture until fully incorporated.
- Chill: Spoon the mousse into serving glasses and refrigerate for at least 2 hours or until set.
- Serve: Before serving, top with chocolate shavings and a sprinkle of sea salt for an extra touch.
Classic Fruitcake: A Holiday Staple With A Twist
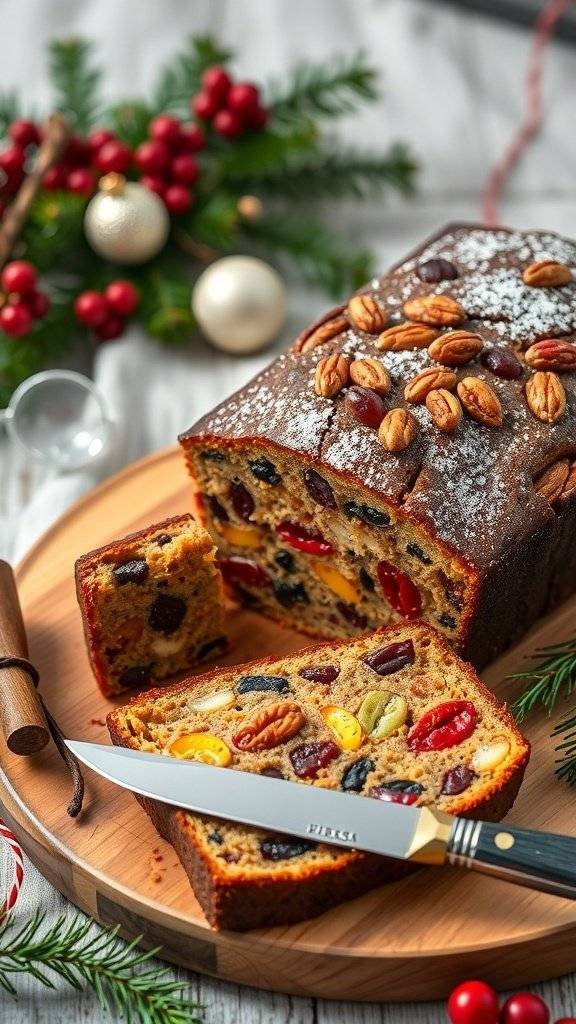
Fruitcake has long been a holiday favorite, especially during Christmas. This classic dessert, often seen as a symbol of festive cheer, has its roots in the 1920s. Back then, it was made with a variety of dried fruits and nuts, creating a rich and hearty treat. The image captures a beautifully baked fruitcake, adorned with colorful candied fruits and nuts, making it a feast for the eyes as well as the palate.
This version of fruitcake adds a modern twist while keeping the traditional essence. The vibrant colors of the fruits and the texture of the nuts give this cake a delightful appearance. It’s perfect for sharing with family and friends during the holiday season.
Ingredients
- 2 cups mixed dried fruits (raisins, currants, chopped dates)
- 1 cup candied cherries
- 1 cup chopped nuts (walnuts or pecans)
- 1 cup all-purpose flour
- 1 teaspoon baking powder
- 1/2 teaspoon salt
- 1 teaspoon ground cinnamon
- 1/2 teaspoon ground nutmeg
- 1/2 cup unsalted butter, softened
- 1 cup brown sugar
- 3 large eggs
- 1/4 cup orange juice
- 1 teaspoon vanilla extract
- 1/4 cup rum or brandy (optional)
Instructions
- Preheat your oven to 325°F (165°C). Grease a loaf pan and line it with parchment paper.
- In a bowl, combine the dried fruits, candied cherries, and nuts. Toss them with a tablespoon of flour to prevent them from sinking in the batter.
- In another bowl, mix the flour, baking powder, salt, cinnamon, and nutmeg. Set aside.
- In a large mixing bowl, cream the softened butter and brown sugar until light and fluffy. Add the eggs one at a time, mixing well after each addition.
- Stir in the orange juice, vanilla extract, and rum or brandy if using. Gradually add the dry ingredients to the wet mixture until just combined.
- Fold in the fruit and nut mixture gently.
- Pour the batter into the prepared loaf pan and smooth the top. Bake for 60-70 minutes or until a toothpick inserted comes out clean.
- Let the cake cool in the pan for 10 minutes before transferring it to a wire rack to cool completely.
Cooking Tips: For a moister cake, soak the dried fruits in rum or orange juice overnight. You can substitute the nuts with seeds for a nut-free version. If you prefer a less sweet cake, reduce the brown sugar by half.
Velvety Eggnog Custard: A Creamy Delight

Velvety Eggnog Custard is a classic dessert that brings the warmth of the holiday season right to your table. Inspired by the 1920s, this creamy treat is perfect for Christmas gatherings. The image showcases a beautifully presented bowl of custard, garnished with a sprig of holly and a sprinkle of cinnamon. The rich, smooth texture is inviting and makes it hard to resist.
This custard is not just about looks; it’s a delightful blend of flavors that captures the essence of Christmas. The combination of eggnog, spices, and a touch of sweetness creates a comforting dessert that everyone will love. Serve it chilled or warm, and watch it disappear!
Ingredients
- 2 cups eggnog
- 3 large eggs
- 1/4 cup granulated sugar
- 1 teaspoon vanilla extract
- 1/2 teaspoon ground nutmeg
- 1/4 teaspoon salt
- 1 tablespoon cornstarch (optional, for thicker custard)
Instructions
- Preheat your oven to 350°F (175°C).
- In a mixing bowl, whisk together the eggs, sugar, vanilla extract, nutmeg, and salt until well combined.
- Gradually add the eggnog to the egg mixture, stirring gently to combine.
- If you prefer a thicker custard, mix the cornstarch with a little eggnog to dissolve, then add it to the mixture.
- Pour the mixture into ramekins or a baking dish.
- Place the ramekins in a larger baking dish and fill the outer dish with hot water until it reaches halfway up the sides of the ramekins.
- Bake for 30-35 minutes, or until the custard is set but still slightly jiggly in the center.
- Remove from the oven and let cool before refrigerating for at least 2 hours.
- Serve chilled, garnished with a sprinkle of cinnamon or nutmeg.
Cooking Tips: If you want to make this custard dairy-free, substitute eggnog with a plant-based version. You can also use maple syrup instead of granulated sugar for a different sweetness. Enjoy this creamy delight at your next holiday gathering!
Gingerbread Cookies: Spicy And Sweet Holiday Treats

Gingerbread cookies are a classic holiday treat that brings warmth and cheer to any festive gathering. These cookies, with their rich spices and sweet flavor, have been enjoyed for centuries. The image captures beautifully decorated gingerbread cookies in various shapes, showcasing intricate icing designs that add a festive touch. The soft glow of lights in the background enhances the cozy holiday vibe, making these cookies even more inviting.
Making gingerbread cookies is a delightful way to celebrate the season. The combination of ginger, cinnamon, and molasses creates a unique flavor that is both spicy and sweet. These cookies are perfect for decorating with family and friends, making them a fun activity for all ages.
For those looking to try their hand at this holiday favorite, here’s a simple recipe to get you started. You can easily customize the spices or the decorations to make them your own!
Ingredients
- 3 cups all-purpose flour
- 1 tablespoon ground ginger
- 1 tablespoon ground cinnamon
- 1 teaspoon baking soda
- 1/2 teaspoon salt
- 1/2 cup unsalted butter, softened
- 1/2 cup brown sugar, packed
- 1/2 cup molasses
- 1 large egg
- 1 teaspoon vanilla extract
- Royal icing for decoration (optional)
Instructions
- Mix Dry Ingredients: In a bowl, whisk together flour, ginger, cinnamon, baking soda, and salt.
- Combine Wet Ingredients: In a separate bowl, beat together the softened butter and brown sugar until creamy. Add molasses, egg, and vanilla, mixing until well combined.
- Combine Mixtures: Gradually add the dry ingredients to the wet mixture, stirring until a dough forms. Wrap the dough in plastic wrap and refrigerate for at least 1 hour.
- Preheat Oven: Preheat your oven to 350°F (175°C). Line baking sheets with parchment paper.
- Roll and Cut: On a floured surface, roll out the dough to about 1/4 inch thick. Use cookie cutters to cut out shapes and place them on the prepared baking sheets.
- Bake: Bake for 8-10 minutes, or until the edges are firm. Let the cookies cool on the baking sheets for a few minutes before transferring them to a wire rack to cool completely.
- Decorate: Once cooled, decorate with royal icing as desired.
Cooking Tips: If you want a spicier cookie, feel free to add more ginger or cinnamon. For a softer cookie, reduce the baking time slightly. You can also substitute honey for molasses if you prefer a different flavor.
Enjoy these gingerbread cookies as part of your Christmas dessert recipes, and share them with family and friends for a sweet holiday treat!
Traditional Yule Log: A Festive Centerpiece
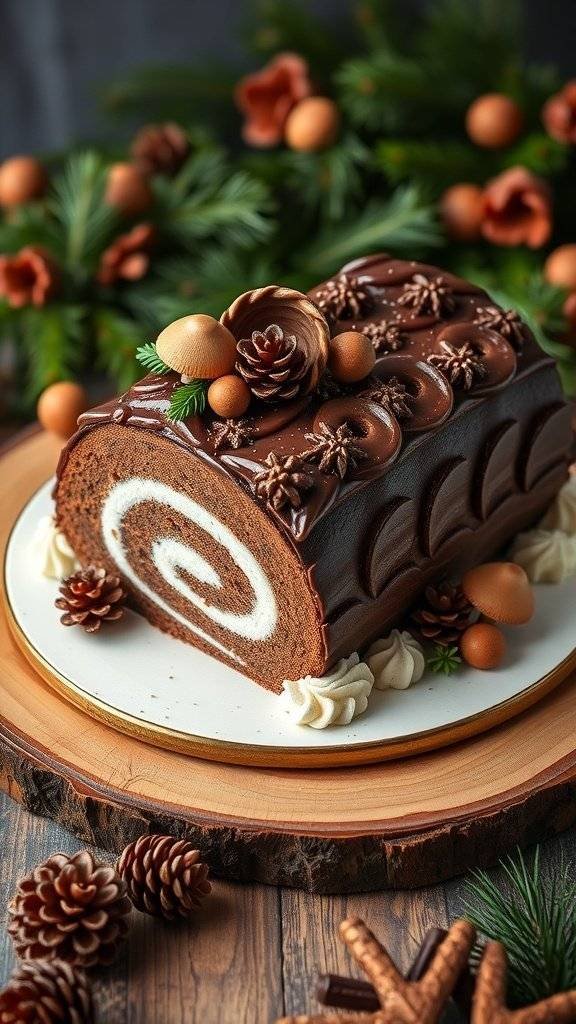
The Yule Log, or Bûche de Noël, is a classic Christmas dessert that brings a touch of nostalgia to holiday gatherings. This delightful cake resembles a log, complete with a rich chocolate exterior and a creamy filling. Its history dates back to the 1920s, when families would burn a log in the fireplace to celebrate the winter solstice. Today, we celebrate with this sweet version, perfect for any festive table.
In the image, you can see a beautifully decorated Yule Log, adorned with chocolate ganache, pine cones, and festive accents. The swirls of cream peeking from the inside add a charming touch, making it not just a treat for the taste buds but also a feast for the eyes.
Making a Yule Log is easier than it looks. You can impress your guests with this traditional dessert, which is sure to be a hit at any Christmas gathering. Let’s get started on this delicious recipe!
Ingredients
- 1 cup all-purpose flour
- 1 cup granulated sugar
- 1/4 cup unsweetened cocoa powder
- 1 teaspoon baking powder
- 1/2 teaspoon salt
- 4 large eggs
- 1 teaspoon vanilla extract
- 1 cup heavy cream
- 1/4 cup powdered sugar
- 8 ounces semi-sweet chocolate, chopped
- 1/2 cup unsalted butter
- Pine cone decorations (optional)
Instructions
- Preheat your oven to 350°F (175°C) and line a jelly roll pan with parchment paper.
- In a bowl, whisk together flour, sugar, cocoa powder, baking powder, and salt.
- In another bowl, beat the eggs and vanilla until light and fluffy. Gradually add the dry ingredients to the egg mixture.
- Spread the batter evenly in the prepared pan and bake for about 12-15 minutes, or until a toothpick comes out clean.
- While the cake is baking, prepare a clean kitchen towel by dusting it with powdered sugar.
- Once baked, immediately invert the cake onto the towel and peel off the parchment paper. Roll the cake up in the towel and let it cool completely.
- For the filling, whip the heavy cream with powdered sugar until soft peaks form. Unroll the cooled cake and spread the whipped cream evenly over it.
- Roll the cake back up without the towel and place it seam side down on a serving platter.
- For the frosting, melt the chocolate and butter together until smooth. Let it cool slightly before spreading it over the cake.
- Decorate with pine cones and other festive touches. Slice and serve!
Cooking Tips: If you want a lighter version, consider using a whipped topping instead of heavy cream. For a gluten-free option, substitute the all-purpose flour with a gluten-free blend. Enjoy this delightful dessert with family and friends!
Creamy Pumpkin Pie: A Seasonal Classic
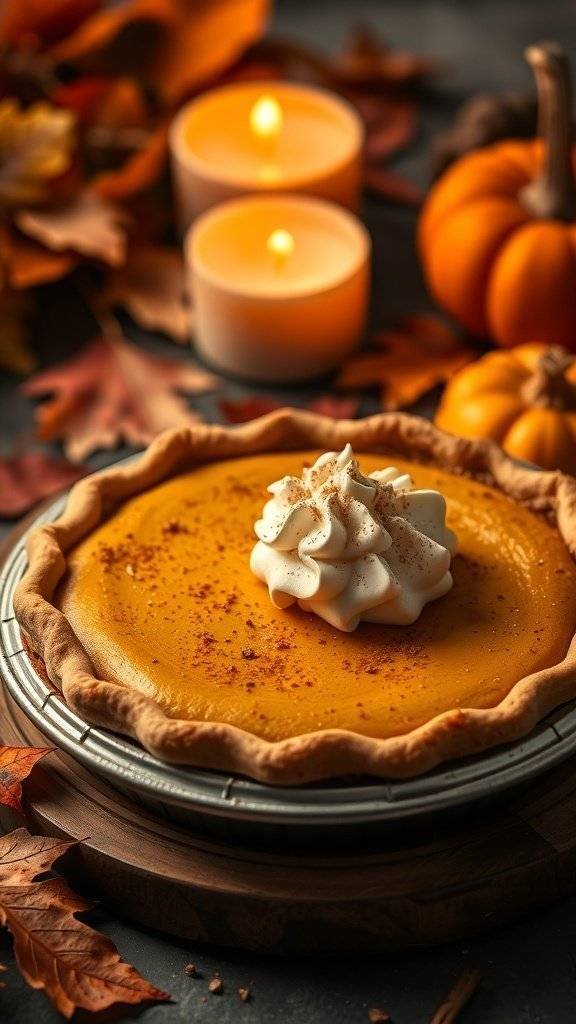
Pumpkin pie is a timeless dessert that brings warmth and comfort, especially during the holiday season. This creamy delight has roots that trace back to the 1920s, when it became a staple at Christmas gatherings. The image captures a beautifully baked pumpkin pie, topped with a generous swirl of whipped cream and a sprinkle of cinnamon, all set against a backdrop of autumn leaves and glowing candles. It’s a perfect representation of the cozy vibes we seek during the holidays.
Making pumpkin pie is simple and rewarding. The rich, spiced filling paired with a flaky crust creates a delightful balance of flavors. Whether you’re hosting a festive dinner or just enjoying a slice at home, this pie is sure to impress.
Ingredients
- 1 unbaked pie crust
- 2 cups pumpkin puree
- 1 cup heavy cream
- 3/4 cup brown sugar
- 1/2 cup granulated sugar
- 3 large eggs
- 1 teaspoon ground cinnamon
- 1/2 teaspoon ground ginger
- 1/4 teaspoon ground nutmeg
- 1/4 teaspoon ground cloves
- 1/2 teaspoon salt
Instructions
- Preheat your oven to 425°F (220°C).
- In a large bowl, mix together the pumpkin puree, heavy cream, brown sugar, granulated sugar, eggs, and spices until smooth.
- Pour the filling into the unbaked pie crust, smoothing the top with a spatula.
- Bake for 15 minutes, then reduce the temperature to 350°F (175°C) and bake for an additional 40-45 minutes, or until the filling is set.
- Let the pie cool before serving. Top with whipped cream and a sprinkle of cinnamon for that extra festive touch.
Cooking Tips: If you want to make it easier, you can use store-bought pie crust. For a gluten-free option, look for gluten-free pie crusts available at most grocery stores. If you prefer a less sweet pie, reduce the sugar to your taste. Enjoy this classic dessert as part of your Christmas dessert recipes!
Nutty Pecan Pie: Sweet And Savory Harmony
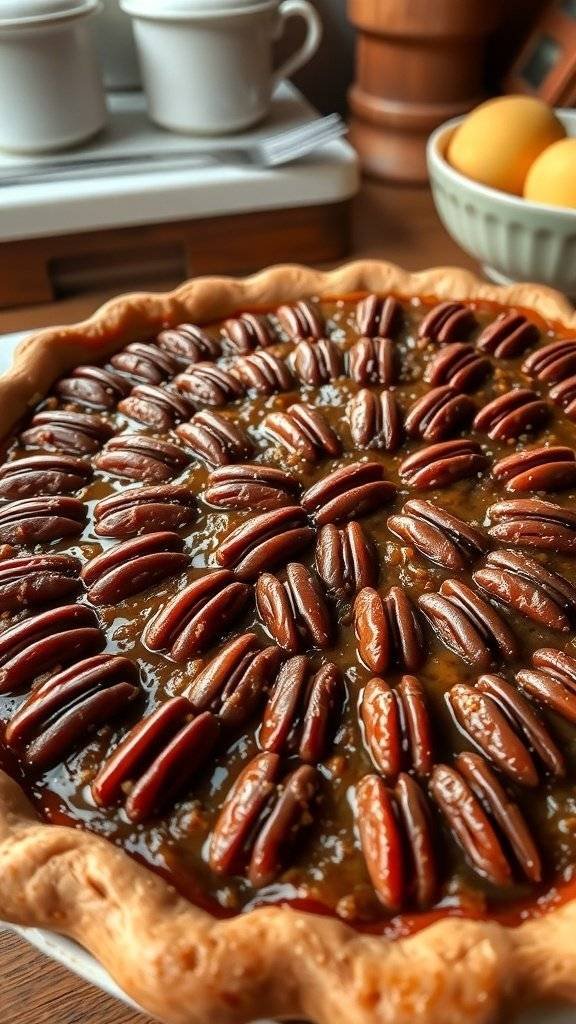
Pecan pie is a classic dessert that brings a touch of nostalgia, especially during the holiday season. This pie, with its glossy filling and crunchy pecans, perfectly captures the spirit of Christmas desserts. The 1920s were a time of celebration, and this pie fits right in with that festive vibe.
The combination of sweet and savory flavors in pecan pie makes it a delightful treat. The rich filling, made from corn syrup and brown sugar, pairs beautifully with the nutty crunch of pecans. The flaky crust adds a satisfying texture that ties everything together.
If you want to make this pie even more special, consider adding a splash of bourbon or vanilla extract to the filling. This little twist can enhance the flavor and give it a unique touch. You can also swap out some of the pecans for walnuts or almonds if you prefer a different nutty flavor.
Ingredients
- 1 unbaked pie crust
- 1 cup corn syrup
- 1 cup brown sugar, packed
- 4 large eggs
- 2 tablespoons unsalted butter, melted
- 1 teaspoon vanilla extract
- 1 1/2 cups pecan halves
- 1/4 teaspoon salt
Instructions
- Preheat your oven to 350°F (175°C).
- In a large bowl, mix together the corn syrup, brown sugar, eggs, melted butter, vanilla extract, and salt until well combined.
- Stir in the pecan halves, ensuring they are evenly distributed.
- Pour the filling into the unbaked pie crust.
- Bake for 60-70 minutes, or until the filling is set and the top is golden brown.
- Let the pie cool before slicing. Serve with whipped cream or vanilla ice cream for an extra treat!
Cooking Tip: If the edges of the crust start to brown too quickly, cover them with foil to prevent burning. For a richer flavor, try using dark corn syrup instead of light.
Ingredient Substitution: If you don’t have corn syrup, you can use maple syrup or honey as a substitute, though it may alter the flavor slightly.
Charming Coconut Cake: A Tropical Touch For Christmas
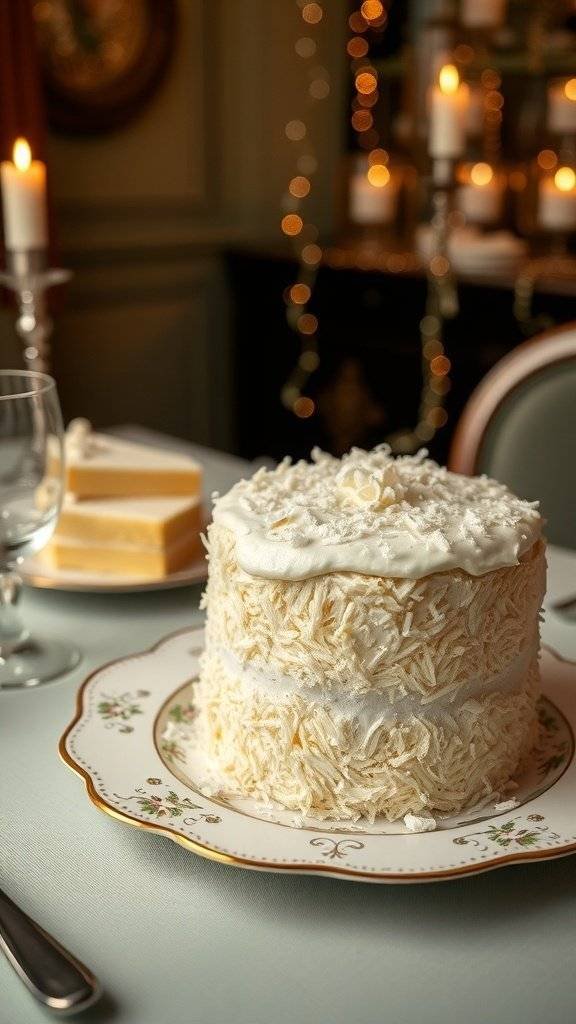
This delightful coconut cake brings a tropical flair to your holiday table. Inspired by the 1920s, it’s a perfect blend of nostalgia and festive cheer. The cake is beautifully layered and covered in fluffy coconut frosting, making it a showstopper for any Christmas gathering.
The image showcases a stunning coconut cake, adorned with shredded coconut on top and around the sides. The soft, creamy frosting contrasts beautifully with the delicate layers of cake. It’s set against a warm, inviting backdrop, complete with twinkling lights and elegant tableware, creating a cozy holiday atmosphere.
To make this cake, you’ll need a few simple ingredients. It’s a fun recipe to try, whether you’re a baking novice or a seasoned pro. Plus, it’s sure to impress your guests!
Ingredients
- 2 cups all-purpose flour
- 1 ½ cups granulated sugar
- 1 tablespoon baking powder
- ½ teaspoon salt
- ½ cup unsalted butter, softened
- 1 cup coconut milk
- 4 large eggs
- 1 teaspoon vanilla extract
- 2 cups shredded coconut
- 1 cup heavy cream
- 2 tablespoons powdered sugar
Instructions
- Preheat your oven to 350°F (175°C). Grease and flour two 9-inch round cake pans.
- In a large bowl, mix flour, sugar, baking powder, and salt. Add softened butter and coconut milk, mixing until smooth.
- Beat in the eggs and vanilla extract until well combined. Fold in shredded coconut.
- Divide the batter evenly between the prepared pans. Bake for 25-30 minutes, or until a toothpick comes out clean.
- Let the cakes cool in the pans for 10 minutes, then transfer to wire racks to cool completely.
- For the frosting, whip heavy cream with powdered sugar until soft peaks form. Spread a layer of frosting between the cooled cakes and cover the top and sides with the remaining frosting.
- Decorate with additional shredded coconut on top and sides. Chill for at least 30 minutes before serving.
Cooking tips: If you want a richer flavor, consider using cream of coconut instead of coconut milk. You can also substitute the heavy cream with whipped coconut cream for a dairy-free option. Enjoy this charming coconut cake at your Christmas gathering!
Elegant Raspberry Tart: A Burst Of Flavor
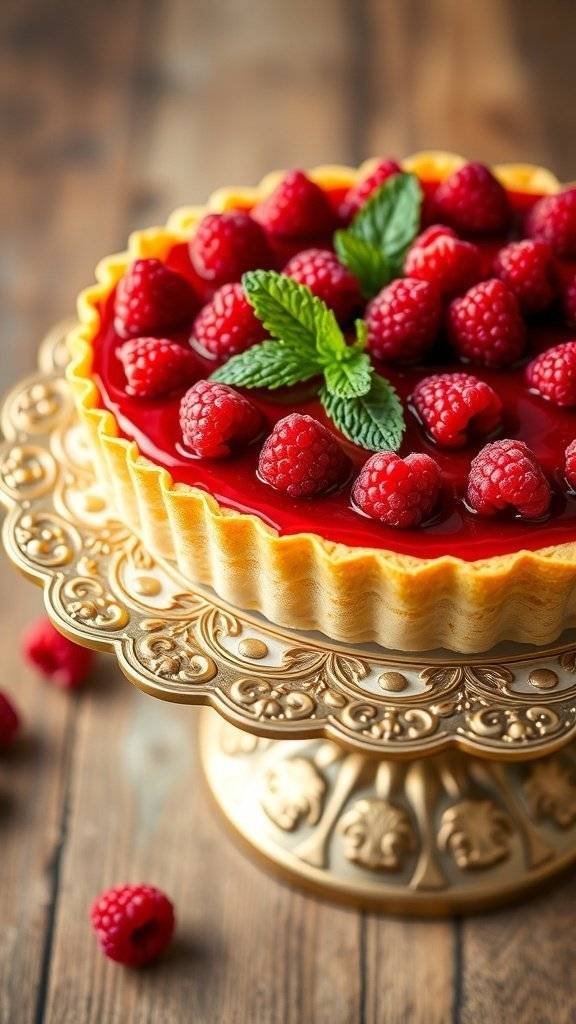
The Raspberry Tart is a delightful dessert that brings a touch of the 1920s to your Christmas table. With its vibrant red raspberries and glossy glaze, it’s not just a treat for the taste buds but also a feast for the eyes. This tart captures the essence of elegance, making it perfect for festive gatherings.
To create this stunning dessert, you’ll need a buttery tart crust filled with a smooth raspberry filling. The fresh raspberries on top add a burst of flavor and a pop of color. This dessert is sure to impress your guests and leave them wanting more.
Ingredients
- 1 ½ cups all-purpose flour
- ½ cup unsalted butter, softened
- ¼ cup powdered sugar
- 1 large egg yolk
- 2 tablespoons cold water
- 2 cups fresh raspberries
- ½ cup granulated sugar
- 1 tablespoon cornstarch
- 1 tablespoon lemon juice
- 1 tablespoon butter
- Mint leaves for garnish
Instructions
- Make the Tart Crust: In a bowl, mix flour and powdered sugar. Cut in softened butter until crumbly. Add egg yolk and cold water, mixing until a dough forms. Press into a tart pan and chill for 30 minutes.
- Preheat the Oven: Set your oven to 350°F (175°C). Bake the crust for 15-20 minutes until lightly golden. Let it cool.
- Prepare the Filling: In a saucepan, combine raspberries, granulated sugar, cornstarch, and lemon juice. Cook over medium heat until the mixture thickens, about 5 minutes. Stir in butter until melted.
- Assemble the Tart: Pour the raspberry filling into the cooled tart crust. Allow it to set in the refrigerator for at least 2 hours.
- Garnish and Serve: Top with fresh raspberries and mint leaves before serving. Enjoy your elegant raspberry tart!
Cooking Tips: If you want to save time, you can use a store-bought tart crust. For a twist, try adding a splash of vanilla extract to the filling. If raspberries aren’t available, strawberries or blueberries work well too!
Old-Fashioned Apple Crisp: A Comforting Favorite
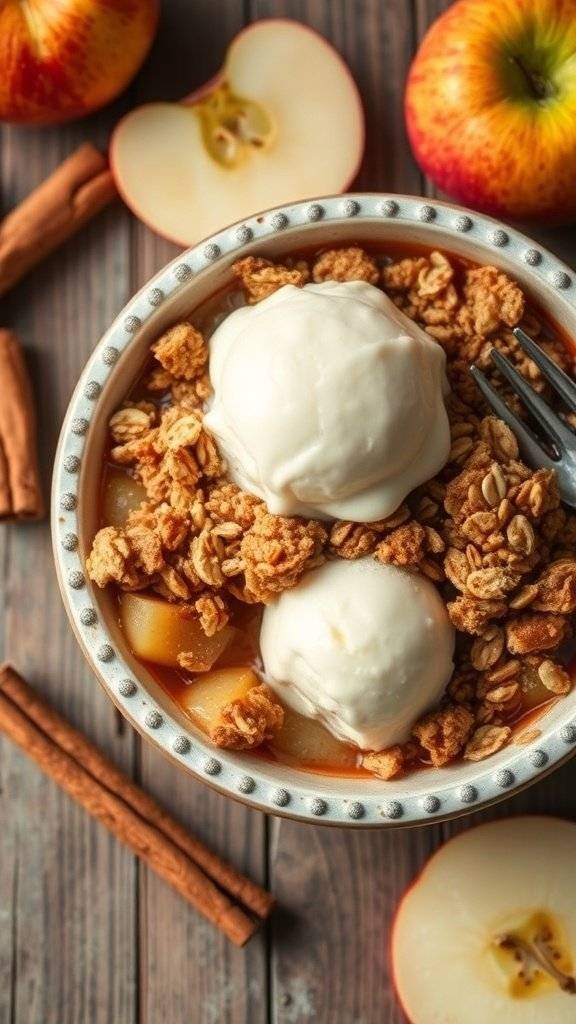
Old-fashioned apple crisp is a classic dessert that brings warmth and nostalgia to any holiday gathering. This dish features tender, spiced apples topped with a crunchy oat mixture, making it a comforting favorite during the Christmas season.
The image showcases a delightful bowl of apple crisp, topped with creamy vanilla ice cream. The vibrant red apples and warm cinnamon sticks hint at the delicious flavors waiting to be enjoyed. This dessert not only looks inviting but also fills the kitchen with a delightful aroma.
To make this recipe even more special, you can use a mix of apples for added flavor. Granny Smith apples provide tartness, while Honeycrisp adds sweetness. Don’t forget to serve it warm for the best experience!
Ingredients
- 6 cups sliced apples (about 6 medium apples)
- 1 tablespoon lemon juice
- 1 cup brown sugar, packed
- 1 teaspoon ground cinnamon
- 1/2 teaspoon nutmeg
- 1/4 teaspoon salt
- 1 cup rolled oats
- 1 cup all-purpose flour
- 1/2 cup unsalted butter, softened
- Vanilla ice cream (for serving)
Instructions
- Preheat your oven to 350°F (175°C).
- In a large bowl, toss the sliced apples with lemon juice, brown sugar, cinnamon, nutmeg, and salt. Spread the apple mixture evenly in a greased 9×13 inch baking dish.
- In another bowl, mix the oats, flour, and softened butter until crumbly. Sprinkle this mixture over the apples.
- Bake for about 30-35 minutes, or until the apples are tender and the topping is golden brown.
- Let it cool slightly before serving. Top with a scoop of vanilla ice cream for a delightful finish!
Cooking Tips: For a twist, add chopped nuts like walnuts or pecans to the topping for extra crunch. If you prefer a sweeter crisp, increase the brown sugar by a couple of tablespoons.
Ingredient Substitutions: You can use gluten-free oats and flour to make this recipe gluten-free. For a dairy-free option, substitute the butter with coconut oil or a dairy-free butter alternative.
Lemon Meringue Pie: A Zesty Surprise
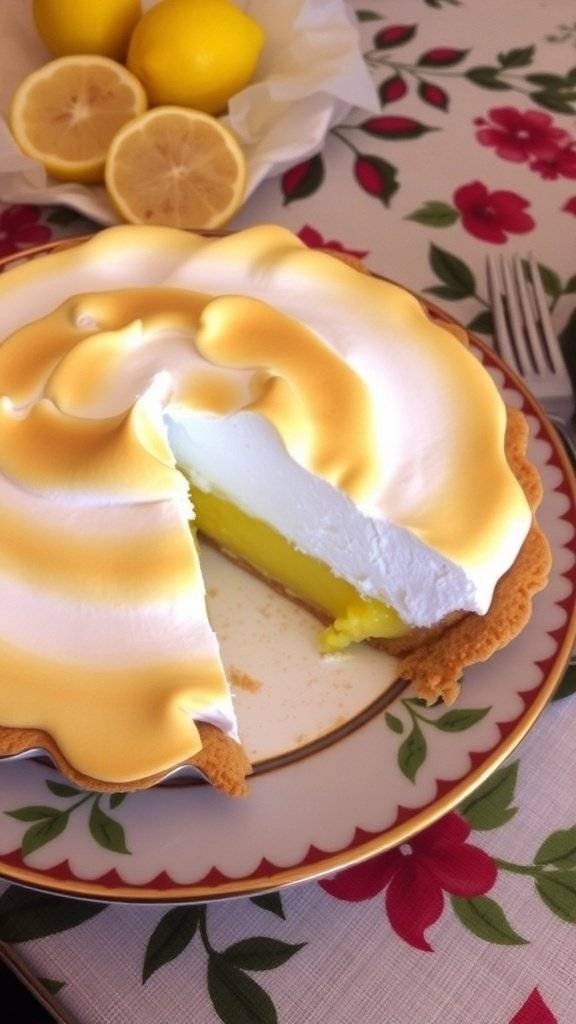
Lemon Meringue Pie is a classic dessert that brings a burst of flavor to any holiday table. This pie features a tangy lemon filling, topped with a fluffy meringue that adds a delightful sweetness. The combination of tart and sweet makes it a perfect choice for Christmas dessert recipes.
The image showcases a beautifully baked Lemon Meringue Pie, with its golden-brown meringue peaks standing tall. The vibrant yellow filling peeks through, hinting at the zesty surprise inside. This pie not only looks stunning but also tastes amazing, making it a festive centerpiece.
To make this pie, you’ll need a few simple ingredients. Here’s how to whip up this delightful treat:
Ingredients
- 1 pre-made pie crust
- 1 cup granulated sugar
- 2 tablespoons cornstarch
- 1/4 teaspoon salt
- 1 cup water
- 3 large egg yolks, beaten
- 1/2 cup fresh lemon juice
- 1 tablespoon lemon zest
- 2 tablespoons unsalted butter
- 3 large egg whites
- 1/4 teaspoon cream of tartar
- 1/2 cup granulated sugar (for meringue)
Instructions
- Preheat your oven to 350°F (175°C).
- In a saucepan, mix 1 cup sugar, cornstarch, and salt. Gradually stir in water. Cook over medium heat until thickened, stirring constantly.
- Remove from heat. Stir a small amount of the hot mixture into the beaten egg yolks, then return it to the saucepan. Cook for 2 more minutes. Stir in lemon juice, zest, and butter until melted.
- Pour the lemon filling into the pre-baked pie crust.
- In a clean bowl, beat egg whites and cream of tartar until soft peaks form. Gradually add 1/2 cup sugar, beating until stiff peaks form.
- Spread the meringue over the lemon filling, making sure to seal the edges.
- Bake for 10-12 minutes until the meringue is golden brown.
- Let it cool before serving. Enjoy your zesty surprise!
Cooking Tips: If you prefer a sweeter pie, you can add more sugar to the lemon filling. For a lighter meringue, ensure your mixing bowl is completely clean and free of grease. If you don’t have fresh lemons, bottled lemon juice can be used, but fresh is always best!
Rich Chocolate Cake: Decadence On A Plate
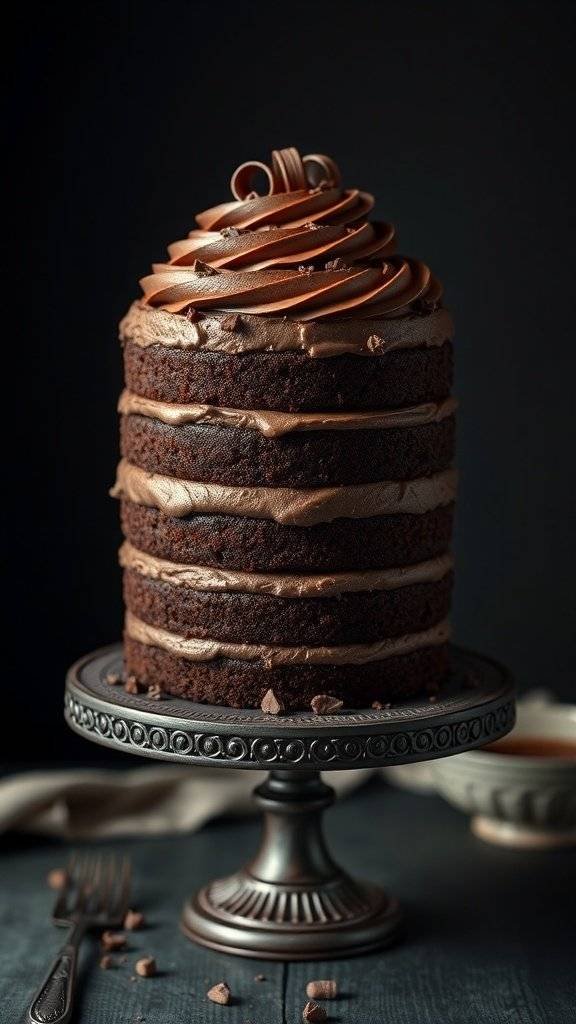
Picture a tall, luscious chocolate cake, layered with rich frosting and adorned with elegant chocolate curls. This dessert captures the spirit of the 1920s, a time when indulgence was celebrated. The layers of moist chocolate cake paired with creamy frosting create a delightful experience for any holiday gathering.
Chocolate cake has always been a favorite, but in the 1920s, it became a symbol of luxury. This cake is perfect for Christmas dessert recipes, bringing a touch of glamour to your festive table. The combination of flavors and textures makes it a standout choice for celebrations.
To make this cake even more special, consider using high-quality cocoa powder and dark chocolate. These ingredients enhance the flavor and give the cake a deeper richness. If you’re looking for a twist, try adding a splash of espresso to the batter for an extra kick.
Ingredients
- 1 ¾ cups all-purpose flour
- 1 ¾ cups granulated sugar
- ¾ cup unsweetened cocoa powder
- 1 ½ teaspoons baking powder
- 1 ½ teaspoons baking soda
- 1 teaspoon salt
- 2 large eggs
- 1 cup whole milk
- ½ cup vegetable oil
- 2 teaspoons vanilla extract
- 1 cup boiling water
- 1 cup heavy cream (for frosting)
- 8 ounces semi-sweet chocolate (for frosting)
- 1 cup powdered sugar
Instructions
- Preheat the oven to 350°F (175°C). Grease and flour two 9-inch round cake pans.
- In a large bowl, mix flour, sugar, cocoa powder, baking powder, baking soda, and salt.
- Add eggs, milk, oil, and vanilla. Beat on medium speed for 2 minutes. Stir in boiling water (the batter will be thin).
- Pour the batter evenly into the prepared pans. Bake for 30-35 minutes or until a toothpick comes out clean.
- Let the cakes cool in the pans for 10 minutes, then remove them from the pans and cool completely on a wire rack.
- For the frosting, heat the heavy cream until just boiling. Pour it over the chopped chocolate and let it sit for 5 minutes. Stir until smooth, then mix in the powdered sugar.
- Once the cakes are cool, spread frosting between the layers and on top. Decorate with chocolate curls if desired.
Cooking Tip: If you want a lighter cake, substitute half of the all-purpose flour with cake flour. For a dairy-free option, use almond milk and coconut cream for the frosting.
Flaky Apple Turnovers: A Delicious Handheld Treat
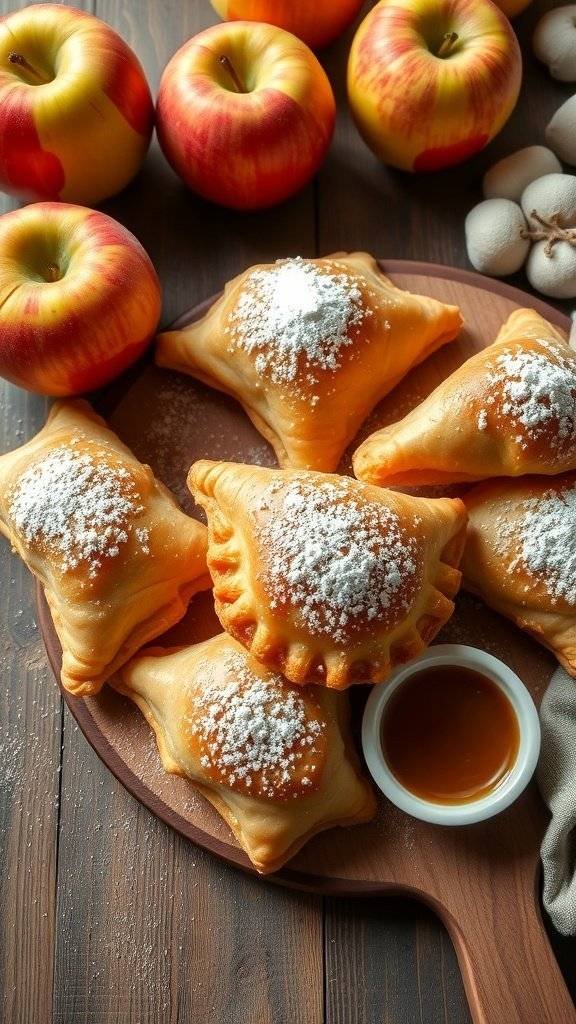
Flaky apple turnovers are a delightful nod to the 1920s, bringing a touch of nostalgia to your holiday table. These handheld treats are perfect for Christmas dessert recipes, combining the sweetness of apples with a buttery, flaky crust. The image showcases golden-brown turnovers dusted with powdered sugar, surrounded by fresh, vibrant apples, hinting at the delicious filling inside.
Making these turnovers is a fun and rewarding experience. You can use store-bought puff pastry for convenience or make your own for a more authentic touch. The filling can be customized with spices like cinnamon and nutmeg, making them even more festive.
Ingredients
- 2 cups peeled and diced apples (Granny Smith or Honeycrisp work well)
- 1/2 cup granulated sugar
- 1 teaspoon ground cinnamon
- 1 tablespoon lemon juice
- 1 tablespoon cornstarch
- 1 package (17.3 oz) frozen puff pastry, thawed
- 1 egg, beaten (for egg wash)
- Powdered sugar for dusting
Instructions
- Prepare the Filling: In a bowl, combine diced apples, granulated sugar, cinnamon, lemon juice, and cornstarch. Mix well and set aside.
- Preheat the Oven: Preheat your oven to 400°F (200°C). Line a baking sheet with parchment paper.
- Roll Out the Pastry: On a floured surface, roll out the puff pastry sheets. Cut each sheet into squares, about 4×4 inches.
- Fill the Pastry: Place a spoonful of the apple filling in the center of each square. Fold the pastry over to form a triangle and seal the edges with a fork.
- Brush with Egg Wash: Place the turnovers on the baking sheet. Brush the tops with the beaten egg for a golden finish.
- Bake: Bake for 20-25 minutes or until golden brown. Remove from the oven and let cool slightly.
- Serve: Dust with powdered sugar before serving. Enjoy your delicious apple turnovers!
Cooking Tips: If you want a richer flavor, add a pinch of nutmeg to the filling. For a healthier option, use less sugar or substitute with honey. You can also try different fruits like pears or berries for variety.
Maple Pudding: A Sweet Tribute To Tradition
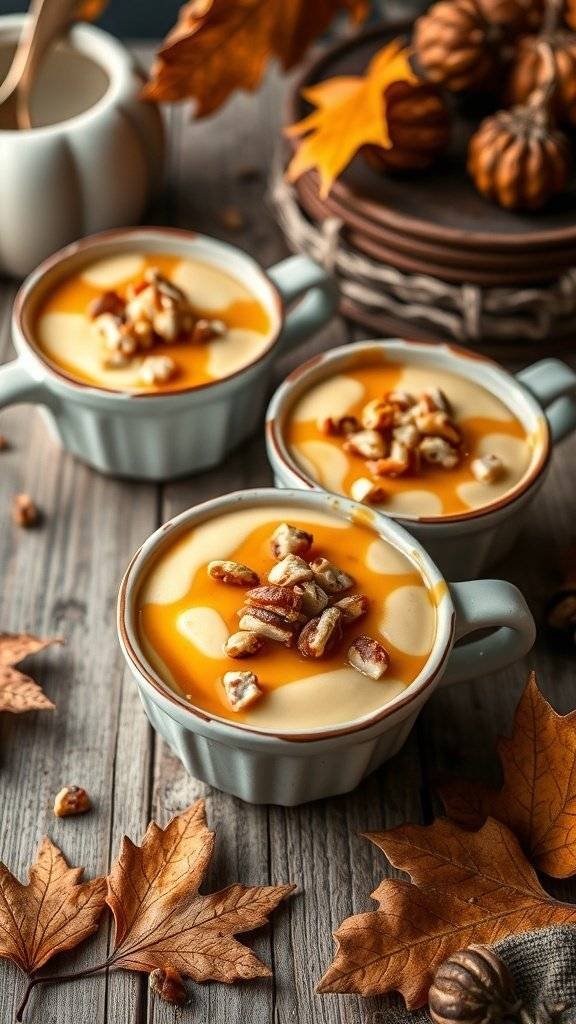
Maple pudding is a delightful dessert that pays homage to the classic flavors of the 1920s. This creamy treat, served in charming little bowls, captures the essence of cozy gatherings during the holiday season. The warm tones of the pudding, topped with crunchy pecans and a drizzle of syrup, evoke a sense of nostalgia and comfort.
To make this pudding, you’ll need simple ingredients that come together beautifully. The rich maple flavor shines through, making it a perfect addition to your Christmas dessert recipes. Whether enjoyed after a festive meal or as a sweet snack, this pudding is sure to impress.
Ingredients
- 2 cups whole milk
- 1/2 cup maple syrup
- 1/4 cup granulated sugar
- 1/4 cup cornstarch
- 1/4 teaspoon salt
- 1 teaspoon vanilla extract
- 1/2 cup chopped pecans (for topping)
- Extra maple syrup (for drizzling)
Instructions
- Combine Ingredients: In a medium saucepan, whisk together the milk, maple syrup, sugar, cornstarch, and salt. Stir until smooth.
- Cook the Mixture: Place the saucepan over medium heat. Continuously stir until the mixture thickens and comes to a gentle boil, about 5-7 minutes.
- Add Vanilla: Once thickened, remove from heat and stir in the vanilla extract.
- Chill: Pour the pudding into individual serving bowls. Let it cool at room temperature for a bit, then refrigerate for at least 2 hours until set.
- Serve: Before serving, top with chopped pecans and a drizzle of maple syrup for added sweetness.
Cooking Tips: If you prefer a richer flavor, consider using half-and-half instead of whole milk. For a nut-free version, simply omit the pecans. This pudding can also be made ahead of time, making it a convenient choice for holiday gatherings!
Cherry Jubilee: A Flamboyant Finale
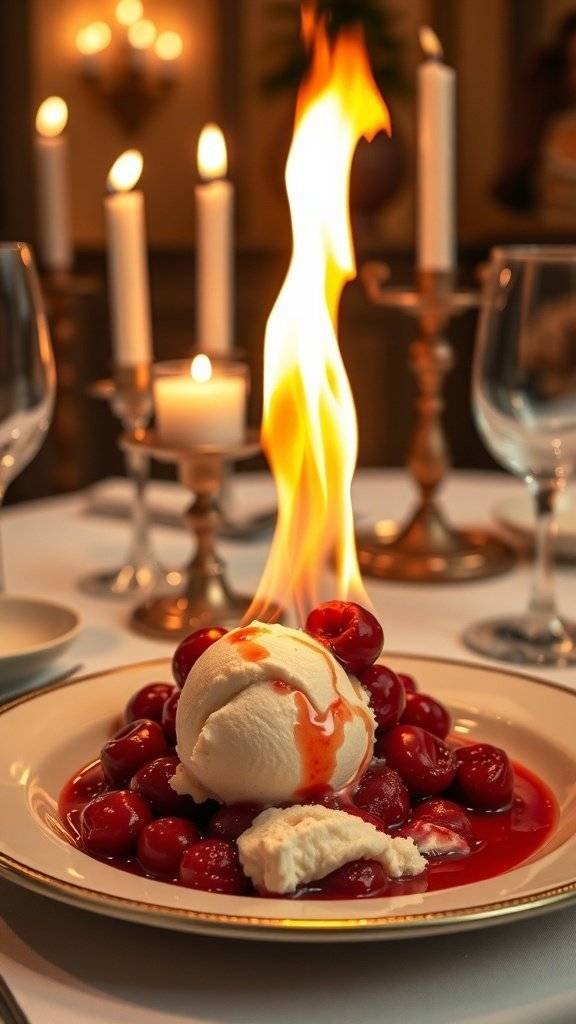
Cherry Jubilee is a classic dessert that brings a touch of flair to any holiday table. This dish is all about the dramatic presentation, featuring cherries flambéed in brandy and served over vanilla ice cream. The vibrant colors and the flames make it a showstopper, perfect for Christmas celebrations.
To create this festive treat, you’ll need fresh or jarred cherries, sugar, brandy, and vanilla ice cream. The combination of sweet cherries and creamy ice cream is simply irresistible. Plus, the flambé adds a fun twist that will impress your guests.
When preparing Cherry Jubilee, be sure to have a lighter handy for the flambé. If you’re not comfortable with flames, you can skip this step and simply serve the cherries warm over ice cream. You can also substitute the brandy with rum or even a non-alcoholic syrup if you prefer a family-friendly version.
Ingredients
- 2 cups fresh or jarred cherries, pitted
- 1/2 cup granulated sugar
- 1/4 cup brandy (or rum for a substitute)
- 1 pint vanilla ice cream
- 1 tablespoon lemon juice
Instructions
- Prepare the Cherries: In a saucepan, combine cherries, sugar, and lemon juice. Cook over medium heat until the cherries are soft and the sugar has dissolved, about 5-7 minutes.
- Flambé: Carefully add the brandy to the pan. Using a long lighter, ignite the brandy to flambé the cherries. Allow the flames to subside as the alcohol burns off.
- Serve: Scoop vanilla ice cream into bowls. Spoon the warm cherry mixture over the ice cream and serve immediately.
Cooking Tips: If using fresh cherries, make sure they are ripe for the best flavor. For a sweeter dish, adjust the sugar to your taste. If you want to make this dessert ahead of time, prepare the cherry mixture and store it in the fridge. Just warm it up before serving!
Classic Sugar Cookies: Sweet Simplicity

Classic sugar cookies are a timeless treat, perfect for the holiday season. Inspired by the 1920s, these cookies bring a touch of nostalgia to your Christmas dessert recipes. Their simple yet delightful flavor makes them a favorite among many.
The image showcases beautifully decorated sugar cookies in festive shapes. Each cookie is adorned with colorful icing and sprinkles, capturing the spirit of Christmas. The vibrant reds and greens, along with the classic star and tree shapes, make them a perfect addition to any holiday gathering.
Making sugar cookies is easy and fun, especially when decorating them with family or friends. You can personalize each cookie, making them unique and special. Let’s get started on this delightful recipe!
Ingredients
- 2 3/4 cups all-purpose flour
- 1 teaspoon baking soda
- 1/2 teaspoon baking powder
- 1 cup unsalted butter, softened
- 1 1/2 cups white sugar
- 1 egg
- 1 teaspoon vanilla extract
- 3 to 4 tablespoons milk
- 1/2 teaspoon salt
- Royal icing for decoration
- Colored sprinkles
Instructions
- Preheat the Oven: Start by preheating your oven to 375°F (190°C).
- Mix Dry Ingredients: In a bowl, combine flour, baking soda, baking powder, and salt. Set aside.
- Cream Butter and Sugar: In another bowl, cream together the softened butter and sugar until smooth. Beat in the egg and vanilla extract.
- Combine Mixtures: Gradually blend the dry ingredients into the wet mixture. If the dough is too dry, add milk one tablespoon at a time until it comes together.
- Roll and Cut: Roll out the dough on a floured surface to about 1/4 inch thick. Use cookie cutters to cut out shapes.
- Bake: Place cookies on an ungreased baking sheet and bake for 8 to 10 minutes, or until golden. Let them cool on a wire rack.
- Decorate: Once cooled, use royal icing and sprinkles to decorate your cookies as desired.
Cooking Tips: If you want a softer cookie, reduce the baking time slightly. For a fun twist, try adding almond extract for a different flavor. You can also substitute half of the butter with coconut oil for a unique taste.
Enjoy these classic sugar cookies as part of your Christmas dessert recipes, and share them with loved ones!
Bourbon Balls: A Cheerful Adult Treat
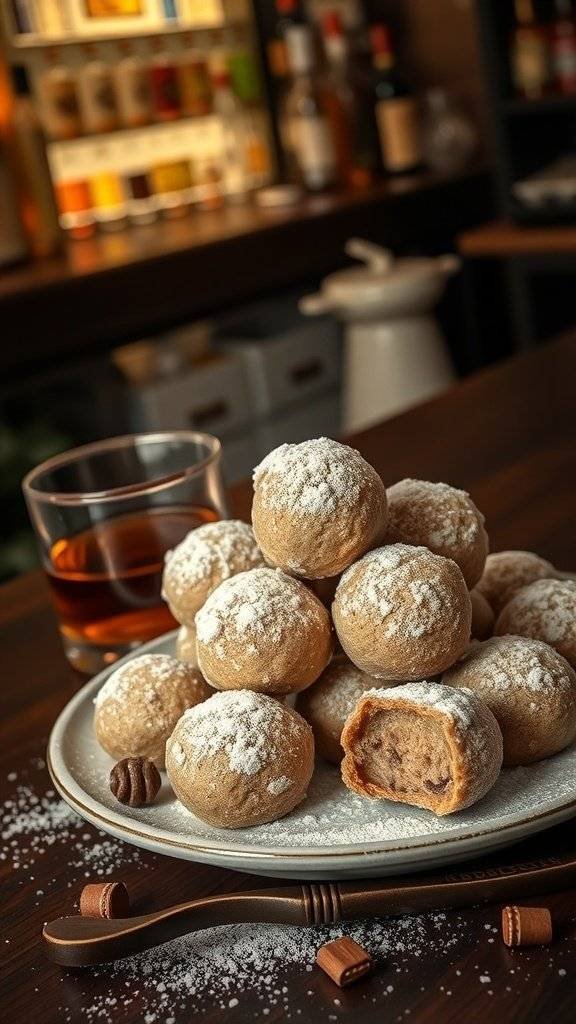
Bourbon balls are a delightful nod to the 1920s, a time when indulgence was key. These bite-sized treats are perfect for holiday gatherings, offering a sweet and spirited flavor that adults will love. The image captures a plate of these round delights, dusted with powdered sugar, sitting invitingly next to a glass of bourbon. The warm, cozy setting hints at festive celebrations, making them a must-try for your Christmas dessert recipes.
Making bourbon balls is simple and fun. You can enjoy them as a sweet treat or even gift them to friends. The combination of chocolate, nuts, and bourbon creates a rich flavor that’s hard to resist. Plus, they’re no-bake, which means less time in the kitchen and more time enjoying the festivities!
Ingredients
- 1 cup vanilla wafer crumbs
- 1 cup finely chopped pecans
- 1 cup powdered sugar
- 1/4 cup cocoa powder
- 1/4 cup bourbon
- 1/2 teaspoon vanilla extract
- Extra powdered sugar for dusting
Instructions
- Mix the Ingredients: In a large bowl, combine the vanilla wafer crumbs, chopped pecans, powdered sugar, and cocoa powder. Stir until well blended.
- Add Bourbon: Pour in the bourbon and vanilla extract. Mix until the mixture is moist and holds together.
- Shape the Balls: Using your hands, form small balls (about 1 inch in diameter) from the mixture. Place them on a baking sheet lined with parchment paper.
- Chill: Refrigerate the balls for at least 2 hours to firm up.
- Dust with Sugar: Once chilled, roll the balls in extra powdered sugar to coat them evenly.
Cooking Tips: If you prefer a less boozy flavor, reduce the bourbon slightly or add more vanilla extract. You can also substitute walnuts for pecans if you like. These bourbon balls can be stored in an airtight container in the fridge for up to two weeks, making them a great make-ahead option for your holiday celebrations!
Spiced Gingerbread Cake: A Festive Favorite
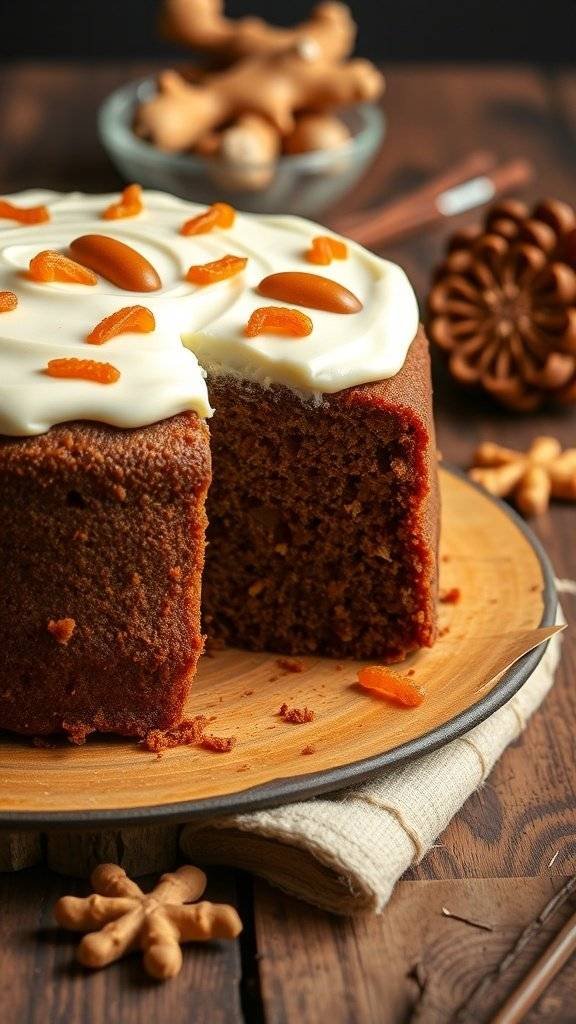
The spiced gingerbread cake is a delightful nod to the 1920s, a time when festive flavors took center stage during the holiday season. This cake, with its rich spices and warm aroma, captures the essence of Christmas dessert recipes from that era. The image showcases a beautifully frosted gingerbread cake, adorned with a touch of elegance from star anise and ginger pieces, making it a perfect centerpiece for any holiday gathering.
To make this cake, you’ll need simple ingredients that blend together to create a warm, spiced flavor. The combination of ginger, cinnamon, and nutmeg brings a nostalgic taste that many associate with Christmas. It’s not just about the flavor; the texture is moist and tender, making each bite a comforting experience.
When baking, consider using fresh spices for a more intense flavor. If you don’t have all the spices on hand, you can substitute with a pre-mixed gingerbread spice blend. For a dairy-free option, swap the butter with coconut oil and use almond milk instead of regular milk. This cake is versatile and can cater to various dietary needs.
Now, let’s get to the recipe!
Ingredients
- 2 cups all-purpose flour
- 1 teaspoon baking soda
- 1 teaspoon ground ginger
- 1 teaspoon ground cinnamon
- 1/2 teaspoon ground nutmeg
- 1/4 teaspoon salt
- 3/4 cup unsalted butter, softened
- 1 cup brown sugar, packed
- 1/2 cup molasses
- 2 large eggs
- 1 cup buttermilk
- 1 teaspoon vanilla extract
Instructions
- Preheat your oven to 350°F (175°C) and grease a 9-inch round cake pan.
- In a bowl, whisk together flour, baking soda, ginger, cinnamon, nutmeg, and salt.
- In another bowl, cream the softened butter and brown sugar until light and fluffy. Add molasses and mix well.
- Beat in the eggs one at a time, then stir in the buttermilk and vanilla extract.
- Gradually add the dry ingredients to the wet mixture, mixing until just combined.
- Pour the batter into the prepared cake pan and smooth the top.
- Bake for 30-35 minutes, or until a toothpick inserted into the center comes out clean.
- Let the cake cool in the pan for 10 minutes before transferring it to a wire rack to cool completely.
- Frost with cream cheese frosting or enjoy plain!
You may also like:
– Sinister Candy Station Ideas for an Unforgettable Halloween Party
– Gothic Hors D’Oeuvres To Impress Your Gotham Guests
– 21 Children’s Birthday Cakes Inspired by Gotham City
If you enjoyed this blog you can visit us or check out our other blogs and learn a bit about us.
Disclaimer: This blog post is inspired by fictional universes and characters created by their respective rights holders. All related content and imagery remain the property of their respective rights holder. This fan-inspired content is for entertainment and commentary purposes only and is not affiliated with or endorsed by HBO, Disney, Warner Bros., Lionsgate, or any other rights holders. To explore the official source material, please visit:
HBO