
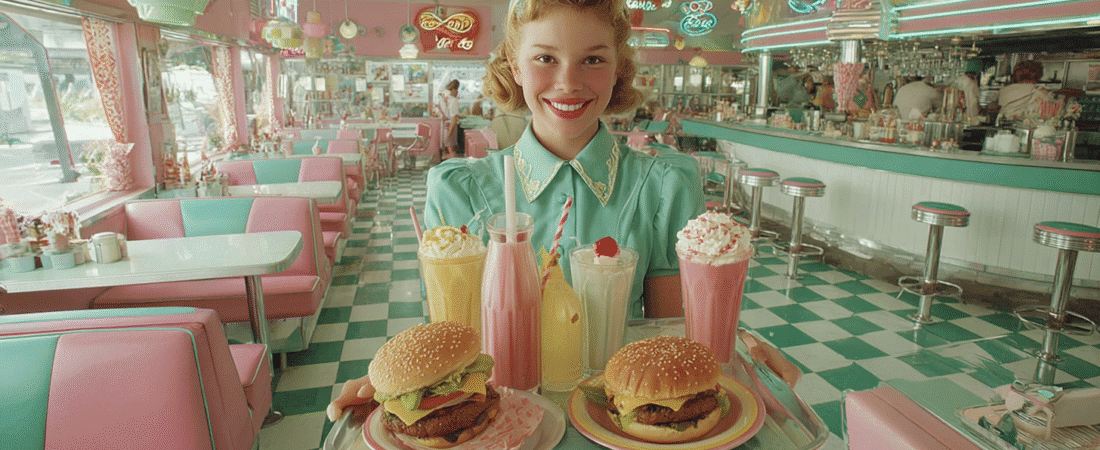
Nostalgic 1960’s Fast Food takes you back to the golden age of tasty drive-ins and classic burger joints where simple ingredients created unforgettable flavors. Picture juicy hamburgers, crispy fries, and thick milkshakes that defined a generation. Cooking up these retro favorites at home is easy with a few helpful tips: use fresh ground beef for your patties and try substituting regular potatoes with sweet potatoes for fries to add a twist. Whatever you choose, crank up the oldies and enjoy recreating those iconic meals!
Timeless Classic: The Perfect Cheeseburger Recipe
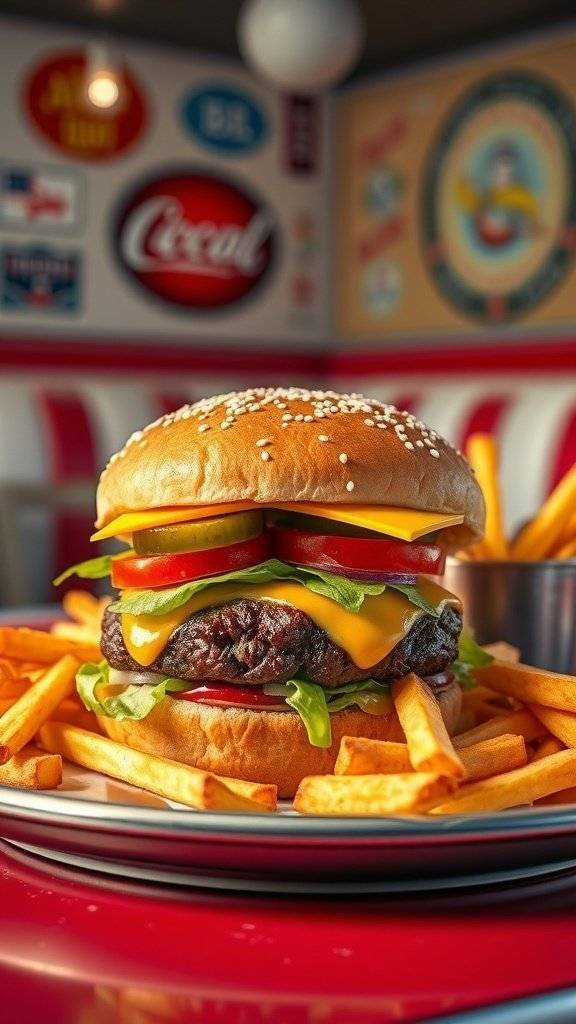
The cheeseburger is a true icon of Nostalgic 1960’s Fast Food. It brings back memories of classic diners and drive-ins, where the aroma of grilled patties filled the air. This image showcases a mouthwatering cheeseburger, stacked high with fresh toppings, nestled in a fluffy sesame seed bun. The vibrant colors of the lettuce, tomato, and cheese make it irresistible, while the crispy fries on the side complete the meal.
Making the perfect cheeseburger at home is easier than you think. With just a few simple ingredients, you can recreate that classic taste right in your kitchen. Let’s gather what you need and get cooking!
Ingredients
- 1 pound ground beef (80/20 blend for juiciness)
- 4 slices of cheddar cheese
- 4 sesame seed hamburger buns
- 1 cup lettuce, shredded
- 1 large tomato, sliced
- 1/2 cup pickles, sliced
- 1/4 cup ketchup
- 1/4 cup mustard
- Salt and pepper to taste
Instructions
- Prepare the Patties: In a bowl, season the ground beef with salt and pepper. Divide it into four equal portions and shape them into patties, making a slight indentation in the center to prevent puffing while cooking.
- Cook the Patties: Heat a grill or skillet over medium-high heat. Cook the patties for about 3-4 minutes on one side. Flip them and place a slice of cheese on top. Cook for another 3-4 minutes until the cheese is melted and the burgers reach your desired doneness.
- Toast the Buns: While the patties are cooking, toast the hamburger buns on the grill or in a toaster until golden brown.
- Assemble the Burgers: Spread ketchup and mustard on the bottom bun. Add the cooked patty with melted cheese, followed by lettuce, tomato, and pickles. Top with the other half of the bun.
- Serve: Plate your cheeseburgers with a side of crispy fries for a complete meal. Enjoy!
Cooking Tips: For a smoky flavor, try adding a dash of smoked paprika to the beef. If you prefer a leaner option, ground turkey or chicken can be used, but be sure to add some moisture like olive oil to keep them juicy. Feel free to customize your toppings with your favorites!
Retro Delight: Homemade Chicken Nuggets

Nostalgic 1960’s Fast Food brings back memories of simpler times, especially when it comes to comfort food like chicken nuggets. These golden bites are crispy on the outside and tender on the inside, making them a favorite for kids and adults alike.
Imagine a plate filled with perfectly fried nuggets, served with a side of dipping sauce. The vibrant colors and inviting aroma take you back to those classic diners where everyone gathered for a quick meal. Making homemade chicken nuggets is not only fun but also allows you to control the ingredients, ensuring a delicious and healthier option.
To make your own chicken nuggets, you’ll need just a few simple ingredients. You can even customize the seasoning to match your taste. Here’s how to whip up a batch that will remind you of those nostalgic fast-food days.
Ingredients
- 1 pound boneless, skinless chicken breasts, cut into bite-sized pieces
- 1 cup all-purpose flour
- 2 large eggs
- 1 cup breadcrumbs (Panko works great for extra crunch)
- 1 teaspoon garlic powder
- 1 teaspoon onion powder
- 1 teaspoon paprika
- Salt and pepper to taste
- Oil for frying
Instructions
- Prepare the Chicken: Season the chicken pieces with salt, pepper, garlic powder, onion powder, and paprika. Let them marinate for about 15 minutes.
- Set Up Breading Stations: In one bowl, place the flour. In a second bowl, beat the eggs. In a third bowl, add the breadcrumbs.
- Bread the Chicken: Dip each chicken piece first in flour, then in the egg, and finally coat with breadcrumbs. Make sure they are well covered.
- Heat the Oil: In a large skillet, heat about 1 inch of oil over medium heat. You can test if the oil is ready by dropping a small piece of bread into it; if it sizzles, it’s good to go.
- Fry the Nuggets: Carefully add the breaded chicken pieces to the hot oil in batches. Fry until golden brown, about 4-5 minutes per side. Remove and place on paper towels to drain excess oil.
- Serve: Enjoy your homemade chicken nuggets with your favorite dipping sauce!
Cooking Tips: For a healthier version, you can bake the nuggets instead of frying. Just place them on a baking sheet and spray lightly with cooking oil before baking at 400°F (200°C) for about 20 minutes, flipping halfway through.
Ingredient Substitutions: If you’re short on breadcrumbs, crushed cornflakes or even ground oats can work well. Feel free to experiment with different spices to create your own unique flavor!
Sizzling Treat: Classic Hot Dog With Toppings

The classic hot dog is a staple of nostalgic 1960’s fast food. Picture a perfectly grilled sausage nestled in a soft bun, topped with vibrant ketchup and mustard. This simple yet satisfying meal brings back memories of summer picnics and days at the ballpark.
Hot dogs are versatile. You can add toppings like diced onions, relish, or even chili for an extra kick. Each bite is a burst of flavor that takes you back to simpler times. Pair it with a side of crispy potato chips, and you have a meal that feels like a warm hug.
Making hot dogs at home is easy and fun. You can use store-bought sausages or make your own for a personal touch. The key is to grill them until they are juicy and slightly charred. Serve them with your favorite toppings and enjoy a taste of nostalgia.
Ingredients
- 4 hot dog sausages
- 4 hot dog buns
- Ketchup
- Mustard
- Diced onions (optional)
- Relish (optional)
- Potato chips for serving
Instructions
- Grill the sausages over medium heat for about 5-7 minutes, turning occasionally until they are heated through and have grill marks.
- While the sausages are grilling, warm the buns on the grill for about 1-2 minutes.
- Place each sausage in a bun and top with ketchup, mustard, and any additional toppings you like.
- Serve immediately with a side of potato chips.
Cooking Tips: For a smoky flavor, try grilling the sausages over charcoal. If you prefer a healthier option, turkey or veggie dogs work great too. You can also experiment with different types of buns, like whole wheat or pretzel buns, for a unique twist.
Ingredient Substitutions: If you want to skip the grill, you can boil or microwave the hot dogs. For toppings, feel free to get creative with salsas or even avocado for a fresh touch.
Sweet Nostalgia: Old-Fashioned Milkshake Recipe
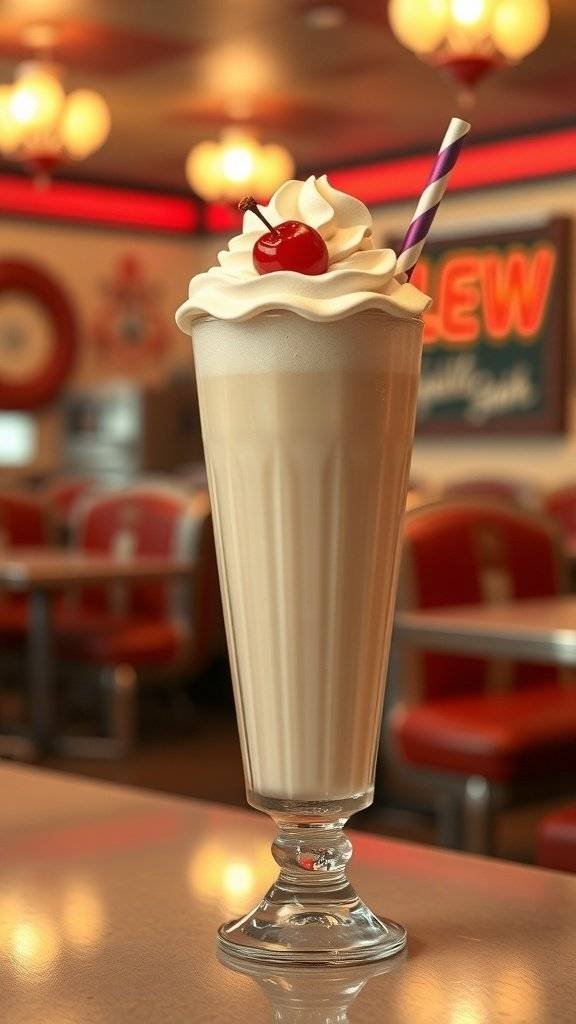
There’s something special about a classic milkshake that takes us back to the nostalgic 1960’s fast food era. Picture yourself in a retro diner, surrounded by bright red booths and cheerful decor. The sound of a blender whirring fills the air, and soon enough, a tall glass of creamy goodness arrives at your table. Topped with whipped cream and a cherry, it’s a treat that never goes out of style.
This old-fashioned milkshake is simple to make and perfect for any occasion. Whether you’re reminiscing about the good old days or just craving something sweet, this recipe will hit the spot.
Ingredients
- 2 cups vanilla ice cream
- 1 cup whole milk
- 1 teaspoon vanilla extract
- Whipped cream for topping
- Maraschino cherry for garnish
Instructions
- Blend the Ice Cream: In a blender, combine the vanilla ice cream, whole milk, and vanilla extract. Blend until smooth and creamy.
- Adjust Consistency: If you prefer a thicker shake, add more ice cream. For a thinner shake, add a bit more milk.
- Serve: Pour the milkshake into a tall glass. Top with whipped cream and place a cherry on top.
- Enjoy: Grab a straw and enjoy your delicious milkshake, just like they did in the 1960s!
Cooking Tip: For a chocolate twist, swap out some of the vanilla ice cream for chocolate ice cream. You can also add a tablespoon of chocolate syrup for extra flavor.
Ingredient Substitution: If you’re looking for a dairy-free option, use almond milk and dairy-free ice cream. This way, everyone can enjoy a taste of nostalgia!
Easy Comfort: Classic Macaroni And Cheese
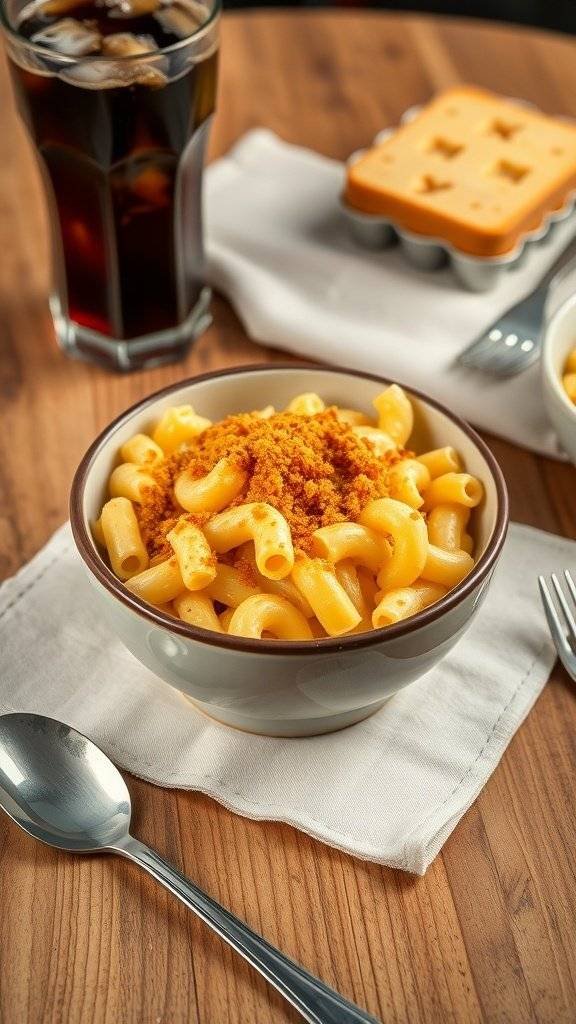
Classic macaroni and cheese is a staple of nostalgic 1960’s fast food. This dish brings back memories of family dinners and cozy nights in. The creamy cheese sauce over perfectly cooked pasta is pure comfort food. In the image, you can see a bowl of macaroni topped with a sprinkle of seasoning, ready to be enjoyed with a refreshing drink.
This dish is not just about taste; it’s about the warmth and happiness it brings. Whether you’re enjoying it at home or grabbing it from a fast-food joint, macaroni and cheese has a special place in our hearts. It’s simple, satisfying, and always hits the spot.
Want to make your own classic macaroni and cheese? Here’s a quick and easy recipe!
Ingredients
- 8 ounces elbow macaroni
- 2 cups shredded sharp cheddar cheese
- 1/2 cup grated Parmesan cheese
- 3 cups milk
- 1/4 cup butter
- 1/4 cup all-purpose flour
- 1/2 teaspoon salt
- 1/4 teaspoon black pepper
- 1/4 teaspoon paprika (optional)
Instructions
- Cook the Pasta: In a large pot, bring salted water to a boil. Add the elbow macaroni and cook according to package instructions until al dente. Drain and set aside.
- Make the Cheese Sauce: In the same pot, melt the butter over medium heat. Stir in the flour, salt, and pepper, cooking for about 1 minute. Gradually whisk in the milk, stirring constantly until the mixture thickens.
- Add the Cheese: Remove the pot from heat and stir in the cheddar and Parmesan cheeses until melted and smooth.
- Combine: Add the cooked macaroni to the cheese sauce, stirring until well coated.
- Serve: Spoon the macaroni and cheese into bowls, sprinkle with paprika if desired, and enjoy!
Cooking Tips: For a creamier texture, use whole milk or add a splash of heavy cream. You can also mix in cooked vegetables like broccoli or peas for added nutrition. If you prefer a crunchy topping, sprinkle breadcrumbs on top and bake at 350°F (175°C) for 20 minutes.
Ingredient Substitutions: If you don’t have sharp cheddar, feel free to use any cheese you like. Gouda or mozzarella can work well too. For a gluten-free option, use gluten-free pasta and flour.
Golden Crunch: Fried Chicken With A Southern Twist
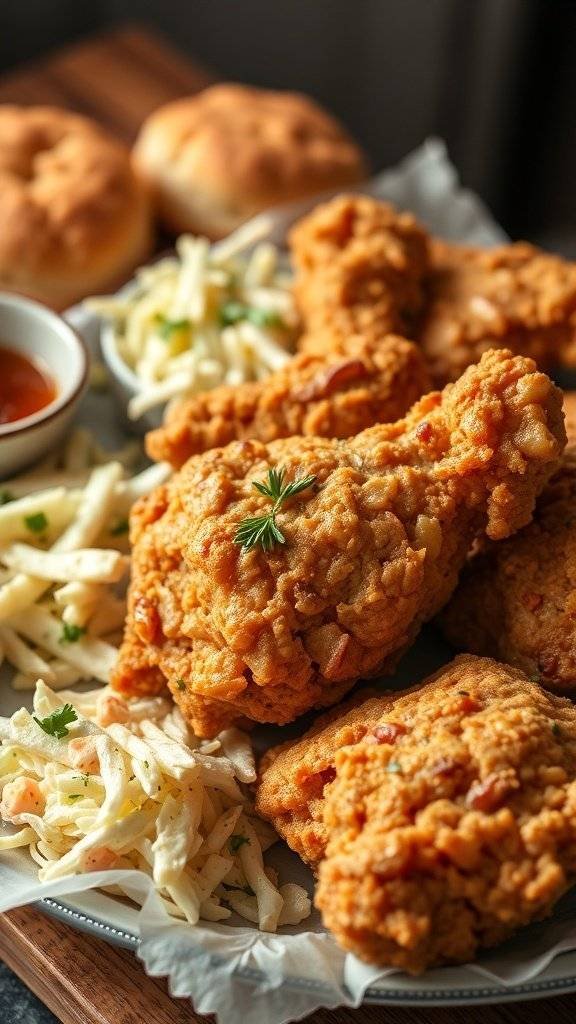
Fried chicken is a classic comfort food, especially when it comes with a Southern twist. The crispy, golden-brown coating gives way to juicy, tender meat that’s simply irresistible. This dish takes you back to the nostalgic 1960’s fast food scene, where fried chicken was a staple on every menu.
In the image, you can see a plate piled high with perfectly fried chicken pieces, surrounded by creamy coleslaw and soft, fluffy biscuits. The coleslaw adds a refreshing crunch, balancing the richness of the chicken. It’s a meal that brings warmth and joy, perfect for family gatherings or a casual dinner.
Making fried chicken at home is easier than you might think. With just a few ingredients and some simple steps, you can recreate this nostalgic dish in your own kitchen. Let’s get cooking!
Ingredients
- 4 chicken thighs and drumsticks
- 1 cup buttermilk
- 1 cup all-purpose flour
- 1 teaspoon paprika
- 1 teaspoon garlic powder
- 1 teaspoon onion powder
- Salt and pepper to taste
- Vegetable oil for frying
- Coleslaw mix (for serving)
- Biscuits (for serving)
Instructions
- Marinate the Chicken: In a bowl, soak the chicken pieces in buttermilk for at least 2 hours, or overnight for best results. This helps tenderize the meat.
- Prepare the Coating: In another bowl, mix flour, paprika, garlic powder, onion powder, salt, and pepper.
- Coat the Chicken: Remove the chicken from the buttermilk, letting the excess drip off. Dredge each piece in the flour mixture, ensuring it’s well coated.
- Heat the Oil: In a deep skillet, heat about 1 inch of vegetable oil over medium-high heat. You can test if it’s ready by dropping a small piece of batter into the oil; it should sizzle.
- Fry the Chicken: Carefully place the chicken pieces in the hot oil. Fry for about 10-12 minutes on each side, or until golden brown and cooked through. Use a meat thermometer to ensure the internal temperature reaches 165°F (75°C).
- Drain and Serve: Once cooked, transfer the chicken to a plate lined with paper towels to drain excess oil. Serve with coleslaw and warm biscuits.
Cooking Tips: For extra crunch, double-dip the chicken by repeating the coating process. If you don’t have buttermilk, you can make a substitute by mixing milk with a tablespoon of vinegar or lemon juice and letting it sit for 5 minutes.
Ingredient Substitutions: You can use any part of the chicken you prefer. For a spicier kick, add cayenne pepper to the flour mixture. If you’re looking for a healthier option, try baking the chicken instead of frying.
Classic Flavor: Homemade French Fries
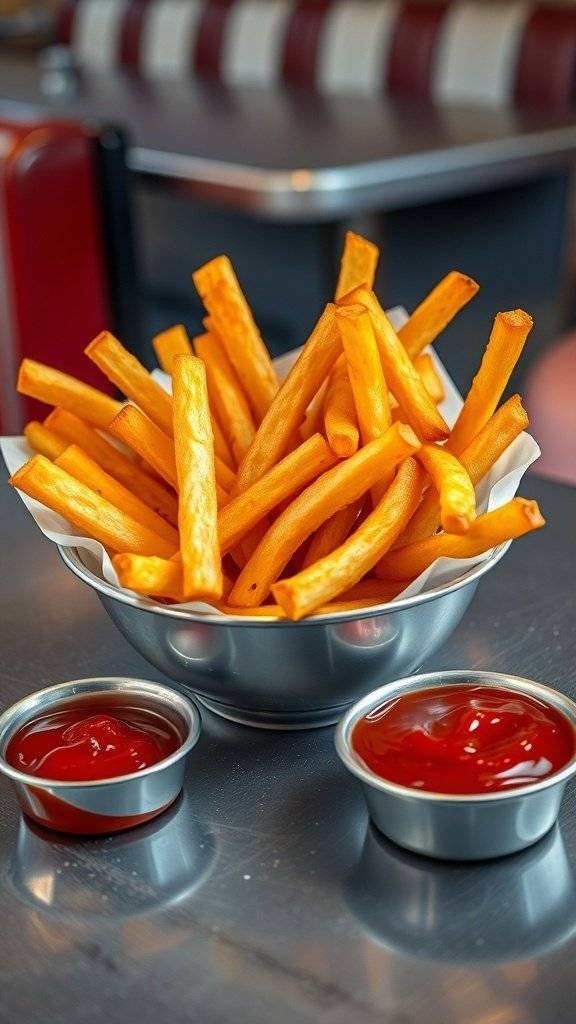
Nothing screams Nostalgic 1960’s Fast Food like a basket of crispy homemade French fries. These golden delights are a staple at diners and drive-ins, bringing back memories of carefree days and classic meals. The perfect crunch on the outside and a soft, fluffy interior make them irresistible.
Making French fries at home is simple and fun. You can customize them to your liking, whether you prefer them thin and crispy or thick and hearty. Pair them with your favorite dipping sauces, like ketchup or mayo, for that authentic fast-food experience.
Here’s how to whip up a batch of these classic fries:
Ingredients
- 4 large russet potatoes
- Vegetable oil for frying
- Salt to taste
- Optional: garlic powder, paprika, or your favorite seasoning
Instructions
- Prep the Potatoes: Start by peeling the potatoes and cutting them into even strips. Aim for about 1/4 inch thick for that classic fry shape.
- Soak: Place the cut potatoes in a bowl of cold water for at least 30 minutes. This helps remove excess starch and makes them crispier.
- Dry: Drain the potatoes and pat them dry with a clean kitchen towel. Moisture can cause the oil to splatter.
- Heat the Oil: In a deep pot or fryer, heat the vegetable oil to 350°F (175°C). Use enough oil to fully submerge the fries.
- Fry: Carefully add the potatoes in batches, frying for about 5-7 minutes or until golden brown. Avoid overcrowding the pot.
- Drain: Remove the fries with a slotted spoon and place them on paper towels to drain excess oil. Sprinkle with salt and any additional seasonings while they’re still hot.
- Serve: Enjoy your homemade fries with ketchup or your favorite dipping sauce!
Cooking Tips: For extra flavor, try soaking the fries in vinegar water for 30 minutes before frying. If you want to bake them instead, toss the cut potatoes in olive oil and seasonings, then bake at 425°F (220°C) for about 30-35 minutes, flipping halfway through.
Ingredient Substitutions: If you’re out of russet potatoes, you can use Yukon Golds for a creamier texture. For frying, canola or peanut oil works well too.
Deliciously Sweet: Classic Apple Pie

Nothing screams Nostalgic 1960’s Fast Food like a classic apple pie. This dessert brings back memories of family gatherings and cozy diners. The golden crust, filled with sweet, spiced apples, is a timeless treat that warms the heart.
Picture this: a freshly baked apple pie cooling on the windowsill, surrounded by bright red apples and cinnamon sticks. The aroma wafts through the air, inviting everyone to grab a slice. It’s a simple pleasure that never goes out of style.
Making a classic apple pie is easier than you might think. With just a few ingredients, you can create a dessert that feels special. Plus, it’s a great way to use up those seasonal apples!
Ingredients
- 2 ½ cups all-purpose flour
- 1 teaspoon salt
- 1 tablespoon granulated sugar
- 1 cup unsalted butter, chilled and diced
- 6 to 8 tablespoons ice water
- 6 to 8 apples, peeled, cored, and sliced
- ¾ cup granulated sugar
- 2 tablespoons all-purpose flour
- 1 teaspoon ground cinnamon
- 1 tablespoon lemon juice
- 1 tablespoon butter
Instructions
- Make the Crust: In a large bowl, mix flour, salt, and sugar. Cut in butter until the mixture resembles coarse crumbs. Stir in ice water, a tablespoon at a time, until the dough comes together. Divide into two balls, wrap in plastic, and chill for at least 1 hour.
- Prepare the Filling: In another bowl, combine sliced apples, sugar, flour, cinnamon, and lemon juice. Toss until apples are well coated.
- Roll Out the Dough: On a floured surface, roll out one ball of dough to fit a 9-inch pie pan. Place it in the pan and fill with the apple mixture. Dot with butter.
- Top the Pie: Roll out the second dough ball and place it over the filling. Seal the edges and cut slits in the top for steam to escape.
- Bake: Preheat the oven to 425°F (220°C). Bake for 15 minutes, then reduce the temperature to 350°F (175°C) and bake for an additional 35-45 minutes, or until the apples are soft and the crust is golden brown.
- Cool and Serve: Let the pie cool for a bit before slicing. Serve warm with a scoop of vanilla ice cream for an extra treat!
Cooking Tips: Use a mix of sweet and tart apples for depth of flavor. If you want a sweeter pie, adjust the sugar in the filling to your taste. For a flaky crust, handle the dough as little as possible.
Ingredient Substitutions: If you don’t have unsalted butter, salted butter works fine. You can also use pre-made pie crusts if you’re short on time.
Creamy Indulgence: Vintage Banana Split

The banana split is a classic treat that takes us back to the nostalgic 1960’s fast food scene. Picture a perfectly ripe banana, sliced in half, cradling scoops of creamy ice cream. The combination of flavors and textures makes this dessert a timeless favorite.
In the image, you can see a delightful banana split topped with three generous scoops of ice cream, drizzled with rich chocolate and vibrant strawberry sauces. A fresh strawberry adds a pop of color, making it as pleasing to the eye as it is to the palate.
This dessert is not just about taste; it’s about the experience. Sharing a banana split with friends or family brings back memories of carefree days spent at the local diner. It’s a sweet reminder of simpler times.
Ingredients
- 1 ripe banana
- 3 scoops of your favorite ice cream (vanilla, chocolate, and strawberry work well)
- 1/4 cup chocolate syrup
- 1/4 cup strawberry syrup
- Whipped cream
- Maraschino cherries for topping
- Chopped nuts (optional)
Instructions
- Slice the banana in half lengthwise and place it in a serving dish.
- Place the scoops of ice cream between the banana halves.
- Drizzle chocolate syrup and strawberry syrup over the ice cream.
- Add a generous dollop of whipped cream on top.
- Finish with a maraschino cherry and chopped nuts if desired.
Cooking Tips: If you want to mix it up, try different flavors of ice cream or add toppings like crushed cookies or sprinkles. For a healthier twist, use frozen yogurt instead of ice cream.
Ingredient Substitutions: If you don’t have chocolate or strawberry syrup, caramel sauce or peanut butter can be delicious alternatives. You can also use fresh fruit instead of syrup for a lighter option.
Classic Refreshment: Root Beer Float

The root beer float is a classic drink that takes us back to the nostalgic 1960’s fast food scene. Imagine a tall glass filled with creamy vanilla ice cream, topped with frothy root beer. The combination of the sweet, bubbly soda and the rich ice cream creates a delightful treat that’s hard to resist.
In the 1960s, diners and drive-ins were the places to be. Families would gather to enjoy burgers and fries, and a root beer float was the perfect way to cool down. The sight of a frosty glass, complete with a cherry on top, brings back memories of simpler times.
Making a root beer float is easy and fun. You can customize it by adding whipped cream or even a drizzle of chocolate syrup. It’s a drink that brings joy to both kids and adults alike. So, let’s whip up this classic refreshment!
Ingredients
- 1 cup root beer
- 2 scoops vanilla ice cream
- Whipped cream (optional)
- Maraschino cherry (for garnish)
Instructions
- Start by filling a tall glass halfway with root beer.
- Add two scoops of vanilla ice cream on top of the root beer.
- Pour more root beer over the ice cream until the glass is full.
- If you like, top with whipped cream and a maraschino cherry.
- Serve immediately with a straw and a spoon!
Cooking Tips: For a twist, try using different flavored ice creams like chocolate or even coffee. If you want a less sweet version, opt for a diet root beer. Enjoy this classic treat on a hot day or whenever you need a little pick-me-up!
Savory Snack: Tasty Onion Rings

Onion rings are a classic treat that takes us back to the nostalgic 1960’s fast food scene. These crispy, golden delights are often served with a side of zesty dipping sauce, making them a perfect snack or side dish. The crunch of the batter paired with the sweet onion inside creates a satisfying experience that many still crave today.
Making onion rings at home is easier than you might think. You can enjoy them fresh and hot, just like at your favorite diner. Plus, they’re a fun treat for gatherings or movie nights!
Ingredients
- 2 large onions
- 1 cup all-purpose flour
- 1 cup buttermilk
- 1 cup breadcrumbs (panko works great)
- 1 teaspoon paprika
- 1 teaspoon garlic powder
- Salt and pepper to taste
- Oil for frying
Instructions
- Prepare the Onions: Slice the onions into thick rings and separate them into individual rings.
- Make the Batter: In a bowl, mix flour, paprika, garlic powder, salt, and pepper. In another bowl, pour the buttermilk.
- Coat the Rings: Dip each onion ring into the flour mixture, then into the buttermilk, and back into the flour mixture for a thick coating.
- Breadcrumb Coating: Roll the coated rings in breadcrumbs until well covered.
- Heat the Oil: In a deep pan, heat oil to 350°F (175°C). You can test if it’s ready by dropping a small piece of batter in; it should sizzle.
- Fry the Rings: Carefully place a few onion rings in the hot oil and fry until golden brown, about 2-3 minutes. Remove and drain on paper towels.
- Serve: Enjoy your onion rings hot with your favorite dipping sauce!
Cooking Tips: For extra crunch, double coat the onion rings by repeating the dipping process. If you want a healthier option, try baking them instead of frying. Just spray them with oil and bake at 425°F (220°C) until crispy.
Ingredient Substitutions: If you don’t have buttermilk, you can make a substitute by mixing regular milk with a tablespoon of vinegar or lemon juice. For a gluten-free version, use gluten-free flour and breadcrumbs.
Classic Comfort: Tomato Soup With Grilled Cheese
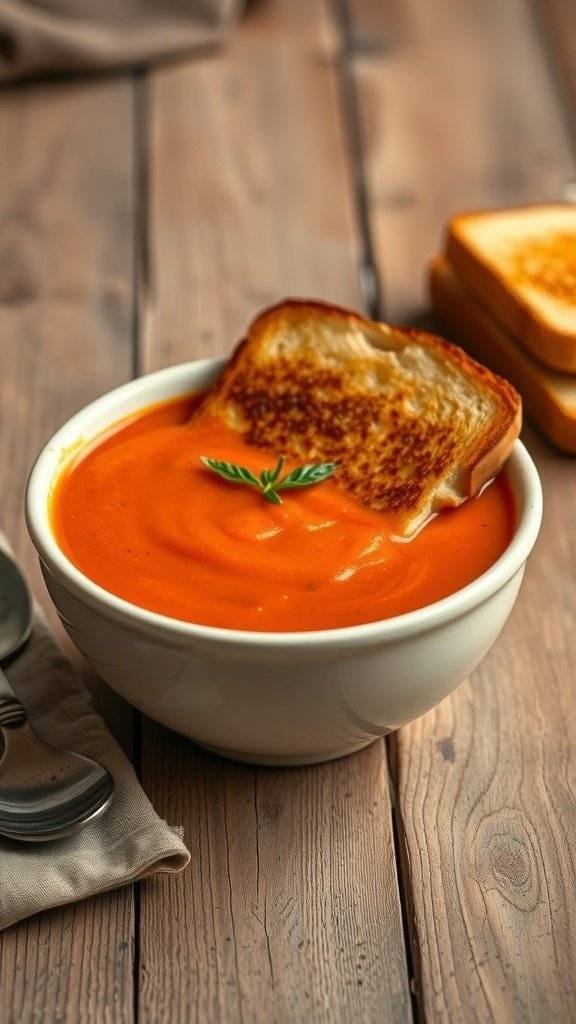
Tomato soup and grilled cheese is a classic combo that takes many of us back to simpler times. This dish is a staple in many homes, especially during the 1960s. The vibrant orange of the soup paired with the golden-brown toast creates a visual feast. The warm, creamy soup invites you to dip that crispy grilled cheese, making every bite a delightful experience.
Making this dish is straightforward and fun. The rich flavors of the tomato soup blend perfectly with the gooey cheese and crunchy bread. It’s comfort food at its best, reminding us of cozy family dinners and lazy weekends.
Ingredients
- 1 can (28 oz) crushed tomatoes
- 1 cup vegetable broth
- 1 medium onion, chopped
- 2 cloves garlic, minced
- 1 teaspoon sugar
- 1 teaspoon dried basil
- Salt and pepper to taste
- 1/2 cup heavy cream (optional)
- 4 slices of bread
- 4 slices of cheese (cheddar or your choice)
- 2 tablespoons butter
Instructions
- Cook the Base: In a pot, sauté the chopped onion and minced garlic in a little olive oil until soft. Add the crushed tomatoes, vegetable broth, sugar, and dried basil. Season with salt and pepper. Let it simmer for about 15 minutes.
- Blend the Soup: For a smooth texture, use an immersion blender or transfer the soup to a blender. If you like it creamy, stir in the heavy cream after blending.
- Make the Grilled Cheese: While the soup simmers, butter one side of each slice of bread. Place cheese between two slices, buttered sides out. Cook in a skillet over medium heat until golden brown on both sides and the cheese is melted.
- Serve: Ladle the hot soup into bowls and serve with the grilled cheese on the side. Enjoy the perfect dip!
Cooking Tips: If you want to add some extra flavor, consider adding a pinch of red pepper flakes for a bit of heat. For a healthier option, use whole grain bread and low-fat cheese. You can also substitute the heavy cream with coconut milk for a dairy-free version.
Decadent Treat: Chocolate Chip Cookies

Chocolate chip cookies are a classic treat that brings back memories of the 1960s fast food scene. Picture a cozy kitchen filled with the warm aroma of freshly baked cookies, a staple in many homes during that time. These cookies are soft, chewy, and loaded with chocolate chips, making them a perfect snack or dessert.
The image shows a delightful stack of chocolate chip cookies, golden brown and topped with even more chocolate chips. A glass of milk sits nearby, ready to complement this sweet indulgence. This combination is a nostalgic reminder of simpler times, where sharing cookies with friends and family was a cherished moment.
Making chocolate chip cookies is easy and fun. You can whip up a batch for any occasion, whether it’s a family gathering or just a cozy night in.
Ingredients
- 2 1/4 cups all-purpose flour
- 1/2 teaspoon baking soda
- 1 cup unsalted butter, softened
- 3/4 cup granulated sugar
- 3/4 cup brown sugar, packed
- 1 teaspoon salt
- 2 teaspoons vanilla extract
- 2 large eggs
- 2 cups chocolate chips
Instructions
- Preheat the oven to 350°F (175°C).
- In a bowl, mix flour and baking soda. Set aside.
- In another bowl, cream together the softened butter, granulated sugar, brown sugar, and salt until smooth.
- Add vanilla and eggs, mixing well.
- Gradually add the flour mixture, stirring until just combined. Fold in the chocolate chips.
- Drop spoonfuls of dough onto a baking sheet lined with parchment paper.
- Bake for 10-12 minutes until the edges are golden. Let cool on the baking sheet for a few minutes before transferring to a wire rack.
Cooking Tips: For a chewier cookie, chill the dough for at least 30 minutes before baking. You can also substitute half of the chocolate chips with nuts for added crunch.
Enjoy these cookies with a glass of milk, and let the nostalgia of 1960’s fast food fill your heart!
Tasty Tradition: Homemade Sloppy Joes
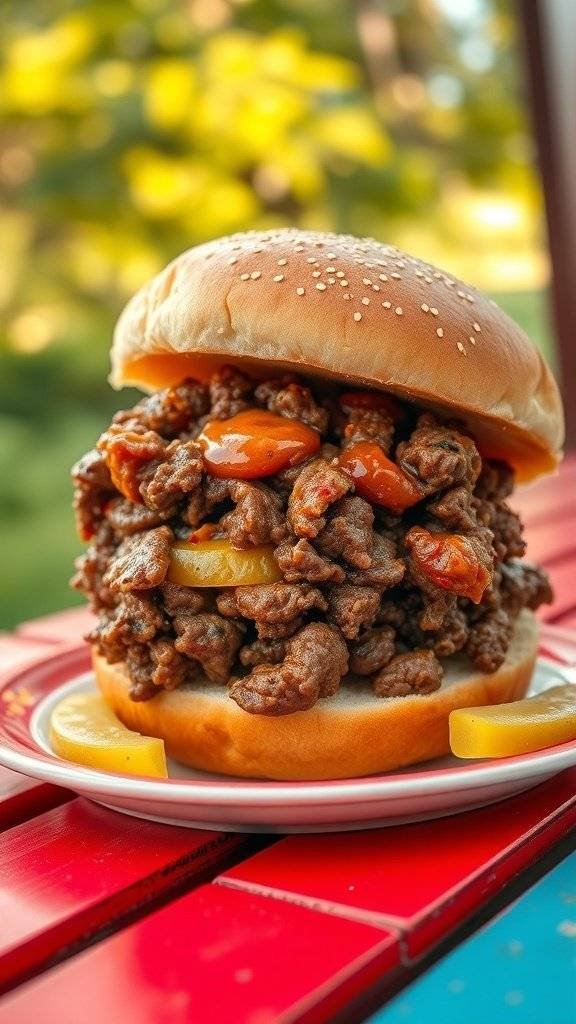
Nostalgic 1960’s fast food brings back memories of simpler times, and homemade Sloppy Joes are a classic dish that fits right into that vibe. These messy, flavorful sandwiches are perfect for casual gatherings or a cozy night in. The combination of seasoned ground beef, tangy sauce, and soft buns creates a delightful experience that many remember fondly.
The image captures a hearty Sloppy Joe, overflowing with seasoned meat and topped with colorful peppers. It’s served on a sesame seed bun, making it a visual treat that promises a burst of flavor with every bite. This dish is not just about taste; it’s about the nostalgia it brings, reminding us of family dinners and backyard barbecues from the 1960s.
Making Sloppy Joes at home is easy and allows for personal touches. You can adjust the spices or add your favorite toppings to make it your own. Plus, it’s a great way to introduce this classic to a new generation.
Ingredients
- 1 pound ground beef
- 1 small onion, chopped
- 1 bell pepper, chopped
- 1 cup ketchup
- 2 tablespoons Worcestershire sauce
- 1 tablespoon brown sugar
- 1 teaspoon garlic powder
- 1 teaspoon mustard
- Salt and pepper to taste
- 4 hamburger buns
- Sliced pickles (optional)
Instructions
- Cook the Beef: In a large skillet over medium heat, brown the ground beef with the chopped onion and bell pepper until the meat is no longer pink. Drain excess fat.
- Add the Sauce: Stir in the ketchup, Worcestershire sauce, brown sugar, garlic powder, mustard, salt, and pepper. Let it simmer for about 10 minutes, stirring occasionally.
- Prepare the Buns: While the mixture simmers, toast the hamburger buns lightly on a separate skillet or in the oven.
- Assemble: Spoon the beef mixture onto the bottom half of each bun. Top with sliced pickles if desired, then place the top half of the bun on.
- Serve: Enjoy your Sloppy Joes warm with your favorite sides!
Cooking Tips: For a healthier option, you can substitute ground turkey or chicken for the beef. If you like it spicy, add some hot sauce or diced jalapeños to the meat mixture. Feel free to use whole grain buns for a nutritious twist!
Sweet Treat: Classic Brownies
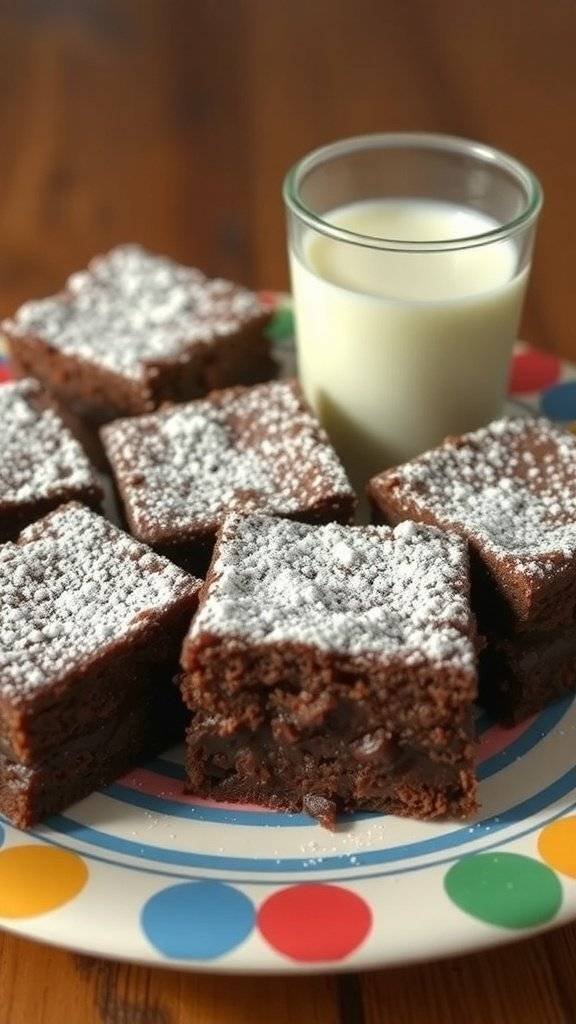
Brownies are a staple of nostalgic 1960’s fast food culture. These rich, chocolatey squares bring back memories of simpler times, where a quick treat could brighten your day. The image shows a plate of classic brownies, dusted with powdered sugar, alongside a glass of milk. This combination is timeless and loved by many.
Making brownies is easy and fun. You can whip them up in no time, and they’re perfect for sharing with friends or family. Whether you enjoy them warm or at room temperature, they always hit the spot.
For those looking to mix things up, consider adding nuts or chocolate chips for extra texture. You can also substitute ingredients based on what you have at home. For instance, if you’re out of eggs, applesauce can work as a great replacement!
Ingredients
- 1/2 cup unsalted butter
- 1 cup granulated sugar
- 2 large eggs
- 1 teaspoon vanilla extract
- 1/3 cup unsweetened cocoa powder
- 1/2 cup all-purpose flour
- 1/4 teaspoon salt
- 1/4 teaspoon baking powder
- 1/2 cup chocolate chips (optional)
Instructions
- Preheat your oven to 350°F (175°C) and grease a 9×9-inch baking pan.
- In a medium saucepan, melt the butter over low heat. Remove from heat and stir in sugar, eggs, and vanilla.
- Mix in cocoa, flour, salt, and baking powder until well combined. If using, fold in chocolate chips.
- Pour the batter into the prepared pan and spread evenly.
- Bake for 20 to 25 minutes. A toothpick inserted in the center should come out with a few moist crumbs.
- Let the brownies cool before cutting into squares. Dust with powdered sugar before serving, if desired.
Enjoy these classic brownies with a glass of milk for a perfect treat that takes you back to the nostalgic 1960’s fast food era!
Savory Flavor: Traditional Chili Recipe
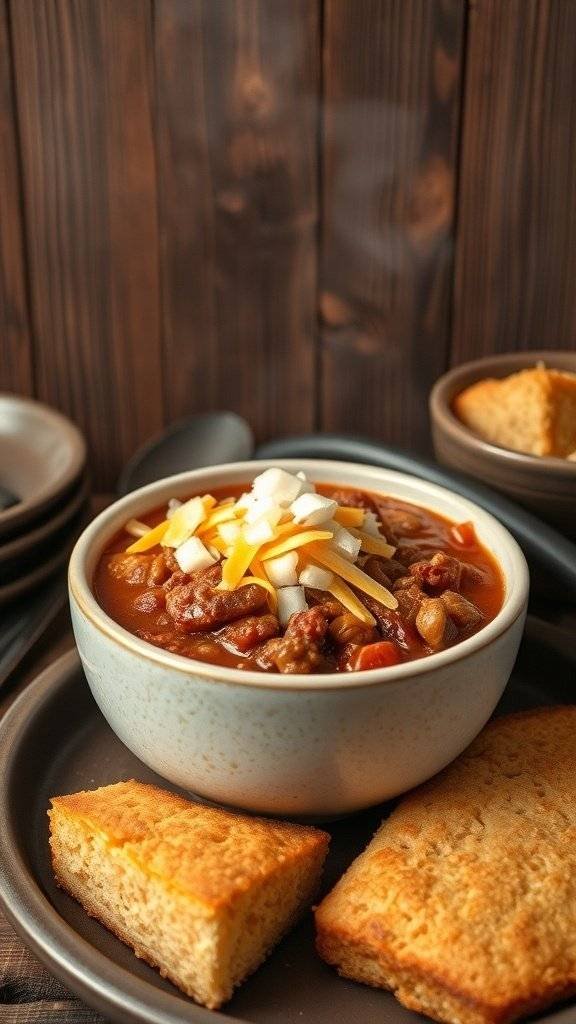
Nostalgic 1960’s fast food brings back memories of simpler times, where meals were hearty and satisfying. One dish that perfectly captures this essence is a classic chili. It’s warm, filling, and packed with flavor, making it a staple in many homes.
This traditional chili recipe is easy to make and perfect for gatherings or cozy nights in. The combination of spices and ingredients creates a rich taste that pairs wonderfully with cornbread, a favorite side from that era.
To make this chili, you’ll need ground beef, beans, tomatoes, and a mix of spices. It’s a dish that can be customized to your liking, whether you prefer it spicy or mild. And don’t forget the toppings! Shredded cheese, onions, and a dollop of sour cream can elevate your bowl to the next level.
Ingredients
- 1 pound ground beef
- 1 can (15 oz) kidney beans, drained and rinsed
- 1 can (15 oz) diced tomatoes
- 1 medium onion, chopped
- 2 cloves garlic, minced
- 2 tablespoons chili powder
- 1 teaspoon cumin
- 1 teaspoon paprika
- Salt and pepper to taste
- 1 cup beef broth
- Shredded cheese, diced onions, and sour cream for topping
Instructions
- Brown the Beef: In a large pot, cook the ground beef over medium heat until browned. Drain excess fat.
- Add Vegetables: Stir in the chopped onion and minced garlic. Cook until the onion is soft.
- Mix in Ingredients: Add the kidney beans, diced tomatoes, chili powder, cumin, paprika, salt, and pepper. Pour in the beef broth and stir well.
- Simmer: Bring the mixture to a boil, then reduce heat and let it simmer for about 30 minutes, stirring occasionally.
- Serve: Ladle the chili into bowls and top with shredded cheese, diced onions, and sour cream as desired.
Cooking Tip: For a thicker chili, let it simmer longer or add a tablespoon of tomato paste. If you want to spice it up, consider adding jalapeños or cayenne pepper. You can also substitute ground turkey or chicken for a leaner option.
Refreshing Treat: Classic Fruit Salad
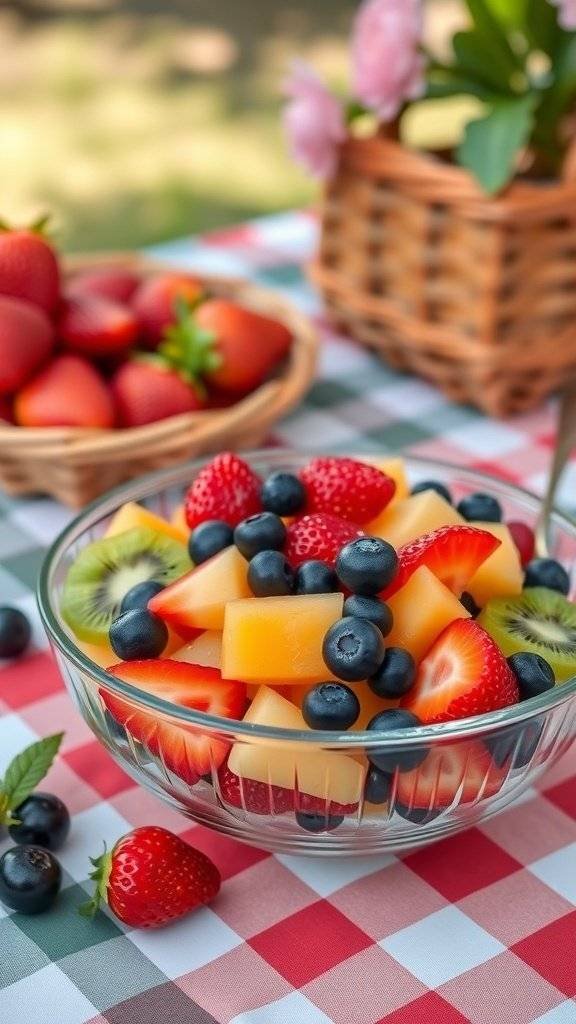
Nothing says summer like a bowl of classic fruit salad. This refreshing treat takes us back to the nostalgic 1960’s fast food era, where simple, wholesome ingredients were the star of the show. Imagine sitting outdoors on a sunny day, enjoying a colorful mix of fruits that not only looks good but tastes delightful.
The vibrant colors of strawberries, blueberries, kiwi, and cantaloupe create a feast for the eyes. Each bite is a burst of sweetness, making it a perfect side dish for any picnic or family gathering. Plus, it’s super easy to prepare!
Fruit salad is versatile, too. You can mix and match your favorite fruits based on what’s in season or what you have on hand. This dish is not just a treat; it’s a healthy option that everyone can enjoy.
Ingredients
- 2 cups strawberries, hulled and halved
- 1 cup blueberries
- 1 cup cantaloupe, diced
- 1 cup kiwi, peeled and sliced
- 1 tablespoon honey (optional)
- 1 tablespoon fresh mint, chopped (for garnish)
Instructions
- Prepare the Fruit: Start by washing all the fruits thoroughly. Hull the strawberries and cut them in half. Dice the cantaloupe and slice the kiwi.
- Mix Together: In a large bowl, combine all the prepared fruits. If you like a touch of sweetness, drizzle honey over the top and gently toss to combine.
- Chill: Let the fruit salad sit in the refrigerator for about 30 minutes. This allows the flavors to meld together.
- Serve: Before serving, give it a gentle toss and garnish with fresh mint leaves for a pop of color.
Cooking Tips: Feel free to substitute any of the fruits with your favorites. Apples, oranges, or grapes can also work well. If you want a bit of crunch, consider adding nuts like walnuts or almonds.
Enjoy this classic fruit salad as a refreshing treat that brings back memories of the 1960’s fast food scene!
Deliciously Sweet: Classic Lemonade Recipe

Nostalgic 1960’s Fast Food brings back memories of sunny days and refreshing drinks. One of the most beloved beverages from that era is classic lemonade. It’s simple, sweet, and oh-so-refreshing. Imagine sipping a glass of this tangy drink while enjoying a burger and fries. It’s a perfect match!
This lemonade is not just a drink; it’s a taste of summer. The bright yellow color and the fresh mint leaves make it inviting. You can almost feel the warmth of the sun just by looking at it. Plus, it’s easy to make at home, so you can enjoy that nostalgic feeling anytime.
Let’s get into the ingredients and steps to whip up this delightful drink.
Ingredients
- 1 cup freshly squeezed lemon juice (about 4-6 lemons)
- 1 cup granulated sugar
- 4 cups cold water
- 1/4 cup fresh mint leaves (optional)
- Slices of lemon for garnish
Instructions
- Make the Lemonade Base: In a pitcher, combine the freshly squeezed lemon juice and sugar. Stir well until the sugar is completely dissolved.
- Add Water: Pour in the cold water and mix until everything is well combined. Taste and adjust sweetness if needed.
- Chill: Refrigerate the lemonade for at least 30 minutes to let the flavors meld together.
- Serve: Pour the lemonade into glasses filled with ice. Garnish with mint leaves and lemon slices for a refreshing touch.
Cooking Tips: If you want a less sweet version, reduce the sugar to 3/4 cup. You can also use honey or agave syrup as a natural sweetener. For a fun twist, add some berries or cucumber slices for extra flavor.
Enjoy this classic lemonade and let it take you back to those carefree days of the 1960’s!
You may also like:
– Sinister Candy Station Ideas for an Unforgettable Halloween Party
– Gothic Hors D’Oeuvres To Impress Your Gotham Guests
– 21 Children’s Birthday Cakes Inspired by Gotham City
If you enjoyed this blog you can visit us or check out our other blogs and learn a bit about us.
Disclaimer: This blog post is inspired by fictional universes and characters created by their respective rights holders. All related content and imagery remain the property of their respective rights holder. This fan-inspired content is for entertainment and commentary purposes only and is not affiliated with or endorsed by HBO, Disney, Warner Bros., Lionsgate, or any other rights holders. To explore the official source material, please visit:
HBO