

Get ready to step back in time and embrace the colorful spirit of the 1960s with “Mad About Color: 1960s-Style Lunch Box Inspiration.” This collection celebrates the bold designs and vibrant patterns that defined an era, perfect for anyone looking to add a splash of retro charm to their lunch routine. From iconic pops of color to playful art, let’s explore how these delightful lunch boxes can inspire your style and brighten your day.
Retro Revival: Classic Macaroni And Cheese

The image captures a delightful scene of classic macaroni and cheese, nestled in a vibrant pink lunch box. This nostalgic dish is a staple for many, evoking memories of carefree days spent outdoors. The bright colors of the macaroni contrast beautifully with the cheerful packaging, making it a perfect choice for lunch box inspiration.
Surrounding the lunch box are fresh oranges and a picnic blanket, suggesting a fun, sunny day. This setup not only highlights the comfort of macaroni and cheese but also the joy of sharing meals with friends and family. It’s a reminder that food can bring happiness and warmth, especially when enjoyed in a lovely outdoor setting.
Ingredients
- 8 ounces elbow macaroni
- 2 cups shredded sharp cheddar cheese
- 1/2 cup grated Parmesan cheese
- 3 cups milk
- 1/4 cup butter
- 1/4 cup all-purpose flour
- 1/2 teaspoon salt
- 1/4 teaspoon black pepper
- 1/4 teaspoon paprika
- 1/4 teaspoon garlic powder
Instructions
- Cook the Macaroni: In a large pot, bring salted water to a boil. Add the elbow macaroni and cook according to package instructions until al dente. Drain and set aside.
- Make the Cheese Sauce: In the same pot, melt the butter over medium heat. Stir in the flour and cook for about 1 minute. Gradually whisk in the milk, stirring constantly until the mixture thickens.
- Add the Cheese: Remove the pot from heat and stir in the cheddar and Parmesan cheeses until melted and smooth. Season with salt, pepper, paprika, and garlic powder.
- Combine: Add the cooked macaroni to the cheese sauce, stirring until well coated.
- Serve: Pack the macaroni and cheese into your favorite lunch box or serve warm. Enjoy your retro meal!
Sweet Nostalgia: Strawberry Shortcake With A Twist
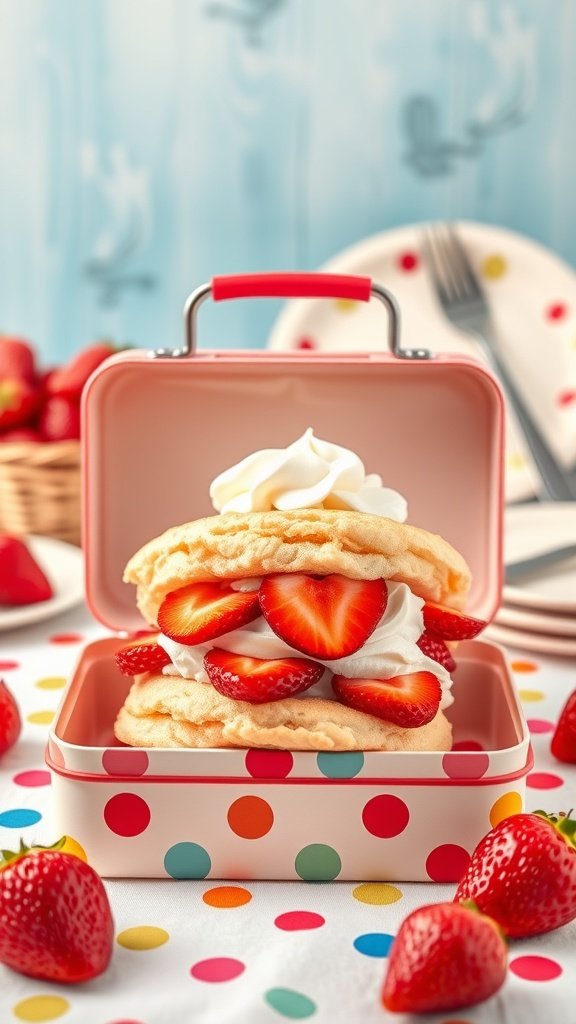
Picture this: a charming lunch box filled with a delightful strawberry shortcake, just like the ones we adored in our childhood. The soft, fluffy layers of cake are generously stuffed with fresh strawberries and topped with a swirl of whipped cream. This nostalgic treat not only brings back memories but also adds a fun twist to your lunch box inspiration.
The vibrant polka dots on the lunch box echo the playful spirit of the 1960s. It’s a reminder of simpler times when lunch was an exciting part of the day. This strawberry shortcake is perfect for sharing or enjoying solo, making it a versatile choice for any occasion.
Let’s dive into making this sweet treat that’s sure to brighten your day and bring a smile to your face!
Ingredients
- 1 cup all-purpose flour
- 1/2 cup granulated sugar
- 2 teaspoons baking powder
- 1/4 teaspoon salt
- 1/4 cup unsalted butter, softened
- 1/2 cup milk
- 1 teaspoon vanilla extract
- 2 cups fresh strawberries, sliced
- 1 cup whipped cream
Instructions
- Preheat your oven to 350°F (175°C). Grease and flour a small cake pan.
- In a bowl, mix flour, sugar, baking powder, and salt. Add softened butter, milk, and vanilla. Stir until smooth.
- Pour the batter into the prepared pan and bake for 25-30 minutes, or until a toothpick comes out clean.
- Once cooled, slice the cake in half horizontally. Layer fresh strawberries and whipped cream between the slices.
- Top with more strawberries and whipped cream. Serve in your favorite lunch box or on a plate!
Colorful Crunch: Rainbow Veggie Wraps

These rainbow veggie wraps are a feast for the eyes and the taste buds! Packed in a retro lunch box, they bring a fun, vibrant vibe reminiscent of the 1960s. The bright colors of the veggies pop against the soft tortillas, making them perfect for a picnic or a lunch break.
Each wrap is filled with fresh ingredients like bell peppers, spinach, and creamy spreads, creating a delightful crunch with every bite. The combination of flavors is refreshing and satisfying, making these wraps a great option for anyone looking to add some color to their meals.
Here’s how you can make your own colorful veggie wraps:
Ingredients
- 4 large whole wheat tortillas
- 1 cup hummus or cream cheese
- 1 red bell pepper, sliced
- 1 yellow bell pepper, sliced
- 1 carrot, grated
- 1 cucumber, thinly sliced
- 1 cup baby spinach
- 1/2 red onion, thinly sliced
- Salt and pepper to taste
Instructions
- Spread a generous layer of hummus or cream cheese over each tortilla.
- Layer the sliced bell peppers, grated carrot, cucumber, spinach, and red onion on top.
- Sprinkle with salt and pepper for added flavor.
- Roll each tortilla tightly, starting from one end, and slice into pinwheels or halves.
- Pack them in your favorite lunch box and enjoy!
Classic Comfort: Southern Biscuits And Gravy

Southern biscuits and gravy is a dish that brings warmth and comfort to any table. The fluffy biscuits, smothered in creamy sausage gravy, are a staple of Southern cooking. This meal is perfect for breakfast or brunch, and it pairs beautifully with a side of fresh fruit.
The image captures this classic dish perfectly, showcasing golden biscuits drenched in rich gravy. The vibrant colors of the fruit on the side add a cheerful touch, reminiscent of a nostalgic lunch box inspiration from the 1960s. It’s a delightful reminder of simpler times, where meals were made with love and shared with family.
To create your own Southern biscuits and gravy, gather your ingredients and follow these simple steps. You’ll be enjoying this comforting dish in no time!
Ingredients
- 2 cups all-purpose flour
- 1 tablespoon baking powder
- 1/2 teaspoon salt
- 1/4 cup unsalted butter, cold and cubed
- 3/4 cup milk
- 1 pound breakfast sausage
- 1/4 cup all-purpose flour (for gravy)
- 2 cups milk (for gravy)
- Salt and pepper to taste
Instructions
- Make the Biscuits: Preheat your oven to 450°F (230°C). In a bowl, mix flour, baking powder, and salt. Cut in the cold butter until the mixture resembles coarse crumbs. Stir in milk until just combined.
- Shape the Biscuits: Turn the dough onto a floured surface. Gently knead it a few times, then roll it out to about 1-inch thickness. Cut out biscuits using a round cutter and place them on a baking sheet.
- Bake the Biscuits: Bake for 12-15 minutes until golden brown. Remove from the oven and let cool slightly.
- Prepare the Gravy: In a skillet, cook the sausage over medium heat until browned. Sprinkle the additional flour over the sausage and stir to combine. Gradually add milk, stirring constantly until the gravy thickens. Season with salt and pepper.
- Serve: Split the warm biscuits in half and ladle the sausage gravy over the top. Enjoy with fresh fruit on the side!
Tasty Treat: Classic Tuna Salad Sandwiches

Picture a vibrant lunch box, reminiscent of the 1960s, filled with delicious tuna salad sandwiches. These sandwiches are not just tasty; they bring back memories of carefree days spent outdoors with friends. The bright red lunch box, paired with fresh greens, makes for a delightful presentation.
Classic tuna salad sandwiches are simple to make and perfect for any lunch box inspiration. They are packed with flavor and can be enjoyed by everyone. The combination of creamy tuna, crunchy celery, and a hint of lemon makes each bite refreshing.
To make these sandwiches, gather your ingredients and follow the steps below. You’ll have a delicious meal ready in no time!
Ingredients
- 1 can (5 oz) tuna, drained
- 1/4 cup mayonnaise
- 1 tablespoon Dijon mustard
- 1/4 cup celery, finely chopped
- 1 tablespoon lemon juice
- Salt and pepper to taste
- 4 slices of bread
- Leafy lettuce
Instructions
- Mix the Tuna: In a bowl, combine the drained tuna, mayonnaise, Dijon mustard, chopped celery, and lemon juice. Stir until well combined.
- Season: Add salt and pepper to taste, adjusting according to your preference.
- Prepare the Bread: Lay out the slices of bread. Place a layer of leafy lettuce on two slices.
- Assemble the Sandwiches: Spread the tuna mixture evenly over the lettuce. Top with the remaining slices of bread.
- Slice and Pack: Cut the sandwiches in half and pack them into your lunch box. Add extra lettuce for a pop of color!
Fruity Fun: Tropical Fruit Salad

Picture a vibrant lunch box filled with a colorful mix of tropical fruits. This image captures the essence of summer with its sunny vibes and refreshing flavors. The bright hues of pineapple, mango, kiwi, and red bell pepper create a feast for the eyes, perfect for a fun lunch break.
This tropical fruit salad is not just a treat for the taste buds; it also brings back memories of carefree days. It’s the kind of dish that fits perfectly in a retro lunch box, making it a delightful choice for anyone looking to add a splash of color to their meal.
Making this salad is simple and quick. Just chop up your favorite fruits, toss them together, and you’re ready to go! It’s great for picnics, school lunches, or just a refreshing snack at home.
Ingredients
- 1 ripe pineapple, peeled and chopped
- 2 ripe mangoes, diced
- 2 kiwis, sliced
- 1 red bell pepper, diced
- 1 cup of grapes, halved
- Juice of 1 lime
- Fresh mint leaves for garnish
Instructions
- Prepare the Fruits: Start by peeling and chopping the pineapple and mango. Slice the kiwis and dice the red bell pepper.
- Combine Ingredients: In a large bowl, mix all the chopped fruits together. Add the halved grapes for extra sweetness.
- Add Lime Juice: Squeeze the lime juice over the fruit mixture to enhance the flavors and prevent browning.
- Garnish: Toss in some fresh mint leaves for a refreshing touch.
- Serve: Pack the salad into your favorite lunch box and enjoy it fresh!
Hearty Delight: Classic Chili Con Carne

Chili con carne is a timeless dish that brings warmth and comfort. This classic recipe is perfect for lunch boxes, especially when you want something hearty and filling. Picture a vibrant lunch box filled with a rich, spicy chili, ready to brighten up your midday meal.
The image showcases a steaming bowl of chili, packed with colorful ingredients like bell peppers and beans. It’s topped with a dollop of sour cream and fresh cilantro, making it not just tasty but also visually appealing. This dish is a great way to embrace the colorful spirit of the 1960s, where bold flavors and fun presentations were all the rage.
Chili con carne is versatile and can be enjoyed on its own or paired with crusty bread. It’s also easy to prepare in advance, making it a fantastic choice for meal prep. Let’s get cooking!
Ingredients
- 1 pound ground beef
- 1 onion, chopped
- 2 cloves garlic, minced
- 1 bell pepper, chopped
- 1 can (15 oz) kidney beans, drained and rinsed
- 1 can (15 oz) diced tomatoes
- 2 tablespoons chili powder
- 1 teaspoon cumin
- Salt and pepper to taste
- 1 cup beef broth
- Sour cream and cilantro for topping
Instructions
- In a large pot, brown the ground beef over medium heat. Drain excess fat.
- Add the chopped onion, garlic, and bell pepper. Cook until the vegetables are soft.
- Stir in the chili powder, cumin, salt, and pepper. Cook for another minute.
- Add the kidney beans, diced tomatoes, and beef broth. Bring to a boil.
- Reduce heat and let simmer for about 30 minutes, stirring occasionally.
- Serve hot, topped with sour cream and cilantro.
Decadent Indulgence: Old-Fashioned Brownies

Brownies are a classic treat that brings back memories of simpler times. The image captures a delightful scene with a stack of rich, fudgy brownies sitting in a charming, retro lunch box. The vibrant colors of the kitchen background and the checkered tablecloth add a playful touch, reminiscent of the 1960s. This is the perfect setting for enjoying a sweet bite during lunch breaks or after school.
These brownies are not just a treat; they are a nostalgic indulgence. Their rich chocolate flavor and chewy texture make them a favorite among many. Whether you’re packing them in a lunch box or serving them at a gathering, they are sure to please everyone.
Let’s get into the kitchen and whip up a batch of these delicious brownies!
Ingredients
- 1 cup unsalted butter
- 2 cups granulated sugar
- 4 large eggs
- 1 teaspoon vanilla extract
- 1 cup all-purpose flour
- 1 cup unsweetened cocoa powder
- 1/2 teaspoon salt
- 1 cup chocolate chips (optional)
Instructions
- Preheat the oven to 350°F (175°C). Grease a 9×13 inch baking pan.
- In a saucepan, melt the butter over low heat. Remove from heat and stir in sugar, eggs, and vanilla.
- Mix in flour, cocoa powder, and salt until well combined. If using, fold in chocolate chips.
- Pour the batter into the prepared baking pan and spread evenly.
- Bake for 25-30 minutes, or until a toothpick inserted in the center comes out with a few moist crumbs.
- Let cool before cutting into squares and serving.
Zesty Flavor: Lemonade Iced Tea

Picture a sunny day, perfect for sipping something refreshing. This image captures the essence of summer with a vibrant lemonade iced tea, served in a cheerful setting. The drink, adorned with a slice of lemon and colorful straws, is just what you need to cool off. The pastel lunch box adds a playful touch, making it a perfect lunch box inspiration for those nostalgic 1960s vibes.
The combination of lemonade and iced tea creates a delightful balance of sweet and tangy flavors. It’s a drink that brings back memories of carefree afternoons spent outdoors. Whether you’re having a picnic or just relaxing at home, this beverage is sure to brighten your day.
Ingredients
- 4 cups brewed black tea, cooled
- 2 cups lemonade
- 1/4 cup simple syrup (adjust to taste)
- Ice cubes
- Lemon slices for garnish
- Fresh mint leaves (optional)
Instructions
- Combine the cooled black tea and lemonade in a large pitcher.
- Add simple syrup to taste, stirring well to mix.
- Fill glasses with ice cubes and pour the tea mixture over the ice.
- Garnish with lemon slices and mint leaves if desired.
- Serve immediately and enjoy your refreshing drink!
Savory Snack: Mini Quiches With Spinach And Cheese
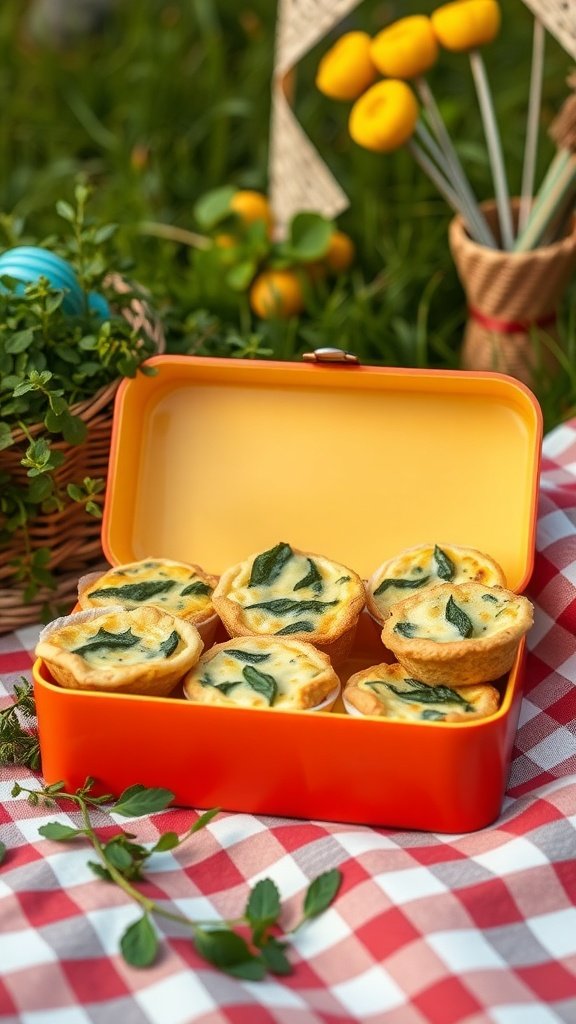
Mini quiches are a delightful addition to any lunch box, bringing a burst of flavor and color reminiscent of the 1960s. The vibrant orange lunch box in the image perfectly captures that retro vibe, making it an ideal container for these tasty bites. Each quiche is filled with creamy cheese and fresh spinach, creating a savory snack that’s both satisfying and easy to enjoy.
These mini quiches are not only delicious but also versatile. You can customize them with your favorite ingredients, making them a great option for any occasion. Whether you’re packing a picnic or just looking for a quick snack at home, these quiches fit the bill.
Let’s get cooking!
Ingredients
- 1 pre-made pie crust
- 4 large eggs
- 1 cup milk
- 1 cup shredded cheese (cheddar or your choice)
- 1 cup fresh spinach, chopped
- 1/2 teaspoon salt
- 1/4 teaspoon black pepper
- 1/4 teaspoon garlic powder
Instructions
- Preheat your oven to 375°F (190°C).
- Roll out the pie crust and cut it into small circles to fit into a muffin tin.
- Place the crust circles into the muffin tin, pressing them down gently.
- In a bowl, whisk together the eggs, milk, salt, pepper, and garlic powder.
- Add the chopped spinach and shredded cheese to the egg mixture and stir well.
- Pour the mixture into each crust, filling them about 3/4 full.
- Bake for 20-25 minutes, or until the quiches are set and lightly golden on top.
- Let them cool slightly before removing from the tin. Enjoy warm or at room temperature!
Sweet Treat: No-Bake Chocolate Oatmeal Cookies

Picture a sunny day, a vibrant picnic blanket, and a cheerful lunch box filled with delicious treats. This image captures the essence of fun and nostalgia, reminiscent of the 1960s. The bright colors of the lunch box and plates bring a playful vibe, making it perfect for a casual outing. The no-bake chocolate oatmeal cookies nestled inside are not only easy to make but also a delightful treat for everyone.
These cookies are a fantastic addition to any lunch box inspiration. They are quick to whip up and require no oven, making them ideal for warm days when you want something sweet without the fuss. Plus, they’re packed with oats and chocolate, offering a satisfying crunch and rich flavor.
Ingredients
- 1 cup quick oats
- 1/2 cup peanut butter
- 1/2 cup honey or maple syrup
- 1/4 cup cocoa powder
- 1/2 teaspoon vanilla extract
- 1/4 cup chocolate chips (optional)
Instructions
- Mix Ingredients: In a large bowl, combine the oats, peanut butter, honey, cocoa powder, and vanilla extract. Stir until everything is well mixed.
- Add Chocolate Chips: If you like, fold in the chocolate chips for an extra chocolatey treat.
- Form Cookies: Using your hands, shape the mixture into small balls or flatten them into cookie shapes. Place them on a baking sheet lined with parchment paper.
- Chill: Refrigerate the cookies for about 30 minutes to firm up.
- Serve: Enjoy your no-bake cookies straight from the fridge, or pack them in a lunch box for a sweet treat on the go!
Classic Flavor: Old-Fashioned Potato Salad

Picture a sunny picnic day, a classic checkered blanket spread out, and a vintage lunch box filled with delicious treats. Among them, a bowl of old-fashioned potato salad steals the show. This dish is a staple that brings back memories of family gatherings and summer outings.
The potato salad in the image is colorful and inviting, with chunks of tender potatoes mixed with vibrant red onions and a sprinkle of fresh herbs. It’s creamy, tangy, and oh-so-satisfying. This dish is perfect for any lunch box inspiration, making it a go-to for picnics or casual lunches.
Making this potato salad is easy and rewarding. Gather your ingredients and let’s create a dish that’s sure to impress!
Ingredients
- 4 cups potatoes, peeled and diced
- 1 cup mayonnaise
- 2 tablespoons Dijon mustard
- 1/2 cup red onion, finely chopped
- 1/4 cup celery, diced
- 2 hard-boiled eggs, chopped
- Salt and pepper to taste
- Fresh parsley for garnish
Instructions
- Boil the Potatoes: In a large pot, bring salted water to a boil. Add diced potatoes and cook until tender, about 10-15 minutes. Drain and let cool.
- Mix the Dressing: In a bowl, combine mayonnaise, Dijon mustard, salt, and pepper. Stir until smooth.
- Combine Ingredients: In a large mixing bowl, add cooled potatoes, red onion, celery, and hard-boiled eggs. Pour the dressing over the mixture and gently fold until everything is well coated.
- Chill: Cover the salad and refrigerate for at least 1 hour to let the flavors meld.
- Serve: Garnish with fresh parsley before serving. Enjoy your classic potato salad!
Crunchy Delight: Homemade Granola Bars
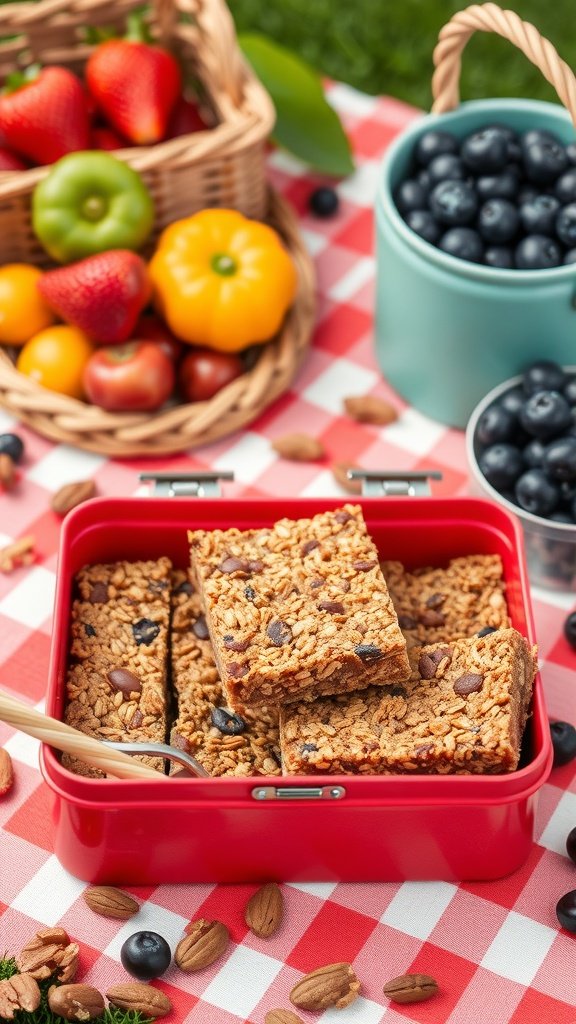
Granola bars are a fantastic snack for any lunch box. They’re easy to make and packed with flavor. The image shows a vibrant red lunch box filled with homemade granola bars, surrounded by fresh fruits and nuts. This setup not only looks appealing but also gives you a healthy option for snacking.
These bars are perfect for a picnic or a quick grab-and-go treat. The combination of oats, nuts, and chocolate makes them a crunchy delight. Plus, they’re customizable! You can add your favorite fruits or nuts to make them your own.
Let’s get into the recipe so you can whip up a batch for your next lunch box inspiration!
Ingredients
- 2 cups rolled oats
- 1 cup mixed nuts (almonds, pecans, etc.)
- 1/2 cup honey or maple syrup
- 1/4 cup peanut butter or almond butter
- 1/2 cup chocolate chips
- 1/4 teaspoon salt
- 1 teaspoon vanilla extract
Instructions
- Preheat your oven to 350°F (175°C). Line an 8×8 inch baking dish with parchment paper.
- In a large bowl, mix the oats, nuts, and salt together.
- In a small saucepan, combine honey and peanut butter over low heat until melted and smooth. Remove from heat and stir in vanilla extract.
- Pour the honey mixture over the oat mixture and stir until well combined. Fold in the chocolate chips.
- Press the mixture firmly into the prepared baking dish. Bake for 20-25 minutes until golden brown.
- Let cool completely before cutting into bars. Store in an airtight container.
Creamy Goodness: Vintage Macadamia Nut Cookies

Picture this: a retro lunch box filled with warm, gooey macadamia nut cookies. These treats bring a nostalgic vibe, reminding us of carefree days and simple pleasures. The soft, chewy texture paired with rich white chocolate creates a delightful experience. It’s the kind of cookie that makes you smile with every bite.
These cookies are perfect for any occasion. Whether you’re packing a lunch or enjoying a cozy afternoon snack, they fit right in. The combination of macadamia nuts and white chocolate is a classic that never goes out of style. Plus, they look great in a vintage lunch box, adding a pop of color and fun.
Let’s get to the good stuff! Here’s how you can whip up your own batch of these delicious cookies.
Ingredients
- 1 cup unsalted butter, softened
- 3/4 cup brown sugar, packed
- 1/2 cup granulated sugar
- 2 large eggs
- 2 teaspoons vanilla extract
- 2 1/4 cups all-purpose flour
- 1 teaspoon baking soda
- 1/2 teaspoon salt
- 1 cup macadamia nuts, chopped
- 1 cup white chocolate chips
Instructions
- Preheat your oven to 350°F (175°C). Line baking sheets with parchment paper.
- In a large bowl, cream together the softened butter, brown sugar, and granulated sugar until smooth.
- Add the eggs one at a time, mixing well after each addition. Stir in the vanilla extract.
- In another bowl, whisk together the flour, baking soda, and salt. Gradually add this to the wet mixture, mixing until just combined.
- Fold in the chopped macadamia nuts and white chocolate chips.
- Drop rounded tablespoons of dough onto the prepared baking sheets, spacing them about 2 inches apart.
- Bake for 10-12 minutes, or until the edges are lightly golden. Let them cool on the baking sheets for a few minutes before transferring to wire racks to cool completely.
Savory Delight: Classic Meatloaf Sandwich

Picture this: a sunny picnic day, a classic lunch box, and a delicious meatloaf sandwich nestled inside. The vibrant red container holds a hearty sandwich, complete with fresh lettuce and juicy tomato slices. This scene brings back memories of carefree days, where lunch was a simple pleasure. The checkered blanket adds a nostalgic touch, reminding us of family gatherings and outdoor fun.
Meatloaf sandwiches are a timeless favorite. They’re easy to make and pack a punch of flavor. You can enjoy them hot or cold, making them perfect for any lunch box inspiration. Let’s dive into how to whip up this classic delight!
Ingredients
- 1 pound ground beef
- 1/2 cup breadcrumbs
- 1/4 cup onion, finely chopped
- 1/4 cup bell pepper, finely chopped
- 1 egg
- 1/4 cup ketchup
- 1 teaspoon Worcestershire sauce
- 1 teaspoon salt
- 1/2 teaspoon black pepper
- 4 sandwich rolls
- Lettuce leaves
- Slices of tomato
Instructions
- Preheat the oven to 350°F (175°C).
- In a large bowl, combine ground beef, breadcrumbs, onion, bell pepper, egg, ketchup, Worcestershire sauce, salt, and pepper. Mix until well combined.
- Shape the mixture into a loaf and place it in a baking dish. Bake for 1 hour or until cooked through.
- Once cooked, let the meatloaf cool slightly before slicing.
- To assemble the sandwiches, place a slice of meatloaf on the bottom half of each roll. Top with lettuce and tomato slices, then cover with the other half of the roll.
- Pack them up in your favorite lunch box and enjoy!
Fruity And Fresh: Classic Apple Crisp

Imagine a cozy kitchen filled with the warm scent of baked apples and cinnamon. This classic apple crisp is a delightful treat that brings back memories of simpler times. The image shows a beautifully baked apple crisp, with a golden-brown topping that looks irresistible. It’s the kind of dish that makes you want to gather around the table with friends and family.
This recipe is perfect for lunch box inspiration. It’s easy to make and can be enjoyed warm or at room temperature, making it a great option for school or work lunches. Plus, who wouldn’t want a sweet treat like this to brighten their day?
Ingredients
- 6 cups sliced apples (about 6 medium apples)
- 1 tablespoon lemon juice
- 1/2 cup granulated sugar
- 1 teaspoon ground cinnamon
- 1 cup rolled oats
- 1 cup all-purpose flour
- 1/2 cup brown sugar, packed
- 1/2 cup unsalted butter, melted
- 1/4 teaspoon salt
Instructions
- Preheat your oven to 350°F (175°C).
- In a large bowl, toss the sliced apples with lemon juice, granulated sugar, and cinnamon. Spread the mixture evenly in a greased baking dish.
- In another bowl, combine oats, flour, brown sugar, melted butter, and salt. Mix until crumbly.
- Sprinkle the oat mixture over the apples in the baking dish.
- Bake for 30-35 minutes, or until the topping is golden and the apples are bubbly.
- Let it cool slightly before serving. Enjoy it warm or at room temperature!
Nostalgic Flavor: Peanut Butter And Banana Sandwiches

Peanut butter and banana sandwiches are a classic favorite, especially when it comes to lunch box inspiration. This delightful combo brings back memories of carefree days filled with sunshine and laughter. The image showcases a vibrant yellow lunch box, perfectly packed with a sandwich that features playful shapes made from peanut butter and banana. The heart and star shapes add a fun twist, making it appealing for kids and adults alike.
Imagine biting into soft bread, with creamy peanut butter and sweet banana creating a perfect harmony of flavors. This simple yet satisfying meal is easy to prepare and can be customized to suit your taste. Whether you prefer crunchy or smooth peanut butter, the addition of banana elevates this classic sandwich to a whole new level.
To make your own peanut butter and banana sandwich, gather your ingredients, and let’s get started!
Ingredients
- 2 slices of bread (white or whole grain)
- 2 tablespoons peanut butter
- 1 ripe banana
- Honey (optional)
- Cinnamon (optional)
Instructions
- Spread peanut butter evenly on one slice of bread.
- Slice the banana into thin rounds and layer them on top of the peanut butter.
- If desired, drizzle a little honey over the banana slices for added sweetness.
- Sprinkle a pinch of cinnamon for extra flavor.
- Top with the second slice of bread and press down gently.
- Cut the sandwich into fun shapes using cookie cutters or simply into halves or quarters.
- Pack it in your favorite lunch box and enjoy!
Charming Classic: Vegetable Soup With Noodles

Picture a cozy kitchen filled with the warmth of a bubbling pot of vegetable soup. This delightful dish, served in a charming lunch box, brings a touch of nostalgia from the 1960s. The vibrant colors of the soup, paired with the playful design of the lunch box, make it a perfect fit for any lunch box inspiration.
Vegetable soup with noodles is not just a meal; it’s a comforting hug in a bowl. The combination of fresh vegetables and tender noodles creates a satisfying experience. Plus, it’s an easy recipe that anyone can whip up!
Let’s get cooking and bring this charming classic to life!
Ingredients
- 2 tablespoons olive oil
- 1 onion, chopped
- 2 carrots, diced
- 2 celery stalks, diced
- 3 cloves garlic, minced
- 4 cups vegetable broth
- 1 can (14.5 oz) diced tomatoes
- 1 cup green beans, chopped
- 1 cup corn (fresh or frozen)
- 1 teaspoon dried thyme
- 1 teaspoon dried basil
- Salt and pepper to taste
- 2 cups egg noodles
- Fresh parsley for garnish
Instructions
- Heat olive oil in a large pot over medium heat. Add onion, carrots, and celery. Sauté for about 5 minutes until softened.
- Stir in garlic and cook for another minute until fragrant.
- Add vegetable broth, diced tomatoes, green beans, corn, thyme, basil, salt, and pepper. Bring to a boil.
- Once boiling, reduce heat and let it simmer for 15 minutes.
- Add the egg noodles and cook according to package instructions, usually about 7-10 minutes.
- Serve hot, garnished with fresh parsley. Enjoy your charming classic vegetable soup with noodles!
You may also like:
– 23 Easy Dinner Recipes Inspired by Qarth – GOT
– 19 Breakfast Recipes Inspired by the Gatsby Roaring 1920s
– 21 Children’s Birthday Cakes Inspired by Gotham City
If you enjoyed this blog you can visit us or check out our other blogs and learn a bit about us.
Disclaimer: This blog post is inspired by fictional universes and characters created by their respective rights holders. All related content and imagery remain the property of their respective rights holder. This fan-inspired content is for entertainment and commentary purposes only and is not affiliated with or endorsed by HBO, Disney, Warner Bros., Lionsgate, or any other rights holders. To explore the official source material, please visit:
HBO