

Step back in time to the stylish world of the 1960s with these 25 cake recipes inspired by the iconic TV show Mad Men.
From classic flavors to retro designs, each recipe captures the essence of a decade known for its creativity and sophistication. Whether you’re planning a party or just looking for a sweet treat, these cakes will add a touch of vintage charm to any occasion.
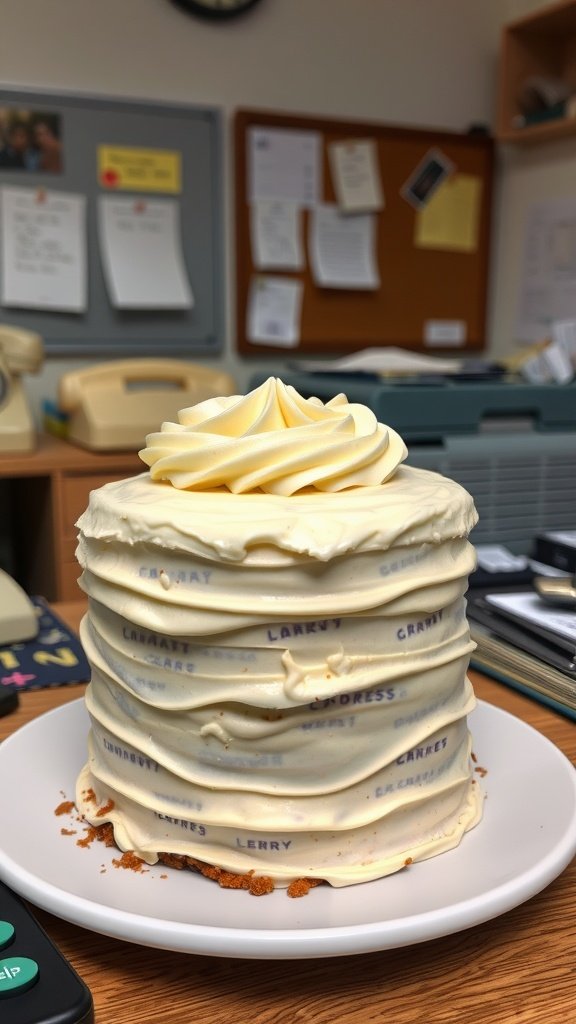
Madison Avenue Marble Cake
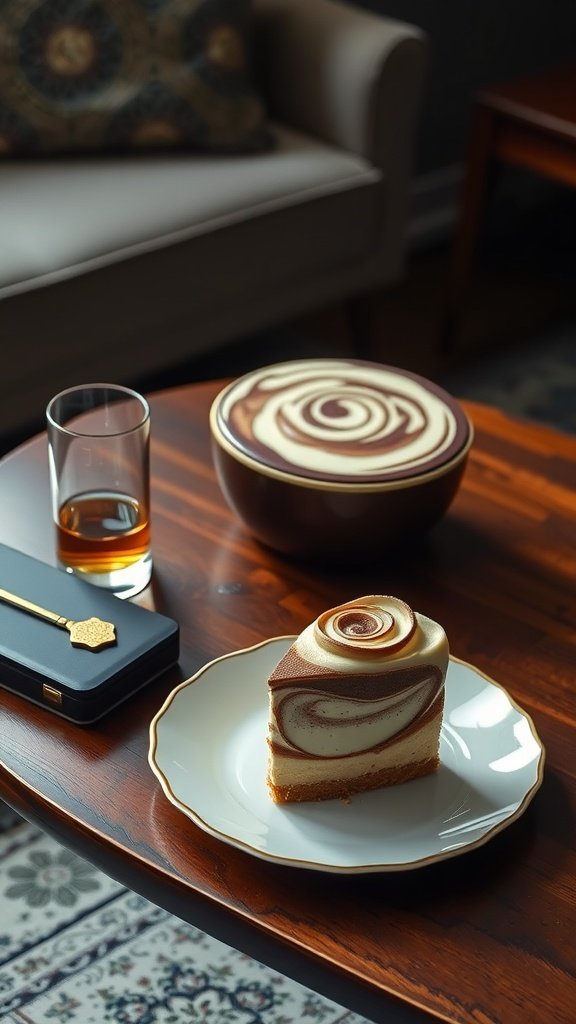
Madison Avenue Marble Cake is a delightful blend of rich chocolate and creamy vanilla flavors, creating a beautiful and inviting appearance. This cake offers a moist texture and a light, airy crumb that makes it an instant crowd-pleaser. Not only is it visually stunning, but it’s also straightforward to make, making it an excellent choice for both novice and experienced bakers.
The marbled effect is achieved by swirling together two batters, which can be a fun technique to master. Whether you’re serving it at a gathering or just enjoying a slice with coffee, this cake brings a touch of 1960s charm right to your kitchen.
Ingredients
- 1 ¾ cups all-purpose flour
- 1 ½ teaspoons baking powder
- ½ teaspoon salt
- ¾ cup unsalted butter, softened
- 1 cup granulated sugar
- 3 large eggs
- 2 teaspoons vanilla extract
- ½ cup milk
- ½ cup unsweetened cocoa powder
- ¼ cup boiling water
Instructions
- Preheat your oven to 350°F (175°C) and grease and flour a 9-inch round cake pan.
- In a bowl, mix the flour, baking powder, and salt. Set aside.
- In a large mixing bowl, cream the softened butter and sugar together until light and fluffy. Add the eggs one at a time, mixing well after each addition, then stir in the vanilla extract.
- Gradually add the dry ingredients to the butter mixture, alternating with the milk, starting and ending with the flour mixture. Mix until just combined.
- In a separate bowl, combine cocoa powder with boiling water until smooth. Take half of the batter and mix it with the cocoa mixture.
- Pour spoonfuls of vanilla and chocolate batters into the prepared pan. Use a knife or skewer to gently swirl the batters together, creating a marbled effect.
- Bake for 30-35 minutes or until a toothpick inserted into the center comes out clean. Allow to cool in the pan for 10 minutes before transferring to a wire rack to cool completely.
Betty Draper’s Lemon Chiffon Delight
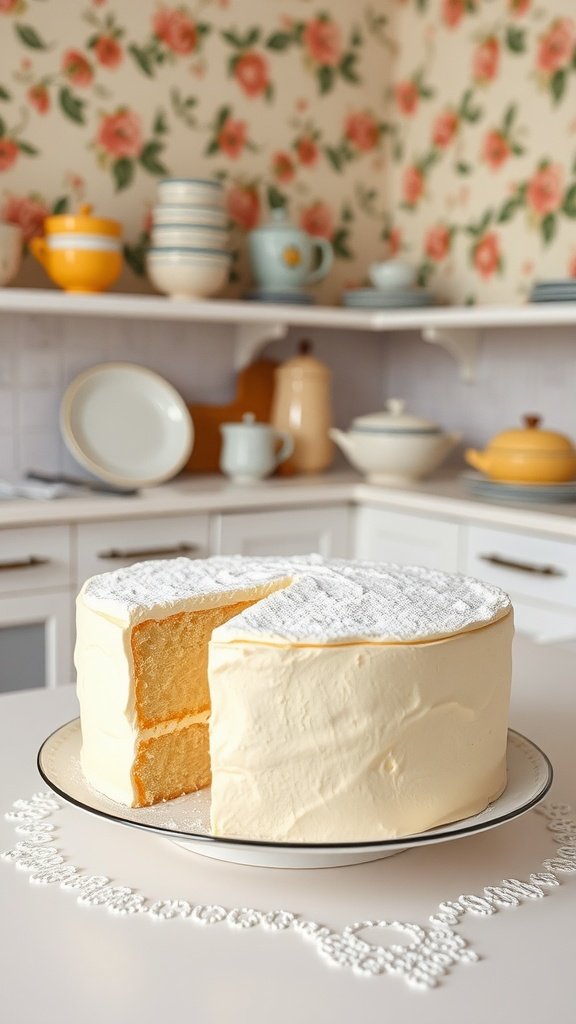
Betty Draper’s Lemon Chiffon Delight is a light and airy cake that perfectly captures the essence of the 1960s with its fresh lemon flavor and delicate texture. This cake is wonderfully refreshing and ideal for any occasion, whether it’s a summer gathering or a casual afternoon tea. The sweet, creamy frosting adds a luxurious touch, making each bite a delightful experience.
This recipe is simple enough for anyone to tackle, even if you’re new to baking. The combination of fluffy chiffon and zesty lemon creates a cake that feels both elegant and comforting. It’s sure to impress your guests and leave them wanting more!
Joan’s Cherry Liqueur Black Forest Cake
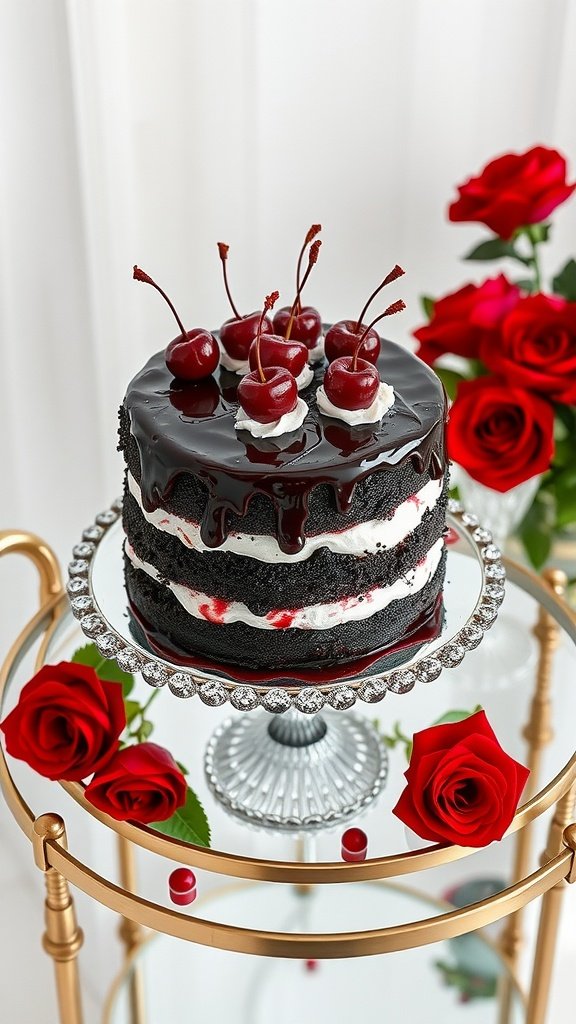
Joan’s Cherry Liqueur Black Forest Cake is a delightful twist on the classic German dessert. This cake layers rich chocolate sponge with silky whipped cream and a burst of cherry flavor, thanks to the addition of cherry liqueur. It’s a treat that balances sweetness with a hint of tartness, making it incredibly satisfying.
Despite its elegant appearance, this cake is relatively easy to make. Perfect for special occasions or a simple afternoon treat, it’s sure to impress your guests with its luscious flavors and beautiful presentation.
Ingredients
- 1 3/4 cups all-purpose flour
- 3/4 cup unsweetened cocoa powder
- 2 cups granulated sugar
- 1 1/2 teaspoons baking powder
- 1 1/2 teaspoons baking soda
- 1 teaspoon salt
- 2 large eggs
- 1 cup whole milk
- 1/2 cup vegetable oil
- 2 teaspoons vanilla extract
- 1 cup boiling water
- 1 cup heavy whipping cream
- 1/4 cup powdered sugar
- 1/2 cup cherry liqueur
- 1 cup cherry pie filling
- Dark chocolate shavings for garnish
- Fresh cherries for decoration
Instructions
- Preheat your oven to 350°F (175°C). Grease and flour two 9-inch round cake pans.
- In a large mixing bowl, whisk together flour, cocoa powder, sugar, baking powder, baking soda, and salt.
- Add eggs, milk, oil, and vanilla to the dry ingredients. Beat on medium speed for 2 minutes. Stir in boiling water until well combined.
- Pour the batter evenly into the prepared pans. Bake for 30 to 35 minutes or until a toothpick inserted in the center comes out clean. Let cool for 10 minutes before transferring to wire racks.
- Once cooled, slice each cake in half to create four layers. Drizzle the tops with cherry liqueur.
- In a separate bowl, whip the heavy cream with powdered sugar until stiff peaks form.
- Layer the cakes, spreading whipped cream and cherry pie filling between each layer. Top with the remaining whipped cream, chocolate shavings, and fresh cherries.
- Chill the cake for at least an hour before serving to set the layers.
Old Fashioned Manhattan Spice Cake
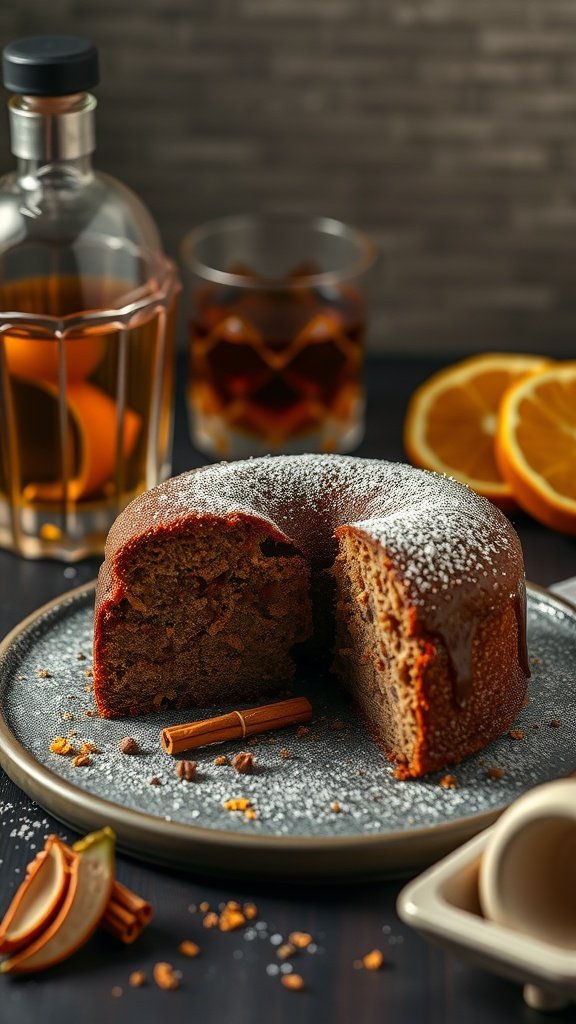
The Old Fashioned Manhattan Spice Cake brings a touch of classic sophistication to your dessert table. With a warm blend of spices and hints of whiskey, this cake captures the essence of the 1960s cocktail culture. It’s moist, flavorful, and perfect for a cozy gathering or a festive celebration.
This recipe is straightforward to make, featuring simple ingredients that come together to create a delightful treat. Whether you’re a baking novice or an experienced cook, you’ll find this cake easy to whip up and absolutely satisfying to enjoy.
Ingredients
- 2 cups all-purpose flour
- 1 cup granulated sugar
- 1/2 cup unsalted butter, softened
- 1 cup buttermilk
- 3 large eggs
- 1 teaspoon baking powder
- 1 teaspoon baking soda
- 1 teaspoon ground cinnamon
- 1/2 teaspoon ground nutmeg
- 1/4 teaspoon ground ginger
- 1/4 teaspoon ground cloves
- 1/2 cup whiskey
- 1 teaspoon vanilla extract
Instructions
- Preheat your oven to 350°F (175°C) and grease a bundt pan.
- In a mixing bowl, cream together the softened butter and granulated sugar until light and fluffy.
- Add the eggs one at a time, mixing well after each addition. Stir in the buttermilk, whiskey, and vanilla extract.
- In another bowl, whisk together the flour, baking powder, baking soda, and spices.
- Gradually add the dry ingredients to the wet mixture, mixing until just combined.
- Pour the batter into the prepared bundt pan and bake for 45-50 minutes, or until a toothpick inserted into the center comes out clean.
- Let the cake cool for 10 minutes in the pan before transferring it to a wire rack to cool completely. Serve with a dusting of powdered sugar or a drizzle of whiskey glaze if desired.
Midtown Espresso Layer Cake
This Midtown Espresso Layer Cake is a delightful nod to the sophisticated flavors of the 1960s. Each layer is infused with rich espresso, complemented by a silky cream cheese frosting. Perfectly balancing sweetness and a hint of bitterness, this cake is sure to impress at any gathering.
Making this cake is a fun experience, and while it does require a few steps, the end result is worth the effort. You’ll love how the layers come together, creating a stunning centerpiece for your table.
Ingredients
- 2 cups all-purpose flour
- 1 ½ cups granulated sugar
- ½ cup unsweetened cocoa powder
- 1 teaspoon baking soda
- ½ teaspoon salt
- 1 cup brewed espresso, cooled
- ½ cup vegetable oil
- 2 large eggs
- 1 teaspoon vanilla extract
- 1 cup buttermilk
- 8 oz cream cheese, softened
- 1 cup unsalted butter, softened
- 4 cups powdered sugar
- 2 tablespoons milk (if needed for consistency)
Instructions
- Preheat your oven to 350°F (175°C) and grease three 9-inch round cake pans.
- In a large bowl, mix together flour, sugar, cocoa powder, baking soda, and salt. In another bowl, combine espresso, oil, eggs, and vanilla. Gradually add the wet ingredients to the dry ingredients, mixing until just combined. Finally, stir in the buttermilk until smooth.
- Divide the batter evenly among the prepared pans and bake for 25-30 minutes, or until a toothpick inserted in the center comes out clean. Let the cakes cool in the pans for 10 minutes before transferring to wire racks to cool completely.
- For the frosting, beat together the cream cheese and butter until creamy. Gradually add powdered sugar until smooth, adding milk if the frosting is too thick.
- Once the cakes are completely cool, place one layer on a serving plate. Spread a layer of frosting on top and repeat with the second layer. Finish by placing the third layer on top and frosting the entire cake. Decorate as desired and enjoy!
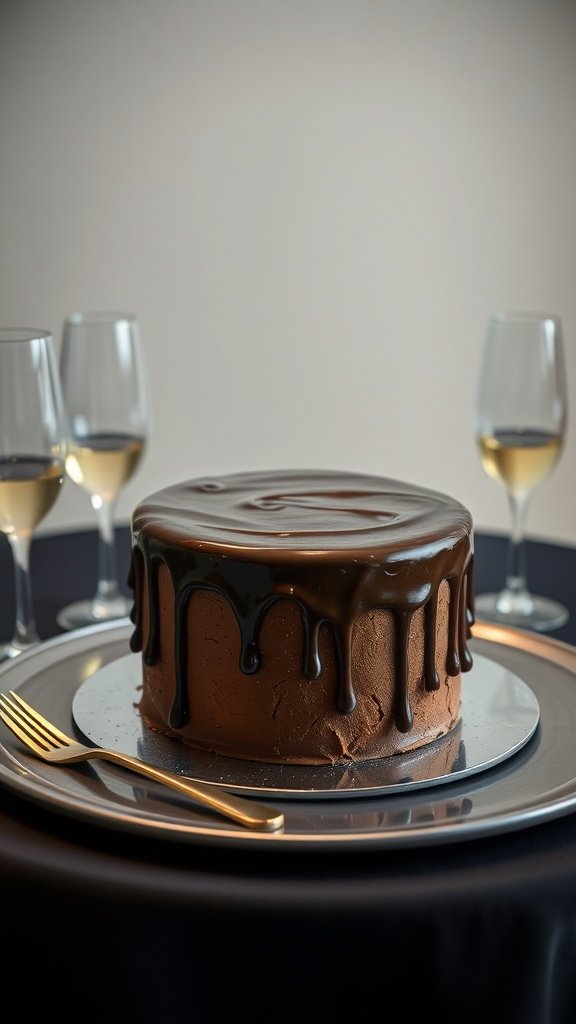
Don Draper’s Dark Chocolate Decadence
Don Draper’s Dark Chocolate Decadence is a rich and indulgent cake that captures the essence of classic 1960s sophistication. With its deep chocolate flavor and smooth ganache topping, it’s perfect for those who appreciate a sweet treat that doesn’t shy away from richness. This recipe is straightforward, making it an excellent choice for both novice and experienced bakers looking to impress.
Each bite delivers a bold chocolate experience, balanced perfectly with a touch of sweetness. Whether you’re hosting a dinner party or simply satisfying a chocolate craving, this cake is sure to be the star of the show. Let’s get into the ingredients and how to make this delightful dessert!
Ingredients
- 1 3/4 cups all-purpose flour
- 1 1/2 cups granulated sugar
- 3/4 cup unsweetened cocoa powder
- 2 teaspoons baking powder
- 1 1/2 teaspoons baking soda
- 1 teaspoon salt
- 2 large eggs
- 1 cup whole milk
- 1/2 cup vegetable oil
- 2 teaspoons vanilla extract
- 1 cup boiling water
- 1 cup heavy cream
- 8 ounces dark chocolate, chopped
Instructions
- Preheat the oven to 350°F (175°C). Grease and flour two 9-inch round cake pans.
- In a large mixing bowl, combine flour, sugar, cocoa powder, baking powder, baking soda, and salt. Mix well.
- Add eggs, milk, oil, and vanilla to the dry ingredients. Beat on medium speed for 2 minutes. Stir in boiling water until well combined; the batter will be thin.
- Pour the batter evenly into the prepared pans. Bake for 30-35 minutes or until a toothpick inserted in the center comes out clean.
- While the cakes are cooling, prepare the ganache. Heat the heavy cream in a saucepan until just simmering, then pour over the chopped dark chocolate. Let it sit for a few minutes, then stir until smooth.
- Once the cakes are completely cool, place one layer on a serving plate. Spread a layer of ganache on top, then place the second layer on top and cover the entire cake with the remaining ganache.
- Allow the ganache to set for a bit before slicing and serving. Enjoy your sophisticated treat!
Sterling’s Triple Vanilla Brandy Cake
Sterling’s Triple Vanilla Brandy Cake is a delightful treat that captures the rich flavors and sophistication of the 1960s. With its three layers of moist vanilla cake, infused with the warmth of brandy, this cake is perfect for any special occasion or just a cozy evening at home. The creamy vanilla frosting adds an extra touch of sweetness that balances the brandy beautifully.
This recipe is relatively simple to make, making it accessible even for novice bakers. The combination of vanilla extract, vanilla bean, and vanilla pudding mix ensures a deep, rich flavor that vanilla lovers will adore. Plus, the brandy gives this cake an elegant twist that’s sure to impress your guests.
Ingredients
- 2 1/2 cups all-purpose flour
- 1 tablespoon baking powder
- 1/2 teaspoon salt
- 1 cup unsalted butter, softened
- 2 cups granulated sugar
- 4 large eggs
- 1 tablespoon pure vanilla extract
- 1 vanilla bean, split and scraped
- 1 cup buttermilk
- 1/4 cup brandy
- 2 cups powdered sugar
- 1/4 cup heavy cream
Instructions
- Preheat your oven to 350°F (175°C). Grease and flour three 9-inch round cake pans.
- In a bowl, whisk together the flour, baking powder, and salt. Set aside.
- In another large bowl, cream the butter and sugar together until light and fluffy. Add the eggs one at a time, mixing well after each addition. Stir in the vanilla extract and vanilla bean seeds.
- Gradually add the flour mixture to the butter mixture, alternating with the buttermilk, starting and ending with the flour.
- Mix in the brandy until well combined.
- Divide the batter evenly among the prepared cake pans and smooth the tops. Bake for 25-30 minutes, or until a toothpick inserted in the center comes out clean.
- Let the cakes cool in the pans for about 10 minutes before transferring them to wire racks to cool completely.
- For the frosting, beat together the powdered sugar and heavy cream until smooth. Spread the frosting between the layers and on top of the cake once it has cooled.
1960s Madison Party Pineapple Upside-Down Cake
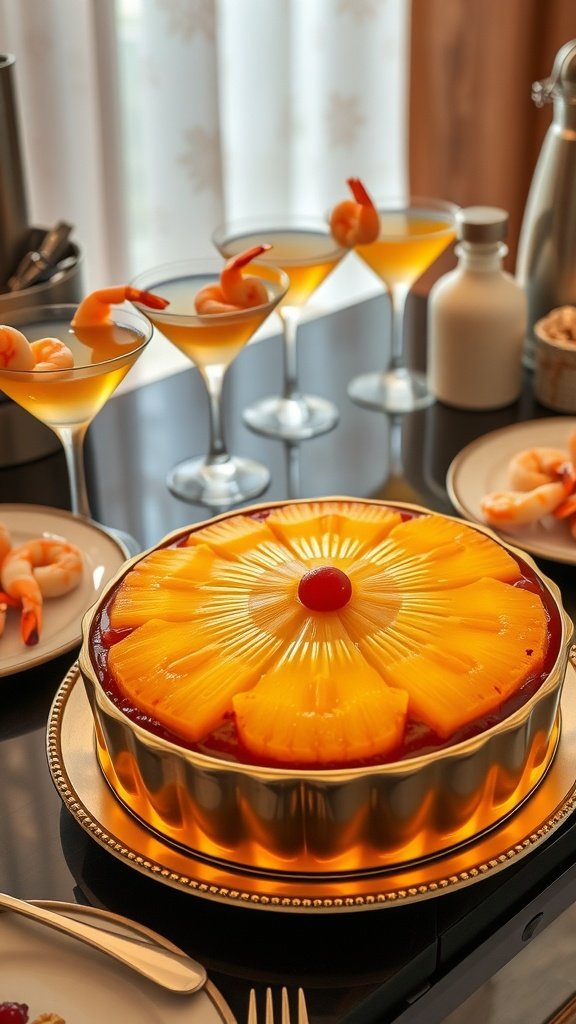
Pineapple Upside-Down Cake is a classic dessert that perfectly captures the spirit of 1960s entertaining. With its caramelized pineapple rings and maraschino cherries on top, this cake is not only visually striking but also offers a delightful mix of sweet and fruity flavors. It’s simple to make, making it an ideal option for a casual gathering or a more festive occasion.
This cake embodies the charm of retro parties, where it would often be the centerpiece on dessert tables. The moist vanilla cake pairs wonderfully with the tartness of the pineapple, creating a nostalgic treat that everyone will love. Plus, the ease of preparation means you can enjoy more time with your guests!
Ingredients
- 1/4 cup unsalted butter
- 1/2 cup brown sugar, packed
- 1 can (20 oz) sliced pineapple, drained
- Maraschino cherries
- 1 1/2 cups all-purpose flour
- 1 cup granulated sugar
- 2 teaspoons baking powder
- 1/2 teaspoon salt
- 1/2 cup whole milk
- 1/2 cup unsalted butter, softened
- 2 large eggs
- 1 teaspoon vanilla extract
Instructions
- Preheat your oven to 350°F (175°C). Melt 1/4 cup of butter in a 9-inch round cake pan and sprinkle the brown sugar evenly over it.
- Arrange the drained pineapple slices on top of the sugar mixture, placing a cherry in the center of each slice.
- In a mixing bowl, combine flour, granulated sugar, baking powder, and salt. Add the milk, softened butter, eggs, and vanilla extract. Mix until smooth.
- Pour the batter over the arranged pineapple and cherries, smoothing the top with a spatula.
- Bake for 35-40 minutes or until a toothpick inserted into the center comes out clean. Allow the cake to cool for 10 minutes before inverting it onto a serving plate.
- Serve warm or at room temperature and enjoy the delightful blend of flavors!
Peggy’s Peppermint Mocha Celebration Cake
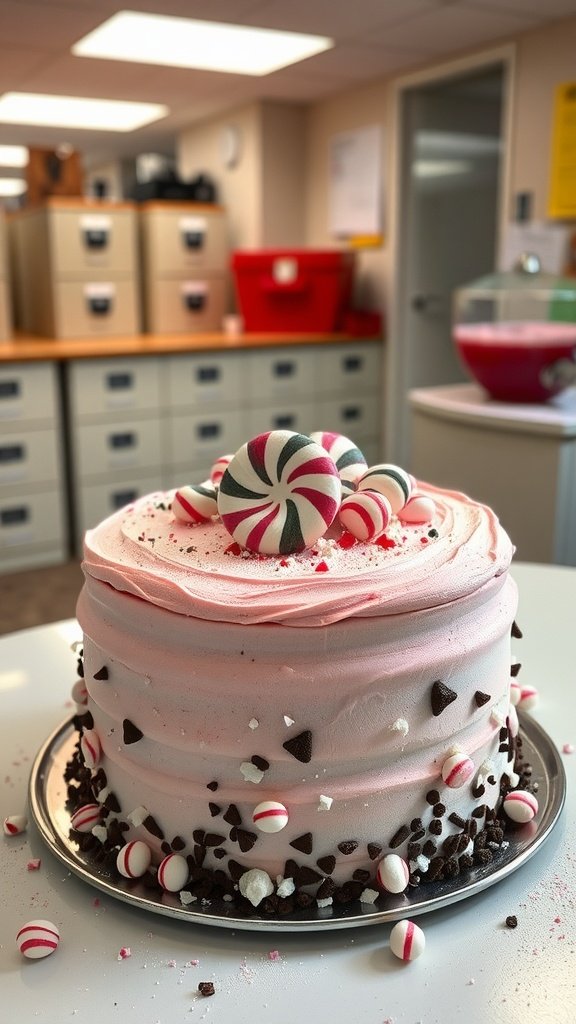
This cake is a delightful tribute to the refreshing flavors of peppermint and the rich depth of mocha, all wrapped in a fun and festive design. Perfect for gatherings, celebrations, or just to treat yourself, this cake is both eye-catching and delicious. It’s surprisingly easy to make, ensuring that even novice bakers can achieve impressive results.
The combination of chocolate cake layers paired with peppermint mocha frosting creates a joyous flavor profile that’s sure to please any crowd. Topped with festive decorations, this cake captures the spirit of the 1960s and brings a touch of nostalgia to your dessert table.
Ingredients
- 2 cups all-purpose flour
- 1 3/4 cups granulated sugar
- 3/4 cup unsweetened cocoa powder
- 2 teaspoons baking soda
- 1 teaspoon baking powder
- 1 teaspoon salt
- 1 cup buttermilk
- 1/2 cup vegetable oil
- 2 large eggs
- 2 teaspoons vanilla extract
- 1 cup freshly brewed mocha coffee, cooled
- 2 cups unsalted butter, softened
- 4 cups powdered sugar
- 1/4 cup milk
- 1 teaspoon peppermint extract
- Crushed peppermint candies for decoration
- Chocolate chips for decoration
Instructions
- Preheat your oven to 350°F (175°C). Grease and flour two 9-inch round cake pans.
- In a large bowl, combine flour, sugar, cocoa powder, baking soda, baking powder, and salt.
- Add buttermilk, vegetable oil, eggs, vanilla extract, and brewed mocha coffee. Mix until smooth.
- Divide the batter evenly between the prepared pans and bake for 30-35 minutes, or until a toothpick comes out clean. Let cool in pans for 10 minutes, then transfer to a wire rack to cool completely.
- For the frosting, beat the softened butter until creamy. Gradually add powdered sugar, mixing on low speed. Add milk and peppermint extract, and beat until fluffy.
- Once the cakes are cooled, frost the top of one layer, then place the second layer on top and frost the entire cake. Decorate with crushed peppermint candies and chocolate chips.
Boardroom Bourbon Butter Cake
This Boardroom Bourbon Butter Cake embodies the sophisticated charm of the 1960s. With its rich, buttery flavor and a hint of bourbon, it’s perfect for celebrating life’s little moments or impressing guests at your next gathering. The balance of sweetness and the warmth from the bourbon makes each bite truly delightful.
Not only does this cake taste fantastic, but it’s also simple to whip up. With just a few ingredients and straightforward steps, you’ll have a stunning dessert ready in no time. Enjoy it plain or with a drizzle of bourbon glaze for that extra touch.
Ingredients
- 2 cups all-purpose flour
- 1 1/2 cups granulated sugar
- 1 cup unsalted butter, softened
- 4 large eggs
- 1/4 cup bourbon
- 1 tablespoon vanilla extract
- 1 teaspoon baking powder
- 1/2 teaspoon salt
Instructions
- Preheat your oven to 350°F (175°C) and grease a bundt pan.
- In a large bowl, cream together the softened butter and sugar until light and fluffy. Add in the eggs, one at a time, mixing well after each addition.
- Stir in the bourbon and vanilla extract until combined.
- In another bowl, whisk together the flour, baking powder, and salt. Gradually add this to the butter mixture, mixing just until combined.
- Pour the batter into the prepared bundt pan and smooth out the top.
- Bake for about 45-50 minutes, or until a toothpick inserted into the center comes out clean.
- Allow the cake to cool in the pan for 10 minutes, then invert onto a plate to cool completely.
- Optional: drizzle with a bourbon glaze made from powdered sugar and bourbon before serving.
Afternoon Ad Pitch Angel Food Cake

Angel food cake is a classic dessert that perfectly captures the light, airy feel of the 1960s. This cake is fluffy and sweet, making it an ideal treat for an afternoon gathering, especially during a busy ad pitch. Its delicate texture and subtle sweetness provide a delightful contrast to richer desserts, allowing everyone to enjoy a slice without feeling weighed down.
Making angel food cake is simpler than you might think. With just a few ingredients and a little patience, you can whip up this nostalgic dessert that will impress your guests. Serve it plain, topped with fresh fruit, or drizzled with a simple glaze for a touch of elegance.
Ingredients
- 1 cup cake flour
- 1 1/2 cups granulated sugar
- 12 large egg whites
- 1 teaspoon cream of tartar
- 1/2 teaspoon salt
- 1 teaspoon vanilla extract
- 1/4 teaspoon almond extract
Instructions
- Preheat your oven to 350°F (175°C). In a bowl, sift together the cake flour and half of the sugar; set aside.
- In a large mixing bowl, beat the egg whites, cream of tartar, and salt until soft peaks form. Gradually add the remaining sugar, continuing to beat until stiff peaks form.
- Gently fold in the sifted flour and sugar mixture, along with the vanilla and almond extracts. Be careful not to deflate the egg whites.
- Pour the batter into an ungreased tube pan. Smooth the top and bake for 35-40 minutes, or until the cake is golden and springs back when touched.
- Remove the cake from the oven and invert the pan to cool completely. Once cooled, carefully remove the cake from the pan, slice, and serve!
60s Cocktail Hour Cream Cheese Red Velvet Cake
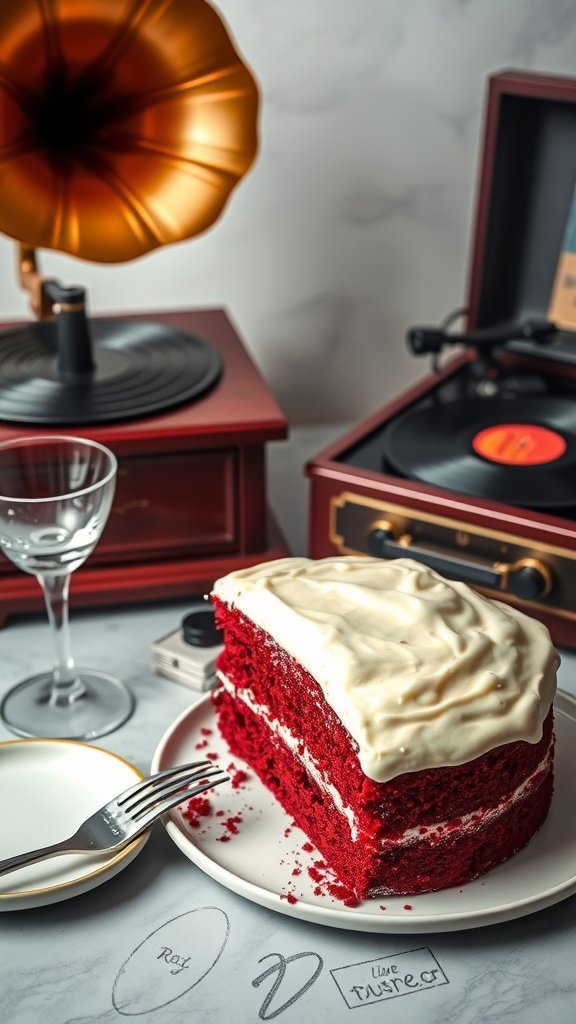
This Cream Cheese Red Velvet Cake is a delightful nod to the classic cocktail hour of the 1960s, blending rich flavors and a stunning appearance. The cake boasts a velvety texture, balanced by the tangy cream cheese frosting, making it a perfect dessert for any occasion.
While it might look fancy, this recipe is quite simple to follow. You’ll enjoy the process, and the result will certainly impress your guests with its vibrant color and decadent taste.
Ingredients
- 2 1/2 cups all-purpose flour
- 1 1/2 cups granulated sugar
- 1 teaspoon baking soda
- 1 teaspoon salt
- 1 teaspoon cocoa powder
- 1 1/2 cups vegetable oil
- 1 cup buttermilk, room temperature
- 2 large eggs, room temperature
- 2 tablespoons red food coloring
- 1 teaspoon vanilla extract
- 1 teaspoon white vinegar
- 8 oz cream cheese, softened
- 1/2 cup unsalted butter, softened
- 4 cups powdered sugar
- 1 teaspoon vanilla extract (for frosting)
Instructions
- Preheat your oven to 350°F (175°C) and grease two 9-inch round cake pans.
- In a large bowl, mix together the flour, sugar, baking soda, salt, and cocoa powder.
- In another bowl, combine the oil, buttermilk, eggs, food coloring, vanilla extract, and vinegar. Mix well.
- Gradually add the wet ingredients to the dry ingredients, stirring until just combined.
- Divide the batter evenly between the prepared pans and bake for 25-30 minutes, or until a toothpick comes out clean.
- Let the cakes cool in the pans for 10 minutes, then transfer them to wire racks to cool completely.
- For the frosting, beat together the softened cream cheese and butter until smooth. Gradually add the powdered sugar and vanilla extract, mixing until creamy and spreadable.
- Once the cakes are completely cool, spread a layer of frosting between the two layers, then frost the top and sides of the cake.
- Slice, serve, and enjoy your delightful slice of 60s nostalgia!
Copywriter’s Coconut Layer Cake
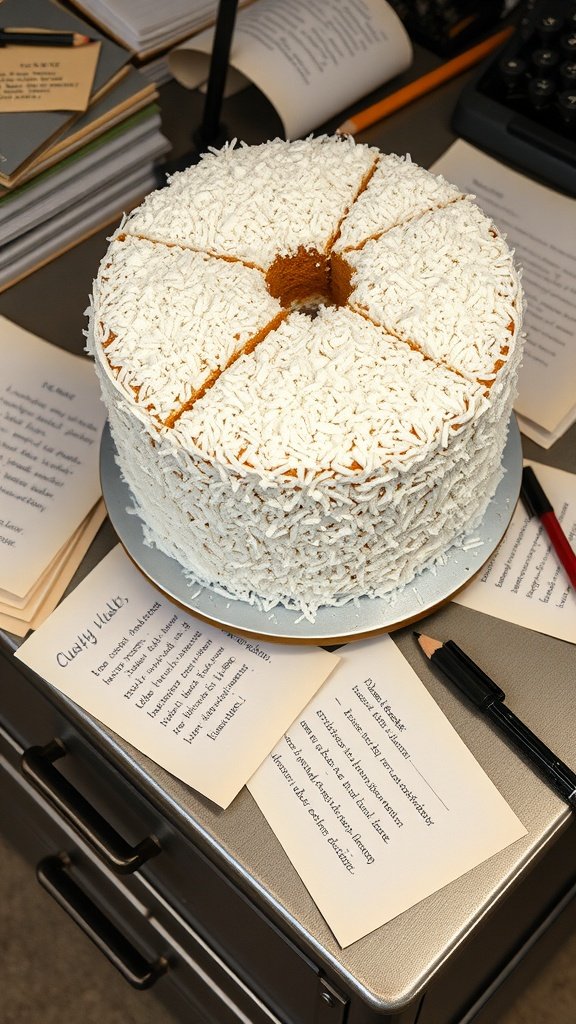
Copywriter’s Coconut Layer Cake is a delightful treat that takes you back to the 1960s with its fluffy layers and sweet coconut flavor. This cake is perfect for anyone who loves the combination of light, airy cake with creamy frosting. It’s not overly complicated to make, making it an enjoyable project for bakers of all skill levels.
The cake has a soft texture that pairs beautifully with the rich coconut frosting, creating a balance that’s hard to resist. Whether you’re celebrating a special occasion or just satisfying a sweet tooth, this cake is sure to impress.
Ingredients
- 2 cups all-purpose flour
- 1 1/2 cups granulated sugar
- 1 tablespoon baking powder
- 1/2 teaspoon salt
- 1 cup unsalted butter, softened
- 4 large eggs
- 1 teaspoon vanilla extract
- 1 cup milk
- 1 1/2 cups shredded coconut
- 2 cups powdered sugar
- 1/2 cup unsalted butter, softened
- 1 teaspoon vanilla extract (for frosting)
- 1 cup shredded coconut (for frosting)
Instructions
- Preheat the oven to 350°F (175°C). Grease and flour two 9-inch round cake pans.
- In a large bowl, whisk together flour, sugar, baking powder, and salt. Add softened butter and mix until crumbly.
- In another bowl, beat the eggs, vanilla extract, and milk together. Gradually add this mixture to the dry ingredients, mixing until smooth. Fold in the shredded coconut.
- Divide the batter evenly between the prepared pans and smooth the tops. Bake for 25-30 minutes or until a toothpick inserted in the center comes out clean.
- Let the cakes cool in the pans for 10 minutes, then turn them out onto wire racks to cool completely.
- For the frosting, beat together the softened butter, powdered sugar, and vanilla extract until creamy. Mix in the shredded coconut.
- Once the cakes are cool, place one layer on a serving plate. Spread a layer of frosting on top, then place the second cake layer on top. Frost the top and sides of the cake with the remaining coconut frosting.
- Decorate the top with extra shredded coconut, if desired, and slice to serve.
Cherry Blossom Park Avenue Tea Cake
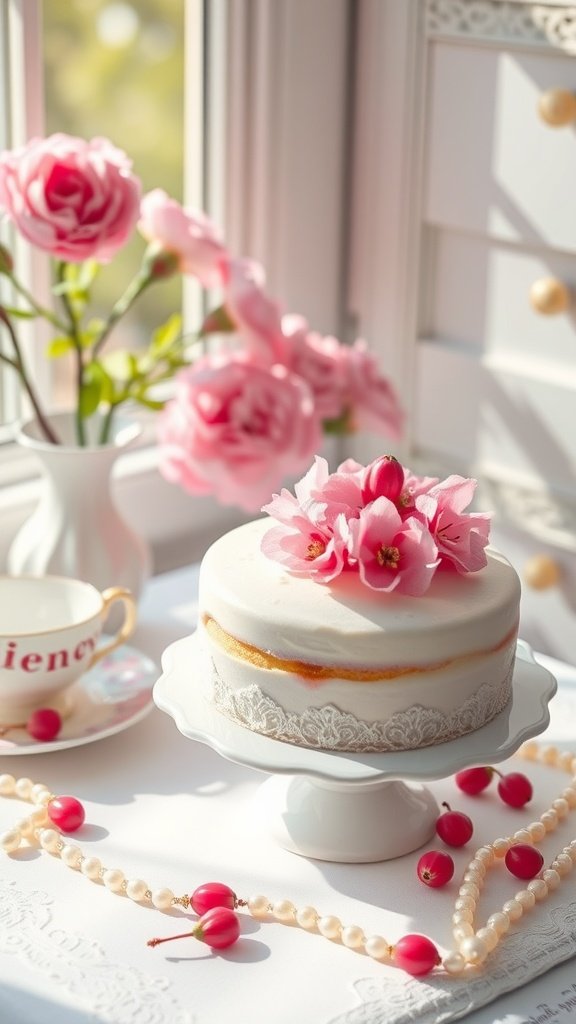
This Cherry Blossom Park Avenue Tea Cake captures the essence of spring with its delicate flavors and beautiful presentation. Light and moist, it combines the sweetness of cherries with a hint of floral notes, making it perfect for afternoon tea or a light dessert. It’s a simple recipe that even novice bakers can master, bringing a touch of elegance to your table.
The cake is adorned with a lovely layer of frosting and fresh flowers, making it not just a treat for the taste buds, but a feast for the eyes too. Whether you’re hosting a gathering or enjoying a quiet afternoon, this cake is sure to impress.
Ingredients
- 2 cups all-purpose flour
- 1 cup granulated sugar
- 1/2 cup unsalted butter, softened
- 1 cup milk
- 3 large eggs
- 1 tablespoon baking powder
- 1 teaspoon vanilla extract
- 1/2 teaspoon almond extract
- 1 cup fresh cherries, pitted and halved
- 1 cup powdered sugar (for frosting)
- 2 tablespoons milk (for frosting)
- Edible flowers for decoration
Instructions
- Preheat your oven to 350°F (175°C) and grease a round cake pan.
- In a large bowl, cream together the softened butter and granulated sugar until light and fluffy. Add the eggs one at a time, mixing well after each addition.
- Stir in the vanilla and almond extracts. In another bowl, combine the flour and baking powder. Gradually add this dry mixture to the wet ingredients, alternating with milk, and mix until just combined.
- Gently fold in the halved cherries. Pour the batter into the prepared cake pan and smooth the top.
- Bake for 25-30 minutes or until a toothpick inserted into the center comes out clean. Allow the cake to cool in the pan for 10 minutes before transferring to a wire rack to cool completely.
- For the frosting, mix the powdered sugar with milk until smooth. Once the cake is cooled, spread the frosting over the top and decorate with edible flowers.
Vinyl & Velvet Chocolate Mousse Cake
This Vinyl & Velvet Chocolate Mousse Cake is a delightful treat that perfectly captures the spirit of the 1960s. With its rich chocolate flavor and silky mousse texture, it’s both indulgent and sophisticated. The combination of smooth chocolate and a touch of cream makes for a dessert that feels special yet is surprisingly simple to whip up.
Ideal for any occasion, whether you’re hosting a retro-themed party or just want to impress friends with a homemade dessert, this cake is sure to be a hit. The luxurious mousse layers are paired with a hint of sweetness, creating a dessert that’s hard to resist. Let’s get into how to make this delicious cake!
Ingredients
- 1 cup semi-sweet chocolate chips
- 1/4 cup unsalted butter
- 3 large eggs, separated
- 1/4 cup granulated sugar
- 1 teaspoon vanilla extract
- 1 cup heavy cream
- 1/4 cup powdered sugar
- 1/2 teaspoon salt
- Chocolate shavings or cocoa powder for garnish
Instructions
- Melt Chocolate: In a heatproof bowl, combine the chocolate chips and butter. Heat over a pot of simmering water, stirring until melted and smooth. Remove from heat and let cool slightly.
- Whip Egg Yolks: In a separate bowl, whisk together the egg yolks, granulated sugar, and vanilla until pale and fluffy. Gradually add the melted chocolate mixture, stirring until combined.
- Beat Egg Whites: In another bowl, beat the egg whites and salt until soft peaks form. Gently fold the egg whites into the chocolate mixture until no white streaks remain.
- Whip Cream: In a separate bowl, beat the heavy cream and powdered sugar until soft peaks form. Gently fold the whipped cream into the chocolate mixture until fully incorporated.
- Assemble Cake: Pour the mousse into a prepared cake pan and refrigerate for at least 4 hours or until set. Once set, remove from the pan and garnish with chocolate shavings or cocoa powder before serving.
Secretary’s Strawberry Champagne Cake
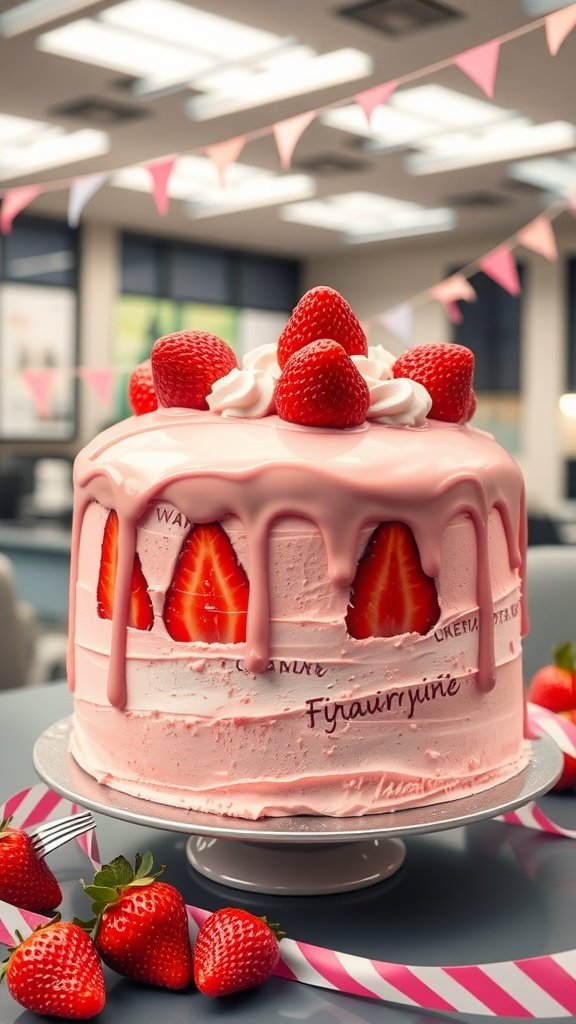
This Secretary’s Strawberry Champagne Cake is a delightful treat that’s perfect for any celebration. With its light and fluffy layers, infused with a touch of champagne and fresh strawberries, it’s as refreshing as it is delicious. The creamy frosting adds a sweet balance that makes each bite irresistible.
This recipe is surprisingly simple to make, making it a great choice for bakers of all levels. You’ll impress your friends and family without spending all day in the kitchen!
Ingredients
- 2 cups all-purpose flour
- 1 ½ cups granulated sugar
- ½ cup unsalted butter, softened
- 1 cup champagne (or sparkling wine)
- 1 cup milk
- 2 large eggs
- 2 teaspoons baking powder
- 1 teaspoon vanilla extract
- ½ teaspoon salt
- 2 cups fresh strawberries, hulled and sliced
- 2 cups heavy cream
- ¼ cup powdered sugar
Instructions
- Preheat the oven to 350°F (175°C). Grease and flour two 9-inch round cake pans.
- In a large bowl, cream together the butter and granulated sugar until light and fluffy. Beat in the eggs one at a time, then stir in the vanilla.
- In another bowl, mix the flour, baking powder, and salt. Gradually add this to the butter mixture alternately with the champagne and milk, starting and ending with the flour mixture. Mix until just combined.
- Divide the batter between the prepared pans and smooth the tops. Bake for 25-30 minutes or until a toothpick inserted into the center comes out clean. Let the cakes cool in the pans for 10 minutes, then turn out onto wire racks to cool completely.
- For the frosting, whip the heavy cream and powdered sugar together until stiff peaks form. Place one layer of the cake on a serving plate and spread a layer of whipped cream over the top, followed by a layer of sliced strawberries. Place the second layer on top and frost the whole cake with the remaining whipped cream.
- Decorate the top with additional strawberries for a beautiful finish. Chill until ready to serve.
Retro Almond Praline Checkerboard Cake
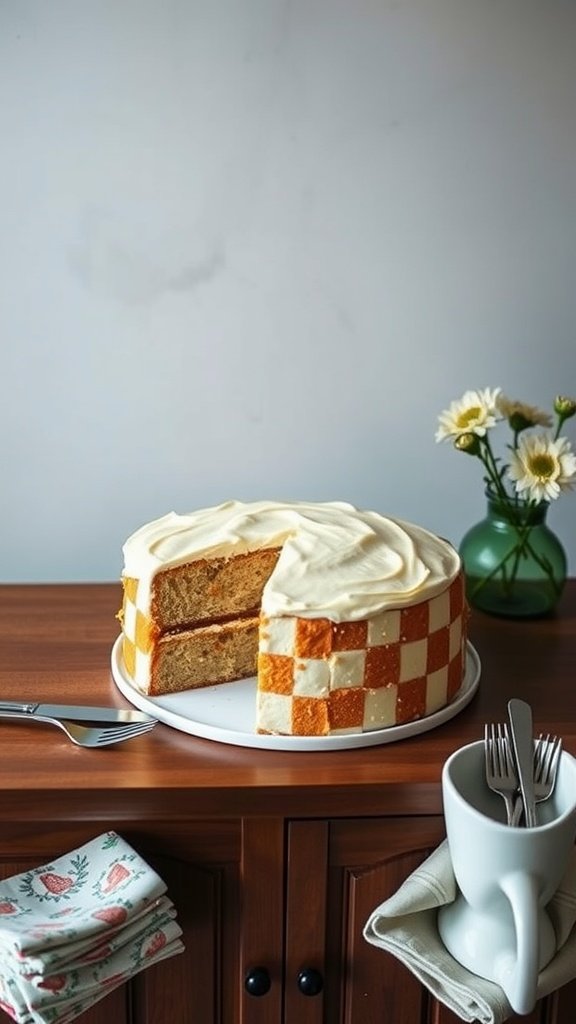
Retro Almond Praline Checkerboard Cake is a delightful throwback to the 1960s, combining rich almond flavors with a fun visual twist. The cake features alternating layers of moist almond sponge, creating a striking checkerboard pattern that makes it as much a feast for the eyes as for the palate. Topped with a creamy praline frosting, this cake offers a sweet, nutty flavor that’s sure to impress.
This recipe is quite accessible for home bakers, making it a great choice for both beginners and seasoned pros. The satisfaction of creating that checkerboard effect is well worth the effort, and it’s an impressive centerpiece for any gathering.
Ingredients
- 2 cups all-purpose flour
- 1 1/2 cups granulated sugar
- 1 cup unsalted butter, softened
- 1 cup almond milk
- 4 large eggs
- 2 teaspoons baking powder
- 1 teaspoon vanilla extract
- 1 teaspoon almond extract
- 1/2 teaspoon salt
- 1 cup powdered sugar
- 1/4 cup heavy cream
- 1/2 cup crushed pralines
Instructions
- Preheat your oven to 350°F (175°C) and grease two 9-inch round cake pans.
- In a large bowl, cream together the butter and granulated sugar until light and fluffy. Add the eggs one at a time, mixing well after each addition.
- Combine the flour, baking powder, and salt in another bowl. Gradually add this dry mixture to the creamed mixture, alternating with almond milk. Stir in the vanilla and almond extracts.
- Divide the batter evenly into two bowls. In one bowl, mix in crushed pralines to create a praline-flavored batter. Leave the other bowl plain.
- Using a checkerboard cake pan or a simple round cake cutter, alternate pouring the two batters into the prepared pans to create a checkerboard effect.
- Bake for 25-30 minutes, or until a toothpick inserted in the center comes out clean. Let the cakes cool in the pans for 10 minutes, then turn them out onto a wire rack to cool completely.
- For the frosting, beat together the powdered sugar and heavy cream until smooth. Fold in the remaining crushed pralines.
- Once the cakes are completely cool, spread the praline frosting between the layers and over the top and sides of the cake. Decorate as desired.
- Slice and serve to enjoy a slice of retro delight!
Copy Room Carrot Walnut Cake
The Copy Room Carrot Walnut Cake is a delightful treat that brings a touch of nostalgia from the 1960s. With its moist layers filled with shredded carrots and crunchy walnuts, this cake offers a perfect balance of sweetness and texture. Topped with a creamy frosting, it’s not only delicious but also visually appealing, making it a hit for any gathering.
This recipe is simple to follow, making it great for bakers of all levels. Whether you’re prepping for a casual office party or a family celebration, this cake will surely impress everyone with its comforting flavors and homemade charm.
Ingredients
- 2 cups all-purpose flour
- 2 cups granulated sugar
- 1 teaspoon baking powder
- 1 teaspoon baking soda
- 1 teaspoon ground cinnamon
- 1/2 teaspoon salt
- 1 cup vegetable oil
- 4 large eggs
- 3 cups grated carrots
- 1 cup chopped walnuts
- 1 teaspoon vanilla extract
Instructions
- Preheat the oven to 350°F (175°C). Grease and flour two 9-inch round cake pans.
- In a large bowl, mix together the flour, sugar, baking powder, baking soda, cinnamon, and salt.
- Add the oil and eggs to the dry ingredients, mixing until well combined. Stir in the grated carrots, chopped walnuts, and vanilla extract.
- Divide the batter evenly between the prepared pans. Bake for 25-30 minutes or until a toothpick inserted into the center comes out clean.
- Allow the cakes to cool in the pans for 10 minutes before transferring them to a wire rack to cool completely.
Golden Age Ginger Rum Cake
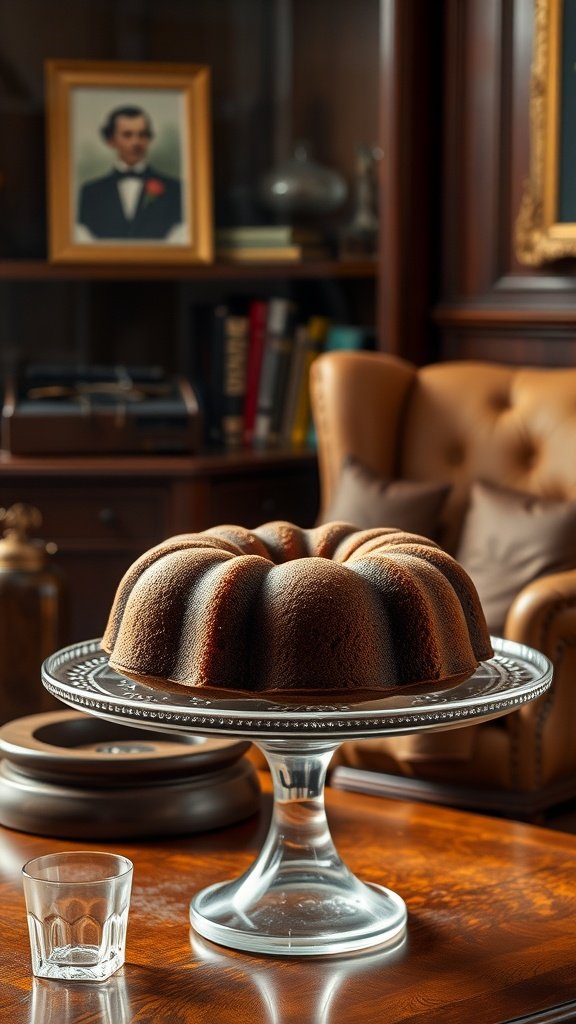
The Golden Age Ginger Rum Cake brings a delightful twist to traditional desserts, perfectly blending the warmth of ginger with the rich depth of rum. This cake is moist, flavorful, and has a hint of spice that makes it stand out. It’s easy to whip up, making it a fantastic choice for both seasoned bakers and beginners alike.
This cake is not just a treat for the taste buds; it’s also a nod to the 1960s era, where entertaining with style was key. Pair it with a cup of coffee or a glass of your favorite dessert wine for a delightful experience.
Ingredients
- 2 cups all-purpose flour
- 1 teaspoon baking powder
- 1/2 teaspoon baking soda
- 1 teaspoon ground ginger
- 1 teaspoon ground cinnamon
- 1/4 teaspoon ground cloves
- 1/2 teaspoon salt
- 1/2 cup unsalted butter, softened
- 1 cup granulated sugar
- 3 large eggs
- 1 cup dark rum
- 1/2 cup molasses
- 1/2 cup chopped crystallized ginger
- 1/2 cup walnuts, chopped (optional)
Instructions
- Preheat the oven to 350°F (175°C). Grease and flour a bundt pan.
- In a medium bowl, whisk together flour, baking powder, baking soda, ground ginger, cinnamon, cloves, and salt.
- In a large bowl, beat the butter and sugar until light and fluffy. Add the eggs one at a time, beating well after each addition.
- Mix in the rum and molasses until combined.
- Gradually add the dry ingredients to the wet mixture, stirring until just combined. Fold in the chopped ginger and walnuts, if using.
- Pour the batter into the prepared bundt pan. Bake for 50-60 minutes, or until a toothpick inserted into the center comes out clean.
- Allow the cake to cool in the pan for about 10 minutes before inverting onto a wire rack to cool completely.
Madison Gala Mocha Fudge Torte
The Madison Gala Mocha Fudge Torte is a delightful dessert that combines rich chocolate and coffee flavors, making it a perfect treat for coffee lovers. This cake is moist, indulgent, and features a luscious fudge frosting that adds an extra layer of sweetness. Perfect for gatherings or as a special treat, it’s surprisingly straightforward to make, even for novice bakers.
With its elegant presentation and decadent taste, this torte will impress anyone lucky enough to have a slice. Ideal for celebrations or cozy evenings, it brings a touch of vintage charm inspired by the 1960s.
Ingredients
- 1 cup all-purpose flour
- 1 cup granulated sugar
- 1/2 cup unsweetened cocoa powder
- 1 teaspoon baking powder
- 1/2 teaspoon baking soda
- 1/4 teaspoon salt
- 1/2 cup unsalted butter, softened
- 2 large eggs
- 1 teaspoon vanilla extract
- 1/2 cup brewed coffee, cooled
- 1 cup heavy cream
- 4 ounces bittersweet chocolate, chopped
- 1 cup confectioners’ sugar
- 1 teaspoon instant coffee granules
Instructions
- Preheat your oven to 350°F (175°C). Grease and flour a 9-inch round cake pan.
- In a large bowl, combine flour, sugar, cocoa powder, baking powder, baking soda, and salt. Mix well.
- Add softened butter, eggs, vanilla, and brewed coffee to the dry ingredients. Beat on medium speed until the batter is smooth.
- Pour the batter into the prepared cake pan and bake for 30-35 minutes, or until a toothpick inserted in the center comes out clean. Let it cool in the pan for 10 minutes, then transfer to a wire rack to cool completely.
- For the frosting, heat the heavy cream in a small saucepan until just boiling. Remove from heat and add the chopped chocolate, stirring until smooth. Add the confectioners’ sugar and instant coffee, mixing until well combined.
- Once the cake is cool, frost the top and sides with the mocha fudge frosting. Serve and enjoy!
Typing Pool Tangerine Pound Cake
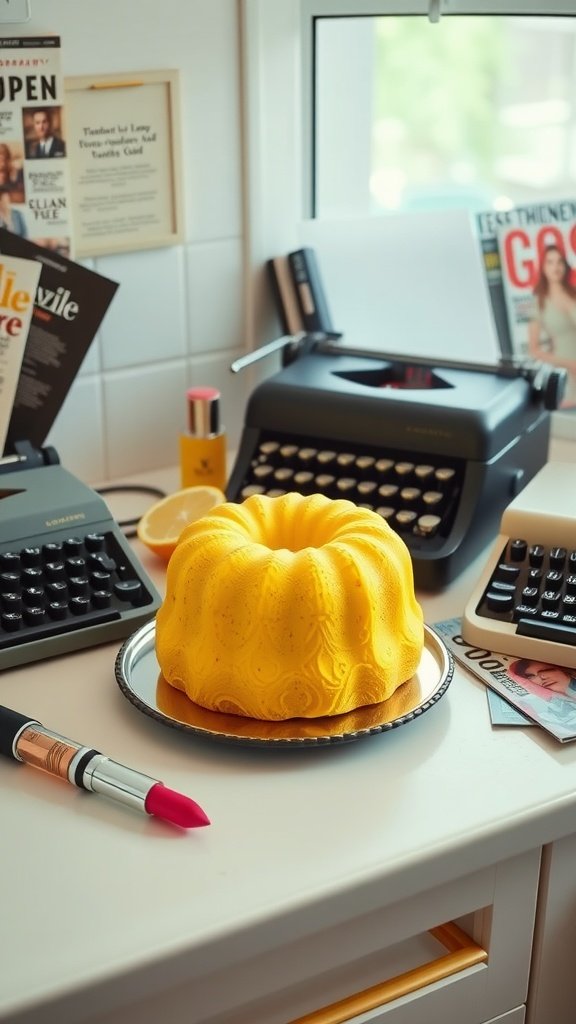
This Typing Pool Tangerine Pound Cake is a delightful nod to the vibrant flavors of the 1960s. With its bright, zesty tangerine notes, the cake offers a perfect balance of sweetness and citrusy brightness, making it a refreshing treat for any occasion. It’s simple to make, whether you’re a baking novice or an experienced home chef.
The cake’s moist texture and rich flavor make it an ideal companion for afternoon tea or a festive gathering. Plus, it’s easily adaptable—feel free to add a glaze or icing for an extra touch of sweetness!
Ingredients
- 1 cup unsalted butter, softened
- 2 cups granulated sugar
- 4 large eggs
- 3 cups all-purpose flour
- 1 teaspoon baking powder
- 1/2 teaspoon baking soda
- 1/2 teaspoon salt
- 1 cup buttermilk
- 1/2 cup fresh tangerine juice
- Zest of 2 tangerines
Instructions
- Preheat the oven to 350°F (175°C) and grease a bundt pan.
- In a large bowl, cream the softened butter and sugar until light and fluffy. Add eggs one at a time, beating well after each addition.
- In another bowl, whisk together flour, baking powder, baking soda, and salt. Gradually add this dry mixture to the butter mixture, alternating with buttermilk, mixing until just combined.
- Stir in the tangerine juice and zest until evenly distributed.
- Pour the batter into the prepared bundt pan and smooth the top. Bake for about 60-70 minutes, or until a toothpick inserted into the center comes out clean.
- Let the cake cool in the pan for 10 minutes before transferring it to a wire rack to cool completely.
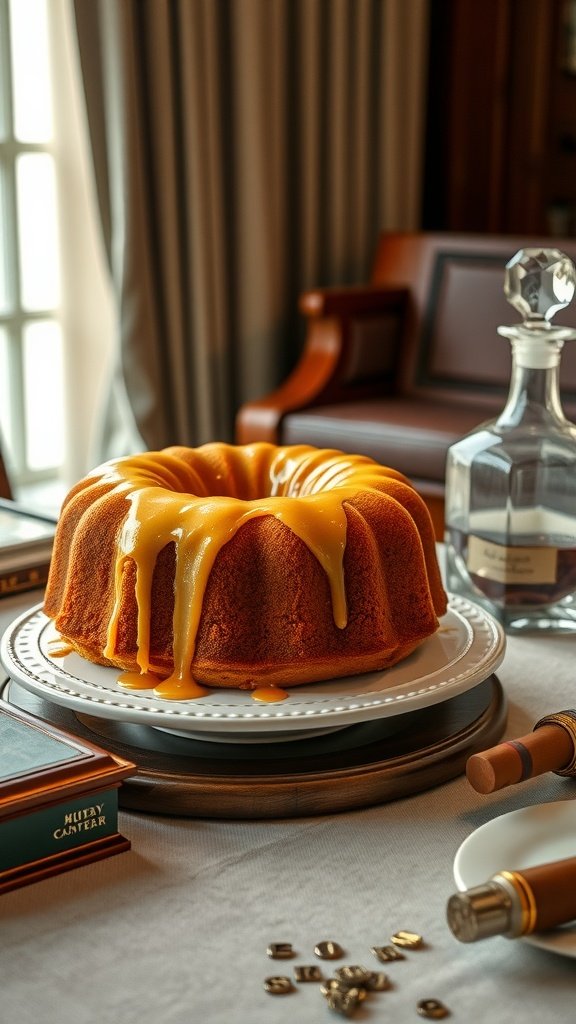
Cabinet Meeting Caramel Drizzle Cake
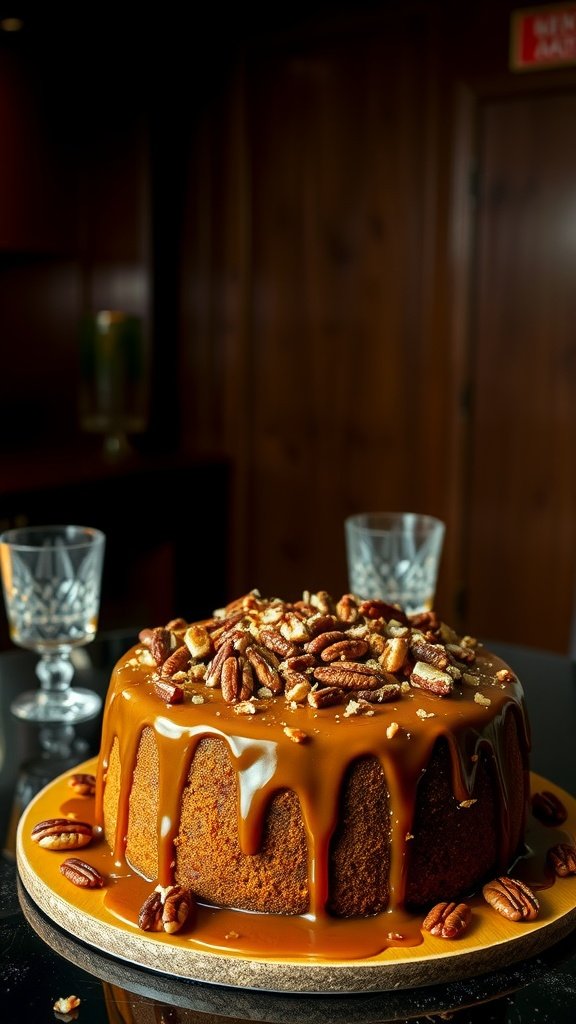
This Cabinet Meeting Caramel Drizzle Cake is the perfect blend of buttery richness and sweet caramel goodness. With a moist texture and a delightful caramel sauce drizzling down the sides, it’s an impressive dessert ideal for gatherings or a cozy night in.
Simple yet sophisticated, this cake is sure to impress whether you’re celebrating a special occasion or just want a treat. The addition of pecans adds a lovely crunch that complements the cake’s soft crumb and decadent caramel.
Ingredients
- 2 cups all-purpose flour
- 1 ½ teaspoons baking powder
- 1 teaspoon baking soda
- ½ teaspoon salt
- 1 cup unsalted butter, softened
- 1 ½ cups granulated sugar
- 4 large eggs
- 1 teaspoon vanilla extract
- 1 cup sour cream
- 1 cup caramel sauce, plus extra for drizzling
- 1 cup pecans, chopped
Instructions
- Preheat your oven to 350°F (175°C) and grease a round cake pan.
- In a bowl, whisk together flour, baking powder, baking soda, and salt; set aside.
- In another large bowl, cream the softened butter and sugar until light and fluffy. Add eggs one at a time, mixing well after each addition, then stir in vanilla.
- Gradually add the flour mixture to the creamed mixture, alternating with sour cream, starting and ending with flour.
- Fold in 1 cup of caramel sauce and chopped pecans until evenly distributed.
- Pour the batter into the prepared cake pan and bake for 30-35 minutes, or until a toothpick comes out clean.
- Let the cake cool for about 10 minutes in the pan before transferring to a wire rack.
- Once cooled, drizzle with additional caramel sauce and sprinkle with more pecans before serving.
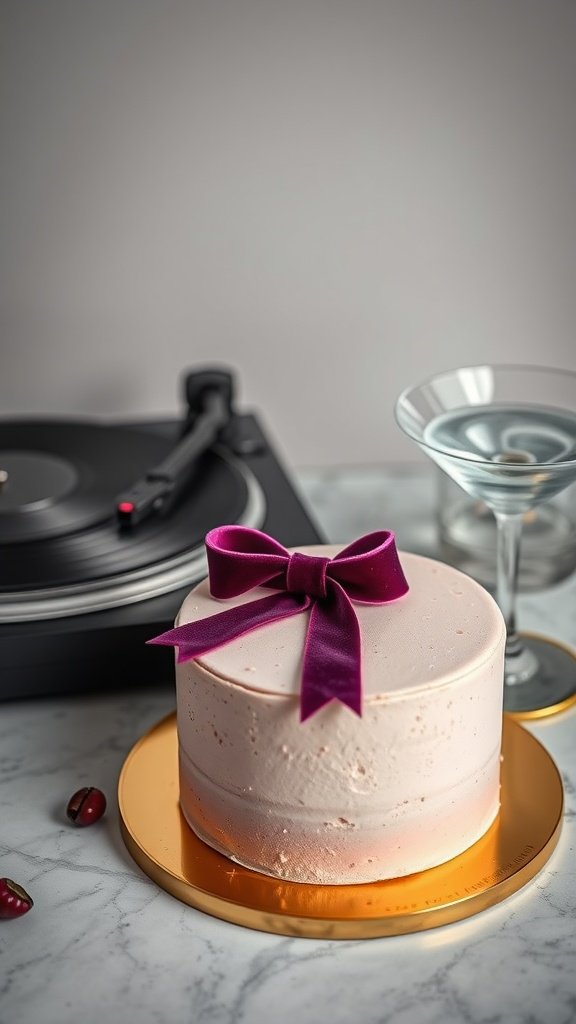
Afternoon Martini Almond Cake

The Afternoon Martini Almond Cake is a delightful blend of flavors that pays tribute to the classic cocktail culture of the 1960s. This cake features a moist almond base, subtly infused with the essence of a martini, making it a unique treat for gatherings or a simple afternoon indulgence. The light, nutty flavor pairs perfectly with a smooth, creamy frosting that rounds out the cake’s profile.
Simple to make, this recipe combines easily accessible ingredients to bring the spirit of the Mad Men era right to your kitchen. Whether you’re serving it at a cocktail party or enjoying a slice with your afternoon tea, this cake is sure to impress!
Ingredients
- 1 ½ cups all-purpose flour
- 1 cup almond flour
- 1 cup granulated sugar
- ½ cup unsalted butter, softened
- 3 large eggs
- 1 tablespoon vanilla extract
- 1 teaspoon baking powder
- ½ teaspoon salt
- ¼ cup dry vermouth
- 1 tablespoon lemon zest
- 1 cup heavy cream
- 2 tablespoons powdered sugar
- Almonds and olives for garnish
Instructions
- Preheat your oven to 350°F (175°C). Grease and flour an 8-inch round cake pan.
- In a mixing bowl, combine the all-purpose flour, almond flour, baking powder, and salt. In another bowl, cream the butter and sugar until light and fluffy. Add the eggs one at a time, mixing well after each addition.
- Stir in the vanilla extract, dry vermouth, and lemon zest. Gradually add the flour mixture to the wet ingredients, mixing until just combined.
- Pour the batter into the prepared cake pan and smooth the top. Bake for 25-30 minutes or until a toothpick inserted in the center comes out clean.
- Once the cake is done, let it cool in the pan for 10 minutes before transferring it to a wire rack to cool completely.
- For the frosting, whip the heavy cream and powdered sugar until soft peaks form. Once the cake is cool, spread the whipped cream on top and garnish with almonds and olives for a playful touch.
Birthday In The Breakroom Confetti Cake
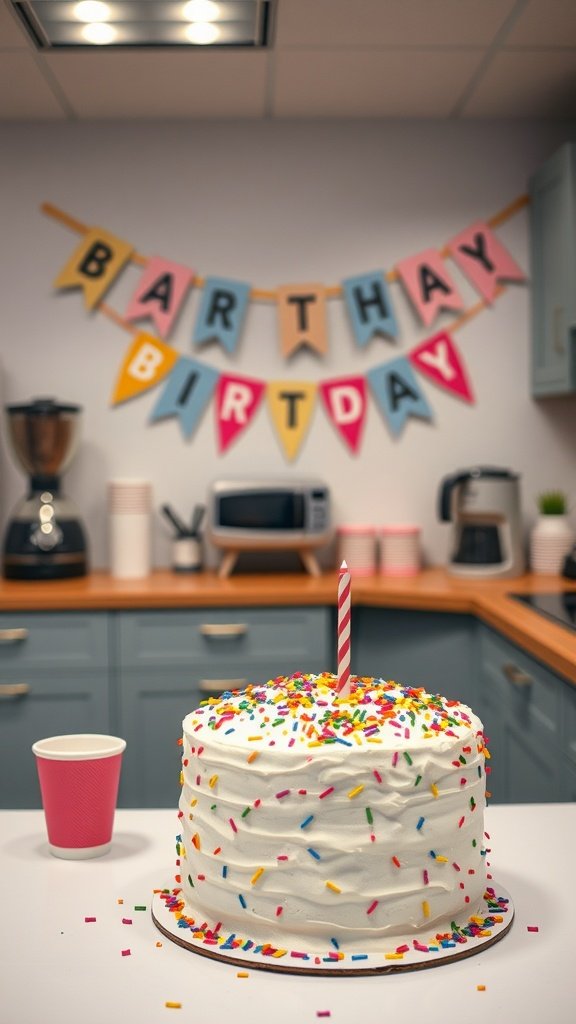
Birthday In The Breakroom Confetti Cake is the perfect treat for celebrating special moments at work. This cake is light, fluffy, and bursting with colorful sprinkles that add a fun touch. It’s simple to make, allowing you to whip it up quickly before the next birthday celebration sneaks up on you.
The sweet, vanilla flavor pairs wonderfully with the soft texture, making each bite a delightful experience. Whether it’s for a colleague or just a fun treat for yourself, this cake is sure to bring joy to any breakroom.
Ingredients
- 2 ½ cups all-purpose flour
- 2 ½ teaspoons baking powder
- 1 teaspoon salt
- 1 cup unsalted butter, softened
- 2 cups granulated sugar
- 4 large eggs
- 1 tablespoon vanilla extract
- 1 cup whole milk
- 1 cup colorful sprinkles (plus more for decoration)
- 4 cups vanilla frosting
Instructions
- Preheat your oven to 350°F (175°C). Grease and flour two 9-inch round cake pans.
- In a bowl, whisk together the flour, baking powder, and salt. Set aside.
- In a large bowl, cream the softened butter and sugar until light and fluffy. Add the eggs one at a time, mixing well after each addition. Stir in the vanilla extract.
- Gradually add the dry ingredients to the wet ingredients, alternating with the milk. Mix until just combined. Fold in the colorful sprinkles.
- Pour the batter evenly into the prepared cake pans and bake for 25-30 minutes or until a toothpick inserted in the center comes out clean.
- Let the cakes cool in the pans for 10 minutes before transferring them to wire racks to cool completely.
- Once cooled, spread a layer of frosting on top of one cake layer, place the second layer on top, and frost the top and sides of the cake. Decorate with additional sprinkles before serving.
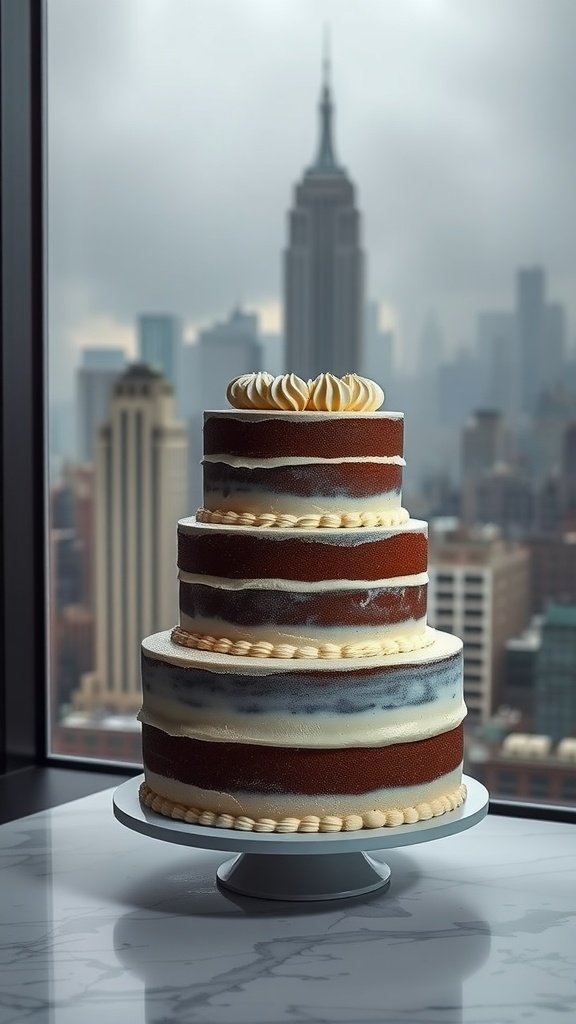
Manhattan Skyline Midnight Chocolate Cake
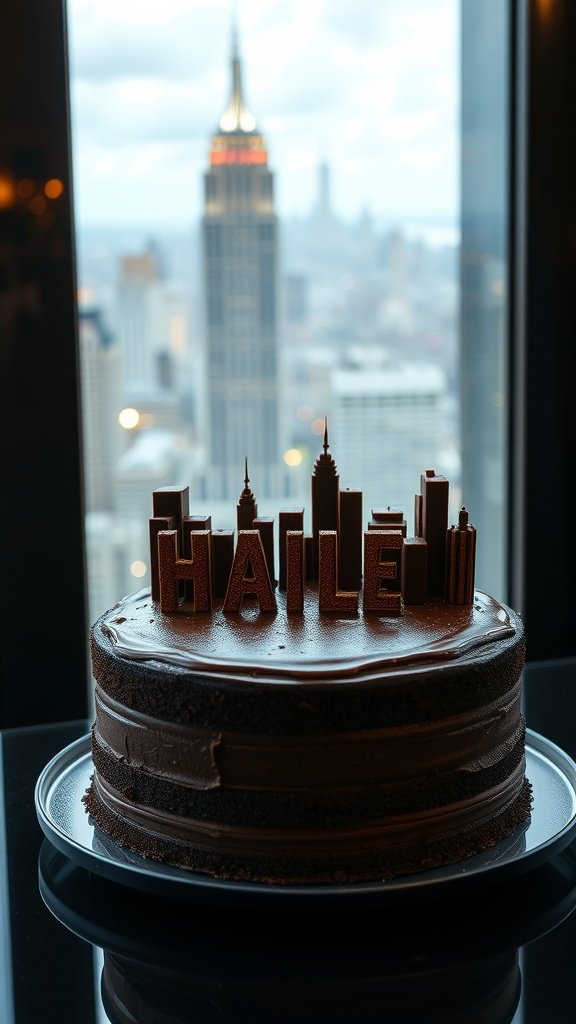
The Manhattan Skyline Midnight Chocolate Cake is a delightful treat that captures the essence of New York City’s nightlife. This cake features rich layers of moist chocolate, complemented by a velvety chocolate frosting that creates a perfect harmony of flavors. It’s not only delicious but also visually striking, making it an excellent centerpiece for any gathering.
While the recipe may seem elaborate, it’s quite simple to make, perfect for both baking novices and seasoned pros. The deep, rich chocolate flavor is sure to satisfy any sweet tooth, and the added touch of a skyline decoration makes it a standout dessert.
Ingredients
- 2 cups all-purpose flour
- 2 cups granulated sugar
- 3/4 cup unsweetened cocoa powder
- 1 1/2 teaspoons baking powder
- 1 1/2 teaspoons baking soda
- 1 teaspoon salt
- 2 large eggs
- 1 cup whole milk
- 1/2 cup vegetable oil
- 2 teaspoons vanilla extract
- 1 cup boiling water
- 1 cup unsweetened chocolate frosting
Instructions
- Preheat your oven to 350°F (175°C). Grease and flour two 9-inch round baking pans.
- In a large bowl, combine flour, sugar, cocoa powder, baking powder, baking soda, and salt. Mix well.
- Add eggs, milk, oil, and vanilla to the dry ingredients. Beat on medium speed for 2 minutes. Stir in boiling water until well combined (the batter will be thin).
- Pour the batter evenly into the prepared pans. Bake for 30 to 35 minutes or until a toothpick inserted in the center comes out clean.
- Once baked, cool the cakes in the pans for 10 minutes, then remove from pans and cool completely on wire racks.
- Frost the cooled cakes with the chocolate frosting, layering them as you go. Get creative with skyline decorations to give it that Manhattan vibe!
If you enjoyed this blog you can visit us or check out our other blogs and learn a bit about us.
Disclaimer: This blog post is inspired by fictional universes and characters created by their respective rights holders. All related content and imagery remain the property of their respective rights holder. This fan-inspired content is for entertainment and commentary purposes only and is not affiliated with or endorsed by HBO, Disney, Warner Bros., Lionsgate, or any other rights holders. To explore the official source material, please visit:
HBO