

Step into the glamorous world of the Roaring 20s with these 19 scrumptious dessert recipes that draw inspiration from the era’s flair and sophistication. From speakeasy-inspired sweets to jazz-age treats, these delightful creations will add a touch of vintage elegance to your gatherings, making them the perfect addition to any celebration or sweet tooth craving.
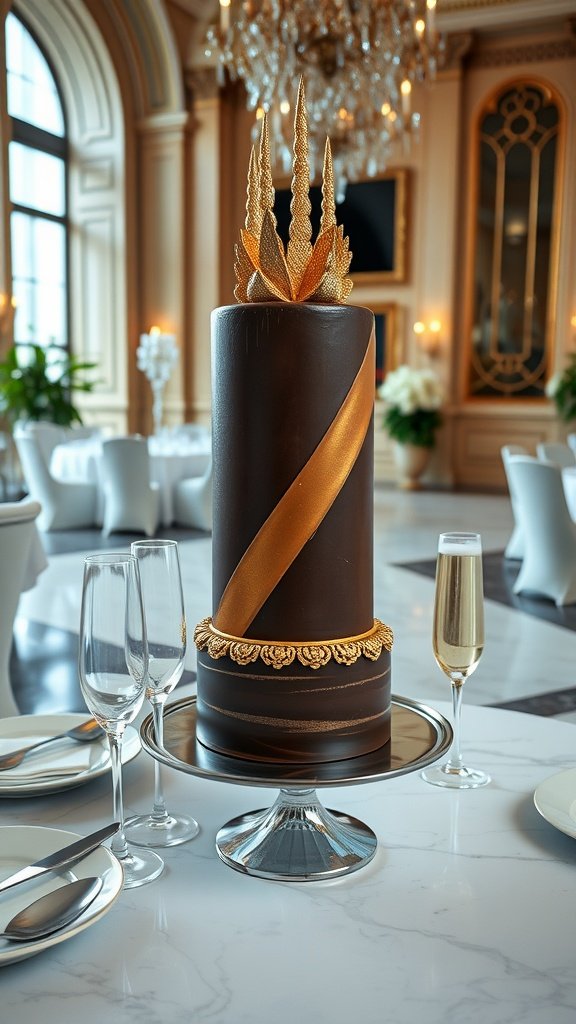
Manhattan Macaron Tower – Luxe, Stacked, Gilded, Tiny Bites
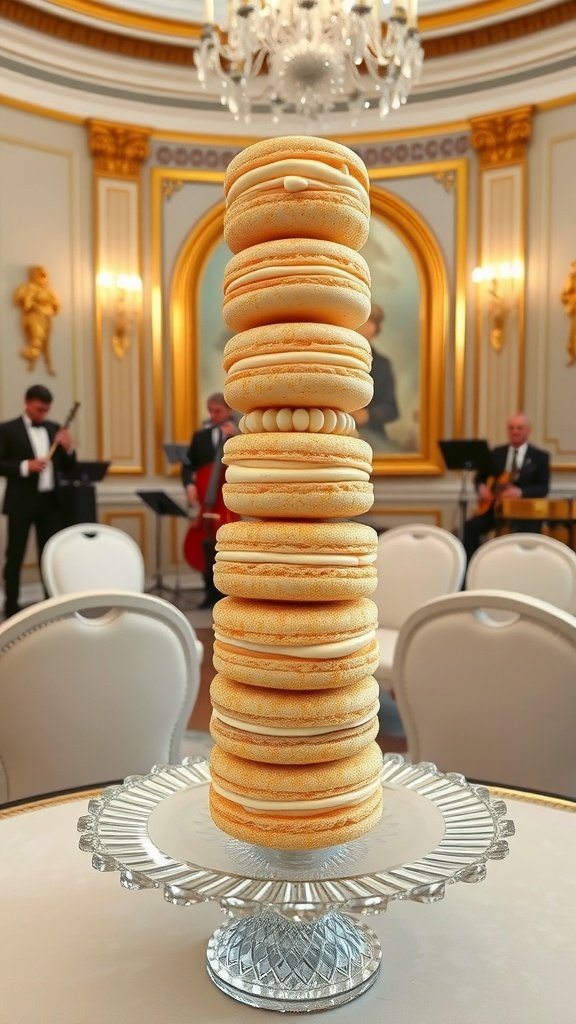
The Manhattan Macaron Tower is a stunning dessert that captures the spirit of the Roaring 20s with its luxurious appearance and delightful flavors. These delicate French treats are made from almond flour, egg whites, and sugar, creating a light, airy texture that’s simply irresistible. Each macaron is typically filled with a rich ganache or cream, adding a burst of flavor that pairs beautifully with the cookies’ crisp exterior.
Making a macaron tower does require some precision, but don’t worry! With a little practice, you’ll be stacking these sweet bites like a pro. The result is a stunning centerpiece for any gathering, sure to impress your guests and transport them back in time to an era of glamour and style.
Ingredients
- 1 cup almond flour
- 1 3/4 cups powdered sugar
- 4 large egg whites
- 1/4 cup granulated sugar
- 1 teaspoon vanilla extract
- 1/2 teaspoon cream of tartar
- Filling of your choice (e.g., buttercream, ganache)
Instructions
- Prepare the Batter: In a bowl, sift together the almond flour and powdered sugar. In a separate bowl, whip the egg whites with cream of tartar until soft peaks form. Gradually add granulated sugar and continue whipping until stiff peaks form. Gently fold in the almond flour mixture and vanilla until combined.
- Pipe the Macarons: Transfer the batter to a piping bag and pipe circles onto a lined baking sheet. Let them sit for about 30 minutes to form a skin.
- Bake: Preheat the oven to 300°F (150°C). Bake the macarons for 15-18 minutes. Allow them to cool completely before removing from the baking sheet.
- Assemble the Tower: Once cooled, pair macarons by size. Fill half of them with your chosen filling, then stack them in a pyramid shape, starting with the largest at the bottom.
- Serve and Enjoy: Display your macaron tower as a stunning centerpiece, and enjoy these tiny bites of luxury!
Jazz Club Chocolate Torte – Deep, Dense, Velvety, Bittersweet Layers
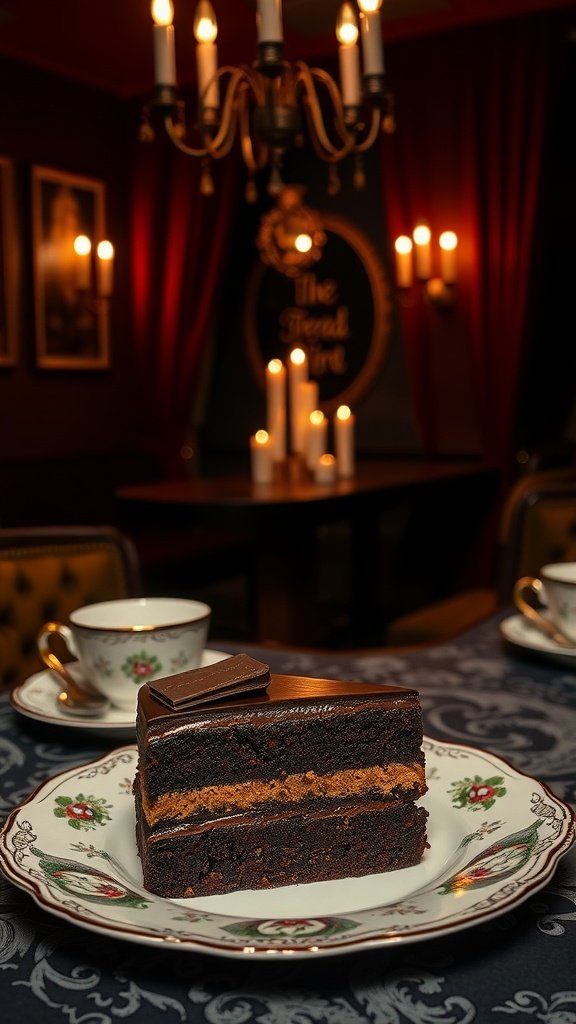
The Jazz Club Chocolate Torte is a showstopper that transports you straight to the glitz and glamour of the Roaring 20s. With deep, dense layers of bittersweet chocolate, this torte is a dessert lover’s dream. It strikes a perfect balance between rich and velvety, making each bite a delightful experience.
This recipe is surprisingly simple to make, allowing you to impress guests without the fuss. The deep flavors and elegant presentation make it perfect for any special occasion, yet it’s easy enough for a cozy night in. Now, let’s get to the ingredients and instructions to whip up this fabulous treat!
Ingredients
- 1 cup unsalted butter
- 8 ounces bittersweet chocolate, chopped
- 1 cup granulated sugar
- 1 cup brown sugar, packed
- 6 large eggs
- 1 teaspoon vanilla extract
- 1 cup all-purpose flour
- 1/2 cup cocoa powder
- 1/4 teaspoon salt
- Chocolate ganache for frosting
Instructions
- Preheat your oven to 350°F (175°C). Grease and line an 8-inch round cake pan with parchment paper.
- In a saucepan, melt the butter and chopped chocolate together over low heat. Stir until smooth and set aside to cool slightly.
- In a mixing bowl, combine granulated sugar, brown sugar, and eggs. Whisk until well blended. Add in the melted chocolate mixture and vanilla extract, stirring until fully incorporated.
- In another bowl, sift together flour, cocoa powder, and salt. Gradually fold the dry ingredients into the wet mixture until just combined.
- Pour the batter into the prepared pan and bake for 30-35 minutes, or until a toothpick inserted in the center comes out clean. Allow to cool in the pan for 10 minutes before transferring to a wire rack to cool completely.
- Once cooled, frost with chocolate ganache and serve. Enjoy your rich, velvety torte with a cup of coffee or tea!
Daisy’s Champagne Cupcakes – Fluffy, Fizzy, Glazed, Gilded Little Cakes
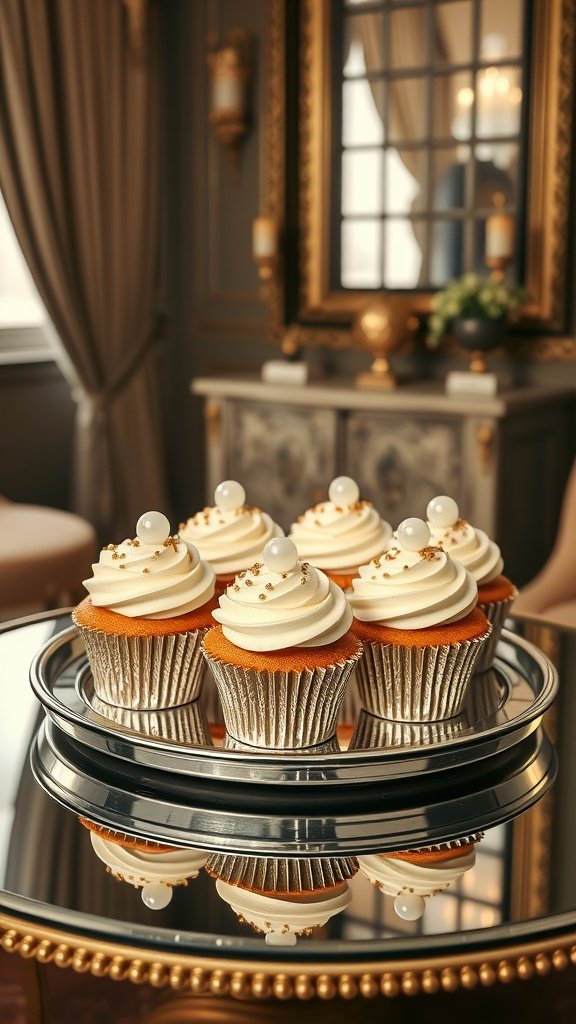
Daisy’s Champagne Cupcakes are a delightful tribute to the lavish spirit of the Roaring 20s. These little cakes are light and fluffy, infused with the effervescent essence of champagne, perfect for any celebration. Topped with a creamy glaze and a touch of elegance, they offer a sweet and fizzy flavor that dances on your palate.
This recipe is simple enough for anyone to whip up, making it an excellent choice for gatherings or just a treat for yourself. With a few ingredients and easy steps, you can bring a taste of the Gatsby era right into your kitchen!
Ingredients
- 1 cup all-purpose flour
- 1/2 cup granulated sugar
- 1/2 teaspoon baking powder
- 1/4 teaspoon salt
- 1/2 cup unsalted butter, softened
- 2 large eggs
- 1/4 cup champagne (or sparkling wine)
- 1 teaspoon vanilla extract
- 1/2 cup powdered sugar (for glaze)
- 1-2 tablespoons champagne (for glaze)
- Edible pearls or gold sprinkles for decoration
Instructions
- Preheat your oven to 350°F (175°C) and line a cupcake tin with liners.
- In a large bowl, cream together the softened butter and sugar until light and fluffy. Add the eggs, one at a time, mixing well after each addition.
- In another bowl, whisk together the flour, baking powder, and salt. Gradually add the dry ingredients to the wet mixture, alternating with the champagne and vanilla extract. Stir until just combined.
- Fill each cupcake liner about two-thirds full with the batter. Bake for 15-18 minutes or until a toothpick inserted into the center comes out clean.
- While the cupcakes are cooling, prepare the glaze by mixing the powdered sugar with champagne until smooth. Drizzle the glaze over the cooled cupcakes.
- Finish with a sprinkle of edible pearls or gold sprinkles for that extra touch of glamour.
East Egg Lemon Tartlets – Sharp, Elegant, Glossy, Mini Citrus Pies
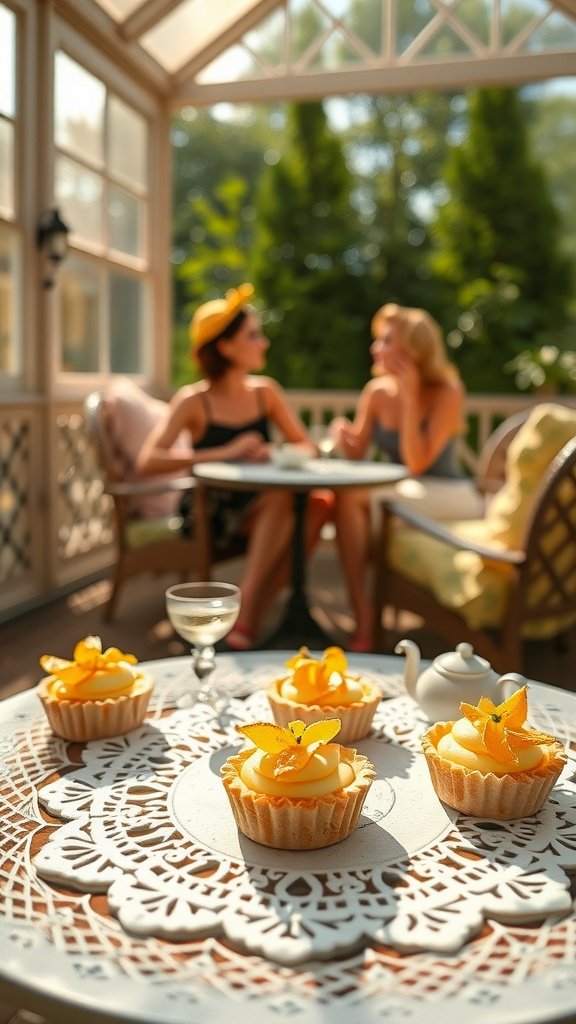
These East Egg Lemon Tartlets are a delightful treat that perfectly captures the spirit of the Roaring 20s. With a sharp, tangy lemon filling nestled in a buttery crust, they offer a refreshing burst of flavor that’s both sophisticated and satisfying. Not only are they visually appealing, but they are also relatively simple to make, making them ideal for gatherings or a sweet ending to any meal.
The glossy finish and elegant presentation make these mini citrus pies a standout dessert. They’re perfect for afternoon tea or a festive celebration, sure to impress your guests with their charm and taste.
Ingredients
- 1 1/2 cups all-purpose flour
- 1/2 cup unsalted butter, softened
- 1/4 cup powdered sugar
- 1/4 teaspoon salt
- 1 large egg yolk
- 1/4 cup fresh lemon juice
- 1 cup granulated sugar
- 2 large eggs
- 1 tablespoon lemon zest
- 1/4 cup heavy cream
- Optional: edible flowers or lemon slices for garnish
Instructions
- Preheat the oven to 350°F (175°C). In a mixing bowl, combine flour, butter, powdered sugar, and salt. Mix until crumbly.
- Add the egg yolk and mix until the dough comes together. Press the dough into mini tartlet pans and bake for about 15 minutes until lightly golden.
- In another bowl, whisk together the lemon juice, granulated sugar, eggs, and lemon zest until smooth. Pour the lemon mixture into the baked tart shells.
- Bake the filled tartlets for an additional 15-20 minutes until the filling is set. Allow them to cool completely.
- Before serving, top with a dollop of whipped cream and garnish with edible flowers or lemon slices if desired.
Speakeasy Cherry Clafoutis – Warm, Boozy, Baked, Hidden Bourbon Cherries
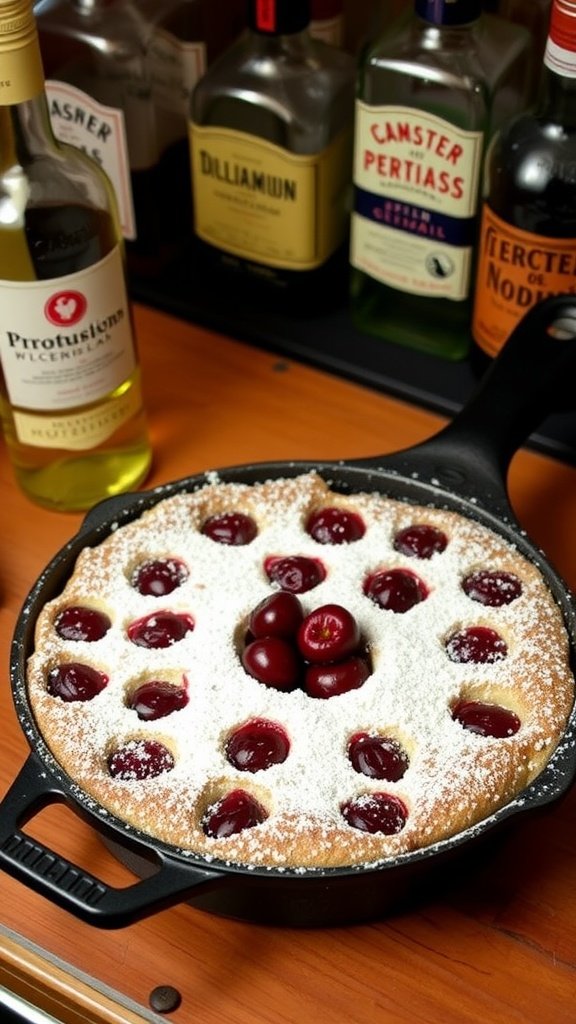
Cherry clafoutis is a delightful French dessert that combines a rich, custard-like batter with juicy cherries. This version adds a boozy twist with bourbon-soaked cherries, making it a perfect dessert for an evening reminiscent of the Roaring 20s. The clafoutis is warm, slightly sweet, and has a hint of nuttiness from the bourbon, creating a cozy treat for any occasion.
What’s great about this dessert is how simple it is to prepare. You can whip it up in no time, and it bakes into a beautiful, puffy treat that is sure to impress. Serve it warm with a dusting of powdered sugar for an elegant finish!
Ingredients
- 2 cups fresh cherries, pitted
- 1/4 cup bourbon
- 3 large eggs
- 1 cup whole milk
- 1/2 cup granulated sugar
- 1 teaspoon vanilla extract
- 1/4 teaspoon salt
- 1/2 cup all-purpose flour
- 2 tablespoons unsalted butter, melted
- Powdered sugar for dusting
Instructions
- Prep the Cherries: In a bowl, combine the pitted cherries and bourbon. Let them soak for at least 30 minutes to infuse with flavor.
- Preheat Oven: Preheat your oven to 350°F (175°C). Grease a baking dish or cast-iron skillet with butter.
- Mix the Batter: In a large bowl, whisk together the eggs, milk, sugar, vanilla extract, and salt. Gradually add the flour and melted butter, mixing until smooth.
- Add Cherries: Spread the soaked cherries evenly in the prepared dish. Pour the batter over the cherries, ensuring they’re well covered.
- Bake: Bake in the preheated oven for 35-40 minutes or until the clafoutis is puffed and golden brown. A toothpick inserted in the center should come out clean.
- Serve: Allow to cool slightly before dusting with powdered sugar. Serve warm for a delightful dessert experience!
Gatsby’s Gold Gelato – Cool, Creamy, Rich, Edible Gold Flakes
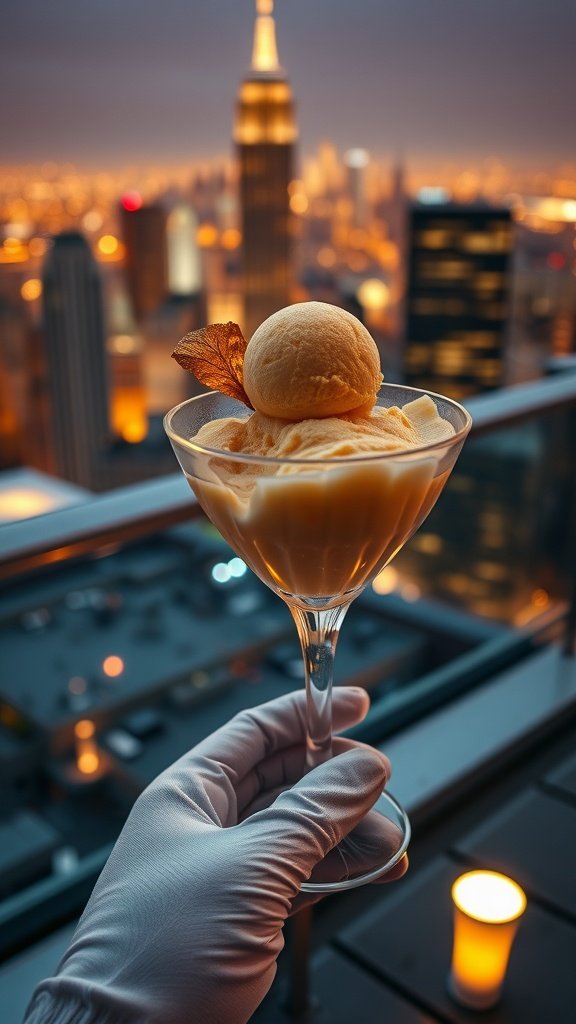
Gatsby’s Gold Gelato is a luxurious treat that captures the spirit of the Roaring Twenties. This creamy delight is not only rich in flavor but also visually stunning, thanks to the sparkling edible gold flakes that add a touch of glamor. It’s smooth, sweet, and has a hint of sophistication, making it perfect for any celebration or as a special dessert to enjoy on a warm evening.
Making this gelato at home is simpler than you might think. With just a few ingredients and a little patience, you can create a dessert that feels indulgent and glamorous. It’s a fantastic way to impress your guests or to treat yourself to something extraordinary!
Ingredients
- 2 cups heavy cream
- 1 cup whole milk
- 3/4 cup granulated sugar
- 1 tablespoon vanilla extract
- 1/4 cup edible gold flakes
- 1/2 cup crushed nuts (optional)
Instructions
- Combine the cream, milk, and sugar in a bowl. Whisk until the sugar is completely dissolved.
- Add the vanilla extract and mix well.
- Pour the mixture into an ice cream maker and churn according to the manufacturer’s instructions until it reaches a soft-serve consistency.
- In the last few minutes of churning, add the edible gold flakes and crushed nuts if using.
- Transfer the gelato to a container and freeze for at least 4 hours until firm.
- Serve in elegant dishes, garnished with more gold flakes on top for that extra sparkle!
Charleston Crème Brûlée – Smooth, Cracked, Caramel-Topped Custard Elegance
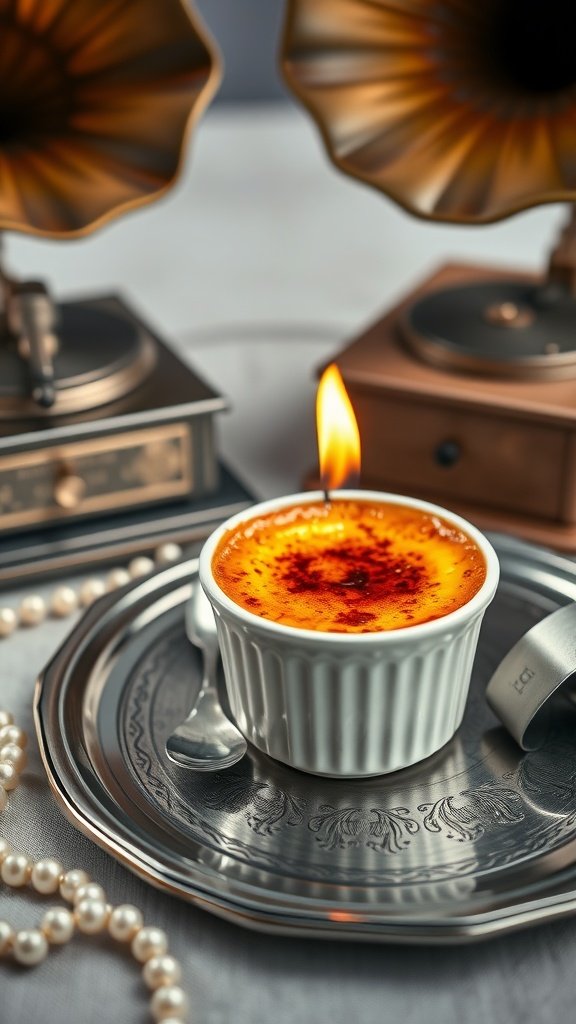
Charleston Crème Brûlée brings a touch of luxury to any dessert table. This classic French dessert features a rich, creamy custard base that is perfectly balanced with a crispy, caramelized sugar top. The contrast between the silky interior and the crackling crust creates a delightful experience with every spoonful. Best of all, it’s surprisingly simple to make, letting you impress guests without spending hours in the kitchen.
The flavor profile of this crème brûlée is subtly sweet with hints of vanilla, making it a perfect ending to any meal. It’s a great choice for both casual dinners and fancy gatherings. Plus, the fun of cracking through the caramelized sugar adds an interactive element that everyone will enjoy!
Ingredients
- 2 cups heavy cream
- 1 teaspoon vanilla extract
- 1/2 cup granulated sugar
- 5 large egg yolks
- Pinch of salt
- 2 tablespoons granulated sugar (for caramelizing)
Instructions
- Preheat the Oven: Preheat your oven to 325°F (160°C).
- Prepare the Cream: In a saucepan, heat the heavy cream and vanilla extract over medium heat until it just begins to simmer. Remove from heat and let cool slightly.
- Mix the Egg Yolks: In a mixing bowl, whisk together the egg yolks, sugar, and salt until the mixture is smooth and pale.
- Combine: Gradually pour the warm cream into the egg mixture, whisking constantly to avoid curdling the eggs. Strain the mixture through a fine sieve into a measuring cup or bowl to remove any lumps.
- Fill Ramekins: Divide the custard mixture among ramekins, filling them about three-quarters full.
- Bake: Place the ramekins in a baking dish and fill the dish with hot water halfway up the sides of the ramekins. Bake for 30-35 minutes until the edges are set but the center is still slightly jiggly.
- Cool: Remove the ramekins from the water and let them cool to room temperature. Cover and refrigerate for at least 2 hours or until set.
- Caramelize: Before serving, sprinkle a thin layer of sugar on top of each custard. Use a kitchen torch to caramelize the sugar until it melts and turns golden brown. Let it cool for a minute before serving.
Roaring Raspberry Pavlova – Fluffy, Tart, Swirled, High Society Dessert
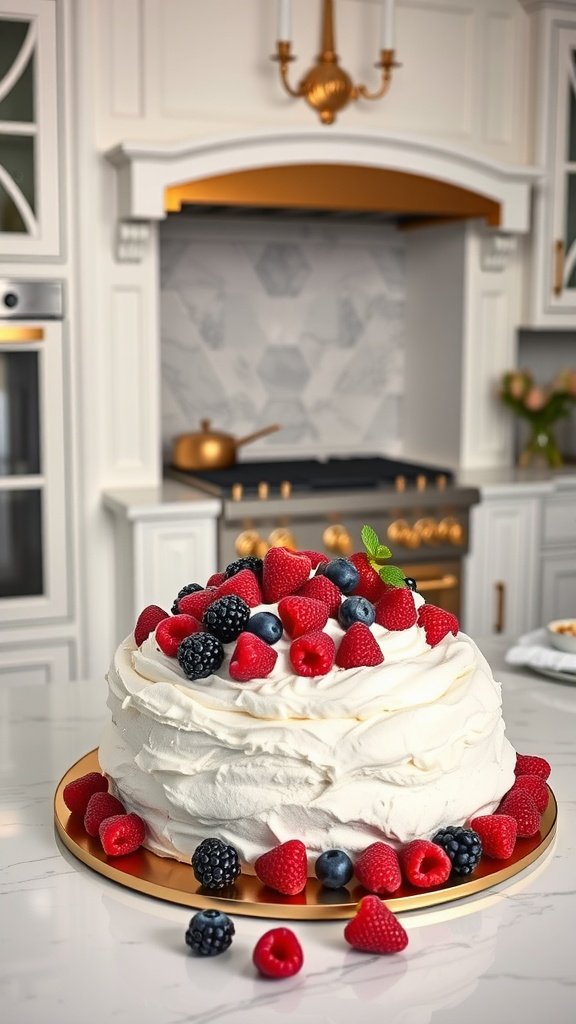
The Roaring Raspberry Pavlova is a delightful dessert that perfectly captures the essence of high society gatherings in the Roaring 20s. This airy dessert features a crisp meringue shell with a light, marshmallow-like interior. Topped with fresh whipped cream and swirls of tart raspberry sauce, it strikes a perfect balance between sweetness and tang. Plus, it’s surprisingly simple to make, making it a fantastic choice for both casual and elegant occasions.
Its light texture and vibrant flavors make it a crowd-pleaser, ideal for warm weather gatherings or festive celebrations. With its beautiful presentation, it’s sure to impress guests and become a staple in your dessert repertoire.
Ingredients
- 4 large egg whites
- 1 cup granulated sugar
- 1 teaspoon cornstarch
- 1 teaspoon white vinegar
- 1 teaspoon vanilla extract
- 1 cup heavy whipping cream
- 2 cups raspberries
- 2 tablespoons powdered sugar
- Fresh mint leaves for garnish
Instructions
- Preheat your oven to 275°F (135°C). Line a baking sheet with parchment paper and draw a circle about 8 inches in diameter as a guide.
- In a mixing bowl, whip the egg whites until soft peaks form. Gradually add the granulated sugar, mixing until glossy and stiff peaks form. Fold in cornstarch, vinegar, and vanilla extract gently.
- Spoon the meringue onto the prepared baking sheet, using the drawn circle as a guide. Create a slight dip in the center to hold the toppings.
- Bake for 1 hour, then turn off the oven and let the pavlova cool completely inside.
- While cooling, whip the cream and powdered sugar in a separate bowl until soft peaks form.
- Once cooled, spread the whipped cream over the pavlova and top with fresh raspberries. Optionally drizzle with raspberry sauce for extra flavor.
- Garnish with mint leaves before serving. Slice and enjoy the fluffy, tart layers of this stunning dessert!
Flapper Fig Tart – Earthy, Sweet, Rustic, With Champagne Glaze
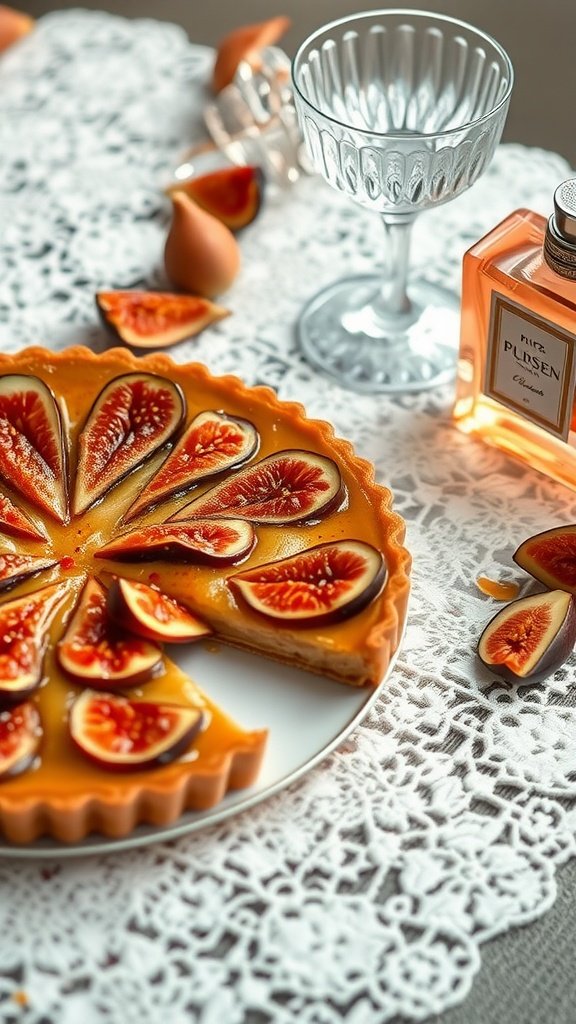
The Flapper Fig Tart is a delightful combination of earthy figs and a sweet, creamy filling, all wrapped in a rustic pastry crust. This dessert captures the essence of the Roaring 20s, providing a taste of elegance that’s surprisingly simple to make. Topped with a champagne glaze, it’s perfect for any celebration or just a cozy evening at home.
This tart is not only visually stunning but also brings a unique flavor profile that balances sweetness and earthiness. The champagne glaze adds a touch of sophistication, making it a great choice for those looking to impress without spending hours in the kitchen.
Ingredients
- 1 ½ cups all-purpose flour
- ½ cup unsalted butter, chilled and diced
- ¼ cup granulated sugar
- 1 egg yolk
- 3-4 tablespoons ice water
- 1 cup fresh figs, sliced
- 1 cup heavy cream
- ½ cup crème fraîche
- ½ cup powdered sugar
- 2 tablespoons champagne
Instructions
- Make the Crust: In a bowl, combine flour and sugar. Cut in the butter until the mixture resembles coarse crumbs. Stir in egg yolk and enough ice water to form a dough. Wrap in plastic and chill for 30 minutes.
- Preheat Oven: Preheat the oven to 350°F (175°C). Roll out the dough on a floured surface and fit it into a tart pan. Poke holes in the bottom and bake for 20 minutes until golden.
- Prepare the Filling: Whip the heavy cream until soft peaks form, then fold in the crème fraîche and powdered sugar until combined.
- Assemble the Tart: Spread the cream mixture over the baked crust and arrange sliced figs on top. Chill for at least one hour.
- Make the Glaze: In a small bowl, mix the champagne with a little powdered sugar until smooth. Drizzle over the figs just before serving.
Prohibition Parfait – Layered, Boozy, Vanilla & Brandy Surprise
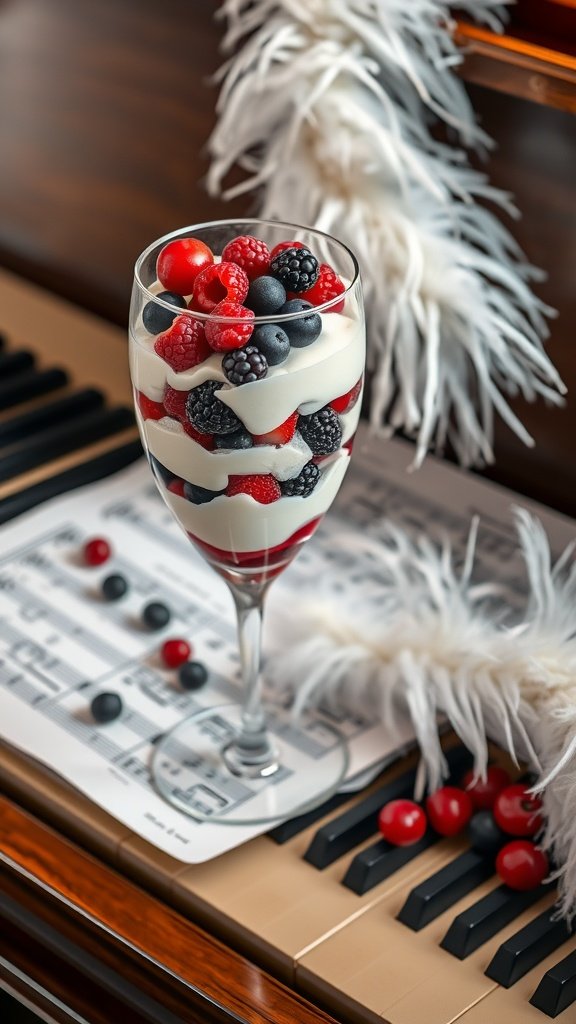
The Prohibition Parfait is a delightful twist on classic desserts, combining layers of creamy vanilla pudding with fresh berries and a splash of brandy. This elegant treat not only brings a taste of the Roaring 20s to your table but is also surprisingly easy to whip up. The combination of flavors creates a refreshing yet indulgent dessert, perfect for any gathering.
Each layer of this parfait offers a unique bite, with the tartness of the berries balancing beautifully against the smooth, rich pudding. Whether you’re hosting a themed party or just want to enjoy something special, this recipe is sure to impress.
Ingredients
- 2 cups vanilla pudding
- 1 cup mixed berries (raspberries, blueberries, and blackberries)
- 1/2 cup brandy
- 1 cup whipped cream
- 1/4 cup granulated sugar
- 1 teaspoon vanilla extract
Instructions
- Prepare the Pudding: In a bowl, mix the vanilla pudding with granulated sugar and vanilla extract until smooth. If you want a boozy kick, stir in 1/4 cup of brandy into the pudding mixture.
- Layer the Parfait: In a clear glass or parfait dish, start with a layer of vanilla pudding, followed by a layer of mixed berries. Repeat the layers until you reach the top, finishing with the berries.
- Add the Whipped Cream: Top each parfait with a generous dollop of whipped cream. For an extra touch, sprinkle some additional berries on top.
- Chill and Serve: Let the parfaits chill in the fridge for at least an hour before serving, allowing the flavors to meld together.
West Egg Whisky Truffles – Rich, Round, Bitter, Spiked Delights
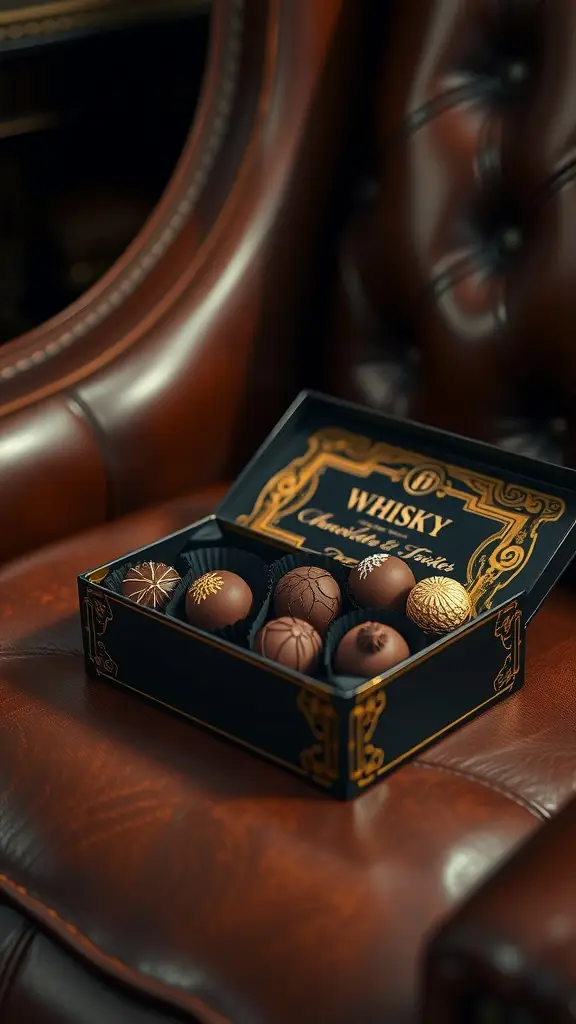
West Egg Whisky Truffles are a delightful treat that captures the essence of indulgence and sophistication. With a rich chocolate exterior and a smooth, spiked whisky center, these truffles deliver a perfect blend of sweetness and warmth. They’re surprisingly simple to make, making them a great choice for both novice bakers and experienced chocolate lovers alike.
The truffles offer a rich, round taste profile with a slight bitterness from the dark chocolate and a subtle kick from the whisky. They make for an elegant dessert at any gathering or a special treat for yourself. Enjoying these morsels feels indulgent, yet they can be whipped up relatively quickly!
Ingredients
- 8 ounces bittersweet chocolate, chopped
- 1/2 cup heavy cream
- 2 tablespoons unsalted butter
- 1/4 cup whisky (your choice)
- 1 teaspoon vanilla extract
- Cocoa powder, for dusting
- Chopped nuts or chocolate shavings, for garnish (optional)
Instructions
- Prepare the Ganache: In a saucepan over low heat, combine the heavy cream and butter. Stir until melted and warm, but not boiling. Remove from heat.
- Mix in Chocolate: Add the chopped chocolate to the warm cream mixture. Let it sit for a minute, then stir until smooth and glossy.
- Add Flavors: Stir in the whisky and vanilla extract until fully combined.
- Chill: Cover the ganache with plastic wrap and refrigerate for about 2 hours, or until firm enough to scoop.
- Shape the Truffles: Once firm, use a melon baller or spoon to scoop out small portions of the ganache. Quickly roll them into balls between your hands.
- Coat: Roll each truffle in cocoa powder, and if desired, roll in chopped nuts or chocolate shavings for added texture.
- Store: Place the finished truffles in an airtight container and refrigerate until ready to serve. Enjoy your delightful West Egg Whisky Truffles!
Mint Julep Mousse – Light, Minty, Icy, Speakeasy Sweetness
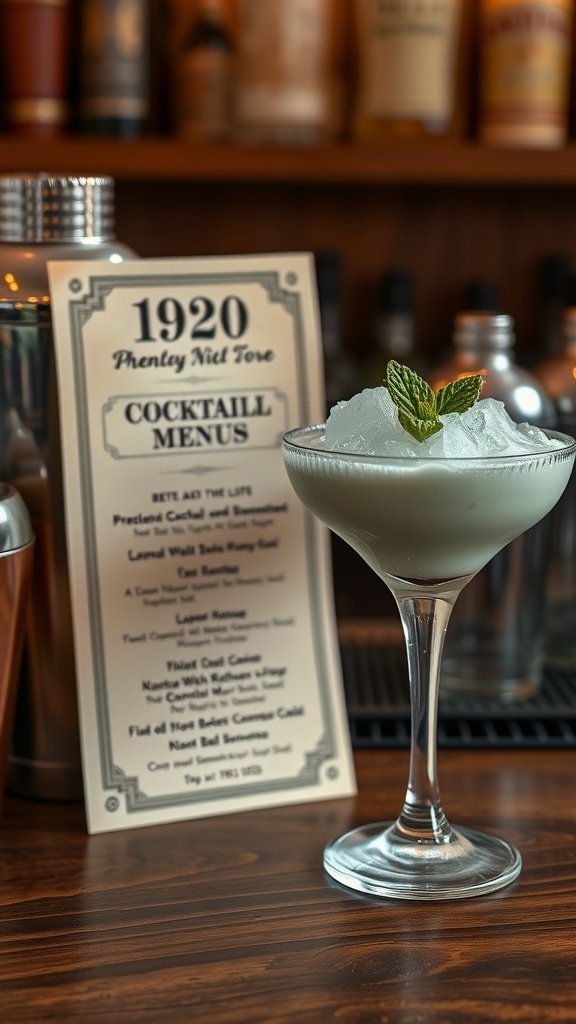
The Mint Julep Mousse is a refreshing and delightful dessert that captures the spirit of the Roaring Twenties. Combining light and airy textures with the classic flavors of mint and bourbon, this mousse offers a sweet, icy treat that feels both indulgent and sophisticated. Perfect for warm evenings or celebratory gatherings, it brings a touch of speakeasy charm to your table.
Easy to whip up, this mousse requires just a few simple ingredients and a bit of chilling time. The result is a light dessert that’s bursting with minty flavor, making it a delightful finish to any meal. Gather your friends and enjoy this deliciously cool treat!
Ingredients
- 1 cup heavy whipping cream
- 1/2 cup powdered sugar
- 1/4 cup bourbon
- 1/4 cup fresh mint leaves, finely chopped
- 1 teaspoon vanilla extract
- 1 tablespoon gelatin powder
- 2 tablespoons cold water
- Fresh mint sprigs for garnish
Instructions
- Prepare the Gelatin: In a small bowl, sprinkle gelatin over cold water and let it sit for about 5 minutes until it blooms.
- Heat the Mixture: In a small saucepan, combine bourbon and chopped mint over low heat. Stir gently, allowing the mint to infuse the bourbon for about 5 minutes. Remove from heat and add the bloomed gelatin, stirring until dissolved.
- Whip the Cream: In a large mixing bowl, whip the heavy cream with powdered sugar and vanilla extract until soft peaks form.
- Combine Ingredients: Gently fold the bourbon mixture into the whipped cream until fully incorporated. Be careful not to deflate the whipped cream.
- Chill: Spoon the mousse into serving dishes and refrigerate for at least 2 hours, or until set.
- Serve: Garnish with fresh mint sprigs before serving. Enjoy your refreshing Mint Julep Mousse!
Art Deco Apple Tart – Sliced, Patterned, Classic, Beautifully Geometric
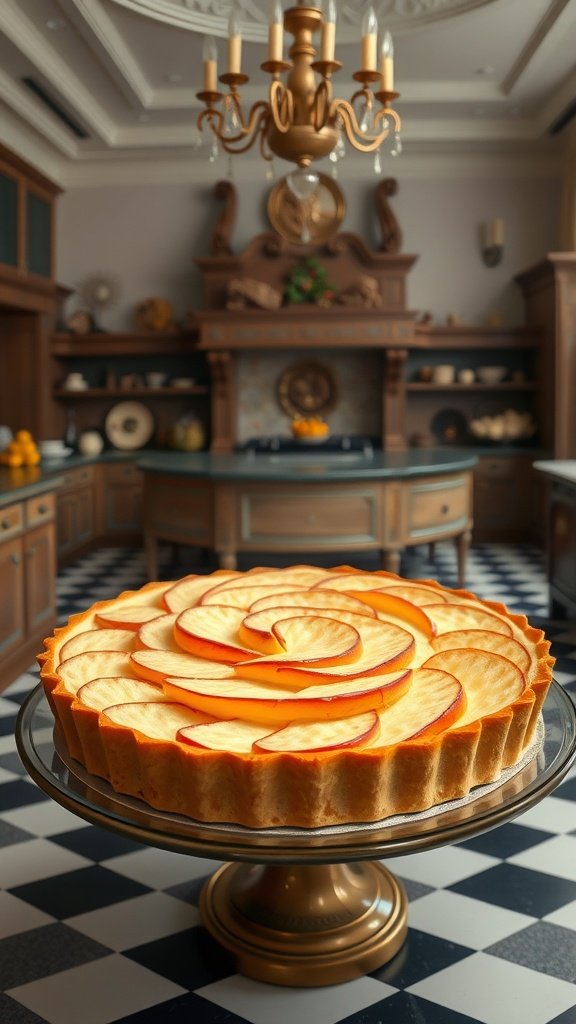
The Art Deco Apple Tart is a stunning dessert that combines the elegance of the Roaring Twenties with a deliciously simple recipe. With its beautifully arranged apple slices and buttery crust, this tart offers a delightful balance of sweetness and tartness. Perfect for gatherings or a cozy night in, it’s surprisingly easy to make, allowing even novice bakers to impress their guests.
The tart features a flaky pastry base topped with thinly sliced apples, arranged in a geometric pattern that is both eye-catching and classic. Each bite melts in your mouth, making it a timeless dessert that pays homage to the art and style of the Gatsby era. Enjoy this beautiful tart with a scoop of vanilla ice cream or a dollop of whipped cream for an extra treat!
Ingredients
- 1 ½ cups all-purpose flour
- ½ cup unsalted butter, cold and diced
- ¼ cup powdered sugar
- 1 egg yolk
- 2-3 tablespoons cold water
- 3-4 medium apples (such as Granny Smith and Honeycrisp)
- ¼ cup granulated sugar
- 1 teaspoon cinnamon
- 1 tablespoon lemon juice
- 1 tablespoon unsalted butter, melted (for brushing)
Instructions
- Prepare the Crust: In a large bowl, mix the flour and powdered sugar. Add cold, diced butter and mix until crumbly. Stir in the egg yolk and cold water until the dough forms. Wrap in plastic and refrigerate for 30 minutes.
- Preheat the Oven: Preheat your oven to 375°F (190°C).
- Roll Out the Dough: On a floured surface, roll out the chilled dough into a circle and transfer it to a tart pan. Trim the edges and poke the bottom with a fork. Bake for 15 minutes, then remove from the oven and let cool.
- Prepare the Apples: Slice the apples thinly and toss with lemon juice, granulated sugar, and cinnamon.
- Arrange the Apples: Layer the apple slices in a circular pattern on the cooled crust, starting from the outside and working your way to the center. Brush with melted butter.
- Bake the Tart: Bake the tart for an additional 25-30 minutes, or until the apples are tender and the crust is lightly golden.
- Serve: Let it cool slightly before slicing. Serve warm or at room temperature with ice cream or whipped cream, if desired.
Bootleg Blackberry Cobbler – Juicy, Rustic, Dusty, Illegally Delicious
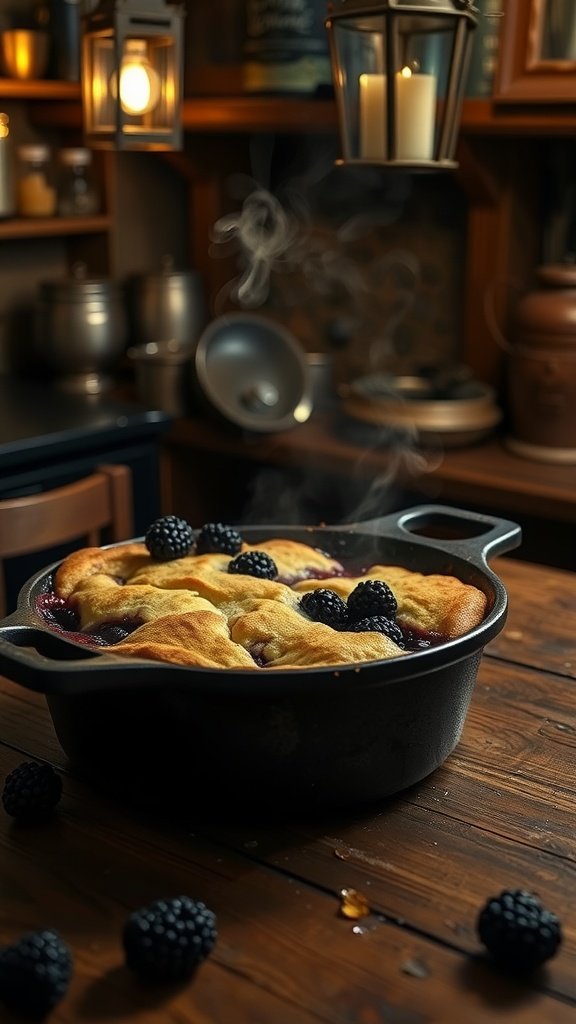
This Bootleg Blackberry Cobbler is a nod to the Roaring 20s, bursting with juicy blackberries and wrapped in a delightful, rustic crust. The sweetness of the berries pairs perfectly with the buttery topping, creating a comforting dessert that feels both indulgent and homestyle. Simple to make, this cobbler is perfect for gatherings or a cozy night in.
With just a few ingredients and minimal prep time, you can have this delicious treat ready to serve. Whether you enjoy it warm with a scoop of vanilla ice cream or on its own, it’s sure to impress.
Ingredients
- 4 cups fresh blackberries
- 1 cup granulated sugar
- 2 tablespoons lemon juice
- 1 tablespoon cornstarch
- 1 teaspoon vanilla extract
- 1 cup all-purpose flour
- 1 teaspoon baking powder
- 1/2 teaspoon salt
- 1/2 cup unsalted butter, melted
- 1 cup milk
Instructions
- Preheat the oven to 375°F (190°C). In a mixing bowl, combine blackberries, 1/2 cup of sugar, lemon juice, cornstarch, and vanilla extract. Stir gently and set aside.
- In another bowl, whisk together flour, baking powder, salt, and the remaining sugar. Stir in melted butter and milk until combined.
- Pour the blackberry mixture into a greased baking dish. Spoon the batter over the berries evenly.
- Bake for 35-40 minutes or until golden brown and bubbly. Allow to cool slightly before serving.
Belle Of The Ball Baklava – Sticky, Flaky, Rosewater-Kissed Richness
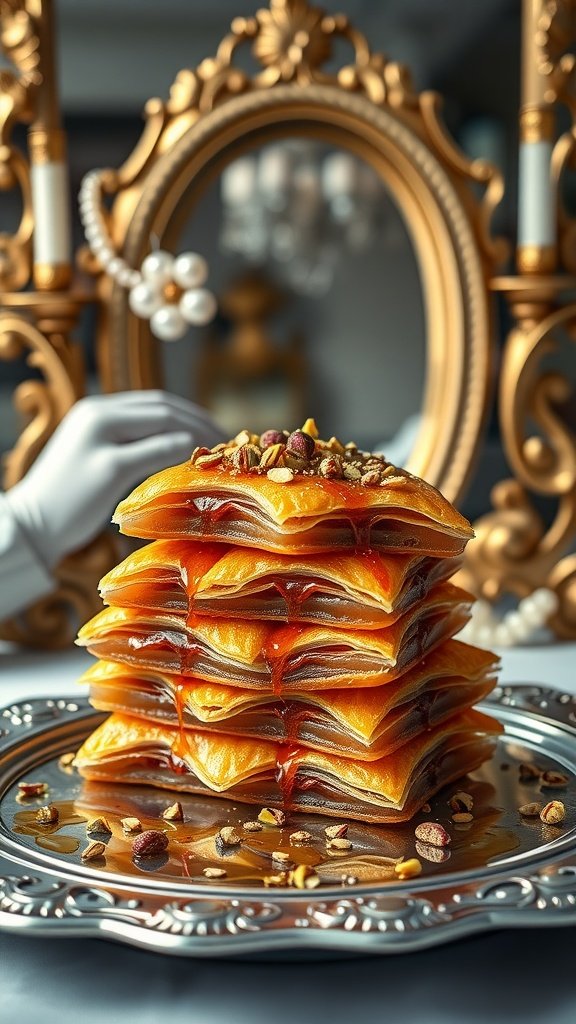
Bella of the Ball Baklava is a delightful twist on the classic dessert, bringing the elegance of the Roaring 20s to your table. This luxurious treat features layers of flaky phyllo dough, filled with a rich mixture of nuts and sweetened with a fragrant rosewater syrup. The combination of textures and flavors makes it a memorable dessert that perfectly captures the glamour of Gatsby-era celebrations.
Making this baklava is simpler than it may seem, and the end result is sure to impress! The sticky layers, infused with rosewater, provide a unique taste that elevates this traditional dessert, making it a showstopper for any gathering.
Ingredients
- 1 package of phyllo dough (16 oz)
- 2 cups mixed nuts (walnuts, pistachios, or almonds), finely chopped
- 1 cup unsalted butter, melted
- 1 teaspoon ground cinnamon
- 1 cup granulated sugar
- 1 cup water
- 1/4 cup rosewater
- 1/2 cup honey
Instructions
- Prepare the Filling: In a bowl, mix the chopped nuts and ground cinnamon together. Set aside.
- Layer the Phyllo: Preheat your oven to 350°F (175°C). Grease a 9×13 inch baking dish. Lay one sheet of phyllo dough in the dish and brush lightly with melted butter. Repeat with about 8 sheets, brushing each layer with butter.
- Add the Filling: Sprinkle a thin layer of the nut mixture over the phyllo. Layer another 4 sheets of phyllo, brushing each with butter. Spread more nuts over the phyllo. Repeat this process until all the nuts are used, finishing with about 8 layers of phyllo on top.
- Cut the Baklava: Using a sharp knife, carefully cut the baklava into diamond or square shapes.
- Bake: Bake in the preheated oven for about 45 minutes or until golden brown and crisp.
- Prepare the Syrup: While the baklava is baking, combine the sugar, water, honey, and rosewater in a saucepan. Bring to a boil, then reduce heat and let simmer for about 10 minutes. Remove from heat and let cool slightly.
- Soak the Baklava: Once the baklava is done baking, remove it from the oven and immediately pour the syrup evenly over the hot baklava. Let it sit for several hours, preferably overnight, to soak up the syrup before serving.
Gin Rickey Sorbet – Tart, Light, Refreshing, Cucumber And Lime
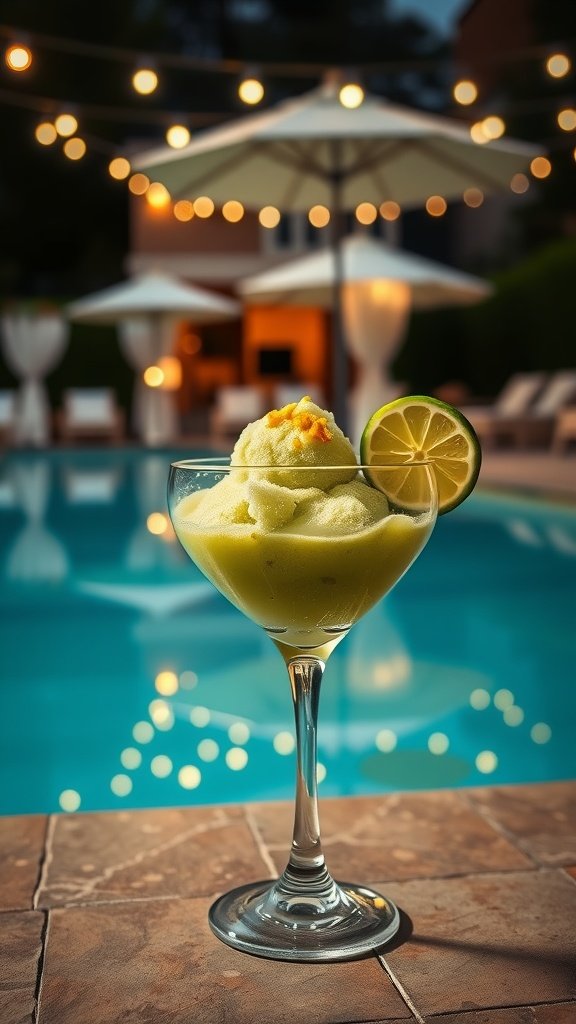
This Gin Rickey Sorbet captures the vibrant spirit of the Roaring 20s with its refreshing cucumber and lime flavors. It’s a delightful dessert that’s simple to whip up, making it perfect for warm evenings or festive gatherings. Expect a tart and light treat that will leave your taste buds craving more.
The combination of cucumber and lime creates a crisp, invigorating flavor profile that pairs beautifully with the botanical notes of gin. This sorbet isn’t just a dessert; it’s an experience that transports you to a jazz-filled garden party in the heart of the 1920s.
Ingredients
- 2 cups cucumber, peeled and diced
- 1/2 cup fresh lime juice
- 1 cup granulated sugar
- 1 cup water
- 1/2 cup gin
- 1 tablespoon lime zest
- Pinch of salt
Instructions
- Prepare the Syrup: In a saucepan, combine water and sugar. Heat over medium until sugar is dissolved. Remove from heat and let cool.
- Blend Ingredients: In a blender, add diced cucumber, lime juice, gin, lime zest, and a pinch of salt. Blend until smooth.
- Mix and Chill: Combine the cucumber mixture with the cooled syrup. Stir well, then refrigerate for at least 1 hour.
- Freeze: Pour the mixture into an ice cream maker and churn according to the manufacturer’s instructions until it reaches a soft-serve consistency. If you don’t have an ice cream maker, pour it into a shallow dish and freeze, stirring every 30 minutes until firm.
- Serve: Once frozen, scoop the sorbet into serving dishes and enjoy a taste of the 1920s!
Decadent Devil’s Food Cake – Moist, Bold, Sinful, Dark And Daring
Devil’s Food Cake is the ultimate chocolate lover’s dream. This cake is rich, moist, and bold, making it the perfect dessert for any gathering or celebration. Its dark color and decadent flavor come from high-quality cocoa powder, which adds depth without being overly sweet. Despite its impressive taste and appearance, this cake is quite simple to make, requiring just a few basic ingredients and straightforward preparation.
The contrast of the soft, chocolate cake with a luscious frosting creates a delightful experience for anyone who takes a bite. Whether you’re serving it at a lavish party inspired by the Roaring 20s or enjoying a slice at home, this cake is sure to impress with its sinful richness and elegant charm.
Ingredients
- 2 cups all-purpose flour
- 1 3/4 cups granulated sugar
- 3/4 cup unsweetened cocoa powder
- 1 1/2 teaspoons baking powder
- 1 1/2 teaspoons baking soda
- 1 teaspoon salt
- 2 large eggs
- 1 cup whole milk
- 1/2 cup vegetable oil
- 2 teaspoons vanilla extract
- 1 cup boiling water
Instructions
- Preheat the oven to 350°F (175°C). Grease and flour two 9-inch round cake pans.
- In a large bowl, combine flour, sugar, cocoa powder, baking powder, baking soda, and salt. Mix well.
- Add eggs, milk, oil, and vanilla to the dry ingredients. Beat on medium speed for about 2 minutes until well combined.
- Stir in the boiling water until the batter is smooth (it will be thin).
- Pour the batter evenly into the prepared cake pans. Bake for 30-35 minutes or until a toothpick inserted in the center comes out clean.
- Cool the cakes in the pans for 10 minutes before transferring to wire racks to cool completely.
Roarin’ Rhubarb Cheesecake – Tangy, Creamy, Baked, Topped With Glitter
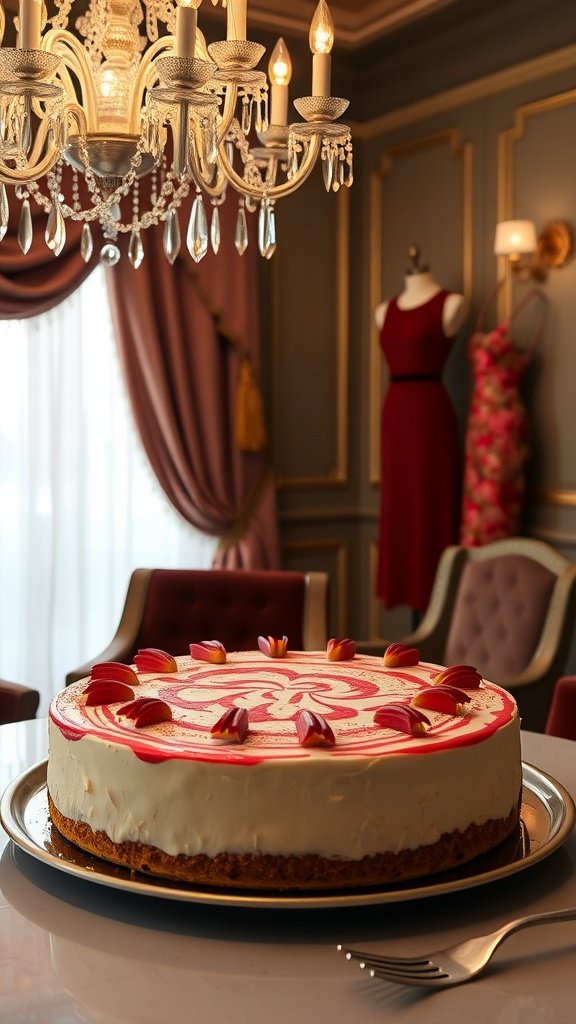
Rhubarb cheesecake is a delightful dessert that perfectly balances tangy and creamy flavors. This baked cheesecake features a buttery crust and a smooth filling, making it a crowd-pleaser at any gathering. It’s surprisingly simple to make, so don’t hesitate to whip it up for your next celebration.
The addition of glitter on top adds a touch of glamour, reminiscent of the opulence of the Roaring 20s. With its vibrant color and rich taste, this cheesecake is not just a dessert; it’s a conversation starter!
Ingredients
For the crust:
- 1 1/2 cups graham cracker crumbs
- 1/4 cup granulated sugar
- 1/2 cup unsalted butter, melted
The filling:
- 3 (8 oz) packages cream cheese, softened
- 1 cup granulated sugar
- 1 teaspoon vanilla extract
- 3 large eggs
- 1 cup sour cream
- 1/4 cup all-purpose flour
- Zest of 1 lemon
Rhubarb swirl:
- 1 1/2 cups chopped rhubarb
- 1/3 cup granulated sugar
- 1 tablespoon lemon juice
- 1 tablespoon water
Instructions
Preheat the oven to 325°F (160°C). Grease a 9-inch springform pan and wrap the outside with foil to prevent leaks.
Make the crust:
In a bowl, combine graham cracker crumbs, sugar, and melted butter. Press mixture into the bottom of the pan. Bake for 10 minutes, then set aside to cool.
Prepare the rhubarb swirl:
In a saucepan over medium heat, combine chopped rhubarb, sugar, lemon juice, and water. Cook until rhubarb softens and mixture thickens, about 8–10 minutes. Let it cool slightly, then puree until smooth.
Make the filling:
In a large bowl, beat cream cheese until smooth. Add sugar, flour, and vanilla. Mix until combined. Add eggs one at a time, mixing just until incorporated. Stir in sour cream and lemon zest.
Pour half the cheesecake batter over the cooled crust. Spoon half the rhubarb puree in small dollops and swirl gently with a knife. Repeat with remaining batter and rhubarb swirl.
Place the pan in a larger baking dish filled with 1 inch of hot water. Bake for 55–65 minutes, or until the center is just set but still slightly jiggly.
High Society Honey Eclairs – Golden, Glazed, Delicate, Pastry Perfection
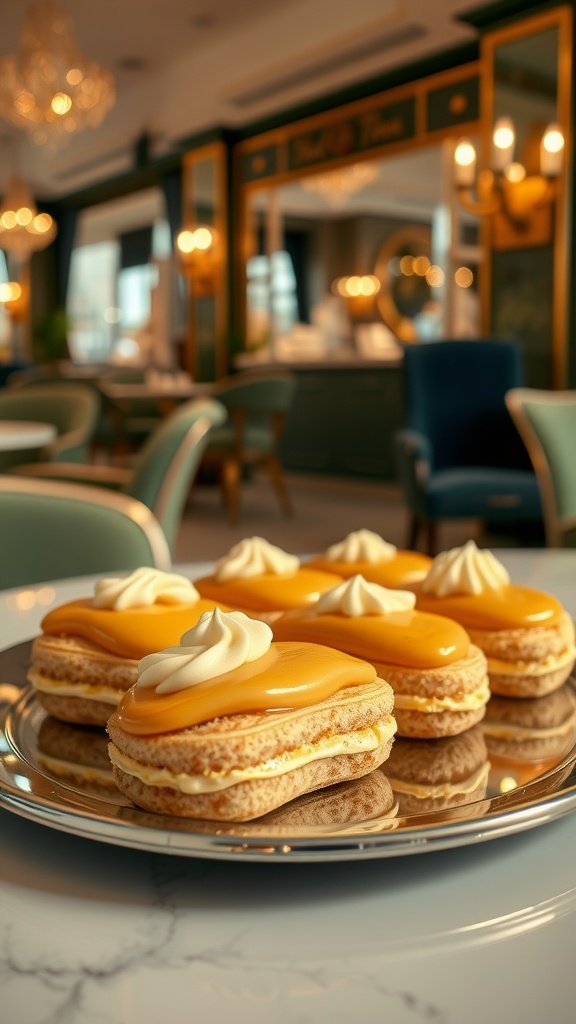
High Society Honey Eclairs are a delightful nod to the lavish desserts of the Roaring Twenties. These light and airy pastries are filled with a rich honey cream and topped with a glossy honey glaze, making each bite a blend of sweetness and sophistication. Not only are they visually stunning, but they also offer a taste that balances creamy and sweet flavors, making them perfect for any elegant gathering.
This recipe is surprisingly simple to make, even for beginners, and will impress your guests with its luxurious presentation and exquisite taste. With just a few key ingredients, you’ll create pastry perfection that captures the essence of high society.
Ingredients
- 1 cup water
- 1/2 cup unsalted butter
- 1 cup all-purpose flour
- 1/4 teaspoon salt
- 4 large eggs
- 1 cup heavy cream
- 1/2 cup honey
- 1 teaspoon vanilla extract
- 1/4 cup powdered sugar
- Additional honey for glazing
Instructions
- Make the Choux Pastry: In a saucepan, combine water and butter, bringing to a boil. Add flour and salt all at once, stirring until the mixture forms a ball. Remove from heat and let cool slightly.
- Add Eggs: Incorporate eggs one at a time, mixing until smooth and glossy. Transfer the dough to a piping bag.
- Pipe Eclairs: Preheat the oven to 400°F (200°C). Pipe long strips onto a baking sheet lined with parchment paper. Bake for 20-25 minutes until golden and puffed. Let cool completely.
- Prepare the Filling: Whip heavy cream with honey and vanilla until stiff peaks form. Gently fold in powdered sugar.
- Fill the Eclairs: Cut eclairs in half lengthwise and pipe the honey cream inside.
- Glaze: Drizzle melted honey over the tops of the filled eclairs for a beautiful finish.
If you enjoyed this blog you can visit us or check out our other blogs and learn a bit about us.
Disclaimer: This blog post is inspired by fictional universes and characters created by their respective rights holders. All related content and imagery remain the property of their respective rights holder. This fan-inspired content is for entertainment and commentary purposes only and is not affiliated with or endorsed by HBO, Disney, Warner Bros., Lionsgate, or any other rights holders. To explore the official source material, please visit:
HBO