

Fruity desserts from the Seven Kingdoms bring a delightful mix of flavors to your table, combining fresh, seasonal fruits with mouth-watering recipes from various regions. Each recipe offers simple cooking tips and ingredients substitutions, making it a breeze to whip up these sweet treats, whether you’re a seasoned chef or just starting out. Get ready to satisfy your sweet tooth with these unique, fruity creations!
Indulge In The Sweetness Of Classic Peach Cobbler
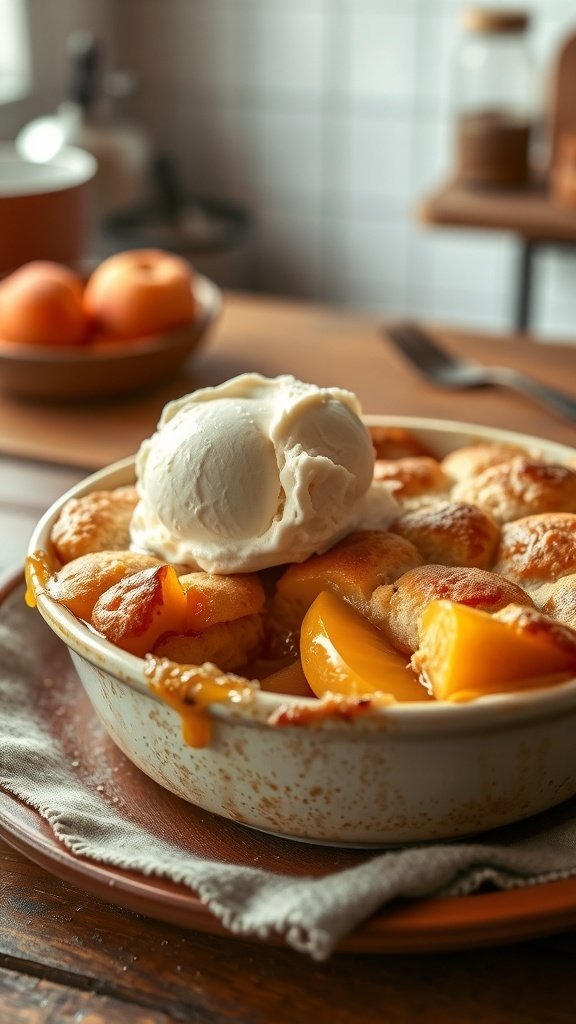
Peach cobbler is a timeless dessert that brings a taste of summer to your table. This dish features juicy, sweet peaches enveloped in a buttery, flaky crust. Topped with a scoop of vanilla ice cream, it’s a comforting treat that warms the heart.
The image shows a beautifully baked peach cobbler, golden and inviting, with a generous scoop of ice cream melting on top. The warm colors and rustic presentation make it look like a dish straight from a cozy kitchen. It’s perfect for gatherings or a quiet night in.
Making peach cobbler is simple and rewarding. You can use fresh or canned peaches, depending on what you have on hand. If you want to switch things up, try adding a sprinkle of cinnamon or nutmeg for extra flavor. You can also substitute the ice cream with whipped cream or yogurt for a lighter option.
Ingredients
- 4 cups fresh or canned peaches, sliced
- 1 cup granulated sugar
- 1 tablespoon lemon juice
- 1 teaspoon vanilla extract
- 1 cup all-purpose flour
- 1 tablespoon baking powder
- 1/2 teaspoon salt
- 1 cup milk
- 1/2 cup unsalted butter, melted
- 1 teaspoon ground cinnamon (optional)
Instructions
- Preheat your oven to 350°F (175°C).
- In a bowl, mix the sliced peaches, sugar, lemon juice, and vanilla extract. Pour this mixture into a greased baking dish.
- In another bowl, combine flour, baking powder, salt, and cinnamon if using. Stir in the milk and melted butter until just combined.
- Pour the batter over the peach mixture in the baking dish. Do not stir.
- Bake for 30-35 minutes, or until the top is golden brown and a toothpick comes out clean.
- Serve warm with a scoop of ice cream or your preferred topping.
Cooking Tip: If using canned peaches, drain them well to avoid excess liquid. You can also use frozen peaches; just thaw and drain before using.
Ingredient Substitution: For a healthier twist, try using whole wheat flour instead of all-purpose flour. You can also reduce the sugar or use a sugar substitute if desired.
Savor The Flavors Of Easy Berry Crisp
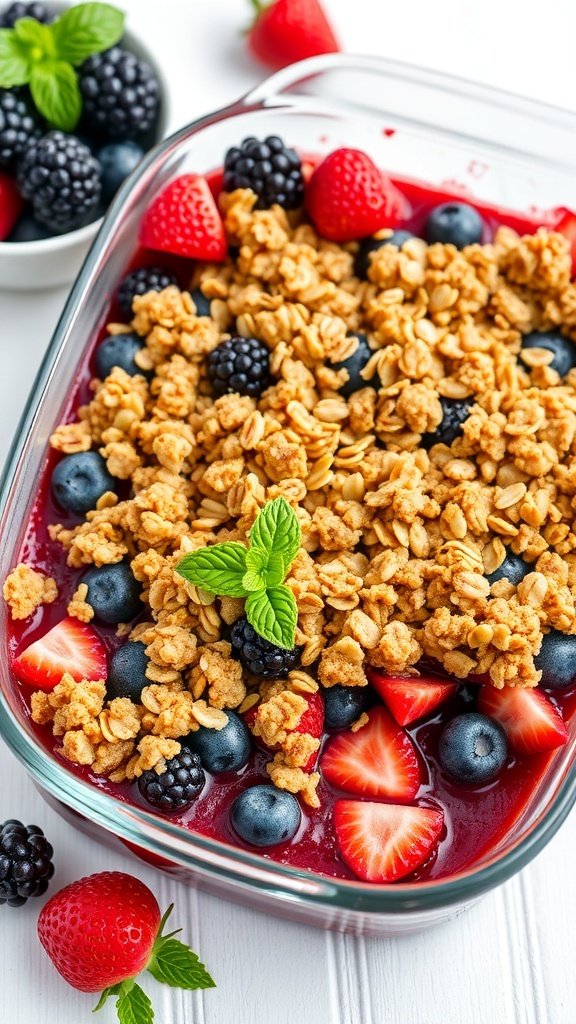
Berry crisp is a delightful treat that brings together the sweetness of fresh berries and the crunch of a golden topping. This dessert is perfect for any occasion, whether it’s a family gathering or a cozy night in. The vibrant colors of strawberries, blueberries, and blackberries create a feast for the eyes, while the warm, crumbly topping adds a comforting texture.
Making this fruity dessert is simple and fun. You can easily customize it with your favorite berries or even add nuts for extra crunch. The combination of flavors is sure to please everyone at the table. Plus, it’s a great way to use up any berries you have on hand!
Here’s how to whip up this easy berry crisp:
Ingredients
- 2 cups strawberries, hulled and sliced
- 2 cups blueberries
- 2 cups blackberries
- 1/4 cup granulated sugar
- 1 tablespoon lemon juice
- 1 cup rolled oats
- 1/2 cup all-purpose flour
- 1/2 cup brown sugar, packed
- 1/2 teaspoon cinnamon
- 1/2 cup unsalted butter, melted
Instructions
- Preheat the oven to 350°F (175°C).
- In a large bowl, combine the strawberries, blueberries, blackberries, sugar, and lemon juice. Mix gently and pour into a greased baking dish.
- In another bowl, mix the oats, flour, brown sugar, and cinnamon. Pour in the melted butter and stir until crumbly.
- Sprinkle the oat mixture evenly over the berry mixture.
- Bake for 30-35 minutes, or until the topping is golden brown and the berries are bubbly.
- Let it cool slightly before serving. Enjoy it warm, perhaps with a scoop of vanilla ice cream!
Cooking tips: If you want a bit more texture, consider adding chopped nuts like almonds or walnuts to the topping. For a healthier option, you can substitute brown sugar with honey or maple syrup. Feel free to mix and match your favorite berries for a unique twist!
Delight In The Refreshing Watermelon Sorbet
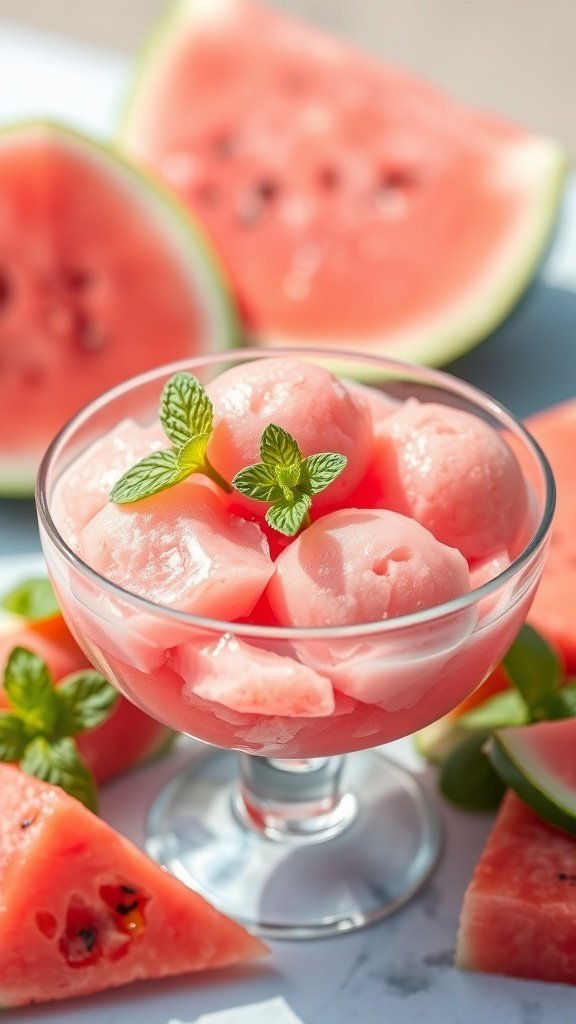
Watermelon sorbet is a refreshing treat that captures the essence of summer. Its vibrant pink color and icy texture make it a perfect dessert for hot days. The image shows a delightful bowl of watermelon sorbet, garnished with fresh mint leaves. Surrounding the bowl are slices of juicy watermelon, showcasing the fruit’s natural sweetness.
This fruity dessert is not just visually appealing; it’s also incredibly easy to make. With just a few ingredients, you can whip up a batch that will impress your friends and family. Plus, it’s a great way to use up any leftover watermelon!
For those looking to add a twist, consider using lime juice for a zesty kick or a splash of coconut milk for creaminess. You can also substitute honey for sugar if you prefer a natural sweetener. Enjoy this sorbet on its own or pair it with other fruity desserts for a delightful summer spread.
Ingredients
- 4 cups watermelon, cubed and seeded
- 1/2 cup granulated sugar (or honey)
- 1 tablespoon lime juice
- 1/4 cup water
- Fresh mint leaves for garnish
Instructions
- Prepare the Watermelon: Start by cutting the watermelon into cubes. Make sure to remove any seeds.
- Blend the Mixture: In a blender, combine the watermelon cubes, sugar, lime juice, and water. Blend until smooth.
- Chill: Pour the mixture into a shallow dish and place it in the freezer. Let it freeze for about 2-3 hours, stirring every 30 minutes to break up any ice crystals.
- Serve: Once the sorbet is firm but scoopable, serve it in bowls. Garnish with fresh mint leaves for a pop of color.
Cooking Tips: If your sorbet is too hard, let it sit at room temperature for a few minutes before scooping. For a smoother texture, blend the mixture again after freezing.
Ingredient Substitutions: Use agave syrup instead of sugar for a vegan option. You can also mix in other fruits like strawberries or mango for a unique flavor.
Experience The Creamy Goodness Of Mango Mousse
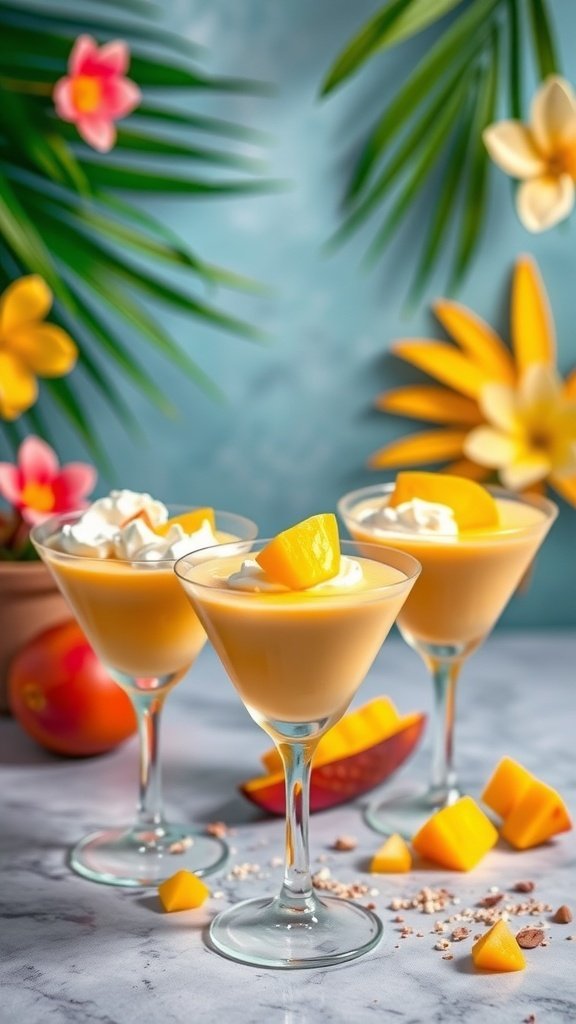
Mango mousse is a delightful treat that brings a taste of the tropics right to your table. This dessert is light, creamy, and bursting with the sweet flavor of ripe mangoes. The vibrant yellow hue and smooth texture make it a feast for the eyes as well as the palate.
Picture this: elegant glasses filled with silky mango mousse, topped with a dollop of whipped cream and fresh mango chunks. The tropical backdrop of palm leaves and colorful flowers adds to the fun vibe, making it perfect for summer gatherings or special occasions.
Making mango mousse is simple and requires just a few ingredients. You can easily swap out heavy cream for coconut cream if you want a dairy-free version. This dessert is not only delicious but also a great way to impress your guests with minimal effort!
Ingredients
- 2 ripe mangoes, peeled and diced
- 1 cup heavy cream (or coconut cream for a dairy-free option)
- 1/2 cup sugar
- 1 tablespoon lemon juice
- 1 teaspoon gelatin (optional, for extra firmness)
- 1/4 cup water (if using gelatin)
- Whipped cream and mango chunks for garnish
Instructions
- Prepare the Mango: Blend the diced mangoes in a blender until smooth. If you like a bit of texture, you can reserve some small pieces for later.
- Make the Cream Mixture: In a separate bowl, whip the heavy cream until soft peaks form. Gradually add sugar and lemon juice, continuing to whip until well combined.
- Combine: Gently fold the mango puree into the whipped cream mixture until fully incorporated. If using gelatin, dissolve it in warm water and mix it into the mousse at this stage.
- Chill: Spoon the mixture into serving glasses and refrigerate for at least 2 hours to set.
- Serve: Top with whipped cream and fresh mango chunks before serving. Enjoy your fruity dessert!
Cooking Tip: If you want to add a twist, consider mixing in some lime zest or a splash of coconut milk for extra flavor. You can also use frozen mango if fresh ones are not available. Just make sure to thaw and drain any excess liquid before blending!
Relish In The Comfort Of Apple Crisp
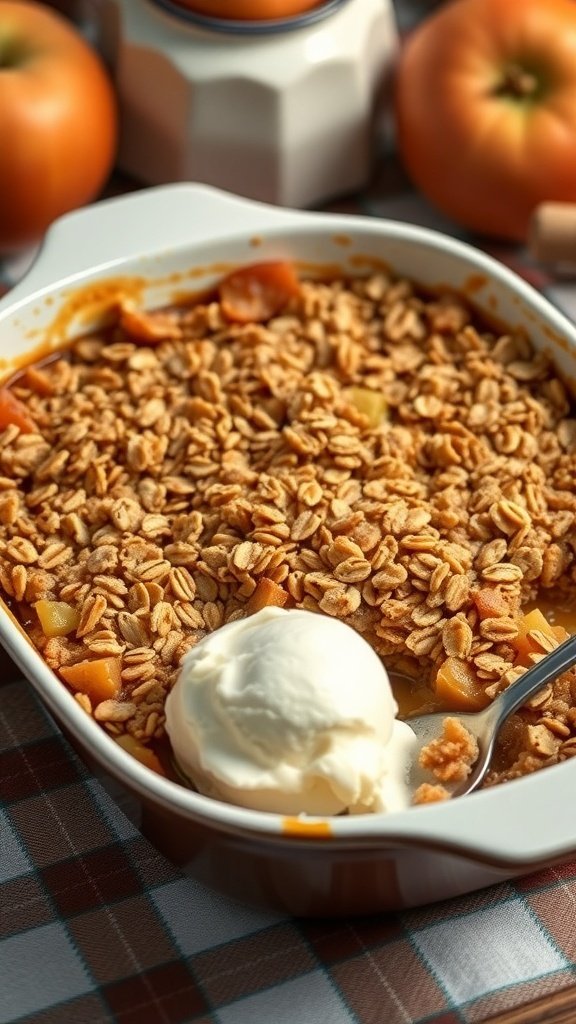
Apple crisp is one of those desserts that feels like a warm hug. The combination of sweet, tender apples and a crunchy topping makes it a favorite for many. It’s perfect for cozy nights or gatherings with friends and family. The aroma of baked apples and cinnamon fills the air, inviting everyone to the table.
This dish is not just about taste; it’s also about comfort. The crispy topping, made with oats and brown sugar, adds texture that pairs beautifully with the soft apples underneath. Serve it warm with a scoop of vanilla ice cream, and you have a dessert that’s hard to resist.
Making apple crisp is simple and requires just a few ingredients. You can easily customize it by adding nuts or using different fruits. If you’re looking for a fruity dessert that brings joy, apple crisp is the way to go!
Ingredients
- 6 cups sliced apples (Granny Smith or Honeycrisp work well)
- 1 tablespoon lemon juice
- 1/2 cup granulated sugar
- 1 teaspoon ground cinnamon
- 1 cup rolled oats
- 1 cup all-purpose flour
- 1/2 cup brown sugar, packed
- 1/2 cup unsalted butter, melted
Instructions
- Preheat your oven to 350°F (175°C).
- In a large bowl, toss the sliced apples with lemon juice, granulated sugar, and cinnamon. Spread the mixture evenly in a greased baking dish.
- In another bowl, combine oats, flour, brown sugar, and melted butter. Mix until crumbly.
- Sprinkle the oat mixture over the apples in the baking dish.
- Bake for 30-35 minutes, or until the apples are tender and the topping is golden brown.
- Let it cool slightly before serving. Enjoy warm with a scoop of vanilla ice cream!
Cooking Tips: If you want to add a twist, consider mixing in some berries or nuts. You can also substitute half of the apples with pears for a different flavor. If you prefer a sweeter dessert, increase the sugar slightly.
Treat Yourself To Decadent Chocolate Cherry Tart
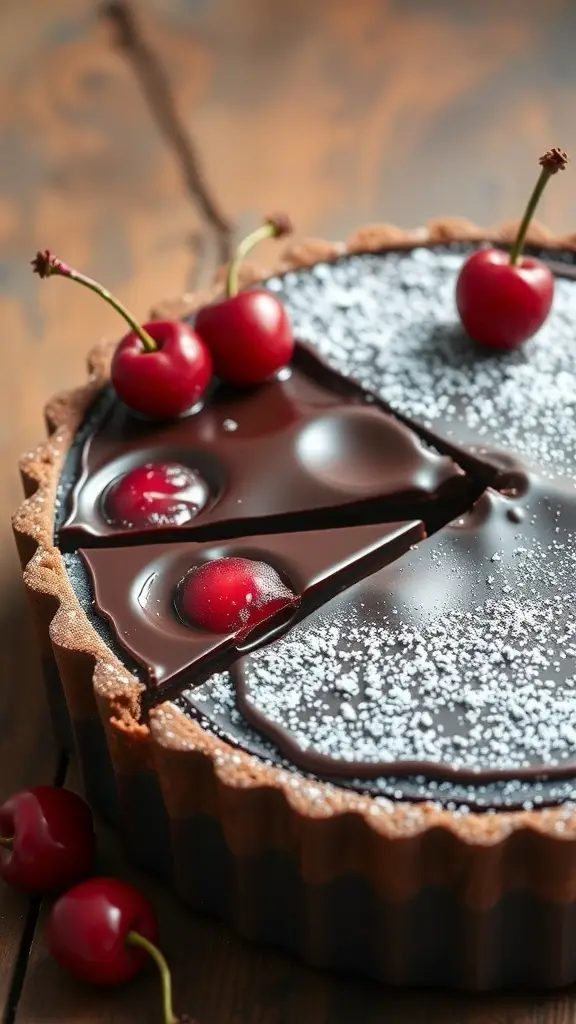
Picture a rich chocolate tart, perfectly baked with a glossy finish, topped with fresh, juicy cherries. This Chocolate Cherry Tart is a delightful blend of flavors that will make your taste buds dance. The tart crust is buttery and crumbly, providing the perfect base for the luscious chocolate filling. The cherries add a burst of freshness, balancing the sweetness of the chocolate.
Making this dessert is a breeze, and it’s sure to impress anyone you serve it to. Whether it’s for a special occasion or just a treat for yourself, this tart is a must-try. The combination of chocolate and cherries is a classic that never goes out of style.
When preparing this tart, feel free to switch things up! If you don’t have fresh cherries, you can use frozen ones or even a cherry compote. For a gluten-free option, substitute the flour in the crust with almond flour. The possibilities are endless!
Ingredients
- 1 1/2 cups all-purpose flour
- 1/2 cup unsweetened cocoa powder
- 1/2 cup powdered sugar
- 1/2 cup unsalted butter, softened
- 1 large egg yolk
- 1/4 teaspoon salt
- 1 cup dark chocolate chips
- 1/2 cup heavy cream
- 1 teaspoon vanilla extract
- 1 cup fresh cherries, pitted and halved
- Powdered sugar for dusting
Instructions
- Make the Crust: In a bowl, mix flour, cocoa powder, and powdered sugar. Add softened butter and egg yolk. Mix until a dough forms. Press the dough into a tart pan and chill for 30 minutes.
- Bake the Crust: Preheat the oven to 350°F (175°C). Bake the crust for 15-20 minutes until firm. Let it cool.
- Prepare the Filling: In a saucepan, heat the heavy cream until it just simmers. Remove from heat and add chocolate chips and vanilla extract. Stir until smooth.
- Assemble the Tart: Pour the chocolate filling into the cooled crust. Top with halved cherries, pressing them gently into the filling.
- Chill: Refrigerate the tart for at least 2 hours until set. Before serving, dust with powdered sugar for a sweet finish.
Enjoy this delightful Chocolate Cherry Tart, a perfect addition to your collection of fruity desserts!
Enjoy The Zesty Lemon Blueberry Cake
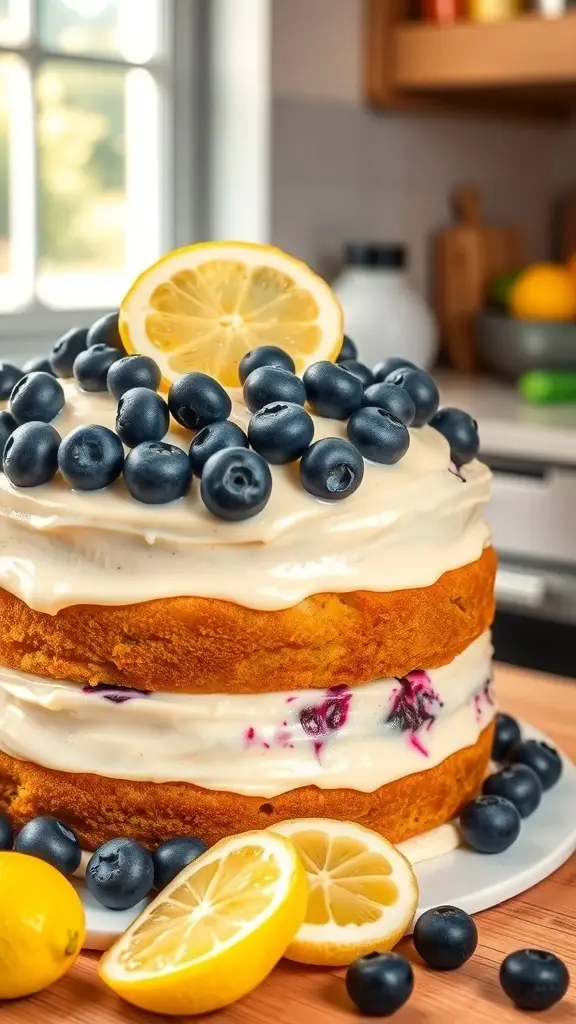
The Zesty Lemon Blueberry Cake is a delightful treat that perfectly captures the essence of fruity desserts. With its vibrant layers, this cake is not just a feast for the taste buds but also a visual delight. The combination of fresh blueberries and zesty lemon creates a refreshing flavor that’s perfect for any occasion.
This cake features soft, fluffy layers filled with creamy frosting and topped with a generous amount of blueberries and lemon slices. It’s a great dessert for summer gatherings or simply to enjoy at home. The bright colors and fresh ingredients make it a standout choice for anyone looking to indulge in something fruity and delicious.
Ingredients
- 2 cups all-purpose flour
- 1 1/2 cups granulated sugar
- 1 tablespoon baking powder
- 1/2 teaspoon salt
- 1/2 cup unsalted butter, softened
- 1 cup milk
- 3 large eggs
- 1 tablespoon lemon zest
- 1/4 cup fresh lemon juice
- 1 cup fresh blueberries
- 1 cup cream cheese, softened
- 1/2 cup powdered sugar
- 1 teaspoon vanilla extract
Instructions
- Preheat the oven to 350°F (175°C). Grease and flour three 8-inch round cake pans.
- In a large bowl, mix flour, sugar, baking powder, and salt. Add softened butter, milk, eggs, lemon zest, and lemon juice. Beat until smooth.
- Gently fold in the blueberries, being careful not to crush them.
- Divide the batter evenly among the prepared pans. Bake for 25-30 minutes or until a toothpick comes out clean.
- Let the cakes cool in the pans for 10 minutes, then transfer to wire racks to cool completely.
- For the frosting, beat together cream cheese, powdered sugar, and vanilla until smooth.
- Once the cakes are cooled, spread frosting between the layers and on top. Decorate with additional blueberries and lemon slices.
Cooking Tips: If you want a lighter cake, consider using egg whites instead of whole eggs. You can also substitute Greek yogurt for some of the butter for a healthier option.
Enjoy this zesty lemon blueberry cake as a perfect fruity dessert that will impress your friends and family!
Satisfy Your Cravings With Strawberry Shortcake

Strawberry shortcake is a classic dessert that never fails to impress. This delightful treat features layers of fluffy cake, fresh strawberries, and whipped cream. The vibrant red strawberries pop against the soft, golden layers, making it a feast for the eyes as well as the taste buds.
The beauty of strawberry shortcake lies in its simplicity. You can whip it up for a casual gathering or a special occasion. It’s a versatile dessert that can be enjoyed year-round, especially when strawberries are in season.
To make your own strawberry shortcake, gather the following ingredients:
Ingredients
- 2 cups all-purpose flour
- 1/4 cup granulated sugar
- 1 tablespoon baking powder
- 1/2 teaspoon salt
- 1/2 cup unsalted butter, cold and cubed
- 1 cup heavy cream
- 1 teaspoon vanilla extract
- 2 cups fresh strawberries, sliced
- 1/4 cup powdered sugar (for whipped cream)
- 1 cup heavy cream (for whipped cream)
Instructions
- Preheat your oven to 425°F (220°C). In a bowl, mix flour, sugar, baking powder, and salt.
- Add the cold butter and mix until crumbly. Stir in the heavy cream and vanilla until just combined.
- Turn the dough onto a floured surface and gently knead it a few times. Roll it out to about 1-inch thick and cut into rounds.
- Place the rounds on a baking sheet and bake for 12-15 minutes until golden. Let them cool.
- While the cakes cool, whip the heavy cream with powdered sugar until soft peaks form.
- To assemble, slice the cakes in half, layer with strawberries and whipped cream, and top with the other half. Add more strawberries and cream on top for a finishing touch.
Cooking Tips: For a lighter version, use Greek yogurt instead of heavy cream for the whipped topping. You can also substitute the strawberries with other berries like blueberries or raspberries for a mixed berry shortcake. Enjoy your fruity dessert!
Savor The Richness Of Chocolate Avocado Pudding

Chocolate avocado pudding is a delightful treat that combines the creamy goodness of avocados with rich chocolate flavor. This dessert is not only delicious but also packed with nutrients, making it a guilt-free indulgence. The image showcases small glass cups filled with smooth, chocolatey pudding, topped with fresh raspberries. The vibrant colors of the raspberries contrast beautifully with the dark pudding, making it visually appealing.
This pudding is perfect for those who enjoy fruity desserts with a twist. The creamy texture comes from ripe avocados, which blend seamlessly with cocoa powder and sweeteners. It’s a fantastic way to enjoy a dessert that feels indulgent without compromising on health.
Ingredients
- 2 ripe avocados
- 1/4 cup unsweetened cocoa powder
- 1/4 cup honey or maple syrup (adjust to taste)
- 1/4 cup almond milk (or any milk of choice)
- 1 teaspoon vanilla extract
- Pinch of salt
- Fresh raspberries for topping
Instructions
- Prepare the Avocados: Cut the avocados in half, remove the pit, and scoop the flesh into a blender.
- Add Ingredients: To the blender, add cocoa powder, honey or maple syrup, almond milk, vanilla extract, and a pinch of salt.
- Blend Until Smooth: Blend everything together until you achieve a creamy and smooth consistency. You may need to scrape down the sides of the blender to ensure everything is mixed well.
- Taste and Adjust: Taste the pudding and adjust sweetness if needed by adding more honey or maple syrup.
- Chill: Transfer the pudding into serving cups and refrigerate for at least 30 minutes to let it set.
- Serve: Top with fresh raspberries before serving for a burst of flavor and color.
Cooking Tips: Make sure your avocados are ripe for the best texture. If you want a sweeter pudding, feel free to add more honey or maple syrup. For a dairy-free option, stick with almond milk or any plant-based milk you prefer.
Ingredient Substitutions: You can substitute honey with agave syrup for a vegan option. If you don’t have cocoa powder, try using carob powder for a different flavor.
Delight In The Simplicity Of Tropical Fruit Salad
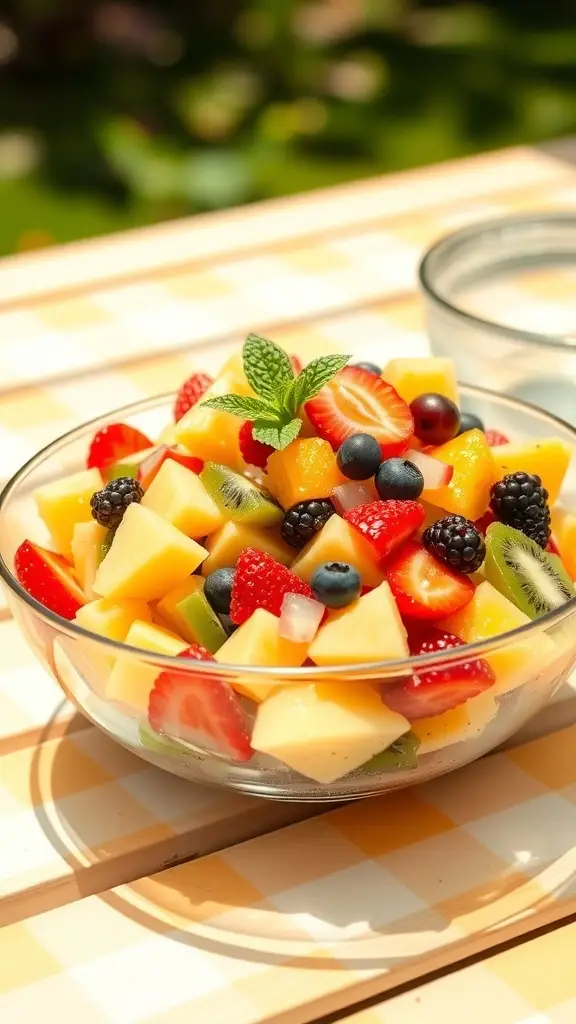
Nothing beats the freshness of a tropical fruit salad, especially on a warm day. This colorful mix of fruits is not just a treat for the eyes but also a burst of flavors that can brighten up any meal. Imagine juicy strawberries, sweet mangoes, and tangy kiwis all coming together in one bowl. It’s like a mini-vacation for your taste buds!
Making this salad is super easy. You can use whatever fruits you love or have on hand. The key is to choose ripe, fresh fruits for the best taste. You can even add a splash of lime juice or a sprinkle of mint for an extra zing. This fruity dessert is perfect for gatherings or just a simple snack at home.
Here’s a quick recipe to whip up your own tropical fruit salad:
Ingredients
- 1 cup strawberries, hulled and sliced
- 1 cup mango, diced
- 1 cup pineapple, diced
- 1 cup kiwi, peeled and sliced
- 1 cup blueberries
- 1 cup blackberries
- 1 tablespoon lime juice
- Fresh mint leaves for garnish
Instructions
- Prepare the Fruits: Start by washing all the fruits thoroughly. Hull and slice the strawberries, dice the mango and pineapple, and peel and slice the kiwi.
- Mix Together: In a large bowl, combine all the prepared fruits. Gently toss them together to mix.
- Add Lime Juice: Drizzle the lime juice over the fruit mixture. This adds a refreshing flavor and helps prevent browning.
- Garnish: Top with fresh mint leaves for a pop of color and flavor.
- Serve: Enjoy immediately or chill in the fridge for about 30 minutes before serving for a cooler treat.
Cooking Tips: If you want to switch things up, feel free to add other fruits like papaya or bananas. You can also use honey instead of lime juice for a sweeter touch. Just remember to adjust the sweetness based on your taste!
Indulge In The Creamy Delight Of Coconut Panna Cotta
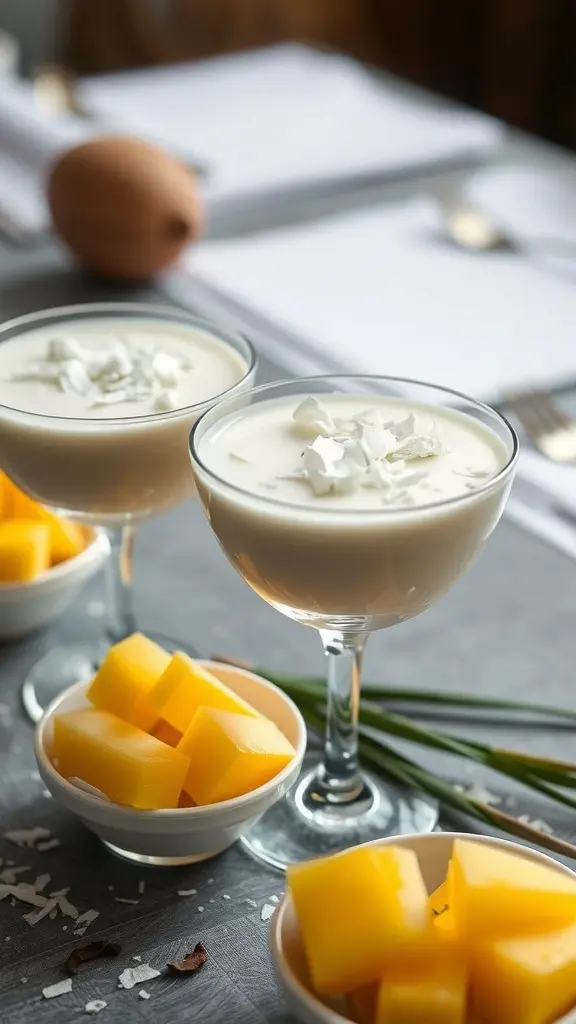
Coconut panna cotta is a creamy dessert that brings a taste of the tropics to your table. This dish features a smooth, velvety texture that melts in your mouth. The coconut flavor is rich and comforting, making it a perfect treat for any occasion. The panna cotta is often paired with fresh fruits, adding a fruity twist that enhances its appeal.
In the image, you can see two elegant servings of coconut panna cotta, topped with a sprinkle of coconut flakes. Next to them, there are bowls of bright yellow mango cubes, ready to add a refreshing burst of flavor. This combination not only looks stunning but also offers a delightful contrast of textures and tastes.
Making coconut panna cotta is quite simple. You’ll need just a few ingredients, and the steps are straightforward. It’s a great dessert to impress your guests or to enjoy on a cozy night in. Plus, you can easily customize it with different fruits or toppings!
Ingredients
- 1 cup coconut milk
- 1 cup heavy cream
- 1/4 cup granulated sugar
- 1 packet (2 1/4 teaspoons) gelatin
- 1/4 cup cold water
- 1 teaspoon vanilla extract
- Fresh mango cubes for serving
- Shredded coconut for garnish
Instructions
- Prepare the Gelatin: In a small bowl, sprinkle the gelatin over cold water. Let it sit for about 5 minutes until it blooms.
- Heat the Mixture: In a saucepan, combine coconut milk, heavy cream, and sugar. Heat over medium heat until the sugar dissolves and the mixture is warm but not boiling.
- Add Gelatin: Remove the saucepan from heat. Stir in the bloomed gelatin and vanilla extract until fully dissolved.
- Pour and Chill: Pour the mixture into serving glasses or molds. Refrigerate for at least 4 hours, or until set.
- Serve: Once set, top with fresh mango cubes and a sprinkle of shredded coconut before serving.
Cooking Tips: If you want a lighter version, you can substitute half of the heavy cream with more coconut milk. For a different flavor, try adding a splash of lime juice or zest to the mixture.
Ingredient Substitutions: If you don’t have heavy cream, you can use full-fat coconut cream for a dairy-free option. For sweetness, honey or maple syrup can replace granulated sugar.
Relish In The Classic Raspberry Fool

Raspberry Fool is a delightful dessert that combines the freshness of raspberries with creamy goodness. This classic treat is perfect for any occasion, whether it’s a family gathering or a cozy night in. The vibrant red of the raspberries adds a pop of color, making it as pleasing to the eyes as it is to the palate.
In the image, you can see two elegant glasses filled with layers of whipped cream and fresh raspberries. Topped with mint leaves, these desserts look inviting and fresh. The surrounding raspberries and flowers enhance the overall charm, creating a lovely presentation.
This dessert is not only easy to make but also allows for some creativity. You can switch up the fruits or even use a different type of cream. Let’s get into the details of how to whip up this fruity delight!
Ingredients
- 2 cups fresh raspberries
- 1 cup heavy cream
- 1/4 cup powdered sugar
- 1 teaspoon vanilla extract
- Mint leaves for garnish
- Optional: crushed cookies or granola for texture
Instructions
- Prepare the Raspberries: In a bowl, mash half of the raspberries gently with a fork. Leave the other half whole for layering.
- Whip the Cream: In a separate bowl, beat the heavy cream, powdered sugar, and vanilla extract until soft peaks form.
- Combine: Gently fold the mashed raspberries into the whipped cream. Be careful not to overmix; you want to keep some of the cream’s fluffiness.
- Layer: In serving glasses, alternate layers of the raspberry cream mixture and whole raspberries. If you like, add a layer of crushed cookies or granola for some crunch.
- Chill: Refrigerate for at least 30 minutes before serving to let the flavors meld.
- Serve: Garnish with mint leaves and enjoy your refreshing Raspberry Fool!
Cooking Tips: For a lighter version, you can substitute half of the heavy cream with Greek yogurt. If you don’t have raspberries, feel free to use strawberries or blueberries instead. This dessert is versatile and can be adapted to your taste!
Experience The Crunch Of Nutty Fruit Granola Bars
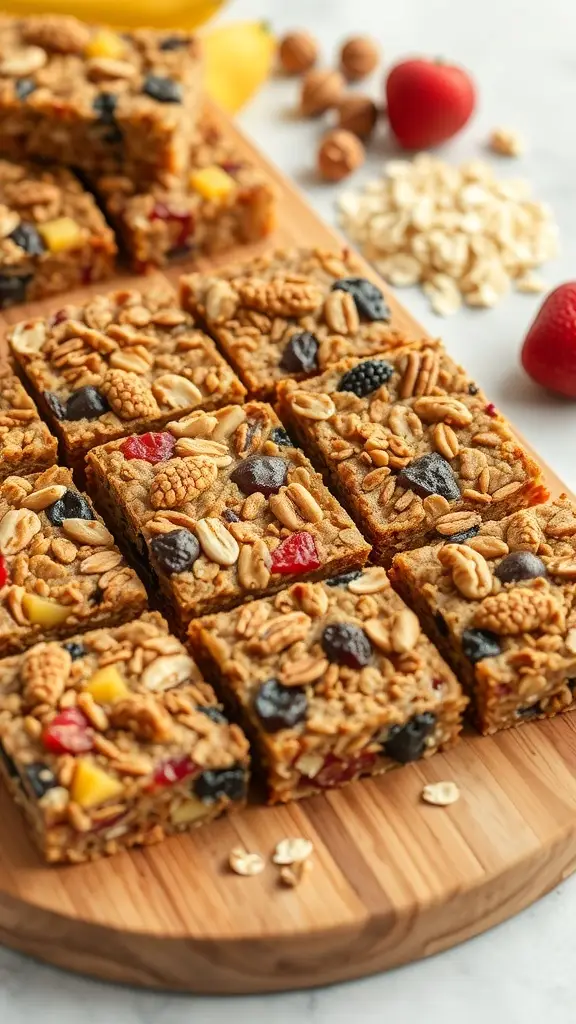
Granola bars are a delightful treat that combines the sweetness of fruity desserts with the satisfying crunch of nuts and oats. These nutty fruit granola bars are perfect for a quick snack or a healthy dessert. They’re packed with flavor and texture, making them a favorite for both kids and adults.
The image showcases beautifully cut granola bars, each piece brimming with colorful dried fruits and crunchy nuts. The combination of oats and nuts creates a hearty base, while the fruits add a burst of sweetness. It’s a snack that’s not only tasty but also visually appealing.
Making these bars at home is simple and fun. You can customize them with your favorite nuts and fruits, ensuring every bite is just how you like it. Plus, they’re a great way to use up any leftover dried fruits you might have.
Here’s how you can whip up your own batch of nutty fruit granola bars:
Ingredients
- 2 cups rolled oats
- 1 cup mixed nuts (almonds, walnuts, pecans)
- 1/2 cup honey or maple syrup
- 1/2 cup peanut butter or almond butter
- 1 cup dried fruits (raisins, cranberries, apricots)
- 1/4 teaspoon salt
- 1 teaspoon vanilla extract
Instructions
- Preheat your oven to 350°F (175°C). Line an 8×8 inch baking dish with parchment paper.
- In a large bowl, mix the oats, nuts, dried fruits, and salt.
- In a small saucepan, combine honey and peanut butter over low heat. Stir until melted and smooth. Remove from heat and add vanilla extract.
- Pour the honey mixture over the oat mixture and stir until everything is well coated.
- Transfer the mixture to the prepared baking dish. Press it down firmly to create an even layer.
- Bake for 20-25 minutes until golden brown. Let it cool completely before cutting into bars.
Cooking Tips: If you prefer a sweeter bar, feel free to add more honey or maple syrup. For a nut-free version, substitute the nuts with seeds like sunflower or pumpkin seeds. You can also swap out the dried fruits based on your preferences.
Savor The Warmth Of Cinnamon Pear Galette

There’s something special about a warm Cinnamon Pear Galette. This delightful dessert brings together the sweetness of ripe pears and the comforting spice of cinnamon. The golden, flaky crust wraps around tender slices of fruit, creating a perfect balance of textures. It’s a simple yet elegant treat that can brighten any day.
As you take a bite, the warm flavors dance on your palate. The galette is not only visually appealing but also easy to make. It’s a fantastic way to showcase seasonal pears, making it a favorite among fruity desserts.
For those who love to bake, this recipe is a must-try. You can serve it with a scoop of vanilla ice cream or a dollop of whipped cream for an extra touch. Let’s dive into the ingredients and steps to create this delicious galette!
Ingredients
- 1 pre-made pie crust (store-bought or homemade)
- 3-4 ripe pears, thinly sliced
- 1/4 cup granulated sugar
- 1 teaspoon ground cinnamon
- 1 tablespoon lemon juice
- 1 tablespoon all-purpose flour
- 1 egg (for egg wash)
- Powdered sugar (for dusting)
Instructions
- Preheat your oven to 375°F (190°C).
- In a bowl, mix the sliced pears with granulated sugar, cinnamon, lemon juice, and flour. Let it sit for about 10 minutes to allow the flavors to meld.
- Roll out the pie crust on a parchment-lined baking sheet. Create a slight border around the edges.
- Arrange the pear mixture in the center of the crust, leaving the border clear.
- Fold the edges of the crust over the pears, pleating as you go.
- Brush the crust with the beaten egg for a golden finish.
- Bake for 30-35 minutes until the crust is golden and the pears are tender.
- Let it cool slightly, then dust with powdered sugar before serving.
Cooking Tips: If you want a richer flavor, consider adding a pinch of nutmeg or a splash of vanilla extract to the pear mixture. For a gluten-free option, use a gluten-free pie crust. Enjoy this warm galette with friends and family!
Delight In The Creaminess Of Vanilla Bean Pudding
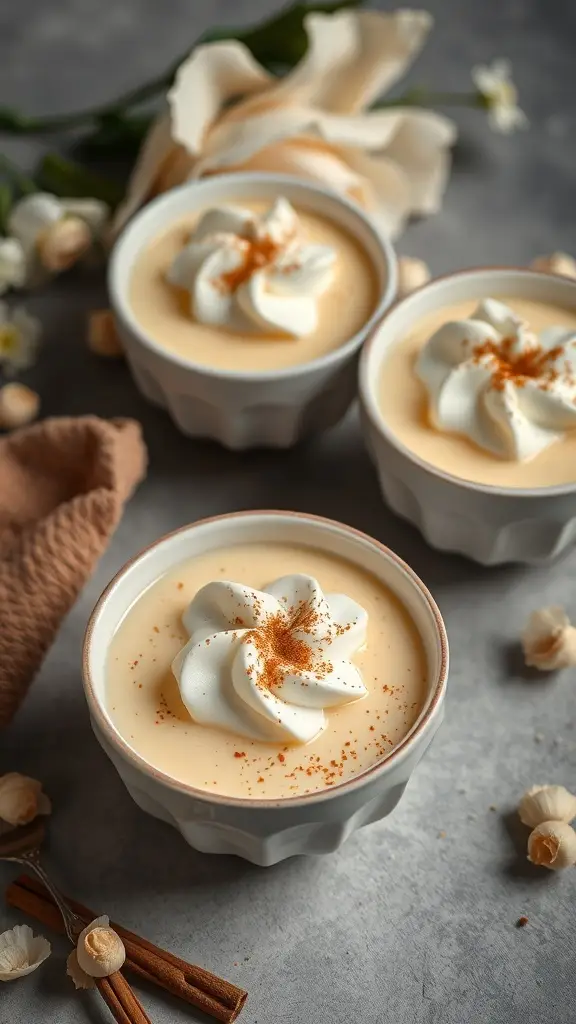
Vanilla bean pudding is a classic dessert that brings a touch of comfort to any meal. Its creamy texture and rich flavor make it a favorite among fruity desserts. This pudding is not just about taste; it’s also about the presentation. Imagine serving it in charming little bowls, topped with a swirl of whipped cream and a sprinkle of cinnamon. The visual appeal adds to the overall experience, making it perfect for gatherings or a simple treat at home.
The beauty of vanilla bean pudding lies in its simplicity. With just a few ingredients, you can create a dessert that feels luxurious. The vanilla beans infuse the pudding with a warm, aromatic flavor that is hard to resist. Pair it with fresh fruits like berries or sliced bananas for a delightful contrast. This combination not only enhances the taste but also adds a pop of color to your plate.
Ready to whip up this creamy delight? Here’s how you can make your own vanilla bean pudding at home!
Ingredients
- 2 cups whole milk
- 1/2 cup granulated sugar
- 1/4 cup cornstarch
- 1/4 teaspoon salt
- 1 tablespoon unsalted butter
- 1 vanilla bean, split and seeds scraped
- 1 teaspoon vanilla extract
- Whipped cream for topping
- Cinnamon for garnish
Instructions
- In a medium saucepan, combine the milk, sugar, cornstarch, and salt. Whisk until smooth.
- Place the saucepan over medium heat and cook, stirring constantly, until the mixture thickens and starts to bubble.
- Remove from heat and stir in the butter, vanilla bean seeds, and vanilla extract.
- Pour the pudding into serving bowls and let it cool to room temperature. Cover with plastic wrap to prevent a skin from forming.
- Chill in the refrigerator for at least 2 hours before serving.
- Top with whipped cream and a sprinkle of cinnamon before serving.
Cooking Tips: If you don’t have whole milk, you can substitute with 2% milk, but the pudding may be slightly less creamy. For a dairy-free option, use almond or coconut milk. If you prefer a sweeter pudding, feel free to add more sugar to taste. Enjoy your homemade vanilla bean pudding!
Enjoy The Tangy Flavor Of Key Lime Pie
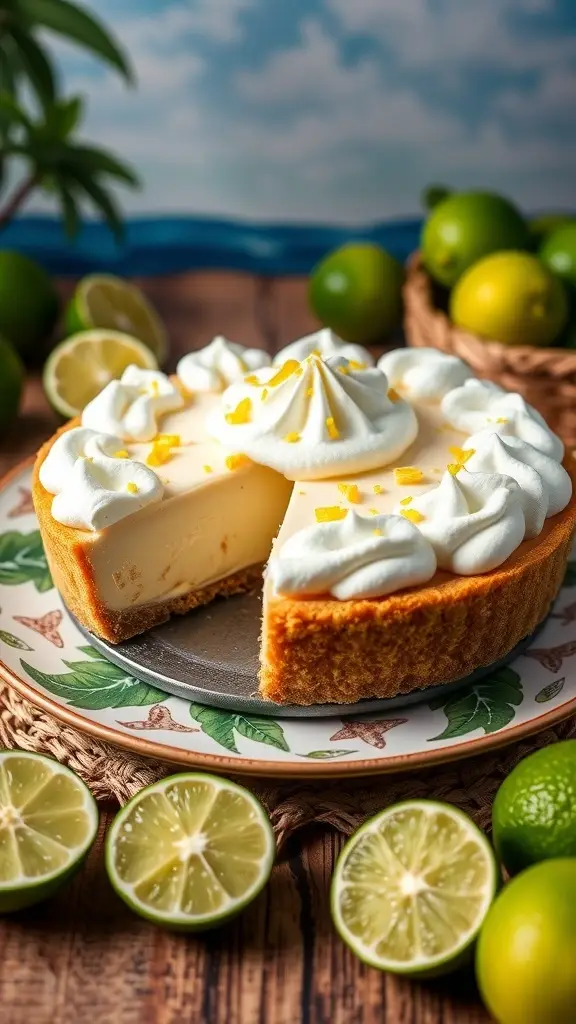
Key lime pie is a classic dessert that brings a burst of tangy flavor to your table. This pie, with its creamy filling and crisp crust, is a favorite in many households. The vibrant green limes used in this recipe give it a refreshing taste that pairs perfectly with whipped cream on top.
The image showcases a beautifully presented key lime pie, complete with a dollop of whipped cream and a sprinkle of lime zest. Surrounding the pie are fresh limes, hinting at the zesty flavor that awaits. The crust is golden and crumbly, inviting you to take a slice.
Making key lime pie is simple and rewarding. You can enjoy it as a light dessert after a hearty meal or as a sweet treat on a warm day. It’s a delightful addition to any gathering, sure to impress your guests.
Ingredients
- 1 ½ cups graham cracker crumbs
- ½ cup granulated sugar
- ½ cup unsalted butter, melted
- 4 large egg yolks
- 1 can (14 ounces) sweetened condensed milk
- ½ cup fresh key lime juice
- 1 teaspoon lime zest
- Whipped cream for topping
Instructions
- Preheat your oven to 350°F (175°C).
- In a bowl, mix graham cracker crumbs, sugar, and melted butter until combined. Press this mixture into the bottom and sides of a pie dish to form the crust.
- Bake the crust for about 10 minutes, then remove it from the oven and let it cool.
- In another bowl, whisk together egg yolks, sweetened condensed milk, key lime juice, and lime zest until smooth.
- Pour the filling into the cooled crust and bake for an additional 15 minutes. Remove from the oven and let it cool to room temperature.
- Chill the pie in the refrigerator for at least 3 hours before serving. Top with whipped cream just before serving.
Cooking Tips: If you can’t find key limes, regular limes work too, but the flavor will be slightly different. For a sweeter pie, add a bit more sugar to the filling. Make sure to chill the pie thoroughly; it enhances the flavors and makes it easier to slice.
Enjoy this fruity dessert with friends and family, and savor the tangy goodness of key lime pie!
Experience The Sweetness Of Fig And Honey Tart

Fruity desserts can bring a delightful touch to any meal, and the Fig and Honey Tart is no exception. This tart showcases the natural sweetness of fresh figs paired with the rich flavor of honey. The golden crust cradles a creamy filling that complements the figs perfectly. It’s a treat that looks as good as it tastes!
When you slice into this tart, you’ll see the vibrant colors of the figs against the creamy backdrop. Drizzling honey on top adds a glossy finish that makes it even more tempting. It’s perfect for gatherings or a cozy night in.
Ingredients
- 1 pre-made tart crust
- 1 cup fresh figs, sliced
- 1 cup ricotta cheese
- 1/2 cup honey
- 2 large eggs
- 1 teaspoon vanilla extract
- 1 tablespoon lemon juice
- Pinch of salt
Instructions
- Preheat your oven to 350°F (175°C).
- In a bowl, mix ricotta cheese, honey, eggs, vanilla extract, lemon juice, and salt until smooth.
- Pour the mixture into the tart crust, spreading it evenly.
- Arrange the sliced figs on top of the filling.
- Bake for 30-35 minutes, or until the filling is set and the crust is golden.
- Let it cool slightly, then drizzle with extra honey before serving.
Cooking Tips: If you can’t find fresh figs, dried figs can work too; just soak them in warm water for a bit to soften. You can also swap ricotta with cream cheese for a richer flavor. Enjoy this fruity dessert with a dollop of whipped cream or a scoop of vanilla ice cream for an extra treat!
Satisfy Your Sweet Tooth With Berry Pavlova
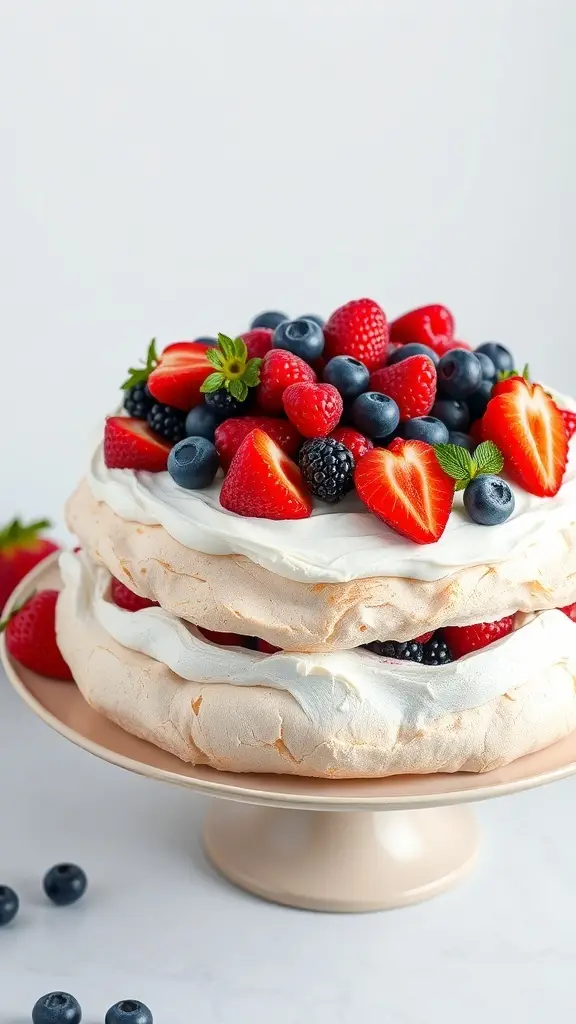
Berry Pavlova is a delightful dessert that brings together a crispy meringue shell and a soft, fluffy interior. Topped with fresh berries, it’s a treat that looks as good as it tastes. The vibrant colors of strawberries, blueberries, and raspberries create a feast for the eyes, making it perfect for any occasion.
This dessert is not just about looks; it’s light and airy, making it a great choice for those warm days when you want something sweet but not too heavy. The combination of the crunchy meringue and the creamy topping is simply irresistible. Plus, it’s a great way to enjoy fruity desserts!
Ingredients
- 4 large egg whites
- 1 cup granulated sugar
- 1 teaspoon vanilla extract
- 1 teaspoon white vinegar
- 2 cups heavy cream
- 2 tablespoons powdered sugar
- 1 teaspoon vanilla extract (for the cream)
- 2 cups mixed berries (strawberries, blueberries, raspberries)
- Fresh mint leaves for garnish (optional)
Instructions
- Preheat your oven to 250°F (120°C). Line a baking sheet with parchment paper and draw a circle about 8 inches in diameter.
- In a clean bowl, beat the egg whites until soft peaks form. Gradually add the granulated sugar, continuing to beat until stiff peaks form and the mixture is glossy.
- Gently fold in the vanilla extract and vinegar. Spoon the meringue onto the prepared circle, creating a slight well in the center.
- Bake for about 1 hour, then turn off the oven and let the pavlova cool completely inside.
- While the pavlova cools, whip the heavy cream with powdered sugar and vanilla extract until soft peaks form.
- Once cooled, carefully transfer the pavlova to a serving plate. Top with whipped cream and arrange the mixed berries on top. Garnish with mint leaves if desired.
- Slice and serve immediately for the best texture!
Cooking Tip: Make sure your mixing bowl is completely clean and dry before whipping the egg whites. Any grease can prevent them from whipping properly.
Ingredient Substitution: If you don’t have heavy cream, you can use coconut cream for a dairy-free option. Just chill a can of coconut milk overnight, scoop out the solid part, and whip it up!
You may also like:
– 43 Easy And Quick Cocktails From The 1960’s
– 27 Must-Try Tequila Cocktails Inspired by Gotham City
– 25 Cocktails Inspired by Gotham City Nightlife
If you enjoyed this blog you can visit us or check out our other blogs and learn a bit about us.
Disclaimer: This blog post is inspired by fictional universes and characters created by their respective rights holders. All related content and imagery remain the property of their respective rights holder. This fan-inspired content is for entertainment and commentary purposes only and is not affiliated with or endorsed by HBO, Disney, Warner Bros., Lionsgate, or any other rights holders. To explore the official source material, please visit:
HBO