
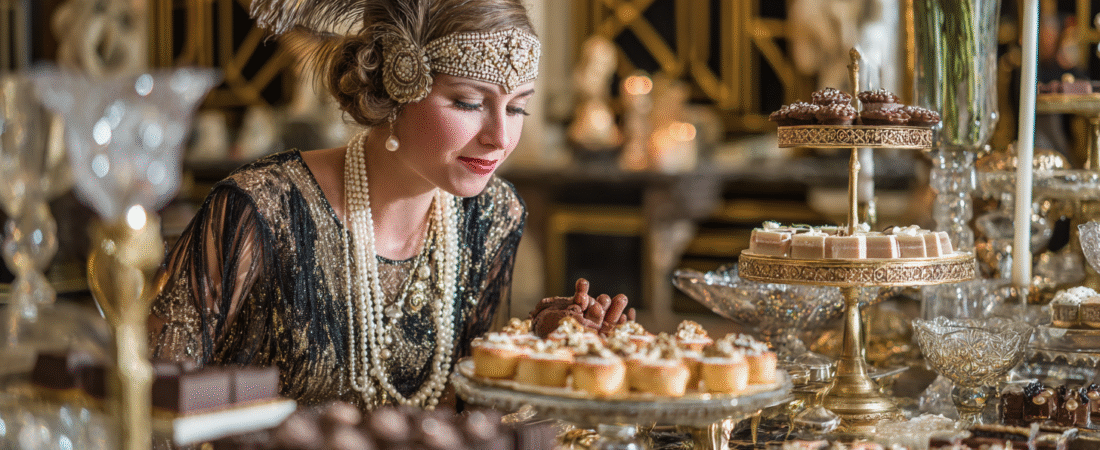
Get ready to turn back time with delightful mini desserts inspired by the fabulous 1920s! This era was all about indulgence, creativity, and flair, setting the stage for some scrumptious treats. From elegant bite-sized pastries to fruity jellies, these ideas will bring a touch of vintage charm to your table. And don’t worry if you’re missing some ingredients; we’ll share handy substitutions and cooking tips to make it a breeze. Let’s whip up some sweet nostalgia!
Decadent Chocolate Mousse: A 1920’s Indulgence
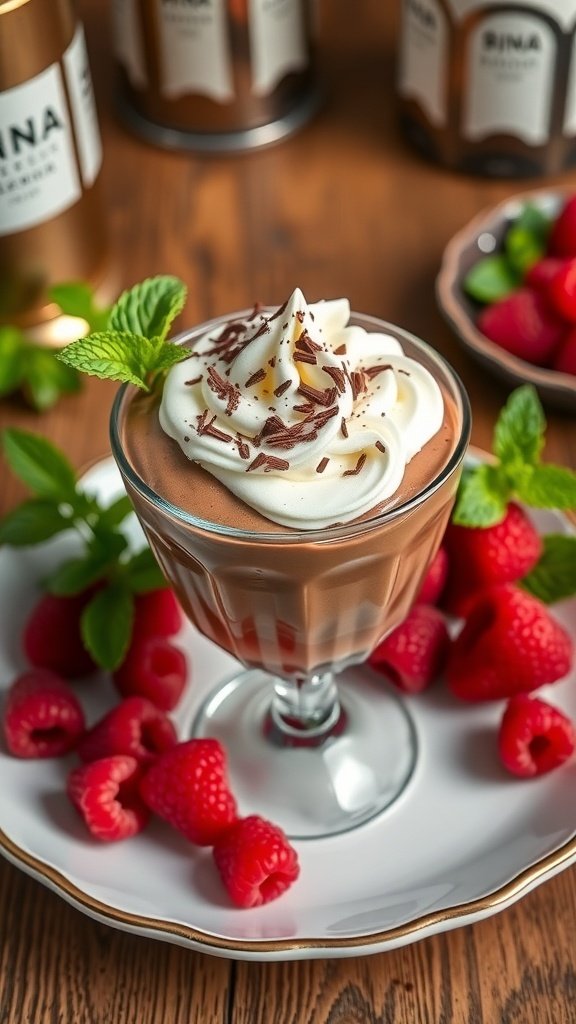
Chocolate mousse is a classic dessert that perfectly captures the spirit of the 1920s. This era was all about elegance and indulgence, making a rich chocolate mousse a fitting treat for any gathering. The image showcases a beautifully presented mousse, topped with whipped cream, chocolate shavings, and fresh raspberries. The vibrant colors and textures invite you to take a bite and savor the moment.
This dessert is not just about taste; it’s also about presentation. The glass dish highlights the smooth, creamy texture of the mousse while the garnishes add a pop of color. Pairing it with fresh raspberries and mint leaves brings a refreshing contrast to the rich chocolate flavor.
Making chocolate mousse is simpler than you might think. It’s a great option for mini dessert ideas, perfect for parties or intimate dinners. You can even prepare it a day in advance, allowing the flavors to meld beautifully.
Ingredients
- 6 ounces semi-sweet chocolate, chopped
- 3 tablespoons unsalted butter
- 3 large eggs, separated
- 1/4 cup granulated sugar
- 1 cup heavy cream
- 1 teaspoon vanilla extract
- Fresh raspberries and mint leaves for garnish
Instructions
- Melt the chocolate and butter together in a heatproof bowl over simmering water. Stir until smooth and let cool slightly.
- In a separate bowl, beat the egg yolks with sugar until pale and thick. Stir in the melted chocolate mixture and vanilla extract.
- In another bowl, whip the heavy cream until soft peaks form. Gently fold the whipped cream into the chocolate mixture.
- In a clean bowl, beat the egg whites until stiff peaks form. Carefully fold the egg whites into the chocolate mixture until no white streaks remain.
- Divide the mousse into serving glasses and refrigerate for at least 2 hours, or until set.
- Before serving, top with whipped cream, chocolate shavings, and fresh raspberries. Garnish with mint leaves for a fresh touch.
Cooking Tips: If you want a richer flavor, try using dark chocolate instead of semi-sweet. You can also substitute the heavy cream with coconut cream for a dairy-free version. Just make sure to chill the coconut cream beforehand for the best results.
Classic Lemon Tart: A Zesty Delight
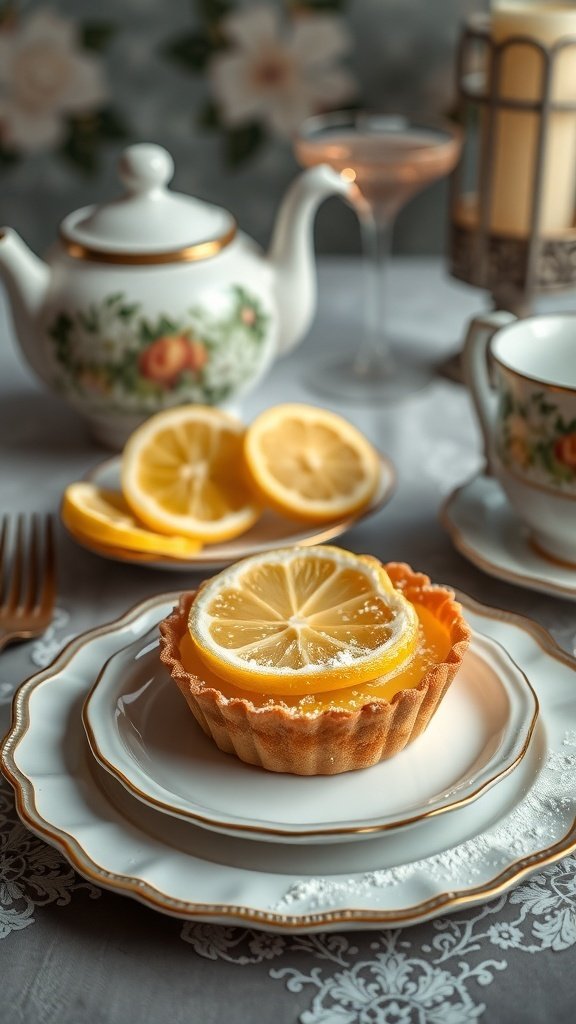
The classic lemon tart is a perfect mini dessert idea inspired by the 1920s. Its bright yellow filling and crisp crust bring a refreshing touch to any gathering. The tart is often garnished with a slice of lemon, adding a pop of color and a hint of sophistication.
This dessert not only looks elegant but also offers a delightful balance of sweetness and tartness. It’s a great way to end a meal or serve at a tea party, reminiscent of the charming gatherings of the Roaring Twenties.
Making a lemon tart is simpler than it seems. You can customize the recipe by using different types of citrus or even adding a hint of lavender for a unique twist. If you’re looking for a gluten-free option, almond flour can be used in place of regular flour for the crust.
Ingredients
- 1 1/4 cups all-purpose flour
- 1/4 cup powdered sugar
- 1/2 cup unsalted butter, cold and cubed
- 1 large egg yolk
- 2/3 cup granulated sugar
- 2 large eggs
- 1/2 cup fresh lemon juice
- Zest of 2 lemons
- 1/4 cup heavy cream
Instructions
- Make the Crust: In a bowl, mix flour and powdered sugar. Cut in the cold butter until the mixture resembles coarse crumbs. Add the egg yolk and mix until combined. Press the dough into a tart pan and chill for 30 minutes.
- Preheat the Oven: Preheat your oven to 350°F (175°C). Bake the crust for about 15 minutes or until lightly golden. Let it cool.
- Prepare the Filling: In another bowl, whisk together granulated sugar, eggs, lemon juice, and lemon zest. Stir in the heavy cream until smooth.
- Fill the Tart: Pour the lemon filling into the cooled crust. Bake for another 20-25 minutes, until the filling is set but still slightly jiggly in the center.
- Cool and Serve: Let the tart cool completely before slicing. Dust with powdered sugar and garnish with lemon slices if desired.
Cooking Tips: If you want a richer flavor, consider adding a tablespoon of vanilla extract to the filling. For a lighter option, you can substitute half of the heavy cream with Greek yogurt.
Enjoy this delightful lemon tart at your next gathering, and let it transport you back to the elegance of the 1920s!
Old-Fashioned Apple Crisp: A Timeless Favorite
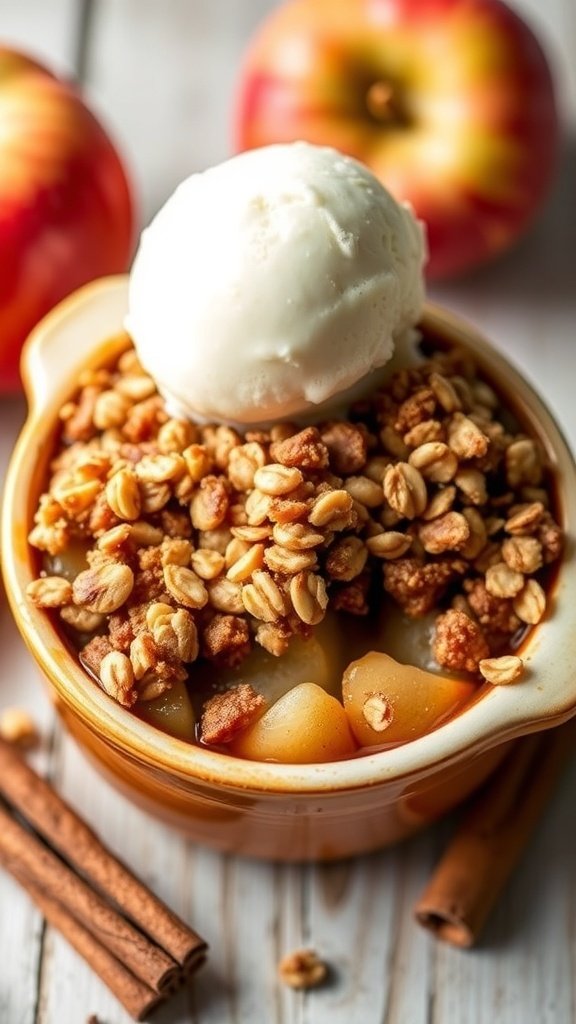
Old-fashioned apple crisp is a delightful dessert that brings back memories of simpler times. This dish is a perfect blend of sweet, tender apples and a crunchy topping that makes it irresistible. The warm, comforting aroma of baked apples and cinnamon fills the kitchen, creating a cozy atmosphere.
This dessert is not only delicious but also easy to prepare. It’s a fantastic choice for gatherings or a quiet evening at home. Pair it with a scoop of vanilla ice cream for that extra touch of indulgence. It’s one of those mini dessert ideas that never goes out of style!
Ingredients
- 6 cups sliced apples (Granny Smith or Honeycrisp work well)
- 1 cup granulated sugar
- 1 teaspoon ground cinnamon
- 1 tablespoon lemon juice
- 1 cup rolled oats
- 1 cup all-purpose flour
- 1/2 cup packed brown sugar
- 1/2 cup unsalted butter, melted
- 1/4 teaspoon salt
Instructions
- Preheat the oven to 350°F (175°C).
- In a large bowl, combine sliced apples, granulated sugar, cinnamon, and lemon juice. Toss until apples are well coated.
- Transfer the apple mixture to a greased baking dish.
- In another bowl, mix oats, flour, brown sugar, melted butter, and salt until crumbly.
- Spread the oat mixture evenly over the apples.
- Bake for 30-35 minutes or until the topping is golden brown and the apples are bubbly.
- Let it cool slightly before serving. Enjoy warm with a scoop of ice cream!
Cooking Tips: For a twist, try adding nuts like walnuts or pecans to the topping. You can also substitute half of the apples with pears for a different flavor. If you prefer a sweeter dessert, increase the sugar in the apple mixture.
Elegant Strawberry Shortcake: A Romantic Treat
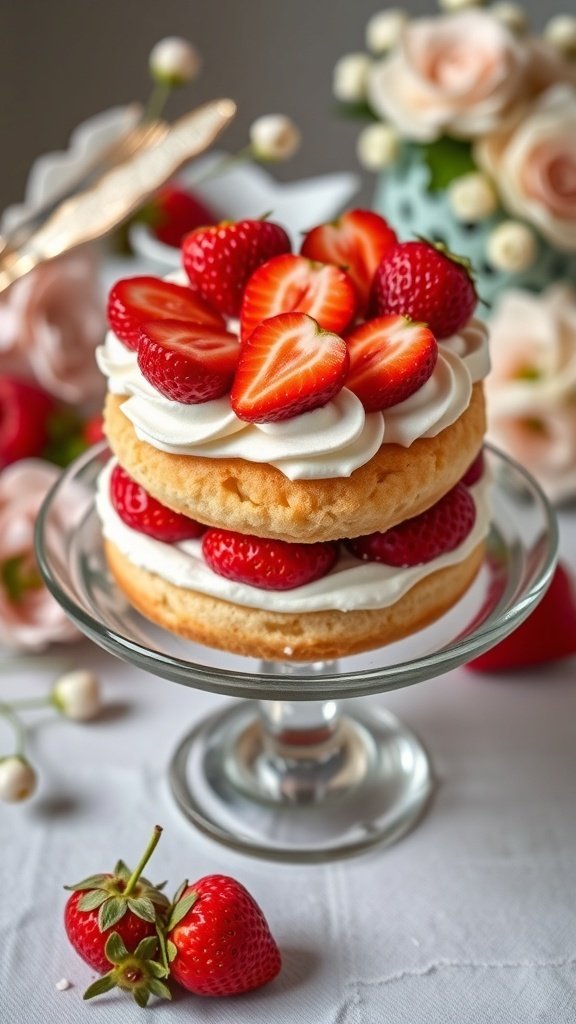
Strawberry shortcake is a classic dessert that brings a touch of romance to any gathering. This delightful treat features layers of soft sponge cake, fresh strawberries, and whipped cream, making it a perfect choice for those mini dessert ideas inspired by the 1920s. The visual appeal of this dessert is simply irresistible, with vibrant red strawberries peeking out from between fluffy layers of cake.
To create your own elegant strawberry shortcake, start with a light sponge cake. The cake should be airy and moist, allowing it to soak up the sweetness of the strawberries. Fresh strawberries are essential; they should be ripe and juicy for the best flavor. Topping it all off with a generous dollop of whipped cream adds a creamy texture that complements the cake and berries beautifully.
When serving, consider garnishing with extra strawberries or edible flowers for a charming presentation. This dessert is not just tasty; it’s also a feast for the eyes!
Ingredients
- 2 cups all-purpose flour
- 1 cup granulated sugar
- 1 tablespoon baking powder
- 1/2 teaspoon salt
- 1/2 cup unsalted butter, softened
- 1 cup milk
- 2 large eggs
- 1 teaspoon vanilla extract
- 4 cups fresh strawberries, sliced
- 1 cup heavy cream
- 2 tablespoons powdered sugar
Instructions
- Preheat the oven to 350°F (175°C). Grease and flour two 9-inch round cake pans.
- In a large bowl, mix flour, sugar, baking powder, and salt. Add softened butter, milk, eggs, and vanilla. Beat until smooth.
- Divide the batter evenly between the prepared pans. Bake for 25-30 minutes or until a toothpick comes out clean.
- While the cakes cool, whip the heavy cream with powdered sugar until soft peaks form.
- Once the cakes are cool, slice each cake in half horizontally. Layer one cake half with strawberries and whipped cream, then repeat with the next layer. Top with the final cake half and more whipped cream and strawberries.
- Serve immediately and enjoy your romantic strawberry shortcake!
Cooking Tips: If you want a richer flavor, consider using buttermilk instead of regular milk. You can also substitute the heavy cream with coconut cream for a dairy-free option.
Ingredient Substitutions: If you don’t have fresh strawberries, feel free to use other berries like raspberries or blueberries. For a gluten-free version, substitute all-purpose flour with a gluten-free blend.
Rich Coconut Cake: A Tropical Twist
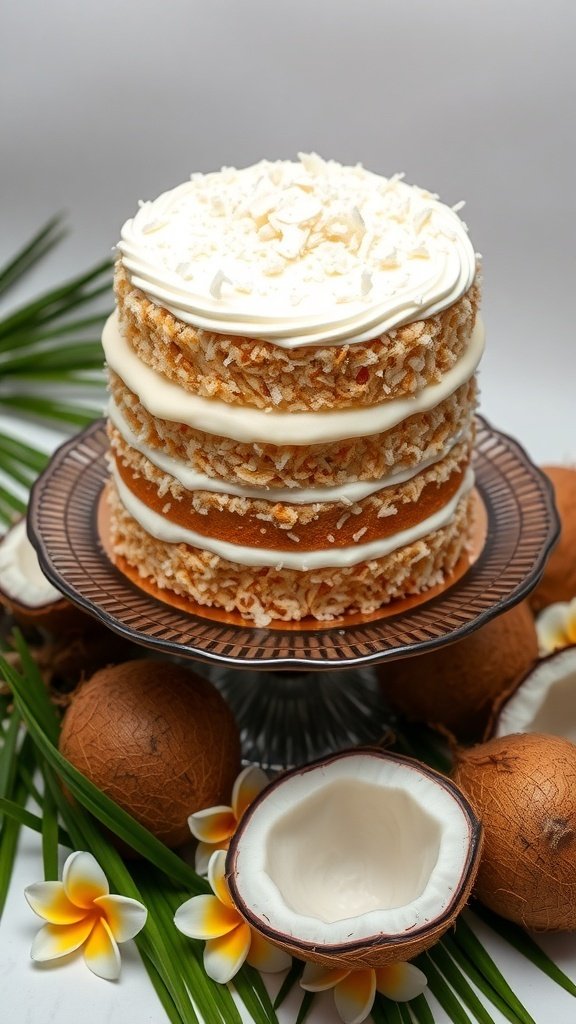
This Rich Coconut Cake brings a delightful tropical twist to your dessert table. Inspired by the 1920s, it features layers of fluffy coconut cake, creamy frosting, and a sprinkle of toasted coconut on top. The cake’s light texture and sweet coconut flavor make it a perfect mini dessert idea for any occasion.
The cake is beautifully presented on a vintage-style cake stand, surrounded by fresh coconuts and tropical leaves, evoking a sense of paradise. Each slice reveals the moist layers, enticing anyone with a sweet tooth. Whether you’re hosting a tea party or a summer gathering, this cake will surely impress your guests.
For those looking to recreate this treat, here’s a simple recipe to follow:
Ingredients
- 2 cups all-purpose flour
- 1 cup granulated sugar
- 1 tablespoon baking powder
- 1/2 teaspoon salt
- 1 cup unsweetened coconut milk
- 1/2 cup unsalted butter, softened
- 3 large eggs
- 1 teaspoon vanilla extract
- 1 cup shredded coconut
- 1 cup heavy cream
- 1/4 cup powdered sugar
- 1 cup toasted coconut flakes for decoration
Instructions
- Preheat your oven to 350°F (175°C). Grease and flour three 6-inch round cake pans.
- In a large bowl, mix flour, sugar, baking powder, and salt. In another bowl, whisk together coconut milk, butter, eggs, and vanilla.
- Combine the wet and dry ingredients, mixing until smooth. Fold in shredded coconut.
- Divide the batter evenly among the prepared pans. Bake for 25-30 minutes or until a toothpick comes out clean.
- Let the cakes cool in the pans for 10 minutes, then transfer to wire racks to cool completely.
- For the frosting, whip heavy cream with powdered sugar until soft peaks form. Spread between the cake layers and on top.
- Finish by sprinkling toasted coconut flakes on top for a beautiful finish.
Cooking Tips: If you want to make this cake even more coconutty, consider adding coconut extract to the batter. For a lighter version, you can substitute Greek yogurt for some of the butter.
Enjoy this tropical delight at your next gathering!
Silky Vanilla Pudding: A Creamy Classic
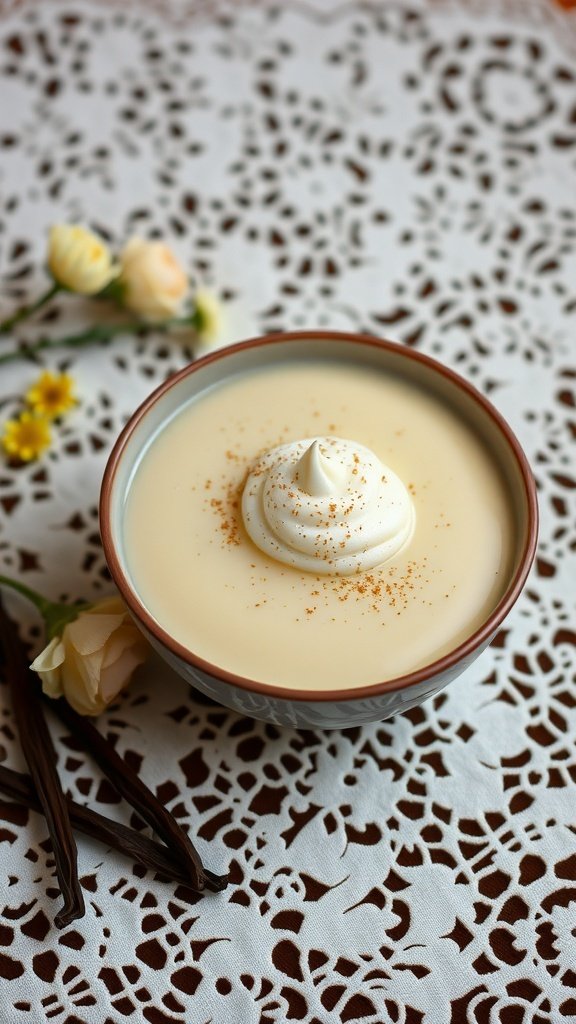
Silky vanilla pudding is a delightful treat that takes us back to the 1920s. This creamy classic was a favorite at many gatherings, offering a comforting sweetness that pairs perfectly with the era’s elegant style. The image captures a bowl of smooth vanilla pudding, topped with a swirl of whipped cream and a sprinkle of nutmeg, all set against a delicate lace backdrop. It’s simple yet sophisticated, making it an ideal mini dessert idea for any occasion.
Making this pudding is straightforward and requires just a few ingredients. You can enjoy it on its own or dress it up with fresh fruits or chocolate shavings. This dessert is not just tasty but also versatile, fitting right into the theme of mini dessert ideas inspired by the 1920s.
Ingredients
- 2 cups whole milk
- 1/2 cup granulated sugar
- 1/4 cup cornstarch
- 1/4 teaspoon salt
- 2 teaspoons vanilla extract
- 2 tablespoons unsalted butter
- Whipped cream for topping
- Ground nutmeg for garnish
Instructions
- Combine the Ingredients: In a medium saucepan, whisk together the sugar, cornstarch, and salt. Gradually add the milk, stirring until smooth.
- Cook the Mixture: Place the saucepan over medium heat. Stir constantly until the mixture thickens and begins to bubble, about 5-7 minutes.
- Add Flavor: Remove from heat and stir in the butter and vanilla extract until fully incorporated.
- Chill: Pour the pudding into serving dishes and let it cool at room temperature. Once cooled, cover and refrigerate for at least 2 hours.
- Serve: Top with whipped cream and a sprinkle of nutmeg before serving.
Cooking tips: For a richer flavor, consider using half-and-half instead of whole milk. If you prefer a dairy-free option, almond or coconut milk can work well too. Adjust the sweetness by adding more or less sugar based on your taste.
Decadent Red Velvet Cake: A Southern Charm

The 1920s brought a flair for the extravagant, and what better way to celebrate that than with a stunning red velvet cake? This cake is not just a treat; it’s a showstopper. The rich, vibrant color and smooth cream cheese frosting make it a perfect centerpiece for any gathering.
Red velvet cake has deep Southern roots, often associated with celebrations and special occasions. Its unique flavor, a blend of cocoa and vanilla, paired with a tangy cream cheese frosting, creates a delightful balance. This cake is a fantastic mini dessert idea that can be served in small slices or even as mini cupcakes for a fun twist.
To make your own red velvet cake, gather these ingredients:
Ingredients
- 2 ½ cups all-purpose flour
- 1 ½ cups granulated sugar
- 1 teaspoon baking soda
- 1 teaspoon salt
- 1 teaspoon cocoa powder
- 1 ½ cups vegetable oil
- 1 cup buttermilk, room temperature
- 2 large eggs, room temperature
- 2 tablespoons red food coloring
- 1 teaspoon vanilla extract
- 1 teaspoon white vinegar
- 8 oz cream cheese, softened
- 1 cup unsalted butter, softened
- 4 cups powdered sugar
- 1 teaspoon vanilla extract (for frosting)
Instructions
- Preheat your oven to 350°F (175°C). Grease and flour two 9-inch round cake pans.
- In a large bowl, sift together the flour, sugar, baking soda, salt, and cocoa powder.
- In another bowl, mix the oil, buttermilk, eggs, food coloring, vanilla, and vinegar until well combined.
- Gradually add the wet ingredients to the dry ingredients, mixing until smooth.
- Divide the batter evenly between the prepared pans and bake for 25-30 minutes, or until a toothpick comes out clean.
- Let the cakes cool in the pans for 10 minutes, then transfer to wire racks to cool completely.
- For the frosting, beat the cream cheese and butter together until creamy. Gradually add the powdered sugar and vanilla, mixing until smooth.
- Once the cakes are cool, spread frosting between the layers and on top. Decorate with edible flowers for a touch of elegance.
Cooking tips: If you don’t have buttermilk, you can make a substitute by mixing milk with a tablespoon of vinegar or lemon juice. For a lighter cake, consider using a mix of half all-purpose flour and half cake flour. This red velvet cake is sure to impress your guests and bring a taste of the 1920s to your table!
Charming Raspberry Fool: A Fruity Delight
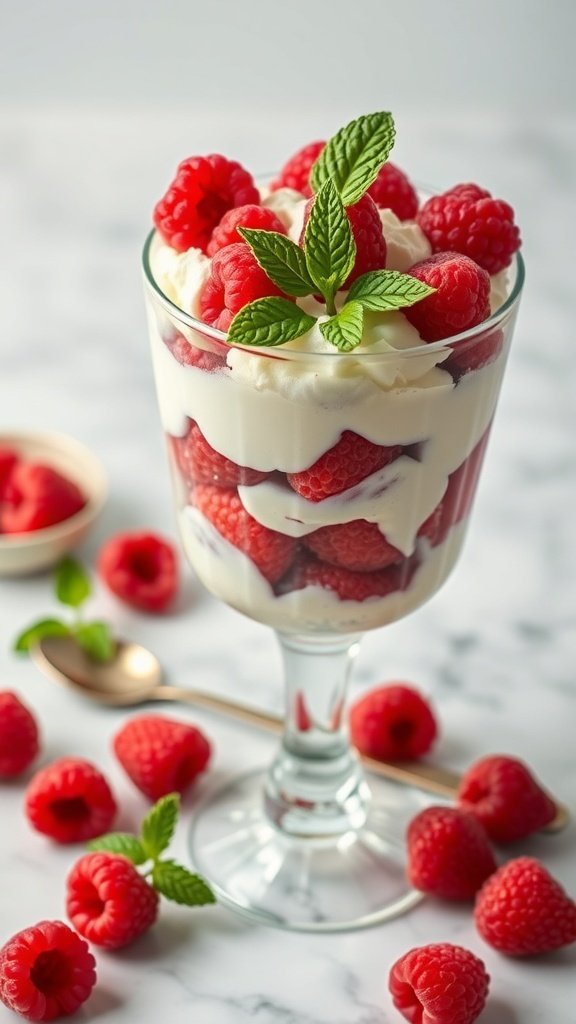
The Raspberry Fool is a delightful mini dessert that captures the essence of the 1920s with its simple elegance. This dessert features layers of fresh raspberries and creamy whipped cream, making it a perfect treat for any occasion. The vibrant red of the raspberries adds a pop of color, while the lightness of the cream balances the tartness of the fruit.
To make this charming dessert, you’ll need just a few ingredients. Fresh raspberries are the star of the show, and they’re complemented by whipped cream and a touch of sugar. This dessert is not only easy to prepare but also allows for creativity in presentation. Serve it in elegant glasses to bring a touch of vintage flair to your table.
For those looking to switch things up, you can substitute other berries like strawberries or blueberries, or even use a dairy-free whipped cream for a lighter option. Enjoy this fruity delight as a refreshing end to your meal or a sweet snack throughout the day!
Ingredients
- 2 cups fresh raspberries
- 1 cup heavy whipping cream
- 1/4 cup powdered sugar
- 1 teaspoon vanilla extract
- Mint leaves for garnish (optional)
Instructions
- Prepare the Raspberries: Rinse the raspberries gently and set aside a few for garnish.
- Make the Whipped Cream: In a mixing bowl, combine heavy whipping cream, powdered sugar, and vanilla extract. Whip until soft peaks form.
- Layer the Dessert: In serving glasses, layer the raspberries and whipped cream. Start with a layer of raspberries, followed by a layer of whipped cream. Repeat until the glasses are filled.
- Garnish: Top each glass with a few whole raspberries and a mint leaf for a fresh touch.
- Chill and Serve: Refrigerate for about 30 minutes before serving to let the flavors meld together.
Delightful Chocolate Éclairs: A French Classic
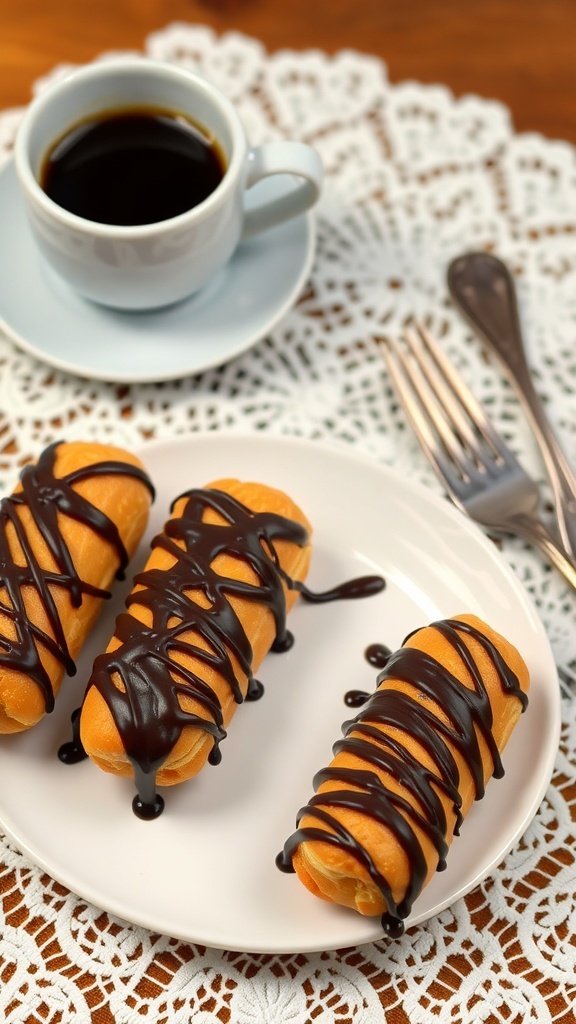
Chocolate éclairs are a timeless French dessert that perfectly captures the elegance of the 1920s. These delightful treats consist of a light choux pastry filled with rich pastry cream and topped with a glossy chocolate glaze. They were a popular choice at tea parties and gatherings during that era, making them a fitting mini dessert idea for any occasion.
The image showcases beautifully crafted éclairs, drizzled with dark chocolate, inviting you to indulge. Their golden-brown exterior and creamy filling are sure to impress your guests. Pair them with a cup of coffee for a delightful afternoon treat.
Ingredients
- 1 cup water
- 1/2 cup unsalted butter
- 1 cup all-purpose flour
- 1/4 teaspoon salt
- 4 large eggs
- 1 cup pastry cream (store-bought or homemade)
- 1 cup dark chocolate, chopped
- 1/2 cup heavy cream
Instructions
- Preheat your oven to 400°F (200°C). Line a baking sheet with parchment paper.
- In a saucepan, combine water and butter. Bring to a boil, then remove from heat. Stir in flour and salt until the mixture forms a ball.
- Add eggs one at a time, mixing well after each addition until smooth.
- Transfer the dough to a piping bag and pipe 4-inch long strips onto the prepared baking sheet.
- Bake for 20-25 minutes until golden and puffed. Let them cool completely.
- While cooling, prepare the chocolate glaze by heating heavy cream until just simmering. Pour over chopped chocolate and stir until smooth.
- Once the éclairs are cool, fill them with pastry cream using a piping bag. Dip the tops in the chocolate glaze and let set.
Cooking Tips: If you want a lighter pastry cream, you can use whipped cream instead. For a fun twist, add a splash of vanilla or coffee to the cream for extra flavor.
Enjoy these delightful éclairs at your next gathering, and watch them disappear!
Traditional Bread Pudding: A Comforting Dessert
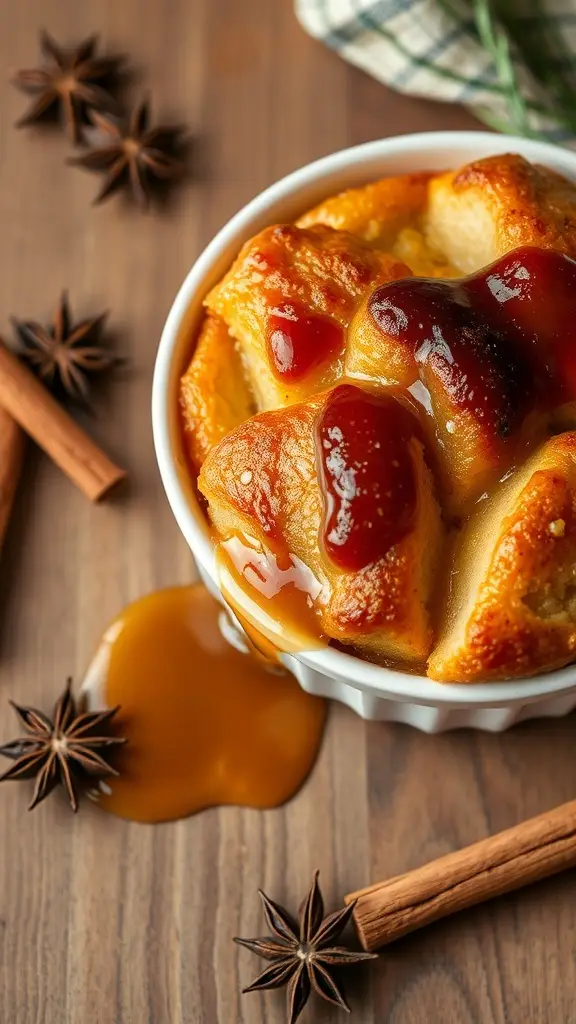
When you think of classic desserts, bread pudding often comes to mind. This dish has a rich history and was popular in the 1920s. It’s a great way to use up leftover bread, turning it into something warm and comforting.
The image shows a delicious serving of bread pudding, golden and slightly crispy on top. It’s drizzled with a sweet sauce, making it look even more inviting. The warm spices, like cinnamon and star anise, add a nostalgic touch that fits perfectly with the 1920s theme.
For mini dessert ideas, consider serving individual portions of bread pudding in small ramekins. This not only makes for a charming presentation but also allows guests to enjoy their own little treat.
Here’s a simple recipe to create your own traditional bread pudding:
Ingredients
- 4 cups stale bread, cubed
- 2 cups milk
- 1 cup heavy cream
- 3/4 cup granulated sugar
- 3 large eggs
- 1 teaspoon vanilla extract
- 1 teaspoon ground cinnamon
- 1/4 teaspoon ground nutmeg
- 1/4 cup raisins (optional)
- Butter for greasing
Instructions
- Preheat your oven to 350°F (175°C). Grease your ramekins or baking dish with butter.
- In a large bowl, combine the milk, cream, sugar, eggs, vanilla, cinnamon, and nutmeg. Whisk until well blended.
- Add the cubed bread to the mixture and let it soak for about 10 minutes. If using, stir in the raisins.
- Pour the mixture into the prepared ramekins or baking dish. Bake for 30-35 minutes, or until the top is golden and a knife inserted in the center comes out clean.
- Let it cool slightly before serving. Drizzle with caramel sauce or a dusting of powdered sugar for extra sweetness.
Cooking tips: If you don’t have heavy cream, you can substitute it with more milk. For a twist, try adding chocolate chips or nuts. Enjoy this comforting dessert that brings a taste of the past to your table!
Chilled Peach Melba: A Summer Refreshment
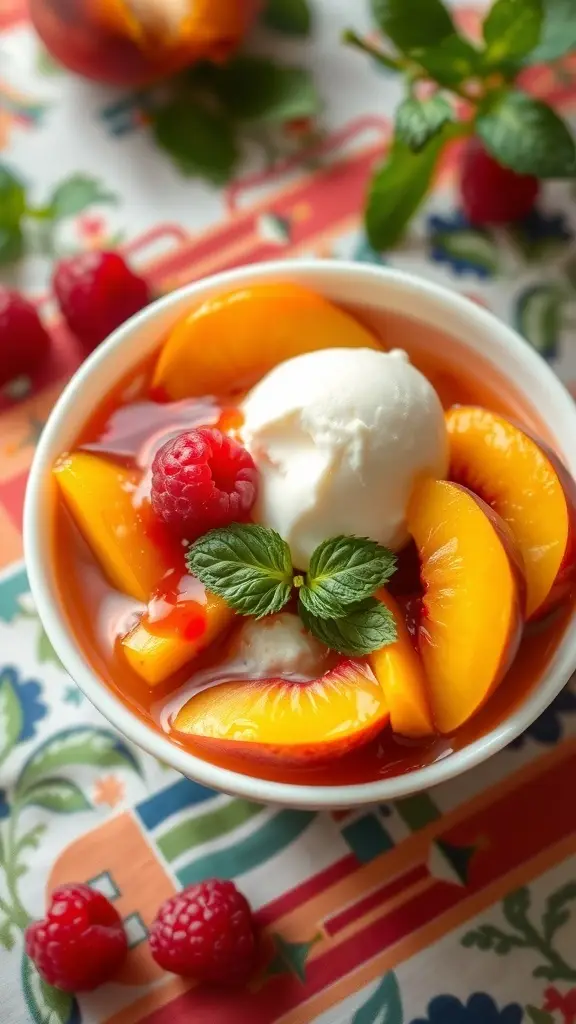
Chilled Peach Melba is a delightful dessert that captures the essence of summer. This classic treat features juicy peaches, sweet raspberry sauce, and creamy vanilla ice cream. It’s a refreshing way to enjoy seasonal fruits and a nod to the 1920s when this dessert became popular.
The image showcases a bowl filled with luscious peach slices, drizzled with vibrant raspberry sauce. A scoop of vanilla ice cream sits atop the peaches, adding a creamy texture. Fresh raspberries and a sprig of mint garnish the dish, making it visually appealing and inviting.
This dessert is perfect for warm days, offering a light yet satisfying option among mini dessert ideas. It’s easy to prepare and can be served at gatherings or enjoyed as a sweet treat after dinner.
Ingredients
- 4 ripe peaches, sliced
- 1 cup raspberries
- 1/2 cup sugar
- 1 tablespoon lemon juice
- 2 cups vanilla ice cream
- Fresh mint leaves for garnish
Instructions
- Make the Raspberry Sauce: In a small saucepan, combine raspberries, sugar, and lemon juice. Cook over medium heat until the raspberries break down and the mixture thickens, about 5-7 minutes. Strain to remove seeds and let cool.
- Prepare the Peaches: Blanch the peaches in boiling water for 30 seconds, then transfer to an ice bath. Peel the skins off, slice the peaches, and arrange them in serving bowls.
- Assemble the Dessert: Top the peach slices with a scoop of vanilla ice cream. Drizzle the raspberry sauce over the ice cream and peaches.
- Garnish: Add fresh raspberries and mint leaves for a pop of color and flavor.
- Serve immediately and enjoy this refreshing summer dessert!
Cooking Tips: If peaches are out of season, you can use canned peaches in juice. Just drain them well before serving. For a twist, try adding a splash of peach schnapps to the raspberry sauce for an adult version!
Scrumptious Pineapple Upside-Down Cake: A Retro Favorite
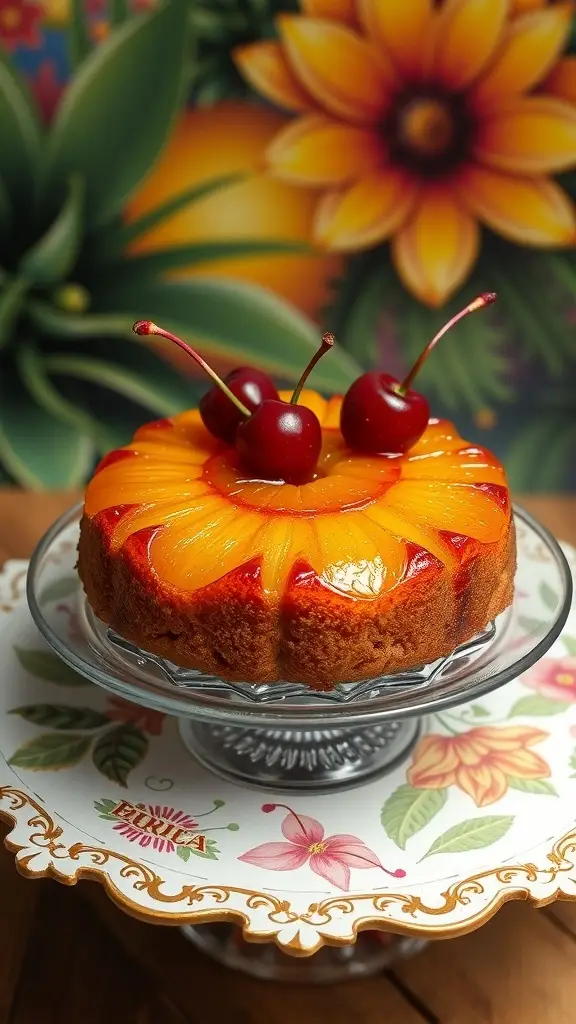
Pineapple upside-down cake is a classic dessert that takes us back to the 1920s. This delightful treat features a beautiful arrangement of caramelized pineapple rings and cherries on top of a moist cake. The vibrant colors and sweet aroma make it a showstopper at any gathering.
The cake’s origins are rooted in a time when home baking was cherished. It’s a nostalgic reminder of simpler days, perfect for those looking for mini dessert ideas that pack a punch in flavor and presentation. The combination of sweet pineapple and buttery cake is sure to please everyone.
For a twist, consider using fresh pineapple instead of canned for a more vibrant taste. You can also swap out the cherries for other fruits like blueberries or strawberries, depending on your preference. This cake is not just a dessert; it’s a conversation starter!
Ingredients
- 1/2 cup unsalted butter
- 1 cup brown sugar
- 1 can (20 oz) sliced pineapple, drained
- Maraschino cherries
- 1 cup all-purpose flour
- 1 teaspoon baking powder
- 1/2 teaspoon salt
- 1/2 cup granulated sugar
- 1/2 cup milk
- 1 large egg
- 1 teaspoon vanilla extract
Instructions
- Preheat your oven to 350°F (175°C). Melt the butter in a 9-inch round cake pan. Sprinkle the brown sugar evenly over the melted butter.
- Arrange the pineapple slices on top of the brown sugar, placing a cherry in the center of each slice.
- In a mixing bowl, combine flour, baking powder, and salt. In another bowl, mix granulated sugar, milk, egg, and vanilla until smooth. Gradually add the dry ingredients to the wet ingredients, mixing until just combined.
- Pour the batter over the pineapple and cherries in the pan. Bake for 30-35 minutes, or until a toothpick inserted in the center comes out clean.
- Let the cake cool for 10 minutes before inverting it onto a serving plate. Enjoy warm or at room temperature!
Cooking Tip: If you want a richer flavor, try adding a splash of rum to the batter. For a gluten-free option, substitute the all-purpose flour with a gluten-free blend.
Classic Ginger Snap Cookies: A Spicy Crunch
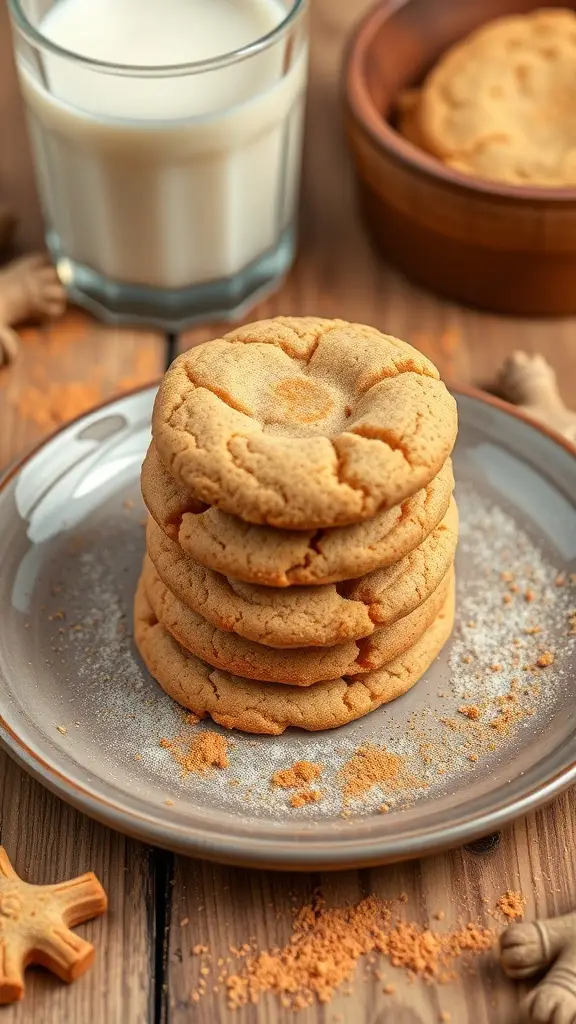
Ginger snap cookies are a delightful treat that takes you back to the 1920s. These cookies have a spicy crunch that makes them perfect for any occasion. The warm spices and crispy texture create a nostalgic vibe, reminiscent of simpler times. They pair wonderfully with a glass of milk, making them a classic mini dessert idea.
Making ginger snap cookies is easy and fun. You can enjoy the process of mixing the ingredients and rolling the dough into little balls. The aroma that fills your kitchen while they bake is simply irresistible. Plus, these cookies are great for sharing with friends and family.
For a twist, feel free to add some chocolate chips or nuts to the dough. You can also adjust the spices to suit your taste. If you prefer a softer cookie, reduce the baking time slightly. These little adjustments can make a big difference!
Ingredients
- 2 cups all-purpose flour
- 1 teaspoon baking soda
- 1 tablespoon ground ginger
- 1 tablespoon ground cinnamon
- 1/2 teaspoon ground cloves
- 1/4 teaspoon salt
- 3/4 cup unsalted butter, softened
- 1 cup granulated sugar
- 1/4 cup molasses
- 1 large egg
- 1/4 cup granulated sugar (for rolling)
Instructions
- Preheat the oven to 350°F (175°C). Line a baking sheet with parchment paper.
- In a bowl, whisk together flour, baking soda, ginger, cinnamon, cloves, and salt.
- In another bowl, cream the softened butter and sugar until light and fluffy. Add the molasses and egg, mixing well.
- Gradually add the dry ingredients to the wet mixture, stirring until combined.
- Roll the dough into small balls, then roll each ball in the extra sugar.
- Place the balls on the prepared baking sheet, spacing them about 2 inches apart.
- Bake for 10-12 minutes, or until the edges are firm but the centers are still soft.
- Let the cookies cool on the baking sheet for a few minutes before transferring them to a wire rack.
Cooking Tips: If you want a spicier kick, add more ginger or cinnamon. For a softer cookie, reduce baking time by a minute or two. You can also substitute brown sugar for granulated sugar for a richer flavor.
Enjoy these classic ginger snap cookies as a mini dessert idea that brings a taste of the 1920s to your table!
Charming Fruit Tart: A Garden Of Flavors
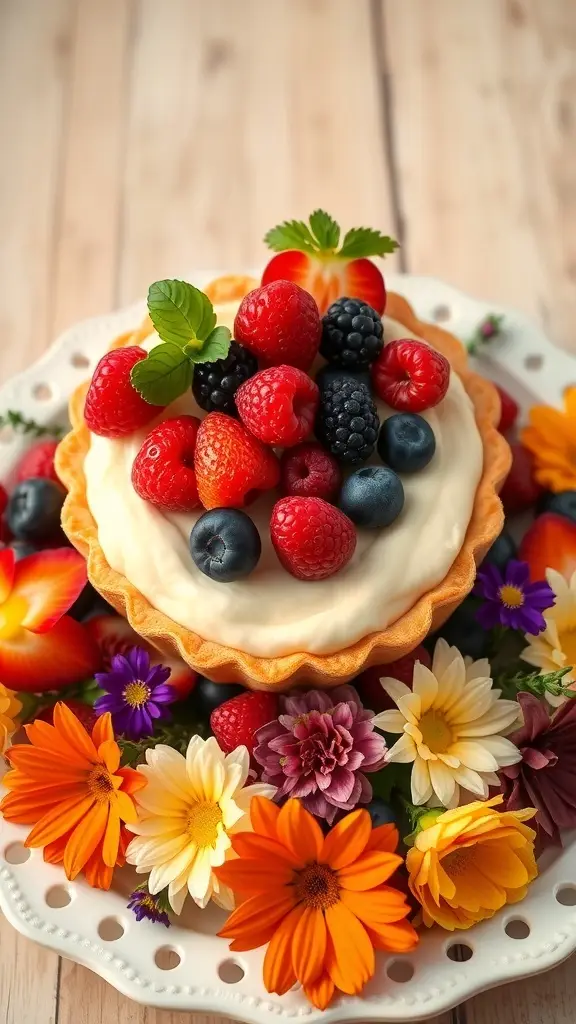
Step into a delightful world with this charming fruit tart, inspired by the 1920s. This mini dessert is a feast for the eyes and the palate. The crisp tart shell cradles a creamy filling, topped with a vibrant array of fresh berries. Each bite is a burst of flavor, reminiscent of garden parties from a bygone era.
The tart is not just beautiful; it’s also versatile. You can use any seasonal fruits you like. Strawberries, blueberries, raspberries, and blackberries create a colorful display. The combination of textures and tastes makes it a perfect addition to any gathering.
Making this dessert is simple and fun. You can involve friends or family in the process. It’s a great way to share stories while creating something delicious together. Plus, it’s a fantastic way to showcase your culinary skills without too much fuss.
Ingredients
- 1 pre-made tart shell
- 1 cup heavy cream
- 1/4 cup powdered sugar
- 1 teaspoon vanilla extract
- 1 cup mixed fresh berries (strawberries, blueberries, raspberries, blackberries)
- Mint leaves for garnish
Instructions
- Prepare the Cream: In a mixing bowl, whip the heavy cream until soft peaks form. Gradually add powdered sugar and vanilla extract, continuing to whip until stiff peaks form.
- Fill the Tart: Spoon the whipped cream into the tart shell, smoothing it out evenly.
- Top with Berries: Arrange the mixed fresh berries on top of the cream. Get creative with the arrangement for a stunning look.
- Garnish: Add a few mint leaves for a pop of color and freshness.
- Chill: Refrigerate the tart for at least 30 minutes before serving to let the flavors meld.
Cooking Tips: If you want a lighter option, you can substitute Greek yogurt for the heavy cream. For a sweeter filling, adjust the sugar to your liking. Feel free to experiment with different fruits based on what’s in season!
Creamy Cheesecake: A Luxurious Slice
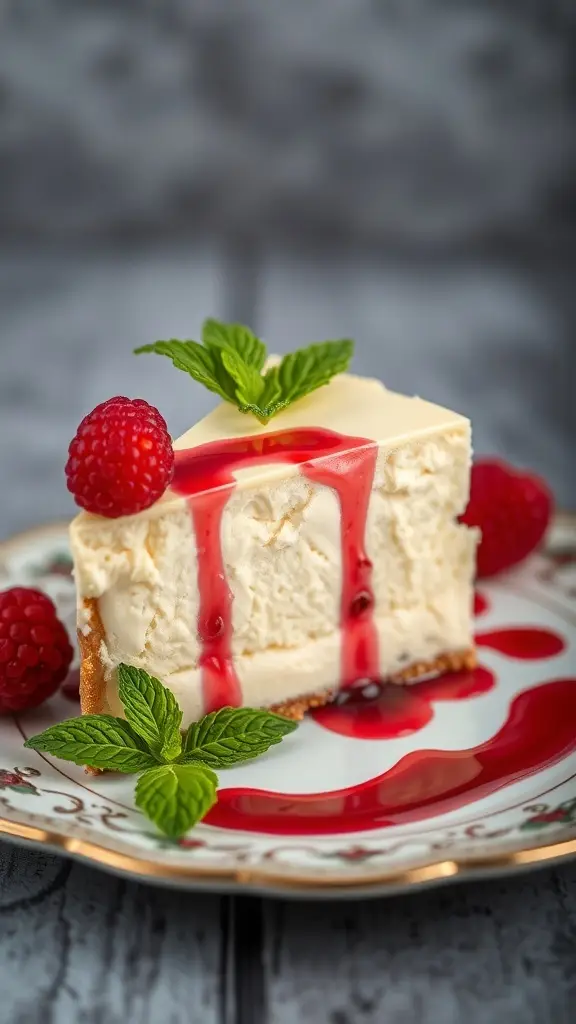
Cheesecake has a special place in dessert history, especially when we think about the 1920s. This creamy delight was often served at lavish parties, making it a symbol of indulgence and celebration. The image captures a slice of cheesecake topped with vibrant raspberry sauce, fresh raspberries, and a sprig of mint. It looks inviting and elegant, perfect for any gathering.
This mini dessert idea is not just about taste; it’s also about presentation. The combination of colors and textures makes it a feast for the eyes. The smooth, creamy filling contrasts beautifully with the crunchy crust and the tartness of the raspberry sauce. It’s a delightful treat that can easily impress your guests.
Making cheesecake at home is simpler than you might think. You can customize it with different toppings or flavors to suit your taste. Let’s get into the recipe!
Ingredients
- 1 ½ cups graham cracker crumbs
- ½ cup unsalted butter, melted
- 2 cups cream cheese, softened
- 1 cup granulated sugar
- 3 large eggs
- 1 teaspoon vanilla extract
- 1 cup sour cream
- ½ cup raspberry sauce (store-bought or homemade)
- Fresh raspberries and mint leaves for garnish
Instructions
- Prepare the Crust: Preheat your oven to 325°F (160°C). In a bowl, mix graham cracker crumbs with melted butter until combined. Press this mixture into the bottom of a 9-inch springform pan.
- Make the Filling: In a large bowl, beat the cream cheese until smooth. Gradually add sugar, mixing well. Add eggs one at a time, mixing after each addition. Stir in vanilla extract and sour cream until fully combined.
- Combine and Bake: Pour the filling over the crust in the springform pan. Bake for 50-60 minutes, or until the center is set but slightly jiggly. Turn off the oven and let the cheesecake cool inside for an hour.
- Chill: Remove the cheesecake from the oven and refrigerate for at least 4 hours, preferably overnight.
- Serve: Before serving, drizzle raspberry sauce over the cheesecake and garnish with fresh raspberries and mint leaves. Slice and enjoy!
Cooking Tips: If you want a gluten-free option, use gluten-free graham crackers for the crust. You can also substitute the sour cream with Greek yogurt for a lighter version. Enjoy your cheesecake!
Classic Tiramisu: An Italian Delight
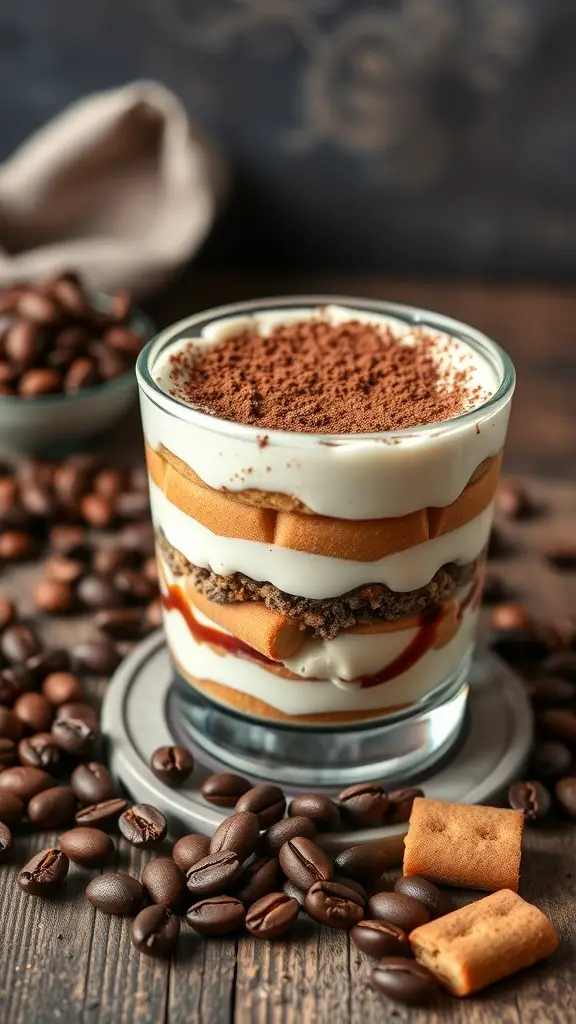
Tiramisu is a classic Italian dessert that captures the essence of the 1920s with its rich flavors and elegant presentation. This delightful treat features layers of coffee-soaked ladyfingers and a creamy mascarpone mixture, all topped with a dusting of cocoa powder. It’s a perfect mini dessert idea for any gathering, bringing a touch of sophistication to your table.
In the image, you can see a beautifully layered tiramisu served in a glass, showcasing its creamy texture and the contrasting colors of coffee and cream. The surrounding coffee beans add to the overall theme, reminding us of the coffee culture that flourished during this vibrant decade.
Making tiramisu at home is easier than you might think. You can customize it to suit your taste, whether you prefer a stronger coffee flavor or a sweeter finish. Plus, it can be made ahead of time, allowing the flavors to meld beautifully.
Ingredients
- 1 cup strong brewed coffee, cooled
- 3 large eggs, separated
- 1/2 cup granulated sugar
- 1 cup mascarpone cheese
- 1 teaspoon vanilla extract
- 24 ladyfingers
- Cocoa powder for dusting
Instructions
- Prepare the Coffee: Brew a strong cup of coffee and let it cool completely.
- Mix the Egg Yolks: In a bowl, whisk the egg yolks and sugar together until pale and creamy. Add the mascarpone cheese and vanilla extract, mixing until smooth.
- Whip the Egg Whites: In a separate bowl, beat the egg whites until stiff peaks form. Gently fold the whipped egg whites into the mascarpone mixture.
- Assemble the Tiramisu: Dip each ladyfinger quickly into the cooled coffee and layer them in a serving dish. Spread half of the mascarpone mixture over the ladyfingers. Repeat with another layer of dipped ladyfingers and the remaining mascarpone mixture.
- Chill: Cover and refrigerate for at least 4 hours, preferably overnight, to let the flavors meld.
- Serve: Before serving, dust the top with cocoa powder for a finishing touch.
Cooking Tips: For a non-alcoholic version, skip any liqueurs. You can also use decaf coffee if you prefer. If you want a richer flavor, consider adding a splash of coffee liqueur to the coffee.
Ingredient Substitutions: If mascarpone is hard to find, cream cheese can be used as a substitute, though the flavor will be slightly different. You can also use store-bought ladyfingers if you’re short on time.
Decadent Chocolate Truffles: A Bite Of Bliss
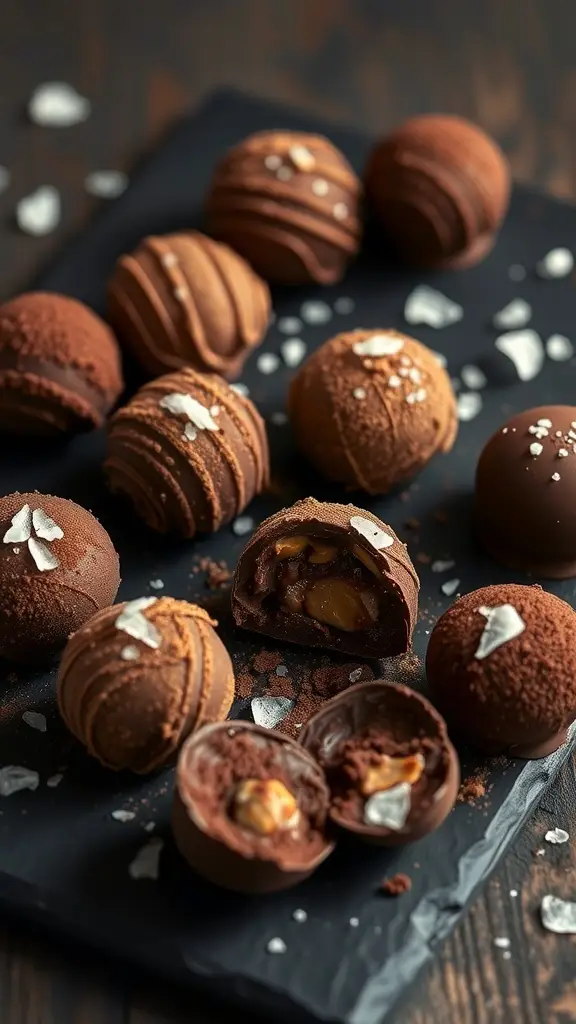
Chocolate truffles are a delightful treat that perfectly capture the spirit of the 1920s. These mini dessert ideas are rich, creamy, and oh-so-satisfying. The image showcases a variety of beautifully crafted truffles, each with its unique texture and flavor. Some are dusted with cocoa powder, while others are adorned with sea salt or drizzled with chocolate. They are not just a feast for the taste buds but also a visual delight.
Making chocolate truffles is surprisingly simple. You can customize them with different fillings and coatings, making them a fun project for any occasion. Whether you’re hosting a vintage-themed party or just want to treat yourself, these truffles are sure to impress.
For a twist, consider using flavored liqueurs or spices in your ganache. You can also swap out heavy cream for coconut cream for a dairy-free option. The possibilities are endless!
Ingredients
- 8 ounces high-quality dark chocolate, chopped
- 1/2 cup heavy cream
- 2 tablespoons unsalted butter
- 1 teaspoon vanilla extract
- Cocoa powder, for dusting
- Sea salt, for garnish (optional)
- Chopped nuts or shredded coconut (optional)
Instructions
- Heat the cream: In a small saucepan, heat the heavy cream over medium heat until it just begins to simmer. Remove from heat.
- Melt the chocolate: Add the chopped chocolate and butter to the warm cream. Let it sit for a minute, then stir until smooth. Mix in the vanilla extract.
- Chill the mixture: Allow the ganache to cool to room temperature, then cover and refrigerate for about 2 hours, or until firm.
- Form the truffles: Use a small scoop or your hands to form the ganache into balls. Roll them in your hands to smooth them out.
- Coat the truffles: Roll the truffles in cocoa powder, chopped nuts, or shredded coconut. Place them on a baking sheet lined with parchment paper.
- Garnish: If desired, sprinkle a little sea salt on top of each truffle for an extra touch.
- Serve: Enjoy your truffles immediately or store them in an airtight container in the fridge for up to a week.
Cooking tips: If you want a creamier texture, use more cream in the ganache. For a stronger flavor, try adding a splash of your favorite liqueur. You can also experiment with different types of chocolate, like milk or white chocolate, for varied sweetness.
Ingredient substitutions: If you don’t have heavy cream, coconut cream works well for a dairy-free version. You can also use flavored extracts like almond or mint for a unique twist.
Whimsical Marshmallow Fluff: A Sweet Nostalgia
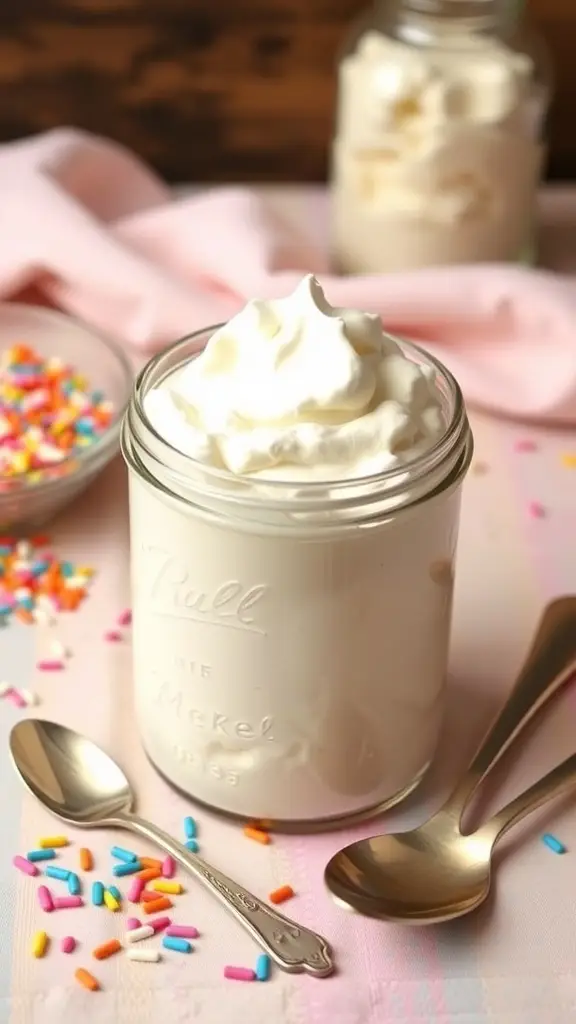
Marshmallow fluff brings back memories of simpler times, especially when we think of the 1920s. This delightful treat is light and airy, perfect for mini dessert ideas that capture the spirit of that era. The fluffy texture and sweet flavor make it a favorite for both kids and adults.
Imagine serving this fluffy goodness in small jars, topped with colorful sprinkles. It’s a fun way to add a touch of whimsy to any gathering. You can enjoy it on its own or use it as a topping for cakes, cupcakes, or even fruit. The possibilities are endless!
Making marshmallow fluff is easy and requires just a few ingredients. You can even customize it by adding flavors like vanilla or chocolate. If you’re looking for a fun and nostalgic dessert, this is it!
Ingredients
- 1 cup granulated sugar
- 1/2 cup corn syrup
- 1/4 cup water
- 2 large egg whites
- 1 teaspoon vanilla extract
- 1/4 teaspoon salt
- Sprinkles for topping
Instructions
- Combine sugar, corn syrup, and water in a saucepan. Cook over medium heat, stirring until the sugar dissolves.
- In a separate bowl, beat egg whites until soft peaks form. Gradually add the hot sugar mixture while continuing to beat until stiff peaks form.
- Mix in vanilla extract and salt. Beat for an additional minute until fluffy.
- Transfer the fluff to jars and top with sprinkles. Serve immediately or store in the fridge for up to a week.
Cooking Tips: If you want to make it extra special, try adding a few drops of food coloring to create a rainbow effect. For a vegan option, you can use aquafaba (chickpea water) instead of egg whites. This marshmallow fluff is sure to impress your guests!
You may also like:
– 43 Easy And Quick Cocktails From The 1960’s
– 27 Must-Try Tequila Cocktails Inspired by Gotham City
– 25 Cocktails Inspired by Gotham City Nightlife
If you enjoyed this blog you can visit us or check out our other blogs and learn a bit about us.
Disclaimer: This blog post is inspired by fictional universes and characters created by their respective rights holders. All related content and imagery remain the property of their respective rights holder. This fan-inspired content is for entertainment and commentary purposes only and is not affiliated with or endorsed by HBO, Disney, Warner Bros., Lionsgate, or any other rights holders. To explore the official source material, please visit:
HBO