

Mini savory pies are a delightful addition to any 1960s vintage picnic, offering a fun and tasty way to enjoy classic flavors. These handheld treats can be filled with a variety of ingredients, from seasoned meats and cheeses to vibrant veggies, making them easily customizable. For a flaky crust, try swapping butter for a plant-based alternative or using whole wheat flour for a healthier twist. When it comes to fillings, don’t hesitate to experiment with leftovers or your favorite spices to spice things up. These little pies are sure to be a hit, evoking nostalgia and charm while satisfying appetites!
Delightful Mini Quiches For A Retro Touch

Mini savory pies are a fantastic addition to any picnic, especially when you want to bring a bit of vintage charm. These delightful mini quiches are not only easy to make but also offer a variety of flavors that everyone will love. Imagine a sunny day, a picnic blanket spread out, and these little treasures ready to be enjoyed.
To make these mini quiches, you’ll need a few simple ingredients. You can customize them with your favorite fillings, whether it’s spinach and cheese or bacon and herbs. The beauty of these pies lies in their versatility. You can mix and match ingredients based on what you have on hand.
These mini quiches are baked in a muffin tin, making them perfectly portioned for sharing. They are light, fluffy, and packed with flavor. Plus, they can be served warm or at room temperature, making them ideal for a picnic setting.
Ingredients
- 1 package of pre-made pie crusts
- 6 large eggs
- 1 cup milk
- 1 cup shredded cheese (cheddar, mozzarella, or your choice)
- 1 cup chopped vegetables (spinach, bell peppers, or onions)
- 1/2 cup cooked bacon or sausage (optional)
- Salt and pepper to taste
- Fresh herbs for garnish (optional)
Instructions
- Preheat your oven to 375°F (190°C).
- Roll out the pie crusts and cut them into circles to fit into a muffin tin. Press the circles into the muffin cups.
- In a bowl, whisk together the eggs and milk. Season with salt and pepper.
- Add the cheese, vegetables, and cooked meat (if using) to the egg mixture. Stir until well combined.
- Pour the egg mixture into each pie crust, filling them about 3/4 full.
- Bake for 20-25 minutes, or until the quiches are set and lightly golden on top.
- Let them cool slightly before removing from the muffin tin. Garnish with fresh herbs if desired.
Cooking Tips: If you’re short on time, store-bought pie crusts save a lot of effort. For a healthier option, consider using whole wheat crusts or making a crustless version by simply greasing the muffin tin. You can also substitute the milk with a dairy-free alternative if needed.
These mini quiches are sure to be a hit at your picnic. Enjoy the retro vibes and happy eating!
Savory Chicken Pot Pies With A Twist
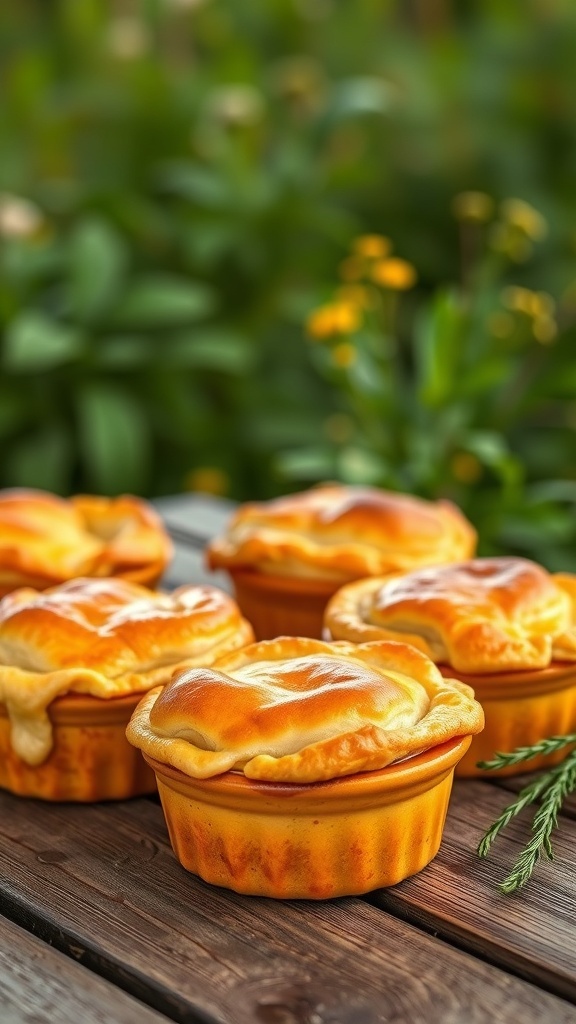
Mini savory pies are a delightful addition to any picnic, especially when they come in the form of chicken pot pies. These little wonders are perfect for a 1960’s vintage picnic, bringing a touch of nostalgia and comfort food to your outdoor feast.
Each pie is filled with tender chicken, fresh vegetables, and a creamy sauce, all encased in a golden, flaky crust. The individual portions make them easy to serve and enjoy while lounging on a picnic blanket. Plus, they can be made ahead of time, so you can spend more time enjoying the sunshine and less time in the kitchen.
For a twist on the classic recipe, consider adding herbs like thyme or rosemary for extra flavor. You can also swap out the chicken for turkey or even a vegetarian filling with mushrooms and spinach. The possibilities are endless!
Ingredients
- 2 cups cooked chicken, shredded
- 1 cup mixed vegetables (peas, carrots, corn)
- 1/2 cup onion, diced
- 1/4 cup flour
- 1 cup chicken broth
- 1/2 cup milk
- 1 teaspoon dried thyme
- Salt and pepper to taste
- 1 package refrigerated pie crusts
- 1 egg, beaten (for egg wash)
Instructions
- Preheat your oven to 400°F (200°C).
- In a large skillet, sauté the onions until translucent. Add the mixed vegetables and cook for a few minutes.
- Stir in the flour and cook for another minute. Gradually add the chicken broth and milk, stirring until the mixture thickens.
- Add the shredded chicken, thyme, salt, and pepper. Mix well and remove from heat.
- Roll out the pie crusts and cut them into circles to fit your mini pie dishes. Place the crusts in the dishes and fill with the chicken mixture.
- Cover with another circle of crust, sealing the edges. Cut slits in the top for steam to escape and brush with the beaten egg.
- Bake for 25-30 minutes, or until the crust is golden brown.
- Let them cool slightly before serving. Enjoy your mini savory pies!
Cooking Tip: If you want to save time, you can use rotisserie chicken for the filling. For a healthier option, consider using whole wheat pie crusts.
Ingredient Substitution: If you don’t have mixed vegetables, fresh or frozen broccoli or green beans work well too. Feel free to get creative with your fillings!
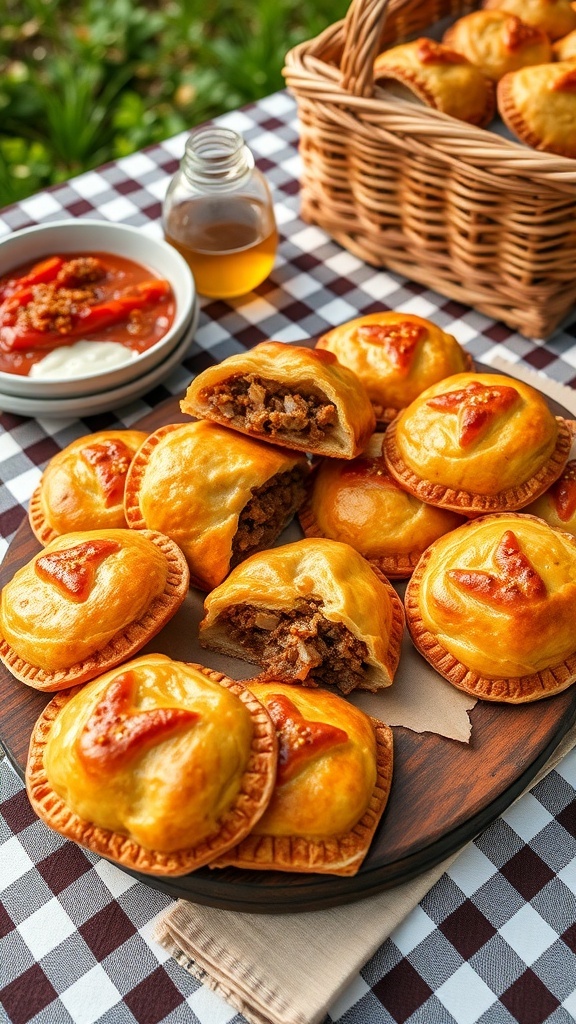
Classic Beef Empanadas For A Flavorful Bite

Mini savory pies like beef empanadas are perfect for a vintage picnic. They are easy to handle and packed with flavor, making them a crowd-pleaser. Imagine a sunny day, a checkered blanket, and a plate full of these golden-brown delights. Each bite offers a crispy exterior with a warm, savory filling that transports you back to simpler times.
These empanadas are versatile too! You can customize the filling to suit your taste. Whether you prefer beef, chicken, or even vegetables, the flaky pastry will hold it all together beautifully. Plus, they can be made ahead of time and enjoyed cold or warm, making them ideal for outdoor gatherings.
Here’s how to whip up a batch of these delicious mini savory pies:
Ingredients
- 2 cups all-purpose flour
- 1/2 teaspoon salt
- 1/2 cup unsalted butter, chilled and diced
- 1/4 cup cold water
- 1 pound ground beef
- 1 small onion, finely chopped
- 2 cloves garlic, minced
- 1 teaspoon cumin
- 1 teaspoon paprika
- Salt and pepper to taste
- 1 egg, beaten (for egg wash)
Instructions
- Make the Dough: In a bowl, mix flour and salt. Add the diced butter and mix until the mixture resembles coarse crumbs. Stir in cold water until the dough comes together. Wrap in plastic and chill for 30 minutes.
- Prepare the Filling: In a skillet, cook the onion and garlic until soft. Add the ground beef, cumin, paprika, salt, and pepper. Cook until the beef is browned. Let it cool.
- Roll Out the Dough: On a floured surface, roll out the dough to about 1/8 inch thick. Cut into circles (about 4 inches in diameter).
- Fill the Empanadas: Place a spoonful of the beef mixture in the center of each circle. Fold the dough over to create a half-moon shape and press the edges to seal. Use a fork to crimp the edges for a decorative touch.
- Bake: Preheat the oven to 375°F (190°C). Place the empanadas on a baking sheet lined with parchment paper. Brush with the beaten egg. Bake for 20-25 minutes or until golden brown.
Cooking Tips: If you want to save time, you can use store-bought dough. For a vegetarian option, swap the beef for mushrooms or lentils. These empanadas can also be frozen before baking. Just bake them straight from the freezer, adding a few extra minutes to the cooking time.
Mini Spinach And Feta Pies For A Greek Flair
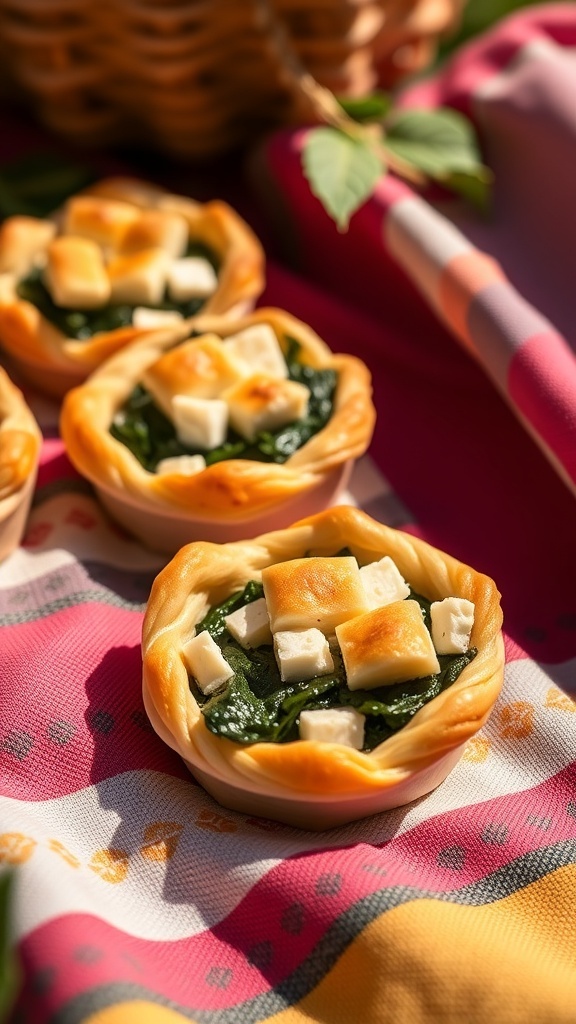
Mini savory pies are a delightful addition to any picnic, especially when they bring a taste of Greece to the table. These mini spinach and feta pies are not only easy to make but also packed with flavor. The golden, flaky crust cradles a rich filling of spinach and creamy feta, making each bite a treat.
Picture a sunny day, a checkered blanket spread out, and these little pies nestled among fresh fruits and drinks. They are perfect finger food, easy to grab and enjoy while soaking up the sun. The combination of spinach and feta is classic, offering a savory taste that pairs wonderfully with the outdoors.
When making these pies, feel free to get creative. You can substitute the spinach with other greens like kale or Swiss chard. If feta isn’t your thing, try ricotta or goat cheese for a different twist. These mini pies are versatile and can be adjusted to suit your taste.
Ingredients
- 1 package of phyllo pastry or pre-made pie crusts
- 2 cups fresh spinach, chopped
- 1 cup feta cheese, crumbled
- 1 small onion, finely chopped
- 2 cloves garlic, minced
- 2 large eggs
- 1/4 cup milk
- Salt and pepper to taste
- Olive oil for brushing
Instructions
- Preheat your oven to 375°F (190°C).
- In a skillet, heat a little olive oil over medium heat. Add the onion and garlic, cooking until soft.
- Add the chopped spinach and cook until wilted. Remove from heat and let cool slightly.
- In a bowl, mix the spinach mixture with feta, eggs, milk, salt, and pepper until well combined.
- If using phyllo pastry, layer several sheets, brushing each with olive oil. Cut into squares and press into a muffin tin. If using pie crusts, simply cut them to fit the muffin tin.
- Fill each crust with the spinach and feta mixture.
- Bake for 20-25 minutes, or until the tops are golden brown.
- Let cool slightly before serving. Enjoy your mini savory pies!
Cooking Tip: If you’re short on time, using pre-made pie crusts can save you a lot of effort. For a healthier option, consider using whole wheat pastry. These mini pies can be made ahead of time and stored in the fridge for a quick snack or picnic treat!
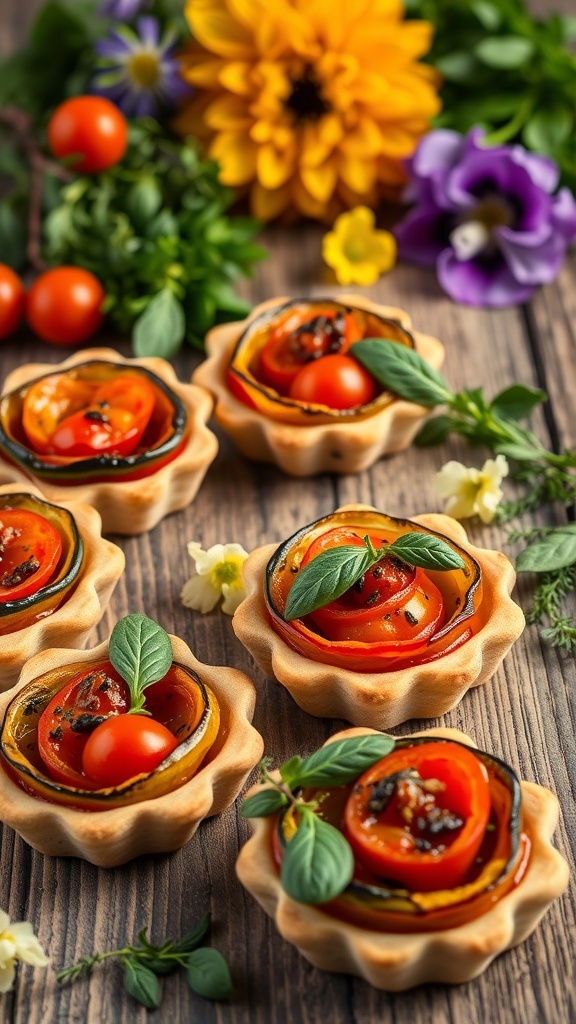
Zesty Tomato And Basil Tartlets For A Fresh Taste

These mini savory pies are a delightful addition to any picnic, especially when the sun is shining and flowers are blooming. The zesty tomato and basil tartlets bring a fresh taste that perfectly complements the vibrant atmosphere of a 1960s vintage picnic. Imagine sitting on a checkered blanket, surrounded by colorful blooms, with these tasty treats in hand.
The tartlets feature a flaky crust filled with juicy tomatoes and aromatic basil. Each bite bursts with flavor, making them a hit among friends and family. Plus, they’re easy to prepare, allowing you to enjoy more time outdoors.
For a twist, feel free to swap out the tomatoes for other veggies like zucchini or bell peppers. You can also use store-bought pastry for a quicker option. These tartlets are versatile, so get creative!
Ingredients
- 1 package of pre-made pastry dough
- 2 cups cherry tomatoes, halved
- 1 cup fresh basil leaves
- 1 cup shredded mozzarella cheese
- 2 tablespoons olive oil
- Salt and pepper to taste
Instructions
- Preheat your oven to 375°F (190°C).
- Roll out the pastry dough and cut it into circles to fit your tartlet pans. Press the dough into the pans.
- In a bowl, mix the halved cherry tomatoes, basil, mozzarella cheese, olive oil, salt, and pepper.
- Fill each pastry shell with the tomato mixture.
- Bake for 20-25 minutes or until the crust is golden brown and the cheese is bubbly.
- Let them cool slightly before serving. Enjoy your picnic!
Cooking Tips: If you want a richer flavor, add a sprinkle of grated Parmesan cheese on top before baking. For a gluten-free option, use a gluten-free pastry dough.
Savory Mushroom And Cheese Pies For Earthy Goodness
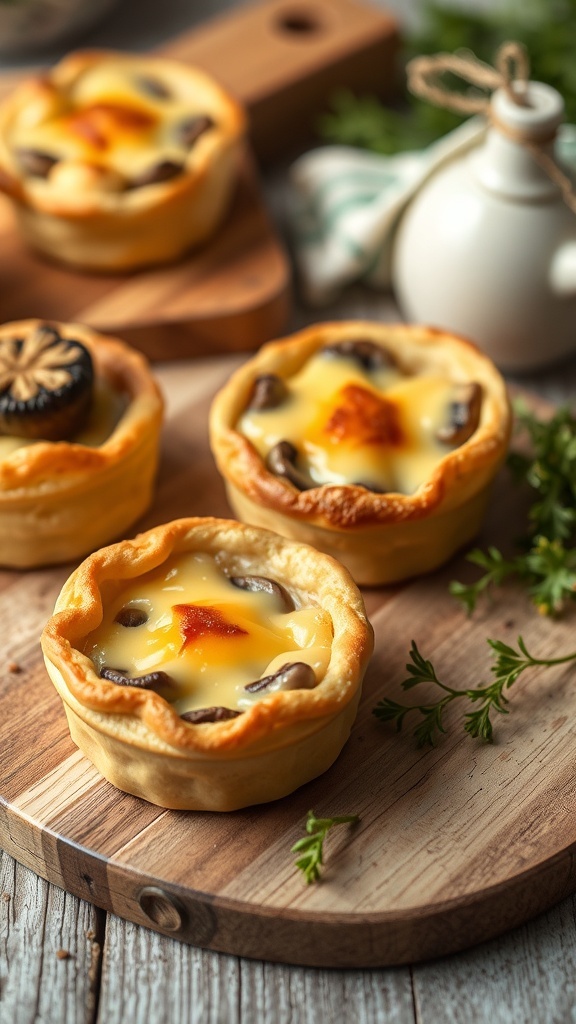
Mini savory pies are a delightful treat that brings a touch of nostalgia to any picnic. These little wonders are filled with earthy mushrooms and creamy cheese, making them a perfect addition to your 1960’s vintage picnic spread. The golden crust and rich filling are sure to please everyone.
These pies are not just tasty; they are also easy to make. You can whip them up in no time, allowing you to focus on enjoying the great outdoors. Whether you’re lounging on a blanket or sharing stories with friends, these savory bites will be a hit.
For the filling, you can use any mushrooms you like. Button mushrooms work well, but feel free to mix in some shiitake or portobello for added flavor. If you want to switch things up, consider adding spinach or herbs for an extra layer of taste.
Now, let’s get to the recipe so you can start baking these mini savory pies!
Ingredients
- 1 package of pre-made pie crusts (or homemade if you prefer)
- 2 cups mushrooms, chopped
- 1 cup shredded cheese (cheddar or your favorite)
- 1/2 cup heavy cream
- 2 large eggs
- 1 tablespoon olive oil
- Salt and pepper to taste
- Fresh herbs (like parsley or thyme) for garnish
Instructions
- Preheat your oven to 375°F (190°C).
- In a skillet, heat olive oil over medium heat. Add chopped mushrooms and sauté until they are soft, about 5-7 minutes. Season with salt and pepper.
- In a mixing bowl, whisk together the eggs and heavy cream. Stir in the sautéed mushrooms and shredded cheese.
- Roll out the pie crust and cut into circles to fit your muffin tin. Place the circles in the tin, pressing them down gently.
- Fill each crust with the mushroom and cheese mixture, being careful not to overfill.
- Bake for 20-25 minutes or until the crust is golden and the filling is set.
- Let them cool slightly before removing from the tin. Garnish with fresh herbs before serving.
Cooking Tips: If you want a lighter version, you can substitute the heavy cream with milk or a dairy-free alternative. For a different flavor profile, try adding some sautéed onions or garlic to the mushroom mixture.
Ingredient Substitutions: If you don’t have mushrooms on hand, you can use cooked chicken or even vegetables like zucchini or bell peppers. The cheese can also be swapped out for a vegan option if needed.
Hearty Pulled Pork Hand Pies For A Filling Treat
Mini savory pies are a perfect addition to any picnic, especially when they’re filled with hearty pulled pork. These hand pies are not just delicious; they’re also easy to grab and enjoy outdoors. Picture a sunny day, a checkered blanket spread out, and a basket filled with these tasty treats. They’re golden brown, flaky, and bursting with flavor.
The filling is made from tender pulled pork, seasoned just right, making each bite satisfying. Pair them with a tangy dipping sauce or a dollop of sour cream for an extra kick. These hand pies are sure to impress everyone at your vintage picnic.
Ingredients
- 2 cups cooked pulled pork
- 1/2 cup barbecue sauce
- 1 cup diced onions
- 1 cup shredded cheese (cheddar or your choice)
- 1 package of refrigerated pie crusts (or homemade if you prefer)
- 1 egg (for egg wash)
- Salt and pepper to taste
Instructions
- Preheat your oven to 400°F (200°C).
- In a bowl, mix the pulled pork, barbecue sauce, diced onions, and cheese. Season with salt and pepper.
- Roll out the pie crusts on a floured surface. Cut out circles about 4 inches in diameter.
- Place a spoonful of the filling in the center of each circle. Fold the dough over and seal the edges with a fork.
- Brush the tops with beaten egg for a golden finish.
- Place the pies on a baking sheet lined with parchment paper and bake for 20-25 minutes or until golden brown.
- Let them cool slightly before serving. Enjoy with your favorite dipping sauce!
Cooking Tips: If you don’t have pulled pork, shredded chicken or beef can be great substitutes. You can also add vegetables like bell peppers or corn for extra flavor. For a spicy kick, mix in some jalapeños or hot sauce!
Classic Cornish Pasties For A Traditional Delight

Picture this: a sunny day, a picnic blanket spread out, and a basket filled with delicious mini savory pies. Cornish pasties are a perfect choice for a vintage picnic, bringing a taste of tradition to your outdoor feast. These delightful pastries are not just tasty; they also carry a rich history that dates back to the 13th century. Originally made for miners, they are hearty and portable, making them ideal for a day out in nature.
With a flaky crust and a savory filling, Cornish pasties are sure to impress your picnic companions. You can fill them with a variety of ingredients, but the classic combination of beef, potatoes, and vegetables is always a hit. Serve them with a selection of sauces for dipping, like ketchup or mustard, to add even more flavor.
Making Cornish pasties is easier than you might think. Start with a simple pastry dough, roll it out, and fill it with your chosen ingredients. Then, fold and crimp the edges to seal in all that goodness. Bake until golden brown, and you’ll have a batch of mini savory pies ready to enjoy.
Ingredients
- 2 cups all-purpose flour
- 1/2 teaspoon salt
- 1/2 cup unsalted butter, chilled and diced
- 5-7 tablespoons cold water
- 1 cup diced beef
- 1 cup diced potatoes
- 1/2 cup diced onions
- Salt and pepper to taste
Instructions
- Make the Dough: In a bowl, mix flour and salt. Add diced butter and rub it into the flour until it resembles breadcrumbs. Gradually add cold water until the dough comes together. Wrap in plastic wrap and chill for 30 minutes.
- Prepare the Filling: In a bowl, combine diced beef, potatoes, and onions. Season with salt and pepper.
- Roll Out the Dough: Preheat your oven to 400°F (200°C). On a floured surface, roll out the dough to about 1/8 inch thick. Cut out circles using a large cookie cutter or a bowl.
- Fill and Seal: Place a spoonful of the filling on one half of each circle. Fold the other half over and crimp the edges to seal.
- Bake: Place the pasties on a baking sheet lined with parchment paper. Bake for 30-35 minutes or until golden brown.
Cooking Tips: If you want a vegetarian option, substitute the beef with mushrooms or lentils. You can also use store-bought pastry for a quicker version. Serve these mini savory pies warm or at room temperature for a delightful picnic treat!
Mini Sausage Rolls For A Crowd-Pleasing Snack

Mini sausage rolls are a classic picnic treat that never goes out of style. These little bites are perfect for sharing and are sure to please everyone at your vintage picnic. With their golden, flaky pastry and savory filling, they bring a delightful touch to any outdoor gathering.
Picture a sunny day, a checkered blanket spread out on the grass, and a plate full of these mini savory pies. They’re easy to grab and munch on, making them ideal for mingling with friends and family. Plus, they can be made ahead of time, so you can spend more time enjoying the day.
To make these mini sausage rolls, you’ll need a few simple ingredients. You can easily customize the filling to suit your taste. Whether you prefer classic pork sausage or a spicy chicken blend, the choice is yours!
Ingredients
- 1 pound sausage meat (pork, chicken, or your choice)
- 1 sheet puff pastry, thawed
- 1 egg, beaten (for egg wash)
- Salt and pepper to taste
- Optional: herbs or spices for extra flavor
Instructions
- Preheat your oven to 400°F (200°C).
- Roll out the puff pastry on a lightly floured surface. Cut it into strips about 3 inches wide.
- Place a line of sausage meat along the center of each strip. Season with salt, pepper, and any herbs you like.
- Fold the pastry over the sausage and seal the edges with a fork. Cut into bite-sized pieces.
- Brush the tops with beaten egg for a golden finish.
- Place on a baking sheet and bake for 20-25 minutes, or until golden brown.
Cooking tips: If you want to make these rolls vegetarian, substitute the sausage meat with a plant-based alternative. You can also add finely chopped vegetables for extra crunch and flavor.
These mini sausage rolls are a fantastic addition to your picnic spread. They’re easy to make, delicious, and sure to impress your guests!
Savory Ratatouille Tarts For A Colorful Option
These mini savory pies are a delightful addition to any picnic, especially one inspired by the vintage vibes of the 1960s. The ratatouille tarts are not just visually appealing, but they also pack a punch of flavor. Each tart features a crispy crust filled with layers of vibrant vegetables, making them a colorful and healthy option for your outdoor feast.
The tarts are topped with fresh herbs and cherry tomatoes, adding a burst of freshness. They are easy to prepare and can be made ahead of time, allowing you to enjoy your picnic without any last-minute stress.
For a fun twist, feel free to mix and match the vegetables based on what you have on hand. Zucchini, bell peppers, and eggplant work wonderfully, and you can even add a sprinkle of cheese for extra flavor.
Ingredients
- 1 package of pre-made pastry dough
- 1 medium zucchini, thinly sliced
- 1 medium eggplant, thinly sliced
- 1 red bell pepper, thinly sliced
- 1 yellow bell pepper, thinly sliced
- 1 cup cherry tomatoes, halved
- 2 tablespoons olive oil
- 1 teaspoon dried oregano
- Salt and pepper to taste
- Fresh basil for garnish
Instructions
- Preheat your oven to 375°F (190°C).
- Roll out the pastry dough and cut it into circles to fit your tart pans. Press the dough into the pans and prick the bottoms with a fork.
- In a bowl, toss the sliced zucchini, eggplant, and bell peppers with olive oil, oregano, salt, and pepper.
- Layer the vegetables in the tart shells, starting with the zucchini, followed by eggplant and bell peppers. Top with halved cherry tomatoes.
- Bake for 25-30 minutes, or until the pastry is golden and the vegetables are tender.
- Remove from the oven and let cool slightly. Garnish with fresh basil before serving.
Cooking Tips: If you prefer a gluten-free option, use gluten-free pastry dough. You can also experiment with different herbs, like thyme or rosemary, for a unique flavor.
Ingredient Substitutions: Feel free to swap out any vegetables for your favorites. Spinach or mushrooms can be great alternatives!
Mini Taco Pies For A Fun Fusion Flavor

Mini taco pies are a delightful twist on traditional picnic fare. These little savory pies pack a punch with their vibrant flavors and fun presentation. Perfect for a 1960’s vintage picnic, they bring a fusion of Mexican and American tastes that everyone will enjoy.
Picture a sunny day, a checkered blanket spread out on the grass, and these mini taco pies stealing the show. Each pie is filled with seasoned ground beef, fresh veggies, and topped with zesty lime. They are not just tasty; they are also easy to grab and eat, making them ideal for outdoor gatherings.
To make these mini savory pies, you’ll need some simple ingredients. Ground beef is the star, but feel free to swap it out for turkey or a plant-based alternative if you prefer. Fresh vegetables like bell peppers and onions add crunch and color. And don’t forget the taco seasoning for that authentic flavor!
These mini taco pies are baked until golden and crispy, creating a delightful contrast to the juicy filling. Serve them with a side of salsa or guacamole for an extra kick. They are sure to be a hit at any picnic!
Ingredients
- 1 pound ground beef (or turkey/plant-based alternative)
- 1 small onion, diced
- 1 bell pepper, diced
- 1 packet taco seasoning
- 1 cup diced tomatoes
- 1 package refrigerated pie crusts
- 1 cup shredded cheese (cheddar or Mexican blend)
- Fresh cilantro, for garnish
- Lime wedges, for serving
Instructions
- Preheat your oven to 400°F (200°C).
- In a skillet, cook the ground beef with the diced onion and bell pepper until the meat is browned and the veggies are tender. Drain any excess fat.
- Add the taco seasoning and diced tomatoes to the skillet. Stir well and let it simmer for about 5 minutes.
- Roll out the pie crusts and cut them into circles that fit into a muffin tin. Press the circles into the muffin cups.
- Fill each crust with the beef mixture and top with shredded cheese.
- Bake for 15-20 minutes or until the crust is golden brown.
- Let them cool slightly before removing from the tin. Garnish with fresh cilantro and serve with lime wedges.
Cooking Tip: If you want to make these ahead of time, prepare the filling and store it in the fridge. Assemble and bake just before serving.
Ingredient Substitution: You can use any ground meat or even beans for a vegetarian option. Swap out the cheese for a dairy-free alternative if needed.
Sweet Potato And Black Bean Pies For A Healthy Twist

These mini savory pies are a delightful addition to any picnic, especially when you want to keep things healthy yet tasty. The sweet potato and black bean filling offers a unique flavor combination that’s both satisfying and nutritious. Each pie is packed with vibrant colors and textures, making them visually appealing as well.
The crust is golden and flaky, providing the perfect base for the creamy sweet potato filling. Topped with black beans and fresh cilantro, these pies are not just a treat for the taste buds but also a feast for the eyes. They’re easy to grab and enjoy, making them ideal for outdoor dining.
For those looking to switch things up, you can always substitute the sweet potato with pumpkin or even mashed carrots for a different flavor profile. If black beans aren’t your thing, feel free to use chickpeas or lentils instead. These mini savory pies are versatile and can be tailored to suit your preferences!
Ingredients
- 1 cup sweet potato, cooked and mashed
- 1 cup black beans, drained and rinsed
- 1 teaspoon cumin
- 1 teaspoon chili powder
- Salt and pepper to taste
- 1 tablespoon olive oil
- 1 package of pre-made pie crusts
- Fresh cilantro, for garnish
- Lime wedges, for serving
Instructions
- Preheat your oven to 375°F (190°C).
- In a bowl, mix the mashed sweet potato, black beans, cumin, chili powder, salt, and pepper. Stir until well combined.
- Roll out the pie crusts and cut them into circles to fit your mini pie tins.
- Place the crusts in the tins and fill each with the sweet potato mixture.
- Bake for 20-25 minutes, or until the crust is golden brown.
- Let them cool slightly before garnishing with fresh cilantro and serving with lime wedges.
Cooking Tip: If you want a creamier filling, add a splash of coconut milk to the sweet potato mixture. For a gluten-free option, use gluten-free pie crusts.
These mini savory pies are sure to impress at your vintage picnic!
Mini Fish Pies For A Seafood Delight
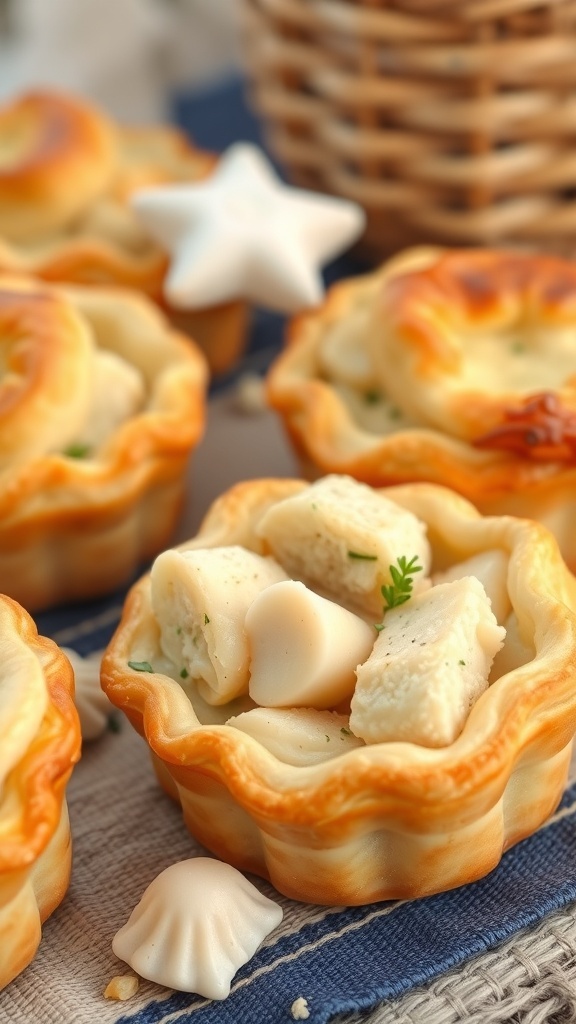
Mini savory pies are perfect for a vintage picnic, especially when they feature a delightful seafood filling. These mini fish pies are not only cute but also packed with flavor. They make a great addition to your picnic basket, bringing a taste of the sea to your outdoor feast.
The image showcases these charming little pies, golden brown and inviting. The star-shaped topping adds a playful touch, making them visually appealing. They are easy to grab and enjoy, making them ideal for sharing with friends and family.
To make these mini fish pies, you’ll need a few simple ingredients. Fresh fish, creamy sauce, and a flaky pastry come together to create a satisfying bite. You can use any white fish you like, such as cod or haddock, and feel free to add some herbs for extra flavor.
Cooking tips: If you want to save time, you can use store-bought pastry. For a healthier option, try using whole wheat flour for the crust. If you’re not a fan of fish, you can substitute it with cooked chicken or vegetables.
Now, let’s get to the recipe!
Rustic Vegetable Pies For A Garden Fresh Flavor
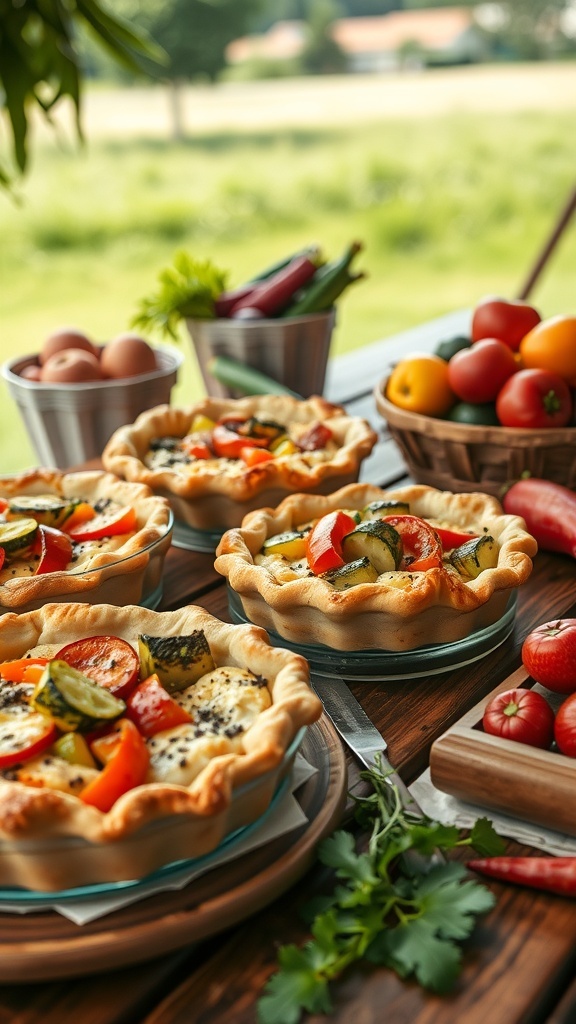
Picture a sunny day, a picnic blanket spread across a lush green field, and the aroma of freshly baked mini savory pies wafting through the air. These rustic vegetable pies are not just a treat for the taste buds; they bring the essence of a vintage picnic right to your table. Filled with vibrant garden vegetables, these pies are perfect for sharing with friends and family.
The image showcases a delightful assortment of mini savory pies, each beautifully crafted with a golden, flaky crust. The colorful filling, featuring fresh tomatoes, zucchini, and bell peppers, highlights the garden-fresh flavors that make these pies so special. They are not only visually appealing but also packed with nutrients, making them a wholesome addition to any picnic spread.
Making these pies is a breeze, and you can customize the filling based on what’s in season or what you have on hand. Feel free to swap out vegetables or add your favorite herbs for an extra flavor boost. Let’s dive into the recipe!
Ingredients
- 1 package of refrigerated pie crusts (or homemade if you prefer)
- 2 cups mixed vegetables (zucchini, bell peppers, tomatoes, etc.)
- 1 cup shredded cheese (cheddar or mozzarella)
- 2 large eggs
- 1/2 cup milk
- 1 teaspoon dried oregano
- Salt and pepper to taste
Instructions
- Preheat your oven to 375°F (190°C).
- Roll out the pie crusts and cut them into small circles to fit your mini pie pans.
- In a bowl, mix the chopped vegetables, cheese, eggs, milk, oregano, salt, and pepper until well combined.
- Fill each pie crust with the vegetable mixture, leaving a little space at the top.
- Bake for 25-30 minutes or until the crust is golden brown and the filling is set.
- Let them cool slightly before serving. Enjoy warm or at room temperature!
Cooking Tips: If you want to make these pies ahead of time, you can prepare the filling and store it in the fridge for a day. Just assemble the pies before baking. For ingredient substitutions, feel free to use any vegetables you like or even add cooked meat for a heartier option.
Mini Mac And Cheese Pies For Comfort Food Lovers

Mini savory pies are a delightful twist on a classic comfort food. These Mini Mac and Cheese Pies bring the creamy goodness of mac and cheese into a portable, bite-sized treat. Perfect for a picnic, they are easy to make and even easier to enjoy.
Imagine a sunny day, a picnic blanket spread out, and these little pies nestled among the snacks. Each pie is filled with cheesy macaroni, baked to golden perfection. They are not just delicious; they also add a fun, retro vibe to your picnic spread.
Making these mini pies is simple. You can use store-bought pastry for convenience or whip up your own. The filling is a classic mac and cheese, but feel free to add extras like bacon, veggies, or different cheeses to suit your taste.
Ingredients
- 2 cups elbow macaroni
- 2 cups shredded cheddar cheese
- 1 cup milk
- 1/4 cup butter
- 2 tablespoons all-purpose flour
- 1/2 teaspoon garlic powder
- Salt and pepper to taste
- 1 package of pre-made pie crusts
- 1 egg (for egg wash)
Instructions
- Cook the macaroni according to package instructions. Drain and set aside.
- In a saucepan, melt butter over medium heat. Stir in flour, garlic powder, salt, and pepper. Gradually whisk in milk until smooth.
- Add the cheese to the sauce and stir until melted. Combine with the cooked macaroni.
- Preheat the oven to 375°F (190°C). Roll out the pie crusts and cut them into circles to fit your muffin tin.
- Place the crusts in the muffin tin and fill each with the mac and cheese mixture.
- Beat the egg and brush it over the crust edges for a golden finish.
- Bake for 20-25 minutes or until the crust is golden brown.
- Let them cool slightly before serving. Enjoy your mini savory pies!
Cooking Tips: If you want a little crunch, sprinkle breadcrumbs on top before baking. For a twist, try adding cooked bacon or sautéed vegetables to the filling. You can also use different cheeses for varied flavors.
Ingredient Substitutions: If you don’t have elbow macaroni, any small pasta will work. For a lighter version, use low-fat cheese and milk. You can also swap the pie crust for phyllo dough for a flakier texture.
Savory Eggplant And Ricotta Pies For A Gourmet Touch

Mini savory pies are a delightful addition to any picnic, especially when they feature the rich flavors of eggplant and creamy ricotta. These little treats not only look charming but also pack a punch in taste. Picture a sunny day, a checkered blanket spread out, and these pies ready to impress your friends and family.
The eggplant adds a lovely depth, while the ricotta brings a smooth texture that balances everything perfectly. Topped with fresh herbs, these pies are as pleasing to the eye as they are to the palate. They’re perfect for a 1960’s vintage picnic, evoking a sense of nostalgia and gourmet flair.
For a fun twist, feel free to swap out the eggplant for zucchini or spinach if you prefer. You can also use cottage cheese instead of ricotta for a lighter option. These pies are versatile and can be enjoyed warm or at room temperature, making them an ideal picnic food.
Ingredients
- 1 sheet of puff pastry
- 1 medium eggplant, sliced thinly
- 1 cup ricotta cheese
- 1/2 cup grated Parmesan cheese
- 1 egg, beaten (for egg wash)
- Fresh herbs (like thyme and mint) for garnish
- Salt and pepper to taste
- Olive oil for drizzling
Instructions
- Preheat the oven to 400°F (200°C).
- Roll out the puff pastry on a floured surface and cut into small circles to fit your tartlet pans.
- Place the pastry circles into the pans and prick the bottoms with a fork.
- In a bowl, mix the ricotta, Parmesan, salt, and pepper. Spoon this mixture into each pastry shell.
- Layer the thin eggplant slices on top of the cheese mixture. Drizzle with olive oil.
- Brush the edges of the pastry with the beaten egg for a golden finish.
- Bake for 20-25 minutes or until the pastry is golden and the eggplant is tender.
- Garnish with fresh herbs before serving.
These mini savory pies are sure to be a hit at your picnic. Enjoy the flavors and the company!
Mini Pesto Chicken Pies For An Italian Flavor Burst

Mini savory pies are a delightful treat, perfect for a vintage picnic inspired by the 1960s. These mini pesto chicken pies pack a punch of Italian flavor that will impress everyone. The combination of flaky pastry and rich pesto filling creates a mouthwatering bite that’s hard to resist.
To make these pies, you’ll need some simple ingredients. Start with pre-made pastry dough for convenience, or make your own if you’re feeling adventurous. The filling features shredded chicken, fresh pesto, and cheese, creating a creamy and savory mix that’s sure to please.
These mini pies are not just tasty; they’re also easy to transport. Pack them in a picnic basket along with some fresh fruit and drinks for a complete meal outdoors. They can be served warm or at room temperature, making them versatile for any picnic setting.
Ingredients
- 1 package of pre-made pastry dough
- 2 cups cooked chicken, shredded
- 1 cup pesto sauce
- 1 cup shredded mozzarella cheese
- 1 egg, beaten (for egg wash)
- Salt and pepper to taste
Instructions
- Preheat your oven to 375°F (190°C).
- Roll out the pastry dough on a floured surface and cut into circles that fit your muffin tin.
- In a bowl, mix the shredded chicken, pesto, and mozzarella cheese. Season with salt and pepper.
- Place the pastry circles in the muffin tin and fill each with the chicken mixture.
- Top with another pastry circle, sealing the edges. Brush with the beaten egg for a golden finish.
- Bake for 20-25 minutes or until golden brown.
- Let cool slightly before serving. Enjoy!
Cooking Tips: If you want to switch things up, try using different proteins like turkey or even a vegetarian option with mushrooms. You can also add veggies like spinach or sun-dried tomatoes to the filling for extra flavor.
Ingredient Substitutions: If you don’t have pesto, a mix of olive oil, garlic, and herbs can work as a substitute. For a dairy-free option, use vegan cheese or omit it altogether.
Classic Ham And Cheese Pockets For A Timeless Favorite

Mini savory pies are a delightful addition to any picnic, especially when they feature classic flavors like ham and cheese. These pockets are not only easy to make but also perfect for sharing. The golden, flaky crust holds a warm filling of savory ham and melted cheese, making them a favorite for both kids and adults.
Picture this: a sunny day, a picnic blanket spread out, and a basket filled with these delicious ham and cheese pockets. They are the perfect finger food, easy to grab and enjoy while soaking up the sun. Plus, they can be made ahead of time, making your picnic prep a breeze.
To make these tasty treats, you’ll need a few simple ingredients. Feel free to mix and match based on what you have on hand. For instance, if you don’t have ham, turkey or chicken works just as well. And if you’re out of cheese, try a different variety or even some veggies for a twist!
Ingredients
- 1 package of puff pastry (2 sheets)
- 1 cup diced ham
- 1 cup shredded cheese (cheddar or Swiss)
- 1 egg (for egg wash)
- Salt and pepper to taste
- Optional: mustard or mayonnaise for extra flavor
Instructions
- Preheat your oven to 400°F (200°C).
- Roll out the puff pastry on a floured surface. Cut into squares, about 4×4 inches.
- In a bowl, mix the diced ham, shredded cheese, salt, and pepper. If you like, add a spoonful of mustard or mayonnaise for extra flavor.
- Place a spoonful of the filling in the center of each pastry square. Fold the pastry over to create a pocket and seal the edges with a fork.
- Beat the egg and brush it over the tops of the pockets for a golden finish.
- Place the pockets on a baking sheet lined with parchment paper and bake for 15-20 minutes, or until golden brown.
- Let them cool slightly before serving. Enjoy warm or at room temperature!
Cooking Tips: If you want to make these pockets even healthier, consider using whole wheat puff pastry. You can also add some chopped spinach or bell peppers to the filling for added nutrition.
Ingredient Substitutions: Feel free to swap out the ham for cooked bacon or even a vegetarian option like mushrooms or spinach. The cheese can also be replaced with a dairy-free alternative if needed.
Mini Caprese Pies For A Fresh And Flavorful Option
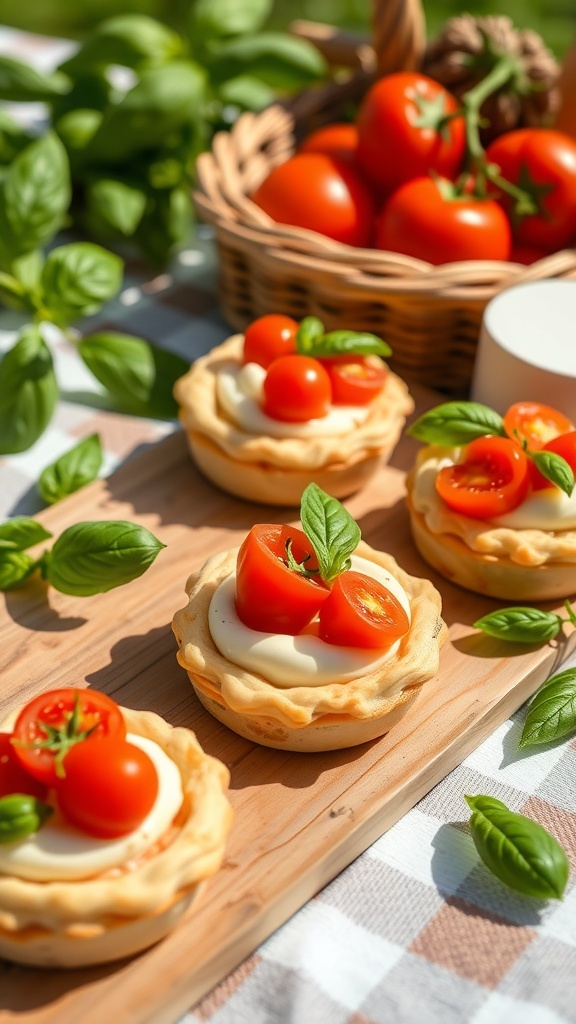
Mini savory pies are a delightful addition to any picnic, especially when they capture the essence of a classic Caprese salad. These little pies are not only visually appealing but also bursting with fresh flavors. The combination of ripe tomatoes, creamy mozzarella, and fragrant basil makes them a perfect choice for a vintage picnic.
In the image, you can see these charming mini pies topped with vibrant cherry tomatoes and fresh basil leaves. The golden crust is inviting, and the bright colors of the toppings add a cheerful touch. These pies are easy to transport and serve, making them ideal for outdoor gatherings.
To make these mini Caprese pies, you’ll need a few simple ingredients. You can use store-bought pastry for convenience or make your own if you have the time. Feel free to mix things up by adding a drizzle of balsamic glaze for extra flavor.
Ingredients
- 1 package of puff pastry (or homemade pastry)
- 1 cup fresh mozzarella, diced
- 1 cup cherry tomatoes, halved
- 1/2 cup fresh basil leaves, chopped
- 1 egg, beaten (for egg wash)
- Salt and pepper to taste
- Balsamic glaze (optional)
Instructions
- Preheat your oven to 400°F (200°C).
- Roll out the puff pastry on a floured surface and cut it into circles to fit your muffin tin.
- Place the pastry circles into the muffin tin, pressing them down gently.
- In a bowl, mix the mozzarella, cherry tomatoes, basil, salt, and pepper.
- Spoon the mixture into each pastry shell, filling them generously.
- Brush the edges of the pastry with the beaten egg for a golden finish.
- Bake for 15-20 minutes or until the pastry is golden brown.
- Let them cool slightly before serving. Drizzle with balsamic glaze if desired.
Cooking Tip: If you want to add a twist, consider using different cheeses like goat cheese or feta. You can also add a pinch of garlic powder for extra flavor.
Ingredient Substitution: If you can’t find fresh mozzarella, shredded mozzarella or even ricotta can work well. For a gluten-free option, use gluten-free pastry dough.
You may also like:
– 43 Easy And Quick Cocktails From The 1960’s
– 27 Must-Try Tequila Cocktails Inspired by Gotham City
– 25 Cocktails Inspired by Gotham City Nightlife
If you enjoyed this blog you can visit us or check out our other blogs and learn a bit about us.
Disclaimer: This blog post is inspired by fictional universes and characters created by their respective rights holders. All related content and imagery remain the property of their respective rights holder. This fan-inspired content is for entertainment and commentary purposes only and is not affiliated with or endorsed by HBO, Disney, Warner Bros., Lionsgate, or any other rights holders. To explore the official source material, please visit:
HBO